How Do Dental Implants Attach?
Imagine driving a screw into a solid oak beam. The threads bite into the wood fibers, creating friction and mechanical resistance. That screw isn’t going anywhere unless you take a drill to it. Dental implants work on a strikingly similar principle, just with far more sophisticated materials and the added magic of human biology.
When patients sit in the consultation chair, the question rarely arrives as a technical inquiry about titanium alloys. It comes as a personal concern. “Will this thing stay in my head?” “How does it not fall out when I eat steak?” “I heard Uncle Bob’s dentures flew out at a wedding; please tell me this is different.”
This guide answers the question “how do dental implants attach” with the depth and clarity it deserves. We will move far beyond the one-sentence answer about “screws in bone” and explore the biomechanical marvel that makes modern tooth replacement one of the most successful procedures in all of medicine.
The Foundational Principle: It’s Not Glue, It’s Fusion
Before we dissect the tiny components and the surgical protocols, we must establish the core concept that separates dental implants from every other form of tooth replacement. Dentures rely on suction or sticky adhesive creams. Bridges rely on grinding down healthy adjacent teeth to use them as support pillars.
Dental implants attach through a process called osseointegration.
This is not a simple mechanical attachment. It is a biological bond. It is the reason you can forget the implant is even there.
What Exactly Is Osseointegration?
In the 1950s, a Swedish orthopedic surgeon named Per-Ingvar Brånemark was studying blood flow in rabbit bone using titanium optical chambers. When he tried to remove the titanium cylinders from the rabbit’s leg bones at the end of the experiment, he discovered he couldn’t. The bone had grown so tightly against the titanium surface that the metal and the skeleton had become one unified structure. He called this phenomenon “osseointegration”—from the Latin os (bone) and integrare (to make whole).
This was a happy accident that changed dentistry forever.
In practical terms for you, the patient, here is what happens:
-
A surgeon places a titanium post into the precise location of your missing tooth root.
-
The body does not reject this post. Titanium is biocompatible; the immune system ignores it like it ignores a piece of your own skeleton.
-
Over a period of 3 to 6 months, specialized bone cells (osteoblasts) migrate to the titanium surface.
-
These cells deposit new bone matrix directly onto the microscopic roughness of the implant surface.
-
The result is a connection so tight that bacteria cannot slip between the bone and the implant. You cannot wiggle it. It has essentially become part of your anatomy.
Important Note for Readers: If an implant fails to attach, it is almost always due to a failure of this biological process—either the bone didn’t heal properly, infection set in, or systemic health issues (like uncontrolled diabetes or smoking) choked off the blood supply needed for bone growth.
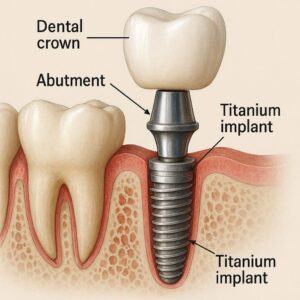
Part 1: The Anatomy of Attachment – The Three-Part System
To truly understand how dental implants attach, you must visualize the system in three distinct layers. Most people think an implant is just a “tooth screwed in.” That is a massive oversimplification. The genius of the modern implant lies in the separation of duties between three components.
| Component | Common Name | Function | How It Attaches |
|---|---|---|---|
| Implant Fixture | The Post / The Screw | Replaces the root of the tooth. | Osseointegration (Fused to jawbone). |
| Abutment | The Connector | Bridges the gap between the implant and the crown. | Mechanical Screw Joint (Screwed into the fixture). |
| Prosthesis | The Crown / Bridge / Denture | The visible part you chew with. | Cement or Screw Retention (Attached to the abutment). |
Let’s examine each layer of attachment in painstaking detail, because this is where the stability comes from.
Layer 1: The Implant Fixture – The Root in the Ground
This is the part buried under your gum, hidden from view for life. It is the foundation of the entire pyramid. The attachment here is purely biological.
The Role of Thread Design
You might think an implant looks like a wood screw. That’s a fair comparison, but dental implant threads are engineered with the precision of a Formula 1 engine piston.
-
Micro-Threads at the Neck: At the very top of the implant, right where it meets the gum line, the threads are often finer and tighter. Why? This design distributes the stress of chewing away from the delicate crestal bone. Without this feature, the bone near the surface would slowly shrink away (a process called crestal bone loss), exposing the metal and ruining the attachment.
-
Self-Tapping Flutes: Many implants have cutting grooves at the tip. As the surgeon twists the implant into the pre-drilled hole, these flutes carve the final few millimeters of bone. This creates an incredibly tight “friction fit” immediately upon placement. This is called Primary Stability.
-
The Surface Texture: Modern implants are not shiny and smooth. Under a powerful microscope, the surface looks like the surface of a distant, cratered moon. This is intentional. This roughness (achieved by sandblasting and acid-etching) increases the surface area available for bone cells to latch onto by up to 300%.
Quote from a Restorative Dentist: “When I restore an implant, I’m not just checking the x-ray for a shadow. I’m listening for the ‘ping’ when I tap the abutment. A truly attached, osseointegrated implant rings with a high-frequency crystalline sound. A failing one sounds dull, like tapping a wet log. The bone is the amplifier.”
Primary vs. Secondary Stability: The Handoff
How does the implant attach in the first week versus the first year? This is a crucial distinction.
-
Primary Stability (The Screw Grip): Immediately after surgery, the implant is held in place by the mechanical friction of the threads against the bone walls. This is the surgeon’s skill in play. If the hole is drilled too wide, primary stability is lost, and the implant can literally spin in the socket.
-
Secondary Stability (The Biological Weld): Over the next 6 to 12 weeks, primary stability decreases as the bone around the implant remodels (heals from the drilling trauma). Simultaneously, secondary stability increases as new bone cells attach to the titanium oxide layer. The attachment transfers from a mechanical screw to a biological ankylosis—a stiff fusion of bone to metal.
Layer 2: The Abutment – The Critical Connection
If the implant fixture is the root, the abutment is the stump of the tooth that sticks out of the gum. This is where the attachment method shifts from biology to precision mechanics.
The abutment attaches to the implant fixture via a prosthetic screw. This is a tiny, gold-plated or titanium screw, often no bigger than a grain of rice. This screw is the single most vulnerable point in the entire system.
The Morse Taper Connection
How does this tiny screw not just break immediately when you bite down with 200 pounds of force? The secret is a design called the Morse Taper.
Imagine trying to pull apart two wet drinking glasses that are perfectly nested inside one another. The friction holds them tight. The Morse taper is a cone-shaped connection where the abutment fits into the implant body. When the screw is tightened to the precise torque (usually 30-35 Ncm), the two pieces wedge together so tightly that they become a single functional unit.
Here is the clever part: The screw doesn’t take the chewing force. The Morse taper wall takes the force. The screw simply provides the tension to keep the taper locked. This is why well-made implant attachments almost never break. The design protects the weakest link.
Cemented vs. Screw-Retained: The Final Attachment Dilemma
This is the final step of the attachment process, and it is a choice your dentist makes based on the position of the implant in your mouth.
| Attachment Method | How It Works | Advantages | Disadvantages |
|---|---|---|---|
| Cemented | The crown is glued onto the abutment using permanent dental cement, just like a crown on a natural tooth. | Aesthetics (no visible screw hole). Easier to correct minor angle issues with the implant placement. | Risk of Peri-implantitis. Excess cement trapped under the gum is the #1 cause of bone loss around implants. Removal is difficult. |
| Screw-Retained | The crown has a small hole in the chewing surface. The dentist drives a long screw through the crown and into the abutment/implant. The hole is filled with Teflon tape and composite resin. | Retrievability. The dentist can remove the crown in 5 minutes to inspect the implant or replace the crown without damaging the implant. No cement allergy risk. | Visible screw hole on the biting surface (though often unnoticeable). Slightly higher lab cost. |
Important Note for Readers: If your dentist cements the crown, they must take a follow-up X-ray to ensure not a single fleck of cement remains deep under the gum. If they skip this step, the attachment will eventually fail due to infection, even though the implant itself is solid in the bone.
Part 2: Variations in Attachment – It Depends on the Situation
The process described above is for a single tooth. But “how do dental implants attach” changes dramatically when we are dealing with a whole arch of missing teeth. The load distribution changes, and therefore the engineering changes.
Scenario 1: The Single Tooth Implant (Standard Attachment)
-
Attachment Sequence: Bone → Implant Fixture → Abutment Screw → Abutment → Crown Cement/Screw.
-
Force Load: 100% of chewing force goes down that single implant.
-
Stability Requirement: Must withstand lateral (side-to-side) forces from the tongue and cheeks.
Scenario 2: The Implant Bridge (Multiple Teeth, Fewer Implants)
You are missing three teeth in a row. We do not place three implants. We place two implants and hang a “bridge” of three teeth between them.
-
How it Attaches: The implants act as Terminal Abutments. The middle tooth (the Pontic) is suspended and does not touch the gum tissue. It attaches via being fused to the crowns on either side.
-
The Challenge: The screws holding the bridge to the abutments are under immense cantilever force (think of a diving board). If you eat sticky caramel, you risk screw loosening. This is why we use torque wrenches to tighten these screws to exact specifications. It is not guesswork; it is engineering.
Scenario 3: Implant Overdentures (The Snap-On Attachment)
This is the area of greatest confusion for patients. Many people want to know how implants attach to a denture that they can take out at night.
-
The Abutment Changes: Instead of a small post for a crown, the abutment has a Ball Top (like a trailer hitch) or a Locator Abutment (a small metal ring with an indent).
-
The Denture Changes: The inside of the denture contains a plastic Retentive Cap or a rubber O-ring.
-
How it Attaches: You press the denture down onto the ball. The rubber ring stretches around the widest part of the ball and snaps back, creating a Friction Fit.
-
The Reality: This is a removable attachment. It is not as rigid as a fixed crown. You will feel a tiny amount of “play” or movement (about 50-100 microns). However, compared to a denture with zero implants that floats around like a boat in rough seas, this attachment is a life-changing upgrade. It provides horizontal stability—the denture will no longer slide forward when you bite an apple.
Scenario 4: Full Arch Fixed (All-on-4® / All-on-6 Attachment)
This is the “Teeth in a Day” concept. A full arch of acrylic teeth attaches to 4 or 6 implants.
-
How it Attaches: This is a Screw-Retained Hybrid Prosthesis.
-
The Difference: Unlike a snap-on denture, you cannot remove this. Only the dentist can. The attachment is a series of multi-unit abutments that are parallel or slightly angled.
-
The Attachment Process:
-
The framework (the bar holding the teeth) is placed on the implants.
-
Long prosthetic screws pass through the framework holes and thread directly into the implant abutments.
-
The screws are torqued down to lock the entire arch of teeth against the gum tissue.
-
The screw holes are sealed with Teflon tape and pink or tooth-colored filling material.
-
Part 3: The Biology of Attachment – Why Bone Matters More Than Metal
You can have the most expensive, beautifully machined titanium implant in the world, but if you attach it to a foundation of Jell-O, it will fail. The attachment is only as strong as the Bone-Implant Interface.
Bone Density Classifications (The Lekholm and Zarb Index)
When your dentist takes a Cone Beam CT scan (a 3D X-ray), they are not just looking for nerves. They are classifying your jawbone into four categories. This classification dictates how the implant will attach and for how long.
| Bone Type | Description | Analogy | Attachment Prognosis |
|---|---|---|---|
| Type I | Dense, thick cortical bone. Almost no spongy marrow. | Hard Oak Wood | Excellent primary stability. Very hard to drill. Healing is slower because there is less blood supply. Attachment is rigid but can be brittle. |
| Type II | Thick cortical shell with dense spongy bone inside. | Pine Wood | Ideal. Best combination of immediate screw grip and fast biological healing. Attachment success rates exceed 98%. |
| Type III | Thin cortical shell with loose spongy bone inside. | Balsa Wood | Acceptable. Surgeon must use special “undersized drilling” techniques to compact the bone rather than remove it. Attachment is moderate. |
| Type IV | Almost no hard outer shell. Just airy, fluffy marrow. | Styrofoam | Challenging. Very low primary stability. Implant can spin freely. Often requires longer healing times and special implant surface coatings to encourage bone attachment. |
A Note on the Maxilla vs. Mandible: The upper jaw (maxilla) is predominantly Type III and IV bone. The lower front jaw (mandible) is Type I. This is why an implant in the lower front attaches so firmly that a dentist sometimes struggles to remove it if there’s a problem. An implant in the upper back requires a more delicate touch and a longer wait for the bone to attach.
The Critical Role of the Periosteum and Soft Tissue
Osseointegration attaches the implant to the bone. But what attaches the gum to the implant?
This is the forgotten layer of attachment that prevents bacteria from invading the bone.
Around a natural tooth, there are collagen fibers that insert directly into the root surface. This creates a Biologic Width—a seal against the outside world.
Around an implant, this seal does not exist. Instead, the gum tissue forms a Peri-implant Junctional Epithelium. It attaches via sticky proteins (hemidesmosomes) to the smooth surface of the abutment. This attachment is weaker and more permeable than the attachment to a natural tooth.
Implication for Attachment Longevity: If you do not clean the abutment meticulously, bacteria easily break this weak gum seal. This leads directly to Peri-implantitis—the loss of the bone the implant is attached to. You will lose the attachment from the top down.
Part 4: The Surgical Process of Establishing Attachment
We have discussed the what. Now let’s discuss the how. How does the dentist physically create the environment for this attachment to occur? This is a narrative of surgical precision and biological patience.
Phase 1: The Extraction and Site Preservation
If the failing tooth is still present, the attachment story begins with its removal.
-
Atraumatic Extraction: The surgeon uses thin instruments (periotomes) to sever the ligament attaching the tooth to the bone. They do not use brute force to pry the tooth out. Why? Because cracking or crushing the thin outer wall of bone (the buccal plate) destroys the future attachment site for the implant.
-
Socket Grafting: The hole left behind (the socket) is a crater. If left empty, the body resorbs the bone walls. They cave in. To preserve the width needed for attachment, the surgeon often packs the socket with bone graft particles. This graft does not attach the implant. It acts as a scaffold to hold space so the body can fill the area with its own bone over the next 4 months.
Phase 2: Implant Placement (The 3D Chess Move)
This is where the angle of attachment is decided for the next 40 years.
-
The Surgical Guide: Increasingly, dentists use 3D printed guides. These are like stencils that fit over your teeth. They have a metal sleeve that dictates the exact angle and depth of the drill.
-
Why Angle Matters for Attachment: The implant must attach to bone, yes. But it also must attach to the future tooth in a way that doesn’t break. If the implant is placed at a 30-degree angle toward the cheek, the screw channel for the crown will exit the front of the tooth—an aesthetic disaster. A guided surgery ensures the implant attaches to the bone in a vector that also allows for a strong, hidden attachment of the crown.
-
The “Feel” of Attachment: As the surgeon tightens the implant into the final position, they are feeling for Insertion Torque. A high torque (above 35 Ncm) indicates the bone is gripping the implant tightly. This is a great sign for immediate loading (attaching a temporary tooth that same day). A low torque (under 15 Ncm) means the implant is loose. The surgeon must “bury” it under the gum and wait months for the bone to attach before putting any pressure on it.
Phase 3: The Waiting Game (Biological Attachment)
This is the most difficult part for the patient. Nothing looks different. But under the gum, a microscopic construction project is underway.
| Time After Surgery | What is Happening Inside the Bone? | Stage of Attachment |
|---|---|---|
| Days 1-5 | Blood clot forms around the implant threads. Inflammatory cells clean the surgical debris. | Hemostasis & Inflammation |
| Week 1-2 | Blood vessels grow into the clot. Soft callus (unorganized collagen) forms. The implant is held purely by mechanical friction (Primary Stability). | Soft Callus Formation |
| Week 3-6 | The Danger Zone. The bone around the implant dies back slightly due to heat from drilling (necrosis). Osteoclasts clean up the dead bone. Primary stability drops to its lowest point. The implant is vulnerable. Do not chew on it yet. | Bone Remodeling Dip |
| Week 6-12 | Osteoblasts arrive. They lay down woven bone directly onto the titanium oxide surface. The implant begins to attach biologically. | Secondary Stability Onset |
| Month 3-6 | Woven bone matures into dense lamellar bone. The implant is now firmly attached. It can withstand full chewing forces. | Mature Osseointegration |
Part 5: Factors That Sabotage Attachment
Understanding how implants attach also requires understanding why they sometimes don’t. The attachment mechanism is robust, but it has a few mortal enemies.
1. Excessive Heat During Drilling (Thermal Necrosis)
Bone is a living tissue full of water and cells. When a drill bit spins at 1,500 RPM without water cooling, it heats the bone like a friction fire.
-
Threshold of Death: Bone cells die at 47 degrees Celsius (116°F) for just one minute.
-
Result: The implant is placed into dead bone. Osseointegration cannot happen because there are no living cells to attach to the surface. The implant heals with a layer of fibrous scar tissue instead of bone. It feels “attached” for a few months, then it fails. A skilled surgeon uses copious sterile saline irrigation and sharp, new drills for every single case to ensure the bone stays cool.
2. Micromotion (The 150 Micron Rule)
This is a cardinal law of implant attachment: The interface must be absolutely still.
If the implant wiggles back and forth by more than 150 microns (the width of two human hairs), the body interprets this as a foreign object that needs to be walled off. Instead of forming bone (osteogenesis), the body forms a collagen capsule around the implant. This is fibrous encapsulation. It is not attachment. It is the body’s way of saying, “I can’t fuse to this wobbly thing, so I’ll wrap it in a soft blanket and ignore it.”
Common causes of lethal micromotion:
-
Patient wearing a loose denture that rocks on the healing implant.
-
Patient chewing on the surgical site prematurely.
-
The surgeon placing the implant into a hole that was too big.
3. The Biofilm Threat (Peri-implant Mucositis and Peri-implantitis)
Once attached, the implant can lose its attachment. This is the most common long-term complication.
| Condition | Where is the Attachment Lost? | Reversible? |
|---|---|---|
| Peri-implant Mucositis | Only the soft tissue seal is inflamed. The bone attachment is intact. | Yes. A professional cleaning and improved home care restores the gum seal. |
| Peri-implantitis | Inflammation has destroyed the bone around the implant. The implant is losing its osseointegrated attachment. | Difficult. Once bone is lost, it rarely grows back predictably around an implant. Surgical intervention is needed to clean the infected threads. |
How to Protect the Attachment:
-
Floss the Implant: Use Superfloss or a Waterpik with a non-metal tip. You must break up the biofilm where the crown attaches to the gum.
-
Non-Metal Scalers: If you get a cleaning, ensure the hygienist uses plastic or titanium scalers. Stainless steel instruments scratch the titanium abutment. Scratches act like magnets for bacteria, accelerating the breakdown of the gum attachment.
Part 6: Comparative Analysis – How Attachment Differs by Implant Type
The term “dental implant” covers a wide range of devices. Their method of attachment differs slightly based on the brand and design philosophy. While the core osseointegration is the same, the mechanical attachment of the abutment varies.
| Feature / Brand Philosophy | Nobel Biocare (External Hex) | Straumann (Morse Taper) | Zimmer / BioHorizons (Internal Hex) | MegaGen / Osstem (Aggressive Threads) |
|---|---|---|---|---|
| Primary Attachment Mechanism | External Hex platform on top of the implant. | Deep internal cone (Morse Taper) friction fit. | Deep internal hexagonal socket. | Deep, sharp threads for high primary stability. |
| Abutment Screw Role | Screw takes all the lateral force. Prone to loosening if not torqued perfectly. | Screw provides tension only. The cone wall takes the load. Very low screw loosening. | Screw takes some load; hex wall takes some. Balanced. | Aggressive self-tapping; often achieves 50+ Ncm insertion torque. |
| Soft Tissue Attachment | Polished collar. | SLActive® surface (hydrophilic) accelerates bone attachment even in diabetics. | MTX Surface (micro-textured). | Xpeed® surface (Calcium-incorporated). |
| Clinical Implication for “Attachment” | Excellent historical success. Requires very passive fit for bridges. | Gold standard for single teeth. Rarely comes loose. | Versatile. Good for immediate molar replacement. | King of Soft Bone. Attaches securely even in Type IV bone where others spin. |
The Rise of Zirconia Implants (Metal-Free Attachment)
Titanium is the standard, but some patients request metal-free options due to allergies or holistic preferences. How does a ceramic implant attach?
-
Material: Zirconium Dioxide (Y-TZP).
-
Osseointegration: Studies show zirconia attaches to bone just as well as titanium.
-
The Critical Difference in Attachment: Zirconia is brittle. It cannot be made with the same aggressive thread geometry as titanium.
-
Abutment Connection: Because zirconia cannot flex, the attachment between the implant and abutment is purely Cemented. There is no screw inside the mouth. This changes the restorative workflow significantly. If the abutment breaks, it is nearly impossible to remove the remnant from the implant.
Part 7: The Daily Life of an Attached Implant – What It Feels Like
We have covered the science and the surgery. But for the person reading this who is considering the procedure, the real question is sensory. “How will it feel once attached?”
The Proprioception Paradox
Natural teeth have a shock absorber called the Periodontal Ligament (PDL) . It is a sling of fibers that suspends the tooth in the socket. This ligament is packed with nerve endings that tell your brain: “You are biting down with 5 pounds of force on a popcorn kernel. Stop biting harder.”
Dental implants do not have a PDL.
The attachment is rigid. Bone-to-Metal. No suspension.
This changes the perception of the tooth.
-
The Good: The tooth feels rock solid. It does not give. It does not bend. When you bite a carrot, the carrot breaks. The implant doesn’t care.
-
The Bad (The Learning Curve): You lose fine tactile sensitivity. You might bite down harder on a fork or a bone chip than you would with a natural tooth. You have to train your jaw muscles to “remember” where the new tooth is.
The “Clunk” vs. The “Thud”
When you tap two natural teeth together, you hear a dull, muffled “thud” because the PDL absorbs the sound.
When you tap an implant crown against a natural tooth, you hear a sharp, high-pitched “clunk” or “ping.” This is the sound of two solid objects colliding without a shock absorber.
Real-Life Implication: If you have an implant crown opposing a natural tooth, the natural tooth will always wear down faster. The implant is harder than enamel. This is why dentists often place composite resin on the biting surface of the implant crown to act as a sacrificial wear layer, protecting the opposing natural tooth from erosion.
Can an Attached Implant Still Move?
This is a common fear. You’re eating steak and you feel something shift.
-
If the implant itself (the fixture) moves: This is implant failure. The bone attachment has dissolved. You need to see a surgeon immediately. This is usually painless, which is the scary part. You only notice it because of mobility.
-
If the crown moves but the implant feels solid: This is screw loosening. This is a mechanical failure, not a biological one. The attachment between abutment and implant is failing. The fix is simple: Open the screw hole, tighten the screw to 35 Ncm with a torque wrench, and reseal. Do not ignore this. A loose screw will break if you keep chewing on it. A broken screw inside an implant is one of the most challenging complications in dentistry.
Part 8: Advanced Attachment Scenarios – When Bone Is Missing
The question “how do dental implants attach” becomes vastly more complex when there is no bone to attach to. In these cases, the attachment is not just a screw in a hole; it is a structural engineering project.
Zygomatic Implants (Attaching to the Cheekbone)
This is the ultimate example of alternative attachment. For patients with no upper jawbone due to long-term denture wear or sinus expansion.
-
Where does it attach? Instead of the jawbone (maxilla), the implant is 45-50mm long and attaches into the Zygomatic Bone (the cheekbone).
-
The Attachment Angle: The implant enters the mouth near the molar area and travels outside the sinus cavity, anchoring into the dense bone of the cheek.
-
Stability: This bone is exceptionally dense (Type I). The attachment is immediate and robust. It allows for a full arch of fixed teeth on the same day, bypassing the need for extensive bone grafting.
Pterygoid Implants (Attaching to the Back of the Upper Jaw)
Another solution for the back of the upper jaw.
-
Attachment Site: The Pterygoid Plate, a dense wing of bone behind the wisdom tooth area.
-
Clinical Nuance: This area is close to a major artery (the internal maxillary artery). The attachment requires a surgeon with advanced knowledge of anatomy. When successful, the attachment allows you to avoid a sinus lift procedure entirely.
Subperiosteal Implants (Attaching to the Bone Surface)
Before modern endosseous implants (implants in the bone), dentists used Subperiosteal Implants (implants on the bone).
-
How it Attaches: A custom metal framework is fabricated to sit on top of the jawbone, under the gum tissue. Posts stick out through the gum.
-
Attachment Mechanism: There is no osseointegration. It is a resting attachment held in place by the overlying gum tissue and the shape of the bone.
-
Modern Relevance: Largely obsolete due to high failure rates. However, with custom 3D printed titanium frames, they are seeing a tiny resurgence for patients who cannot tolerate bone grafting but want fixed teeth.
Part 9: The Financial Reality of Attachment Durability
A natural tooth can last 80 years. How does the implant attachment compare? The data is very clear, and it revolves entirely around how you maintain the attachment seal.
| Component | Average Lifespan | Reason for Failure |
|---|---|---|
| Implant Fixture (Bone Attachment) | 95%+ at 20 years | Peri-implantitis (gum disease around implant). |
| Abutment Screw | 10-15 years | Metal fatigue. Micro-movement. |
| Crown (Porcelain) | 10-15 years | Chipping or wear. |
The Hidden Cost of Re-Attachment:
If the bone attachment fails and the implant falls out, you cannot simply screw a new one back into the same hole. The hole is wider now due to infection and bone loss. You face:
-
Removal of the failed implant.
-
Bone grafting to rebuild the socket.
-
6-9 months of healing.
-
Placement of a new implant (often wider diameter).
Preventative Maintenance: The Key to Lifelong Attachment
The best way to ensure the implant stays attached is not expensive surgery. It is cheap maintenance.
-
Annual X-ray: The dentist checks for “saucerization”—a dark shadow around the implant threads indicating bone loss.
-
Torque Check: Every 5 years, the dentist can open a screw-retained crown and re-tighten the abutment screw. This prevents catastrophic screw fracture.
Part 10: Step-by-Step Summary – The Journey of Attachment
Let’s condense everything we have learned into a chronological narrative of attachment.
Day 0: The Placement
-
You are numb. You feel vibration (the drill) and pressure (the wrench).
-
The implant threads cut into the bone. Primary Attachment achieved. It feels like a screw in a stud.
Day 1 – 14: The Inflammatory Phase
-
You are on soft foods. The site is tender.
-
Attachment Status: Fragile. Held by mechanical friction and blood clot. Do not disturb.
Week 3 – 6: The Remodeling Dip
-
You feel great. The gum looks healed. This is a trap.
-
Attachment Status: Weakest point. The bone around the implant is dying back slightly. Primary stability is gone; secondary stability hasn’t started yet. If you chew on this implant now, you will create micromotion and destroy the attachment forever.
Month 3: The Bone Growth
-
Attachment Status: New bone is weaving around the threads. The implant is now Biologically Attached. It cannot be unscrewed by hand.
Month 4 – 6: The Restoration (Attaching the Tooth)
-
The dentist uncovers the implant (if buried).
-
The Abutment is attached via a Prosthetic Screw. Torqued to 30 Ncm. This is the Mechanical Attachment.
-
The Crown is attached via cement or screw. This is the Restorative Attachment.
Year 1 and Beyond: Maintenance of Attachment
-
You brush and floss. The Soft Tissue Seal attaches to the abutment.
-
Annual Check: Dentist probes the gum gently. No blood = Stable Attachment. Bleeding = Infection threatening the attachment.
Conclusion
Dental implants attach through a unique, two-stage process that combines mechanical engineering with biological fusion. The implant fixture itself bonds directly to living jawbone via osseointegration, creating a foundation that mimics a natural tooth root. Above the gumline, the visible crown attaches to this foundation using a precision abutment and screw or cement, resulting in a restoration that remains stable and functional for decades with proper care.
Frequently Asked Questions (FAQ)
Q: Can a dental implant attach immediately after extraction?
A: Yes, in specific cases. This is called “Immediate Implant Placement.” However, the attachment is not immediate. The implant is placed into the fresh socket, but it still requires 3-4 months of undisturbed healing for the bone to attach to the threads. A temporary crown placed on the same day must be adjusted so it does not touch the opposing tooth. Any biting force will break the attachment.
Q: How does a dental implant attach if I grind my teeth?
A: Bruxism (grinding) creates immense lateral forces that stress the abutment screw. To protect the attachment, your dentist should fabricate a hard acrylic Night Guard. This appliance separates the implant from the opposing teeth, transferring the grinding force to the plastic instead of the screw joint.
Q: Is the attachment of an implant stronger than a natural tooth?
A: The bond to the bone is comparable. However, the survival mechanism is different. A natural tooth will get a cavity or an abscess and hurt, alerting you to a problem. An implant has no nerves. You can destroy the bone attachment through infection (peri-implantitis) and feel zero pain until the implant is loose and falling out. In that sense, the natural tooth’s attachment is more “communicative.”
Q: Can a dental implant attach if I have osteoporosis?
A: Yes, but with caution. Osteoporosis affects the turnover of bone, not necessarily the initial ability of bone to attach to titanium. However, certain medications for osteoporosis (Bisphosphonates) severely impair the bone’s healing response. If you take Fosamax, Actonel, Boniva, or Reclast (IV), the risk of the implant failing to attach or the jawbone dying (MRONJ) increases significantly. Full disclosure of these meds to your surgeon is mandatory for attachment success.
Q: How do they attach an implant to a denture so it doesn’t fall out?
A: They use Locator Abutments. This is a male-female snap connection. The implant has a small metal post (male) sticking up. The denture has a plastic housing with a metal insert (female) embedded in the acrylic. When you press the denture down, you hear a “click.” That click is the sound of the denture attaching to the implant. The retention is strong enough to hold the denture during speech and light eating, but weak enough for you to pop it out with your fingers for cleaning.
Additional Resources
For further reading on the long-term maintenance of the implant attachment and the management of peri-implantitis, the following peer-reviewed resource is invaluable:
American Academy of Periodontology (AAP)
-
Topic: Dental Implant Maintenance and Peri-implant Diseases
-
Link: https://www.perio.org/for-patients/periodontal-treatments-and-procedures/dental-implant-procedures/