What Is an Abutment in Dental Implants?
If you are exploring dental implants, you have probably heard a lot of confusing terms. Screws. Posts. Crowns. Abutments.
It can feel overwhelming.
But here is the good news: understanding the parts is easier than you think. Today, we are going to focus on one specific piece. A piece that is small but absolutely vital.
We are talking about the abutment.
So, what exactly is an abutment in dental implants?
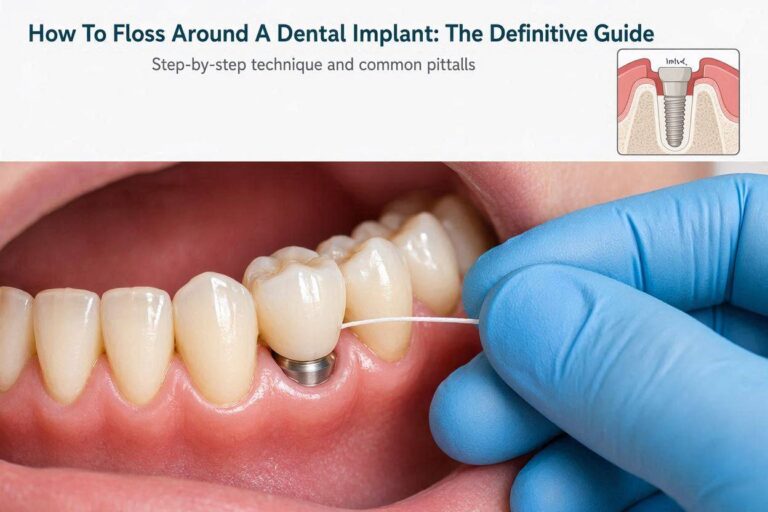
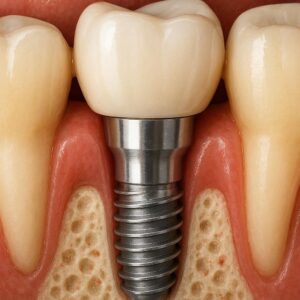
In simple terms, an abutment is the connector piece. It sits on top of the dental implant (the part buried in your jawbone) and holds your new artificial tooth (the crown). Think of it as a tiny bridge. Without it, your new tooth would have nothing to attach to.
Let’s break this down step by step. By the end of this guide, you will know more about abutments than most people ever learn. You will feel confident, informed, and ready to talk to your dentist.
Why the Abutment Matters More Than You Think
Most people focus on the crown. That is the part that looks like a real tooth. It is white, shiny, and visible when you smile.
But the abutment?
It works behind the scenes. It does the heavy lifting.
A good abutment makes sure your crown fits perfectly. It protects the implant underneath from bacteria and damage. It also makes sure your bite feels natural when you chew food.
A bad abutment, or one that is poorly fitted, can cause problems. You might feel pain. Food might get trapped. The crown could feel loose.
So yes. This tiny piece deserves your attention.
Important note for readers: Not all abutments are the same. The type your dentist chooses will depend on your specific mouth, your budget, and your healing process.
The Three Main Parts of a Dental Implant
Before we go deeper, let’s look at the big picture. A complete dental implant has three parts:
-
The Implant Fixture (The Root): This is a small screw, usually made of titanium. A surgeon places it directly into your jawbone. Over time, your bone grows around it. This creates a super strong foundation.
-
The Abutment (The Connector): This piece screws or snaps onto the top of the implant fixture. It rises slightly above your gum line.
-
The Crown (The Tooth): This is the visible, tooth-colored cap. Your dentist attaches it to the abutment.
| Part | Location | Main Job | Material |
|---|---|---|---|
| Implant Fixture | Inside the jawbone | Act as an artificial tooth root | Titanium or Zirconia |
| Abutment | At gum level | Connect fixture to the crown | Titanium, Zirconia, Gold |
| Crown | Above the gum | Look and chew like a real tooth | Porcelain, Ceramic |
So, when someone asks, “what is an abutment in dental implants?” you can now say: It is the middle piece that connects the hidden root to the visible tooth.
How Does an Abutment Actually Work?
Let’s use a simple analogy.
Imagine a wall lamp.
-
The electrical box inside the wall is like the implant fixture. It is hidden and provides power (stability).
-
The light bulb is like the crown. It is the part you see and enjoy.
-
The metal bracket that connects the bulb to the box? That is the abutment.
Without the bracket, you cannot attach the bulb to the box.
The same happens in your mouth. The abutment has a special screw channel. Your dentist uses a tiny wrench to tighten it. Once it is secure, they can cement or screw the crown onto the abutment.
This design is brilliant for two reasons:
-
Repair is easy. If your crown cracks years later, the dentist can remove just the crown. They do not need to touch the abutment or the implant.
-
It is strong. The connection distributes chewing force evenly down into your jawbone.
The Step-by-Step Process: When Do You Get the Abutment?
This is where many patients get confused. The timing of the abutment placement varies. Let me explain the two most common approaches.
Approach 1: The Two-Stage (Traditional) Method
This is the classic method. It takes more time, but it is very safe.
-
Step 1 – Implant Placement: The surgeon places the implant into your bone. Then, they cover it with a small healing cap and stitch your gum closed. The implant stays hidden for 3 to 6 months. During this time, the bone heals around it (osseointegration).
-
Step 2 – Abutment Placement: After healing, the dentist makes a small cut to reopen the gum. They remove the healing cap. Then, they screw the abutment onto the implant. The gum is stitched around the abutment (not over it). You will see a small metal or white post in your mouth.
-
Step 3 – Crown Placement: Two weeks later, after your gum heals around the abutment, the dentist takes impressions. Then they place the final crown.
Approach 2: The One-Stage (Immediate) Method
If your bone is very healthy, your dentist might do this.
-
The surgeon places the implant and attaches the abutment during the same appointment.
-
The gum heals around the abutment right away. You do not need a second surgery to uncover the implant.
-
This is faster and less invasive. But it is not for everyone.
Approach 3: Immediate Loading (Same-Day Teeth)
In rare cases, the dentist places the implant, the abutment, and a temporary crown all in one day.
This sounds amazing, but it comes with risks. You must follow a very soft diet. Not all patients qualify.
Important note for readers: Do not rush the healing process. Your bone needs time. Let your dentist guide you. Do not demand a faster method if your bone is not ready.
Different Types of Abutments (Which One Is Right for You?)
Not all abutments look the same. Dentists choose from several types. Each one has a specific job.
Let’s look at the main categories.
1. Stock Abutments (Prefabricated)
These are mass-produced. The dental lab makes them in standard sizes and angles.
-
Pros: Cheaper. Ready to use quickly.
-
Cons: Might not fit your mouth perfectly. Can put stress on the implant if the angle is wrong.
-
Best for: Back teeth (molars) where esthetics are less important.
2. Custom Abutments (Made for You)
A dental lab designs these specifically for your implant and your gum shape. They use digital scans or physical molds.
-
Pros: Perfect fit. Better gum health. More natural look.
-
Cons: More expensive. Takes extra time to manufacture.
-
Best for: Front teeth (anterior) where appearance matters most.
3. Temporary Abutments
These are plastic or low-cost metal pieces. You use them only for a short time.
-
Pros: Protect the implant while your gum heals.
-
Cons: Not strong enough for permanent use.
-
Best for: The healing phase between implant placement and final crown.
4. Angled Abutments (Corrective)
Sometimes the implant goes into the bone at a less-than-ideal angle. An angled abutment fixes this. It straightens the path for the crown.
-
Pros: Saves you from removing a poorly angled implant.
-
Cons: Requires an experienced dentist to place correctly.
5. UCLA Abutments (For Special Cases)
This is a specific type of custom abutment. It is often used when the dentist wants to screw the crown directly onto the abutment instead of using cement.
-
Pros: Very strong. No cement residue to irritate gums.
-
Cons: More complex to fabricate.
What Are Abutments Made Of? Titanium vs. Zirconia
The material of your abutment matters. It affects strength, appearance, and gum health.
Here is a simple comparison.
| Material | Appearance | Strength | Best For | Possible Issue |
|---|---|---|---|---|
| Titanium | Metal (grey) | Extremely strong | Back teeth, heavy chewing | Might show through thin gums |
| Zirconia | White (tooth-colored) | Very strong | Front teeth, thin gums | Can be more brittle than titanium |
| Gold | Yellow | Very strong | Patients with metal allergies | Expensive, visible |
Which one is better?
There is no single winner.
-
If you have thick gums, titanium is perfect. It is cheap and durable.
-
If you have thin gums, choose zirconia. It looks natural. You will not see a grey line through your gum.
-
If you are allergic to metal, zirconia or gold are your only safe options.
Important note for readers: Ask your dentist to show you a photo of your gum thickness. Do not guess. A simple probe can measure this in seconds.
The Cost of an Abutment: What to Expect
Let’s talk about money. This is an honest, realistic breakdown.
The abutment itself is not the most expensive part of the implant. But it is not free either.
-
Stock abutment: $150 to $400 per tooth
-
Custom abutment (titanium): $400 to $800 per tooth
-
Custom abutment (zirconia): $500 to $1,000 per tooth
But wait. Most dental insurance plans do not list “abutment” as a separate line item. Instead, they bundle it into the overall implant service.
If you pay out of pocket, a full implant (fixture + abutment + crown) usually costs between $3,000 and $5,000 per tooth. The abutment makes up roughly 10% to 20% of that total.
How to save money:
-
Ask your dentist if a stock abutment works for your case.
-
Consider dental schools. They offer lower prices. Supervised students do the work.
-
Look for dental discount plans. They are not insurance, but they can reduce fees by 20% to 30%.
Common Problems With Abutments (And How to Avoid Them)
Nothing in life is perfect. Abutments can have issues. But here is the good news: most problems are preventable.
Problem 1: Loose Abutment
You might feel a slight wiggle in your crown. Or hear a clicking sound when you bite.
Why it happens: The screw loosens over time. This is normal.
Solution: Your dentist can retighten it in five minutes. Do not ignore it. A loose abutment can damage the implant.
Problem 2: Gum Inflammation (Peri-Implant Mucositis)
The gum around the abutment looks red, swollen, or bleeds when you floss.
Why it happens: Poor cleaning. Food and bacteria build up around the abutment.
Solution: Better oral hygiene. Your dentist might also clean the area with special plastic instruments (metal ones can scratch the abutment).
Problem 3: Abutment Fracture (Rare)
The abutment actually cracks or breaks.
Why it happens: Extreme force. Grinding your teeth (bruxism). Or a cheap stock abutment.
Solution: Replace the abutment. You might also need a night guard to stop grinding.
Problem 4: Cement Residue
If your dentist cements the crown onto the abutment, some excess cement can squeeze out. It gets trapped under the gum.
Why it is bad: Cement is rough. Bacteria love to hide on it. This can lead to bone loss around the implant.
Solution: Ask your dentist to use a screw-retained crown instead of cement. Or ask them to take an X-ray to check for leftover cement.
Important note for readers: Do not be afraid to ask questions. A good dentist will explain exactly how they will attach your crown. If they get defensive, consider a second opinion.
How to Care for Your Abutment and Crown
You cannot remove your abutment at home. It stays in your mouth like a natural tooth root. But you can still clean it.
Here is a simple daily routine.
What you need:
-
Soft toothbrush
-
Non-abrasive toothpaste (no baking soda or charcoal)
-
Super floss or implant-specific floss (has a stiff end)
-
Water flosser (optional but helpful)
Morning routine:
-
Brush gently around the abutment and crown. Do not scrub hard.
-
Pay attention to the gum line. That is where bacteria hide.
Evening routine:
-
Floss carefully. Thread the floss between the crown and the neighboring teeth.
-
If you have a water flosser, use it on low pressure. Aim it at the gum around the abutment.
-
Rinse with an alcohol-free mouthwash.
What to avoid:
-
Do not use metal dental picks. They can scratch the abutment.
-
Do not chew ice, hard candy, or pens. These can break the crown or loosen the abutment.
-
Do not skip your dental checkups. Your dentist needs to check the tightness of the abutment screw every year.
Signs You Need to See Your Dentist Immediately
Most implant problems start small. Do not wait.
Call your dentist if you notice any of these:
-
Movement: Your crown feels like it is spinning or shifting.
-
Bad taste or smell: This can mean food or bacteria are trapped under the crown.
-
Bleeding when you brush: A little is normal for the first week. After that, it is a sign of inflammation.
-
Pain when biting: Your abutment might be too tall. The crown is hitting your opposite tooth too hard.
-
Gum recession: The gum pulling away from the abutment. You might see metal or zirconia that used to be hidden.
Most of these issues are simple to fix. But if you ignore them, you could lose the entire implant.
A Realistic Timeline: From Implant to Final Crown
Let me give you a realistic view of time. Do not believe anyone who promises a permanent crown in one week (unless you have a very simple case).
Here is a normal timeline.
| Step | Time | What happens |
|---|---|---|
| Implant placement | Day 1 | Surgeon places the fixture into your bone. |
| Healing period | 3 to 6 months | Your bone grows around the implant. You have a gap or a temporary tooth. |
| Abutment placement | Month 4 to 7 | Small surgery to uncover the implant and attach the abutment. |
| Gum healing | 2 to 4 weeks | Your gum shapes itself around the abutment. |
| Impressions | Month 5 to 8 | Dentist scans or molds your mouth for the permanent crown. |
| Crown placement | Month 6 to 9 | You get your final tooth. |
Total time: 6 to 9 months on average.
Yes, it is a long process. But remember: you are creating a structure that can last 20, 30, or even 40 years. A few months of patience is a small price to pay.
Frequently Asked Questions (FAQ)
1. Does it hurt to place the abutment?
Most patients say no. The gum area is numb with local anesthesia. Afterward, you might feel mild soreness for a day or two. It is much less painful than the initial implant surgery.
2. Can I see the abutment when I smile?
It depends. If your abutment is made of zirconia (white) and your gum is healthy, you will not see it. If you have a titanium abutment and very thin gums, you might see a dark shadow. Your dentist can warn you about this ahead of time.
3. How long does an abutment last?
The abutment itself can last a lifetime. However, the screw inside it may need tightening every few years. The crown on top will eventually wear out (usually after 10 to 20 years). But the abutment remains.
4. Can I eat normally with an abutment but no crown?
Yes, but be careful. The abutment is strong, but it is not shaped like a tooth. Food can get trapped around it. Stick to soft foods. And never bite directly on the abutment with your opposite teeth.
5. Is the abutment permanent?
Once placed, the abutment is meant to stay. But a dentist can remove it if needed. For example, if the abutment breaks or if you need to replace the implant fixture. It is not something you can remove yourself.
6. Do all implants need an abutment?
Yes. Every single dental implant needs some form of abutment. Even “all-in-one” implants have a built-in abutment. The abutment is the only way to connect the hidden fixture to the visible crown.
7. What happens if I wait too long to get the abutment after the implant heals?
If you wait more than a few months, your gum tissue will grow over the top of the implant. A dentist can still uncover it with a small laser or scalpel. But it adds an extra step. Try to follow your dentist’s recommended timeline.
Conclusion
Let’s wrap this up in three simple lines.
The abutment is the essential connector between your dental implant and your new tooth. It comes in different materials and types, but its job is always the same: provide a stable, secure foundation for your crown. With proper care and regular dental checkups, your abutment can last a lifetime and help you eat, speak, and smile with confidence.
Additional Resource
For a deeper look at the entire dental implant process, including healing times, costs, and patient testimonials, visit the American Academy of Implant Dentistry’s patient education page:
https://www.aaid.com/patients/