Restore Dental Implants: A Complete, Honest Guide to Rebuilding Your Smile
If you are missing one or more teeth, you have probably heard about dental implants. But the world of implants can feel complex and overwhelming. Words like “abutment,” “osseointegration,” and “restoration” might sound clinical or even scary.
Let’s be honest: losing a tooth affects more than your smile. It changes how you eat, speak, and feel about yourself.
The good news is that modern dentistry offers a reliable, long-lasting solution. This article walks you through everything you need to know about restoring dental implants. No confusing jargon. No unrealistic promises. Just clear, helpful information from a professional perspective.
By the end, you will understand the process, the costs, the timeline, and what to expect at every step.
What Does It Mean to Restore Dental Implants?
Many people think the implant is the tooth. That is not quite right.
A complete implant system has three parts:
- The implant post: A small screw, usually made of titanium, placed into your jawbone.
- The abutment: A connector piece attached to the post.
- The restoration: The visible part—a crown, bridge, or denture—that looks and functions like a real tooth.
So, when we talk about “restoring dental implants,” we mean the entire process. We mean placing the post, attaching the abutment, and finally securing your new tooth or teeth.
Important note: Implant restoration is not a single appointment. It is a journey that happens over several months. Patience is key to success.
Why Choose Implant Restoration Over Other Options?
You have choices for replacing missing teeth. Let us look at how implant restoration stacks up against the alternatives.
| Feature | Dental Implant Restoration | Fixed Bridge | Removable Denture |
|---|---|---|---|
| Bone preservation | Prevents bone loss | Does not prevent bone loss | Accelerates bone loss |
| Adjacent teeth | No alteration | Requires filing down healthy teeth | No alteration |
| Stability | Permanent, like natural teeth | Stable | Can slip or click |
| Comfort | Feels natural | Good | Can cause sore spots |
| Lifespan | 20+ years with care | 7–15 years | 5–10 years |
| Cost (long-term) | Higher upfront, lower over time | Moderate | Lower upfront, higher over time |
The Realistic Benefits
Let me share what patients tell me after restoring dental implants:
- “I forgot it was there.” That is the most common comment. A restored implant feels that natural.
- “I can eat an apple again.” No more avoiding hard or sticky foods.
- “My speech improved.” Dentures can slip and cause slurring. Implants stay put.
- “No more denture glue.” Many people hate adhesives. Implants eliminate that need.
The Honest Drawbacks
You deserve the full picture. Implant restoration is not for everyone.
- Cost: The upfront investment is higher than other options.
- Time: The process takes months, not weeks.
- Surgery: You need a minor surgical procedure.
- Bone requirement: You need enough healthy jawbone. If not, you may need a bone graft first.
The Step-by-Step Process to Restore Dental Implants
Every patient is unique. But most implant restorations follow the same general path. Let us break it down.
Step 1: Initial Consultation and Evaluation
Your journey starts with an exam, not surgery.
The dentist will:
- Take X-rays or a CT scan of your jaw
- Review your medical history
- Discuss your goals and budget
- Check your bone density and gum health
What you should ask:
- “Am I a good candidate right now?”
- “Do I need any preliminary work like a bone graft?”
- “How long will my specific case take?”
Step 2: Treatment Planning
Modern dentistry uses technology to plan your restoration before any cuts happen.
Your dentist creates a surgical guide using 3D imaging. This guide shows exactly where the implant will go. This precision reduces surprises and improves success rates.
Timeframe: 1–2 weeks for planning.
Step 3: Implant Placement (Surgery Day)
This is the day the titanium post goes into your jawbone.
Do not worry. The procedure happens under local anesthesia. You will be awake but numb. You should feel pressure but not pain.
What happens:
- The dentist makes a small cut in your gum.
- They drill a precise hole into the jawbone.
- They screw the implant post into that hole.
- They close the gum over the implant or place a healing cap.
Some dentists offer sedation if you feel anxious. Ask about this option during your consultation.
Timeframe: One surgery visit, usually 60–90 minutes per implant.
Step 4: Osseointegration – The Waiting Period
This is the most important phase.
Osseointegration is a fancy word for a simple process: your jawbone grows around the implant post. The bone fuses to the titanium. This creates a rock-solid foundation.
How long does osseointegration take?
- Lower jaw: 3–4 months
- Upper jaw: 5–6 months
Why longer for the upper jaw? The bone is softer there. It needs more healing time.
Critical note: Do not rush this step. Placing a crown on an unintegrated implant is like building a house on wet cement. It will fail.
Step 5: Abutment Placement
Once osseointegration is complete, you return for a minor procedure.
The dentist:
- Reopens the gum to expose the implant
- Attaches the abutment (the connector piece)
- Places a temporary crown or healing collar
This appointment is much smaller than the initial surgery. Most people feel back to normal within a day or two.
Timeframe: One visit, about 30–45 minutes.
Step 6: Impressions and Crown Fabrication
After the gum heals around the abutment (about two weeks), the dentist takes impressions of your mouth.
These impressions go to a dental laboratory. A skilled technician crafts your permanent crown. They match the color, shape, and size to your natural teeth.
Timeframe: 2–4 weeks for fabrication.
Step 7: Final Restoration – Your New Tooth
The big day arrives.
Your dentist removes the temporary crown. They check the fit of your permanent restoration. If everything looks good, they cement or screw it onto the abutment.
You look in the mirror. You see a complete smile again.
Timeframe: One visit, about 60 minutes.
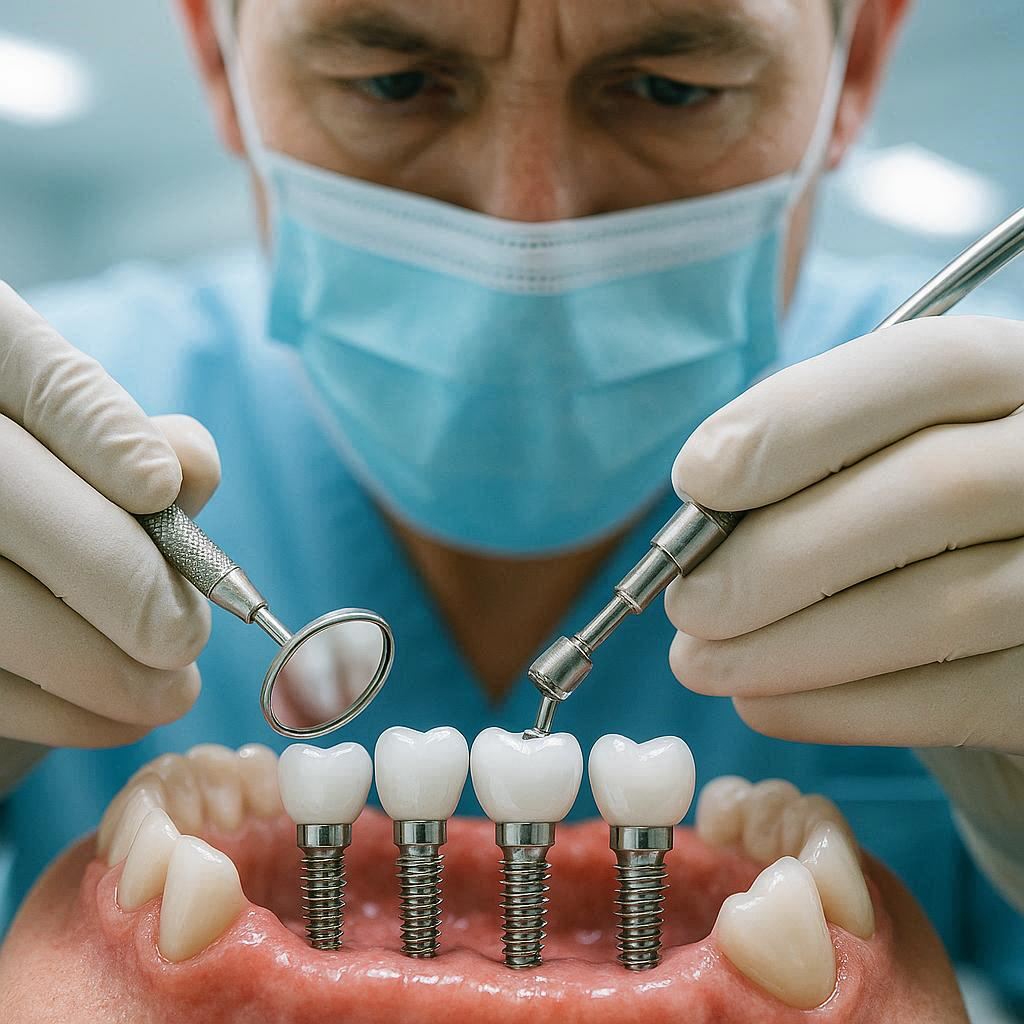
Types of Implant Restorations
Not all restorations look the same. The right type depends on how many teeth you are missing.
Single Tooth Implant Restoration
One implant + one crown.
Best for: Missing one tooth.
Advantages: Does not affect neighboring teeth. Easy to clean. Most natural option.
Implant-Supported Bridge
Two implants + a bridge with three or four crowns in between.
Best for: Missing two, three, or four teeth in a row.
Advantages: Fewer implants than replacing each tooth individually. Lower cost than single implants for each gap.
Implant-Supported Denture
Multiple implants (usually 4 to 8) + a full denture that snaps onto them.
Best for: Missing all teeth in one jaw or both jaws.
Advantages: Stops denture slipping. Preserves bone. No adhesives needed.
There are two types of implant dentures:
- Fixed (non-removable): Only a dentist removes it. Feels most like real teeth.
- Removable (snap-on): You take it out for cleaning. Easier to maintain but slightly less stable.
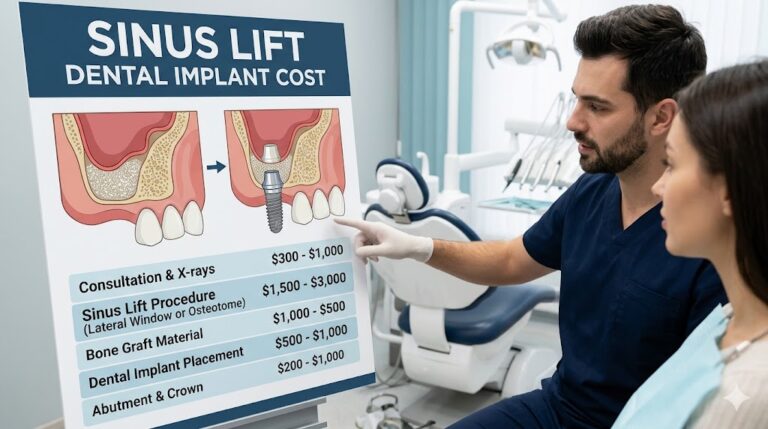
Cost Breakdown: What to Budget For
Let us talk money. Prices vary significantly based on your location, dentist experience, and materials used.
Here is a realistic range for the United States (2025 averages):
| Procedure | Low Range | High Range | Notes |
|---|---|---|---|
| Consultation and CT scan | $150 | $500 | Sometimes applied toward treatment |
| Bone graft (if needed) | $300 | $1,200 per site | Not everyone needs this |
| Implant post placement | $1,500 | $3,000 | Per implant |
| Abutment | $300 | $600 | Per abutment |
| Crown (final restoration) | $1,000 | $2,500 | Porcelain or zirconia |
| Total per single implant | $3,250 | $6,600 | Before insurance |
Total Cost Examples
- Single tooth: 3,500–6,500
- Implant bridge (3 units, 2 implants): 7,000–15,000
- Implant denture (lower jaw, 4 implants): 15,000–30,000
- Full mouth restoration (both jaws): 30,000–60,000 or more
Does Insurance Cover Implant Restoration?
Traditional dental insurance often covers little to none of the implant post. However, many plans cover part of the crown or bridge. Some pay 50% of the final restoration.
Pro tip: Ask your dentist for a predetermination of benefits. This tells you exactly what your insurance will pay before you start.
Financing Options
Do not let the price scare you away. Many people finance implant restoration.
- CareCredit: Medical credit card with promotional financing
- In-house payment plans: Some dental offices offer monthly payments
- Dental schools: Significant discounts (often 50% less) but longer appointment times
- FSAs or HSAs: Use pre-tax dollars to pay
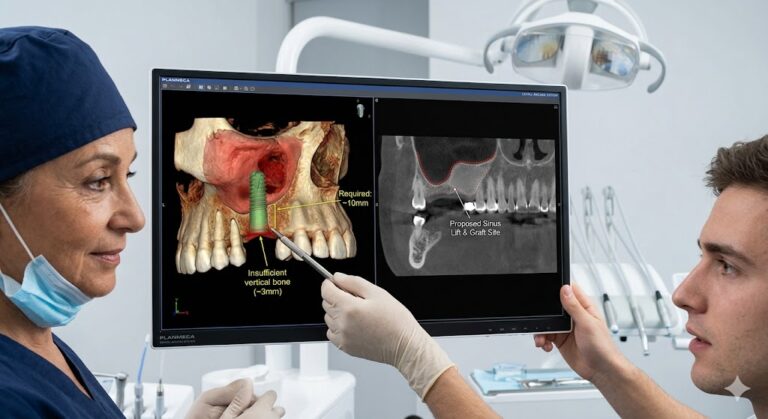
Bone Grafts: Do You Need One Before Restoring Dental Implants?
This is a common question. About 40% of implant candidates need some type of bone grafting first.
Why Bone Matters
Your jawbone must be thick, tall, and dense enough to hold the implant. When you lose a tooth, the bone that supported it starts to melt away. This is called resorption.
If too much bone is lost, there is nothing to anchor the implant.
Types of Bone Grafts
| Graft Type | What It Is | Healing Time |
|---|---|---|
| Socket preservation | Bone placed immediately after extraction | 3–4 months |
| Block graft | Larger bone piece from your chin or hip | 6–9 months |
| Sinus lift | Bone added to upper jaw near sinuses | 6–8 months |
| Allograft | Donor bone (human, processed) | 4–6 months |
| Xenograft | Cow bone (processed) | 4–6 months |
Pain and Recovery
Yes, a bone graft is an extra procedure. But most patients describe it as similar to the implant surgery itself. You will be numb. Recovery involves gentle swelling and over-the-counter pain relief for a few days.
Who Is a Good Candidate for Implant Restoration?
You might be a candidate if:
- You have one or more missing teeth
- You have a fully grown jawbone (age 18+ for women, 20+ for men)
- You have healthy gums (no active gum disease)
- You are willing to commit to several months of treatment
- You do not smoke heavily (smoking reduces success rates)
Medical Conditions That Affect Success
Being honest here: Some health conditions make implant restoration riskier or less predictable.
- Uncontrolled diabetes: Slows healing and osseointegration
- Autoimmune diseases: May increase rejection risk
- Bisphosphonate medications: Some bone medications increase complication risk
- Heavy smoking: Reduces blood flow to the bone
- Active cancer treatment: May postpone implant placement
Talk to both your dentist and your medical doctor. Do not hide your full health history.
Recovery: What to Expect After Implant Restoration Surgery
Let us walk through a realistic recovery timeline.
Day of Surgery
You leave the office with gauze over the site. You are still numb. Eat soft, cool foods before the anesthesia wears off.
Days 1–3
- Swelling: Peaks at 48 hours. Use ice packs.
- Pain: Mild to moderate. Ibuprofen usually works.
- Diet: Soft foods only. No chewing on the implant side.
- Cleaning: Gentle salt water rinses. No brushing the site.
Days 4–7
Swelling goes down. You feel more normal. You can return to work or school. Stick with soft foods for one full week.
Weeks 2–4
The gum heals over the implant. You barely notice it. You can eat more normally, but avoid very hard or sticky foods.
During Osseointegration (Months 3–6)
This is quiet time. You live your normal life. No special care is needed. Just brush and floss your other teeth normally.
After Final Restoration
The day you get your permanent crown, you can eat normally. You might feel some mild tenderness at the gumline for a day or two. That is normal.
Success Rates and Longevity
People want to know: “Will this last?”
Here are the honest numbers from long-term dental research.
| Timeframe | Success Rate |
|---|---|
| After 5 years | 95–98% |
| After 10 years | 93–95% |
| After 20 years | 85–90% |
| After 30+ years | 75–80% |
Lower jaw implants last slightly longer than upper jaw implants. The bone is denser.
What Causes Implant Failure?
Most failures happen early or late.
Early failure (first 6 months):
- Poor osseointegration
- Infection at surgery site
- Overheating the bone during drilling
- Patient smokes heavily
Late failure (after final restoration):
- Poor oral hygiene leading to peri-implantitis (gum disease around the implant)
- Clenching or grinding (bruxism)
- Trauma or injury
- Medical changes like diabetes worsening
The single most important factor in implant longevity: Your daily cleaning habits. Treat your implant like a natural tooth. Brush it. Floss around it. See your dentist regularly.
Caring for Restored Dental Implants
Good news: Implants do not get cavities. The crown is made of ceramic or metal.
But bad news: Implants can get gum disease. And that gum disease can cause bone loss and implant failure.
Daily Home Care
- Brush twice daily: Use a soft or extra-soft toothbrush. Pay attention to the gumline around the crown.
- Floss daily: Use unwaxed floss or special implant floss with a stiff end.
- Interdental brushes: These small brushes clean between implants and natural teeth.
- Water flosser: Excellent for flushing food debris around abutments.
What to Avoid
- Chewing ice or hard candy: Can fracture the crown.
- Using your teeth as tools: Opening packages tears crowns.
- Skipping cleanings: Plaque buildup leads to peri-implantitis.
- Tobacco: Reduces gum health and long-term survival.
Professional Maintenance
See your dentist or hygienist every 6 months. They will:
- Check the crown for wear or damage
- Take X-rays every 12–24 months to check bone levels
- Clean with special instruments that will not scratch the implant surface
- Check that the crown is still tight (screw-retained crowns can loosen over time)
Problems and Complications: An Honest Look
No medical procedure is perfect. Let us talk about what can go wrong and what you can do about it.
Peri-Implantitis
This is the biggest threat to long-term implant success.
What it is: Inflammation and infection of the gum and bone around an implant.
Signs: Bleeding when brushing, red/swollen gums, bad taste, bone loss on X-ray.
Treatment: Deep cleaning, sometimes surgery to clean the implant surface.
Prevention: Excellent daily hygiene and regular cleanings. That is it.
Crown Fracture or Loosening
The implant post is metal. It will not break. But the porcelain crown can chip or crack.
What to do: Call your dentist. Small chips can be polished. Larger fractures require a new crown.
Screw Loosening
Some crowns attach to the abutment with a small screw. Over time, chewing forces can loosen that screw.
Signs: The crown feels slightly wobbly or clicks.
Fix: The dentist tightens it. Simple, quick, and usually painless.
Nerve Injury (Rare)
The lower jaw contains the inferior alveolar nerve. If an implant is placed too close, you may feel numbness in your lip, chin, or gum.
How often? Less than 1% of cases with modern 3D planning.
Does it heal? Sometimes yes over months. Sometimes it is permanent.
This is why you want an experienced dentist who uses CT scans for planning.
Comparing Implant Restoration to Other Options
Sometimes people ask: “Should I just get a bridge or denture instead?”
Let us be direct.
Implant vs. Traditional Bridge
| Factor | Implant | Traditional Bridge |
|---|---|---|
| Affects healthy teeth? | No | Yes (files down adjacent teeth) |
| Bone loss prevention? | Yes | No |
| Lifespan | 20+ years | 10–15 years |
| Initial cost | Higher | Lower |
| Feels like a real tooth? | Very much so | Somewhat |
Best pick for a single missing tooth: Implant.
Best pick for tight budget: Bridge.
Implant Denture vs. Regular Denture
| Factor | Implant Denture | Regular Denture |
|---|---|---|
| Stability | Rock solid | Can slip |
| Bone preservation | Yes | No (bone melts away) |
| Comfort | Natural feeling | Can rub gums sore |
| Removable? | Some types | Yes |
| Cost | 15k–30k per arch | 1k–3k per arch |
Best pick for lower jaw: Implant denture. The lower denture is notoriously unstable without implants.
Best pick for upper jaw: Either can work. The upper denture has more suction and holds better naturally.
Questions to Ask Your Dentist Before Starting
You are the consumer. Ask these questions during your consultation.
- “How many implant restorations have you completed?”
- “Do you use a CT scan for planning?”
- “What is your success rate for implants?”
- “What brand of implants do you use?” (Reputable brands include Nobel Biocare, Straumann, Zimmer, Hiossen)
- “What is the total cost including everything?” (Surgery, abutment, crown, anesthesia, follow-ups)
- “What happens if my implant fails? Is there a warranty or refund?”
- “Do you offer sedation if I am nervous?”
- “Can you show me before-and-after photos of similar cases?”
Red flags: A dentist who guarantees 100% success. A dentist who rushes you to decide. A price that seems too good to be true (under $2,000 for a complete single implant).
The Emotional Side of Restoring Your Smile
We talk a lot about bone, crowns, and costs. But there is another side to this story.
Missing teeth affect confidence. You might cover your mouth when you laugh. You might avoid social situations. You might order soup instead of steak even though you love steak.
Implant restoration changes that.
Patients tell me they smile more freely. They eat without anxiety. They feel like themselves again.
That is not just dentistry. That is quality of life.
One patient said: “I didn’t realize how much I was hiding until I got my implant. Now I forget it was ever missing. That is worth every penny.”
Summary of Key Steps to Restore Dental Implants
Let us bring all the information together into one clear list.
- Step 1: Schedule a consultation with an implant dentist.
- Step 2: Complete any needed bone grafting (allow 4–9 months healing).
- Step 3: Undergo implant placement surgery (1 visit, 60–90 minutes).
- Step 4: Wait for osseointegration (3–6 months).
- Step 5: Have abutment placed (1 visit, 30 minutes).
- Step 6: Wait for gum healing (2 weeks).
- Step 7: Get impressions for final crown.
- Step 8: Receive and cement your permanent restoration.
- Step 9: Maintain with daily brushing, flossing, and 6-month checkups.
Total time from start to finish: 4 to 9 months, depending on bone grafting needs.
Total number of dental visits: 5 to 8 visits.
Conclusion (3 lines)
Restoring dental implants is a multi-step process that replaces missing teeth with permanent, natural-looking results. While it requires time, investment, and minor surgery, the long-term benefits—stable chewing, preserved bone, and renewed confidence—make it a leading choice for tooth replacement. With proper daily care and regular checkups, your restored implant can last decades.
Frequently Asked Questions (FAQ)
1. Is restoring dental implants painful?
Most patients say the procedure itself is not painful due to local anesthesia. After surgery, you may feel soreness similar to a tooth extraction. Over-the-counter pain relievers usually manage this well for 2–3 days.
2. How long does the entire implant restoration process take?
Typically 4 to 9 months. The waiting period is for osseointegration (bone fusing to the implant). Rushing this step increases failure risk.
3. Can I get a temporary tooth during the healing process?
Yes. Many dentists provide a temporary partial denture, flipper, or temporary crown. This hides the gap while you heal. Ask about this option during your consultation.
4. Are dental implants covered by insurance?
Rarely for the implant post itself. Some plans cover 50% of the crown or bridge. Check your policy. Use a predetermination of benefits before starting treatment.
5. What is the failure rate for dental implants?
About 2–5% fail within 5 years. After 10 years, the failure rate rises to about 5–7% . Most failures happen early due to poor osseointegration or later due to peri-implantitis (gum disease).
6. Can I have an MRI with dental implants?
Yes. Titanium implants are not magnetic. They are safe for MRI. However, some older implants from the 1980s may contain magnetic metals. Modern implants are completely MRI-safe.
7. Will my implant look natural?
Yes. A skilled dental technician matches the crown to your adjacent teeth—color, shape, translucency, and size. Most people cannot tell which tooth is the implant.
8. Can I smoke with dental implants?
Smoking significantly increases failure risk. Smokers have success rates about 10–15% lower than non-smokers. If you cannot quit, talk to your dentist about risk reduction strategies.
9. Do I need to remove my implant denture at night?
For removable implant dentures (snap-on type), yes. Remove it at night to clean both the denture and the implants. Let your gums rest. For fixed implant dentures, only a dentist removes it.
10. What happens if my implant fails?
Your dentist will evaluate the cause. Sometimes the implant can be removed, the bone regrafted, and a new implant placed. Other times, a different restoration like a bridge becomes the alternative. Many dentists offer a limited warranty on their work.
Additional Resource
For more detailed, patient-friendly information on dental implant safety, types, and finding a qualified provider, visit the American Academy of Implant Dentistry (AAID) patient education page.
🔗 Recommended link: “Patient Resources – American Academy of Implant Dentistry”
(Search this term online to find their official patient guide, which includes a “find a dentist” directory and downloadable brochures.)
Disclaimer
This article is for informational purposes only and does not constitute medical or dental advice. Every patient is unique. Treatment outcomes vary based on individual health, anatomy, and compliance with home care. Always consult a licensed dentist or dental specialist for a personal examination and treatment plan. The author and publisher are not responsible for any outcomes resulting from the use of this information.