Natural Looking Dental Implants
If you are missing a tooth, you have probably already done some research. You know that dental implants are the gold standard for replacement. But here is the question that keeps you up at night: Will they look real?
You have seen bad dental work before. You know the telltale signs. A tooth that is too white. A shape that doesn’t match the neighbors. A dark line near the gum.
You don’t want that. You want a restoration that feels like you. You want natural looking dental implants.
The good news is that modern dentistry has evolved tremendously. Today, creating an implant that blends seamlessly with your existing teeth is not a miracle. It is a science. And in this guide, we will walk you through exactly how it works, what to ask your dentist, and how to ensure your new smile looks 100% authentic.
Note to the reader: This guide is based on current dental standards and real clinical practices. We do not promise “perfect Hollywood smiles” because nature is rarely perfect. Instead, we focus on realistic, healthy, and beautiful outcomes.
What Makes a Dental Implant Look “Natural”?
Before we dive into materials and procedures, we need to understand the anatomy of a beautiful smile. A natural tooth is not just a block of white enamel. It has depth, translucency, and texture.
A natural looking dental implant must mimic three specific things: the tooth itself, the way light passes through it, and the way it emerges from the gum tissue.
The Three Pillars of Aesthetic Implants
- Color (Chroma and Value): Your teeth are not all the same shade. The tip is usually more translucent. The body has a warmer hue. A fake tooth often looks flat because it has a single color.
- Shape and Contour: Your teeth have subtle ridges, lobes, and irregularities. A natural implant respects the unique anatomy of your arch.
- Soft Tissue Interaction (The Gums): This is the biggest giveaway. If the gum around the implant looks inflamed, receded, or gray, the tooth will look fake regardless of how good the crown is.
The Importance of Customization
One size does not fit all. Mass-produced implant crowns often look artificial because they are generic. A truly natural result requires a customized approach.
Think of it like tailoring a suit. Off-the-rack might fit. But a bespoke suit fits perfectly. Your implant should be bespoke.
| Feature | Generic Implant | Natural Looking Implant |
|---|---|---|
| Color Matching | Single solid shade (e.g., B1 Bleach White) | Multi-layered gradient (darker root, lighter edge) |
| Surface Texture | Smooth, glossy plastic/ceramic | Micro-textured to match adjacent enamel |
| Translucency | Opaque (blocks all light) | Semi-translucent edges (mimics real enamel) |
| Gum Line | Flat, straight line | Scalloped, mimicking natural gum peaks |
Materials Matter: Porcelain vs. Zirconia
To get a natural look, you need the right building blocks. Historically, implant crowns were made of metal fused to porcelain (PFM). These worked, but they had a dark metal line at the gum.
Today, we have better options.
All-Ceramic (Lithium Disilicate – e.g., E.max)
This material is famous for its translucency. It handles light almost exactly like natural enamel. If you have high aesthetic demands (front teeth), this is often the champion.
- Pros: Incredibly natural light behavior. Great for single teeth.
- Cons: Slightly less resistant to extreme biting forces on back molars.
Full Contour Zirconia
Zirconia is incredibly strong. It is often called “ceramic steel.” Modern multilayer zirconia blocks have color gradients built in.
- Pros: Extremely durable. Biocompatible. No metal.
- Cons: Older versions looked opaque and “chalky.” Newer high-translucency versions are much better, but still not as glass-like as porcelain.
The Verdict on Materials
“In my practice, for a patient seeking natural looking dental implants in the front smile zone, we almost always lean toward high-translucency lithium disilicate. For molars where force is high, we use layered zirconia. The material dictates the illusion.” — Dr. Elena Vasquez, Prosthodontist.
The Role of the Abutment (The Hidden Connector)
Most people focus on the crown (the tooth part). But the abutment—the small connector piece that sits on top of the implant screw and holds the crown—is often the culprit for unnatural results.
If the abutment is made of metal (titanium), its gray color can shine through the gum and the ceramic crown. This creates a dark shadow at the base of the tooth.
The Solution: Custom Color Abutments
- Titanium with Gold Hue: Some alloys mask the gray better.
- Zirconia Abutments: These are white/translucent. They allow light to pass through the gum naturally.
If you want a truly seamless look, ask your dentist specifically about a custom zirconia abutment.
Step-by-Step: How You Get a Natural Result
Understanding the process helps you know what to ask for. Here is how a modern, aesthetic implant placement usually goes.
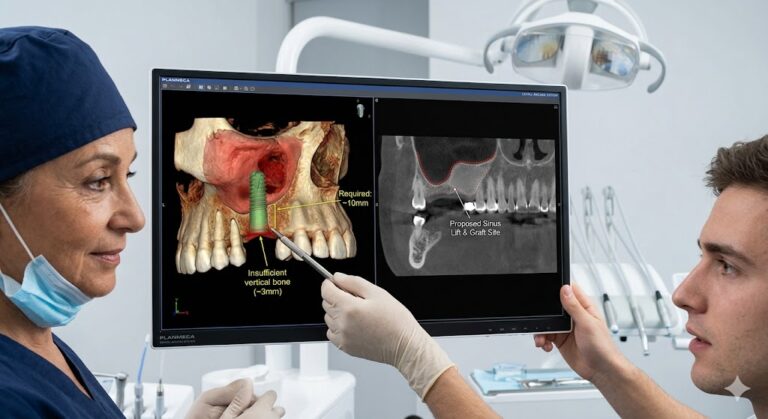
Step 1: The Diagnostic Phase (The Blueprint)
Your dentist does not just look at the hole. They take a CBCT (3D X-ray) to see your bone density. They take photos of your smile. They take shades of your adjacent teeth.
Important Note: This shade taking should happen before your tooth is extracted if possible. Natural teeth get darker after root canal or extraction. A shade taken from a dry tooth is inaccurate.
Step 2: Guided Surgery (Preserving the Gum)
The way the implant is placed affects the final look. If the dentist places the implant too far to the cheek, the crown will look bulky.
Modern dentists use 3D printed surgical guides. This ensures the screw is positioned exactly where the root used to be. This preserves the natural “emergence profile” of the gum.
Step 3: The Healing Period
You will wear a temporary denture or a healing abutment. During this time, the gum shapes itself. Patience here is key. Rushing to the final crown often ruins the aesthetic result.
Step 4: The Impression and Lab Work
This is where the magic happens. The dentist takes a digital scan of your mouth. This scan is sent to a master ceramist (a dental artist).
The ceramist builds your crown layer by layer. They mix different porcelain powders to match the slight yellowing, the white spots, and the cracks of your adjacent teeth.
Step 5: The Try-In
You should never accept a permanent cementation on the first try. A good dentist will place the crown temporarily. You look in the mirror. You check the shape. You check the color in natural light, office light, and phone light.
Only when you say “This looks like my tooth” do they cement it permanently.
How to Avoid the “Chicklet” Look
You know the look. Six front teeth that are all perfectly square, bright white, and identical. It looks like a row of chiclets gum.
Natural smiles have variation. Your lateral incisors (the teeth next to your front two) are usually slightly smaller and rounder. Your canines are pointier and often darker.
A checklist for natural aesthetics:
- Is the tooth slightly darker at the gum line than the edge?
- Does the tooth have mamelons (small ridges) if you are under 30?
- Is the texture matte, or is it shiny like a glazed donut? (Real teeth are not shiny. They have a subtle satin finish.)
- Does the crown touch the gum evenly without pinching the tissue?
Immediate Implants vs. Delayed Healing
There is a common myth that getting the tooth immediately (same day as extraction) looks better. Sometimes yes, sometimes no.
Immediate Implants
- Pros: You never have a “hole.” The gum papilla (the pink triangle between teeth) is preserved.
- Cons: High risk. If the bone is infected or thin, the gum might recede later, exposing a metal edge.
Delayed Implants (3-6 months)
- Pros: The bone has healed. The dentist has a solid foundation. The final aesthetic result is more predictable.
- Cons: You need a temporary partial denture or a flipper for a few months.
Honest advice: For the most natural looking dental implants in the long term (10+ years), delayed healing is statistically safer. Time heals, and time provides stability.
Realistic Expectations: What Nature Looks Like
Let us be honest with each other. Nature is not symmetrical. Your natural teeth probably have gaps, rotations, or slight color variations.
A perfect implant that is a “10/10” match usually looks fake because it is too perfect next to your imperfect natural teeth.
The goal is usually an 8/10 or 9/10 match. A 10/10 match is almost impossible because natural teeth change color over time, and implants do not.
- Natural teeth: Get darker, yellower, and more stained with coffee/tea.
- Implants: Stay the same color forever.
This means that in 10 years, your natural teeth will look older. Your implant will still look brand new. That contrast makes the implant stand out.
The Solution: Slight Undershading
Many expert ceramists make the implant crown slightly darker and slightly warmer than your current teeth. This allows it to age gracefully. As your real teeth darken, the implant catches up.
Maintenance for Long-Term Aesthetics
You have invested in a beautiful restoration. Protect it.
The Hygiene Factor
A natural looking implant only looks good if the gum around it is healthy.
- Red, swollen gum? Looks fake.
- Bleeding? Looks sick.
- Healthy pink stippled gum? Looks real.
You need specific tools:
- Water flosser: To clean the “collar” of the implant.
- Plastic scalers: Metal scrapers can scratch the ceramic. Scratches hold bacteria and make the tooth look dull.
- Prophylaxis appointments: Every 6 months for a professional polish.
Foods to Watch
Implants do not decay, but the crown can stain (especially porcelain). Coffee, red wine, and turmeric can stain the microscopic ridges.
However, unlike natural teeth, you cannot use abrasive whitening toothpaste on ceramic. It creates micro-scratches that look cloudy.
Note: Never use baking soda or “charcoal” whitening powders on implant crowns. You will permanently ruin the glaze.
Frequently Asked Questions (FAQ)
1. Can I whiten my natural teeth to match a dark implant?
Yes, but carefully. You can whiten your natural teeth before the implant crown is made. You cannot whiten the implant itself. So, you whiten the natural teeth first, then match the implant to the new whiter shade.
2. Will people be able to tell I have an implant?
Usually, no. If the gum line is healthy and the ceramist did a good job layering the enamel, only a dentist with a magnifying loupe and an X-ray can tell.
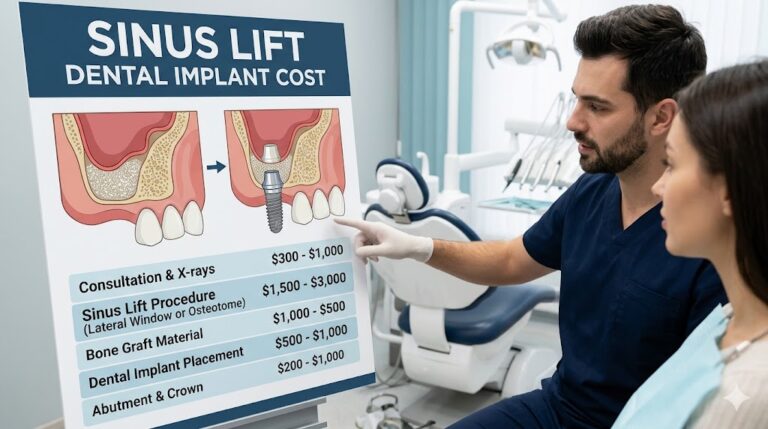
3. How much more do aesthetic implants cost?
A standard implant crown might cost 1,500−2,000. A custom aesthetic crown with a zirconia abutment and master ceramist usually ranges from 2,500−4,000. You are paying for the artistry.
4. Do the gums grow over the implant naturally?
No. Gum tissue does not attach to zirconia or ceramic the same way it attaches to natural tooth root. You will always have a small “pocket.” You must keep this pocket clean.
5. What if I don’t like the color after it is cemented?
Difficult to fix. This is why try-ins are vital. If it is permanently cemented, the crown must be drilled off (destroyed) and remade. Always do a try-in with temporary cement for two weeks.
Additional Resource: Finding a Specialist
Not every general dentist is an artist. For complex aesthetic cases, look for one of these three credentials:
- Prosthodontist (American College of Prosthodontists): They did 3 extra years of training in occlusion and aesthetics.
- Accredited Member of the American Academy of Cosmetic Dentistry (AACD): These dentists submit cases for peer review. They are judged on aesthetics.
- ITI Fellow (International Team for Implantology): Focuses on surgical precision.
You can use the American Academy of Cosmetic Dentistry’s “Find a Dentist” tool to locate a provider in your area who specializes in aesthetic implantology.
[Link: www.aacd.com (Search for “Implant Aesthetics”)]
Comprehensive Comparison Table: Aesthetic Outcomes
| Factor | Poor Aesthetic Outcome | Natural Looking Outcome | Why It Matters |
|---|---|---|---|
| Crown Material | PFM (Metal fused to ceramic) | High-Translucency Zirconia or Lithium Disilicate | Metal shows through gum. |
| Abutment | Stock Titanium (grey) | Custom Zirconia (white/pink) | Eliminates dark shadow at gum. |
| Emergence Profile | Straight angle from screw | Curved, root-like angle | Mimics natural tooth erupting from bone. |
| Surface Gloss | High-gloss, wet look | Satin, dry look | Real teeth are not wet-looking unless saliva covers them. |
| Interdental Papilla | Missing black triangle | Healthy pink triangle | “Black triangles” scream “bridge/implant.” |
Conclusion: Your Smile, Improved But Honest
You deserve a smile that looks like it belongs to you. Natural looking dental implants are absolutely achievable with the right materials (zirconia or lithium disilicate), the right hidden parts (custom abutments), and the right artist (a skilled ceramist). Be wary of shortcuts, generic crowns, and metal abutments. Prioritize gum health over speed, and always approve the try-in in natural daylight. Your smile is an investment in your confidence—make sure it looks like nature, not a renovation.
Disclaimer
This article is for informational purposes only and does not constitute medical or dental advice. Individual results vary based on bone structure, healing capacity, and existing oral health. Always consult with a licensed dental professional for diagnosis and treatment options. The author and publisher are not liable for any outcomes resulting from the use of this information.