A Comprehensive Guide to Dental Implant Abutment Exposure
A dental implant is widely regarded as the pinnacle of tooth replacement, a modern marvel of dentistry that restores function, aesthetics, and confidence. For millions of patients, it is a life-changing solution. The process is often presented as a seamless fusion of biology and engineering: a titanium root integrates with the jawbone, a connector piece is attached, and a beautiful, custom-made crown is placed on top. The expectation is a perfect, permanent replica of a natural tooth.
However, sometimes this seamless integration is disrupted. Months or years after the triumphant completion of treatment, a patient might notice something disconcerting in the mirror—a subtle grey shadow or a sliver of metallic silver peeking out from beneath the gumline of their implant crown. This is the exposed abutment, a phenomenon that is more than a mere cosmetic oversight. It is a clinical sign, a potential harbinger of biological discontent, and a challenge that tests the skill of the clinician and the resilience of the patient’s tissues.
This article delves deep into the world of dental implant abutment exposure. We will move beyond the surface to explore the intricate biological reasons why it occurs, unravel the potential consequences it poses for the long-term health of the implant, and detail the sophisticated surgical and restorative techniques used to correct it. Most importantly, we will emphasize the proactive strategies that can prevent it from happening in the first place. This is not just about hiding metal; it is about preserving health, ensuring longevity, and upholding the promise of a truly successful implant restoration.
2. The Anatomy of a Smile: Understanding the Implant System
To comprehend abutment exposure, one must first understand the components of an implant and their ideal relationship with the oral environment.
The Fixture: Osseointegration and the Foundation
The fixture is the implant itself—the screw-like titanium (or zirconia) structure that is surgically placed into the jawbone. Through a miraculous process called osseointegration, the bone cells literally attach themselves to the implant surface, creating a stable, load-bearing foundation that mimics the root of a natural tooth. This biological union is the non-negotiable prerequisite for implant success.
The Abutment: The Crucial Connector
The abutment is the intermediary component that connects the submerged fixture to the visible crown. It can be stock-produced or custom-milled from titanium, zirconia, gold, or PEEK polymer. Its design is critical, as it must emerge through the gum tissue and provide the ideal platform upon which the crown is cemented or screwed. The abutment’s subgingival (below the gum) contour dictates the shape and health of the gum tissue that surrounds it—a concept known as the emergence profile.
The Prosthesis: The Crown Jewel
This is the final restoration, the visible tooth-like structure, typically made from porcelain fused to metal, all-ceramic, or zirconia. It is meticulously crafted to match the color, shape, and translucency of the adjacent natural teeth, completing the aesthetic and functional rehabilitation.
Ideal Scenario: The gum tissue drapes seamlessly around the prosthesis, hiding the abutment completely beneath a healthy, pink collar of gingiva. The transition from implant to abutment to crown is entirely subgingival, invisible to the eye, and impervious to bacterial invasion.
(Image: A diagram showing a cross-section of a healthy implant with the fixture in the bone, the abutment completely surrounded by gum tissue, and the crown emerging naturally.)
3. What is Abutment Exposure? Defining the Phenomenon
Abutment exposure occurs when the gum tissue surrounding an implant crown recedes or fails to form adequately, revealing a portion of the underlying abutment that was intended to remain hidden below the gumline.
-
Visual Signs: The patient or clinician may see the metal (grey/silver) of a titanium abutment, the white of a zirconia abutment, or the darker hue of the underlying implant platform. This often appears as a thin line or a small area between the crown’s margin and the gum tissue.
-
Tactile Signs: A patient may feel a “ledge” or “gap” with their tongue or fingernail where the crown meets the gum, indicating a lack of tissue support.
This exposure exists on a spectrum. It can be a minute, stable, and asymptomatic millimeter of visibility that poses no immediate threat, or it can be a progressive, several-millimeter recession that exposes not just the abutment but also the implant’s screw-access hole, creating significant aesthetic and biological problems.
4. Unveiling the Causes: Why Does the Abutment Become Exposed?
Abutment exposure is rarely a random event. It is almost always the result of a violation of biological principles, technical missteps, or a combination of both.
Biological Width Violation: The Prime Suspect
This is the most critical concept in understanding gum recession around teeth and implants. The biological width is a specific dimension of living tissue that naturally attaches to a tooth’s root (or an implant’s surface). This zone, approximately 2-3mm in height, includes both the connective tissue attachment and the epithelial attachment. It is a mandatory “seal” that the body forms to protect the underlying bone from the bacteria-filled oral environment.
If a restoration (crown or abutment) impinges upon this space—for example, if a crown margin is placed too close to the bone—the body will mount a defensive response. It cannot compress this biological necessity. Instead, it will resorb the bone to re-establish the proper dimensional relationship, leading to gum recession and exposure of the restoration. In the implant world, placing an abutment too deeply or with a improper contour can directly violate this zone, triggering bone loss and subsequent gingival recession.
Surgical and Restorative Miscalculations
-
Over-contouring the Abutment/Crown: An abutment or crown that is too wide or convex at the gumline creates excessive pressure on the thin surrounding tissue, strangulating its blood supply and leading to tissue death (necrosis) and recession.
-
Under-contouring: An emergence profile that is too flat fails to support the gum tissue adequately, allowing it to collapse inward and exposing the abutment.
-
Improper Implant Placement: Placing the implant itself in a less-than-ideal position (too facial, too shallow) automatically dictates where the abutment and crown will be, often forcing a compromised emergence through the gum that the tissue cannot sustain.
-
Trauma During Surgery: Damage to the delicate gum tissue or bone during the surgical phases can lead to scarring and tissue loss during healing.
The Role of Tissue Phenotype: Thin vs. Thick Gingiva
Patients are not biologically identical. A thin tissue phenotype (or biotype) is characterized by delicate, fragile gum tissue that is more translucent and prone to recession. It has less underlying connective tissue and a poorer blood supply, making it highly vulnerable to surgical trauma, restorative pressure, and inflammatory insults. A thick tissue phenotype, in contrast, is robust, fibrous, and highly resilient. It is much more capable of masking underlying grey hues and resisting recession. Thin tissue is a significant risk factor for abutment exposure.
Prosthetic Design and Emergence Profile
The journey the crown takes as it emerges from the gumline is its “emergence profile.” A well-designed profile transitions smoothly from the abutment platform to the full contour of the crown, providing gentle, supportive pressure to the gum tissue. A poorly designed profile—too abrupt, too flat, or too bulky—will either crush the tissue or fail to support it, leading to exposure.
The Insidious Role of Peri-Implant Diseases
Peri-implant mucositis (a reversible inflammation of the gums around an implant) and peri-implantitis (a destructive inflammatory process affecting both soft and hard tissues, similar to periodontitis) are major causes of tissue recession. Chronic inflammation breaks down the soft tissue attachment and destroys the supporting bone, inevitably leading to gum recession and abutment exposure.
Trauma and Behavioral Factors
-
Overzealous Oral Hygiene: Aggressive brushing with a hard-bristled toothbrush directly traumatizes the gum margin, causing it to recede.
-
Parafunctional Habits: Clenching and grinding (bruxism) place excessive, non-axial forces on the implant, which can cause bone micro-fractures and soft tissue remodeling, potentially leading to recession.
-
Lip or cheek muscle attachments: High muscle pulls can tension the gum tissue, contributing to its recession over time.
5. Beyond Aesthetics: The Multifaceted Consequences of Exposure
While the grey line is often the patient’s primary concern, the implications run much deeper.
-
The Aesthetic Compromise: This is the most immediate and obvious consequence. The metallic shine creates an unnatural appearance, disrupting the seamless blend of the restoration with natural teeth. It is particularly devastating in the “esthetic zone” (front teeth), where it can significantly impact a patient’s smile and self-esteem.
-
Functional and Hygienic Challenges: The exposed abutment often creates a small ledge or gap between the crown and the gum. This area becomes a plaque trap, making it extremely difficult to clean. Food and debris accumulate, leading to chronic inflammation, bad breath, and a bad taste for the patient.
-
The Microbial Gateway: Risk of Peri-Implantitis: The exposed abutment surface, especially if rough or micro-gapped, is a perfect substrate for plaque biofilm colonization. This biofilm can migrate down the abutment to the implant interface, breaching the biological seal. If it reaches the bone, it can trigger the destructive process of peri-implantitis, which is the leading cause of implant failure in the long term.
-
Prosthetic Loosening and Mechanical Failure: In screw-retained crowns, exposure can mean the screw access channel is open to the oral environment, risking screw loosening or corrosion. Furthermore, the loss of supporting bone due to chronic inflammation can compromise the implant’s mechanical stability.
6. Diagnosis and Assessment: A Clinician’s Detective Work
A systematic approach is essential to diagnose the cause and plan the correction.
-
Clinical Examination:
-
Visual: Assessing the color, contour, and consistency of the gum tissue. Measuring the extent of exposure in millimeters.
-
Probing: Gently using a periodontal probe to measure pocket depths around the implant. Deep pockets can indicate peri-implant disease.
-
Palpation: Assessing tissue thickness (phenotype) by pressing a probe or instrument against the gum.
-
-
Radiographic Evaluation (X-rays): A periapical radiograph is indispensable. It reveals the level of the bone surrounding the implant. Bone loss, especially on the facial aspect, confirms that the recession is not just soft tissue but has a bony component, which drastically changes the treatment prognosis and plan.
-
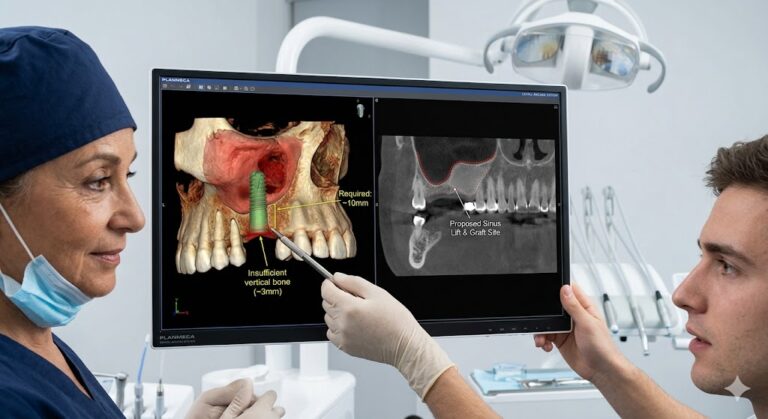
Advanced Diagnostic Modalities: In complex cases, a CBCT (Cone Beam Computed Tomography) scan may be used to create a 3D model of the implant’s position and the surrounding bone anatomy, revealing defects not visible on 2D X-rays.
7. The Treatment Arsenal: Correcting the Exposed Abutment
The chosen treatment path depends on the cause, severity, and the patient’s aesthetic demands.
Philosophy of Treatment: Monitoring vs. Intervention
A minute, stable exposure in a non-aesthetic area (e.g., a second molar) that is easily cleanable may not require active treatment beyond monitoring and impeccable hygiene. Any exposure in the aesthetic zone or that is progressive, unaesthetic, or causing hygiene issues warrants intervention.
Non-Surgical Management:
This is often a temporary measure or only for very minor cases.
-
Hygienic Adaptation: Polishing the exposed abutment to a high gloss to minimize plaque adhesion and educating the patient on precise cleaning techniques using soft brushes, nylon-coated implants brushes, and water flossers.
-
Pink Composite/Resin: Using a tooth-colored or pink-colored composite resin to camouflage the exposed metal at the gumline. This is a minimally invasive and reversible option but is often a temporary aesthetic fix as the material can stain, wear, and still accumulate plaque at its margins.
Surgical Management: The Gold Standard for Correction
Surgery aims to biologically correct the defect by rebuilding the lost hard and soft tissues.
-
Esthetic Crown Lengthening: This is a counter-intuitive but vital procedure. If the exposure is due to an underlying bone defect or the implant being placed too shallow, the bone on the facial aspect may need to be reducted to a more apical (deeper) position. This allows the gum tissue to follow and be sutured at a lower level, ultimately covering the abutment and creating a longer-looking crown. It is about creating space for the gum to heal at the correct level.
-
Soft Tissue Grafting: The Autogenous Gold Standard: This is the most predictable and durable solution for addressing a lack of gum tissue.
-
Procedure: A small piece of tissue (a graft) is harvested from the patient’s own palate (roof of the mouth) or from another donor site. The recipient site around the implant is prepared, and the graft is meticulously sutured over the exposed abutment to thicken and augment the gum tissue.
-
Types of Grafts:
-
Connective Tissue Graft (CTG): The most common technique. The connective tissue layer from the palate is used to thicken the existing gum.
-
Free Gingival Graft (FGG): A thicker piece of both epithelium and connective tissue is used, often for cases with severe tissue deficiency.
-
-
Outcome: The graft integrates with the local tissue, creating a thicker, more robust, and resilient band of keratinized gingiva that is resistant to recession and provides superior aesthetics and cleansability.
-
-
Pink Ceramics / Prosthetic Camouflage: For cases where surgical correction is not possible or desired by the patient, the final crown can be remade with a gingiva-colored porcelain portion to mask the exposed abutment and blend with the adjacent pink tissue. This is a prosthetic “illusion” that does not address the underlying biological issue but can be an effective aesthetic workaround.
Summary of Treatment Options for Abutment Exposure
| Treatment Option | Description | Best For | Pros | Cons |
|---|---|---|---|---|
| Monitoring & Hygiene | Non-invasive management through professional polishing and optimized home care. | Minor, stable exposure in non-aesthetic zones. | Conservative, no cost, no trauma. | Does not correct the problem; only manages it. |
| Pink Composite | Application of pink-colored resin to camouflage the exposed metal. | Minor exposure as a temporary or low-cost solution. | Minimally invasive, quick, reversible. | Temporary, can stain, poor plaque control at margins. |
| Surgery: Crown Lengthening | Reshaping the bone to allow the gum to be repositioned at a lower level. | Exposure due to shallow implant placement or bone defects. | Addresses the underlying bony cause. | Invasive, healing time, results can be unpredictable. |
| Surgery: Soft Tissue Graft | Transplanting tissue from the palate to cover the exposure and thicken gums. | Most cases of aesthetic zone exposure with thin tissue. | Most predictable & durable biological solution. | Invasive, requires a second surgical site (palate), cost, healing time. |
| Prosthetic: Pink Ceramics | Fabricating a new crown with a porcelain “gum” section. | Cases where surgery is contraindicated or refused. | No surgery required, good aesthetic result. | Does not improve tissue health; hygiene can be challenging. |
8. The Proactive Approach: Strategies for Prevention
The best treatment for abutment exposure is to never let it happen. This requires a meticulous, biologically-driven approach from the very beginning.
-
Meticulous Treatment Planning: Using CBCT scans and digital smile design to plan the ideal implant position in three dimensions before surgery. This virtual planning ensures the implant is placed in the correct restorative position for the final crown to emerge naturally through the gum.
-
The Timing of Placement: Immediate, Early, or Delayed? Choosing the right protocol for implant placement after a tooth extraction is crucial. Often, placing a bone graft and a soft tissue graft at the time of extraction (socket preservation) helps maintain the bone and gum architecture for a future ideal implant placement.
-
The Power of Tissue Grafting: Building for the Future: Proactive soft tissue grafting at the time of implant placement or abutment connection is a powerful tool. Even if the tissue looks adequate, augmenting a thin tissue phenotype to a thick one around a new implant dramatically increases its long-term stability and resistance to recession.
-
The Choice of Abutment: Using custom-milled zirconia abutments for front teeth provides a white, tissue-friendly substrate instead of grey titanium. If exposure does occur, it is far less noticeable. The material’s biocompatibility is also excellent.
-
The Imperative of Patient Maintenance: Educating the patient that an implant is a lifelong investment requiring meticulous care. Regular professional cleanings with a hygienist trained in implant maintenance and excellent daily home care are non-negotiable for preventing the inflammation that leads to recession.
9. A Case Study: From Exposure to Excellence
Presentation: A 45-year-old female, non-smoker, presented 18 months after the placement of her maxillary right lateral incisor implant crown. Her chief complaint was a “grey shadow” and increasing visibility of metal when she smiled.
Examination: A 2mm exposure of a titanium abutment was evident on the facial aspect. The tissue was thin and translucent. Probing depths were within normal limits, and a radiograph showed stable bone levels. The cause was determined to be a combination of a thin tissue phenotype and slight over-contouring of the crown’s facial emergence profile.
Treatment Plan: 1. Explanation of the etiology and treatment options. 2. Removal of the existing crown. 3. Subepithelial connective tissue graft to thicken the facial gum tissue and cover the exposed abutment. 4. Healing period of 3 months. 5. New impression and fabrication of a new crown on a custom zirconia abutment with an ideal emergence profile.
Outcome: At delivery of the new crown, the tissue was thick, pink, and healthy. The abutment was completely submerged, and the grey shadow was eliminated. The aesthetic and functional result was excellent, and the patient was satisfied. The long-term prognosis was significantly improved.
(Image: Series of photos for the case study: pre-op showing exposure, intra-op showing the graft, healed tissue, and final restored crown.)
10. The Future of Abutment Management: Technological Horizons
The field is evolving rapidly to minimize such complications:
-
Digital Workflows: Fully digital impressions (IOS) and CAD/CAM design allow for incredibly precise abutment and crown design, eliminating manual errors in casting and fabrication.
-
3D-Printed Biologic Scaffolds: Research is ongoing into 3D-printed matrices that can guide both bone and soft tissue regeneration with unprecedented accuracy.
-
Enhanced Surface Technologies: Implant and abutment surfaces treated with peptides or other biomolecules that actively promote soft tissue attachment and integration, creating a stronger biological seal.
-
AI-Powered Treatment Planning: Artificial intelligence algorithms that analyze CBCT scans and intraoral scans to automatically flag risk factors for recession (e.g., thin bone, thin tissue) and suggest ideal implant positions and the need for proactive grafting.
11. Conclusion: The Synthesis of Science and Art
Abutment exposure is a complex clinical dilemma that underscores the intricate balance between restorative dentistry, surgical periodontics, and biological science. It moves implantology from a purely mechanical discipline to a biological one, where respect for the soft tissue envelope is paramount. Successful management requires a thorough diagnosis of the underlying cause, a sophisticated armamentarium of corrective techniques, and, above all, a philosophy of prevention through meticulous planning and tissue graft augmentation where indicated. Ultimately, achieving a healthy, aesthetic, and long-lasting implant restoration is a testament to the clinician’s ability to harmonize engineering with the art of healing.
12. Frequently Asked Questions (FAQs)
Q1: Is an exposed implant abutment a dental emergency?
A: It is typically not an emergency in the sense of requiring immediate same-day treatment. However, it is a sign that should be evaluated by your dentist or specialist promptly to determine the cause and prevent potential long-term consequences like peri-implantitis.
Q2: Can the gum grow back to cover an exposed abutment on its own?
A: Unfortunately, no. Gum tissue that has receded due to bone loss or thinning does not regenerate spontaneously. Once the supporting bone is lost, the gum level follows. Covering an exposure almost always requires a surgical procedure, such as a soft tissue graft, to rebuild the tissue.
Q3: Does an exposed abutment mean my implant is failing?
A: Not necessarily. An exposure can be a standalone aesthetic or hygienic issue. However, it can be a warning sign of active peri-implant disease, which, if left untreated, can lead to implant failure. A professional evaluation with X-rays is needed to assess the health of the underlying bone.
Q4: How much does it cost to fix an exposed abutment?
A: Costs vary widely based on geographic location, the clinician’s expertise, and the complexity of the procedure. Simple monitoring or composite camouflage is low-cost. Surgical procedures like soft tissue grafting can range from several hundred to several thousand dollars per tooth, as they are specialized surgeries often performed by periodontists.
Q5: How can I prevent this from happening to my implant?
A: Choose an experienced clinician who emphasizes biologic principles. Ensure they assess your tissue type (thick or thin) and discuss the potential need for grafting before or during implant placement. Practice impeccable oral hygiene with tools recommended for implants and attend all your scheduled maintenance appointments.
13. Additional Resources
-
American Academy of Periodontology (AAP): Patient Information on Dental Implants and Peri-Implant Diseases. https://www.perio.org/for-patients/
-
International Team for Implantology (ITI): Education and resources on evidence-based implant dentistry. https://www.iti.org/
-
Journal of Periodontology: A peer-reviewed publication featuring the latest clinical and scientific research in periodontics and implantology.
-
Zucchelli, G. (2012). Plastic Esthetic Periodontal and Implant Surgery: A Microsurgical Approach. Quintessence Publishing. (A seminal textbook on advanced surgical techniques for soft tissue management).
Date: September 15, 2025
Author: Dr. Eleanor Vance, DDS, MS, Board-Certified Periodontist
Disclaimer: The information provided in this article is for educational and informational purposes only and does not constitute medical or dental advice. It is not a substitute for professional consultation with a qualified healthcare provider. Always seek the advice of your dentist or other qualified health provider with any questions you may have regarding a medical condition or treatment. Never disregard professional medical advice or delay in seeking it because of something you have read in this article.