ADA Insurance Codes for Dental Implants
Let’s be honest: looking at a dental insurance statement can sometimes feel like trying to read a document written in a forgotten language. Between columns of numbers, strange abbreviations, and amounts that never seem to add up the way you expect, it’s easy to feel overwhelmed.
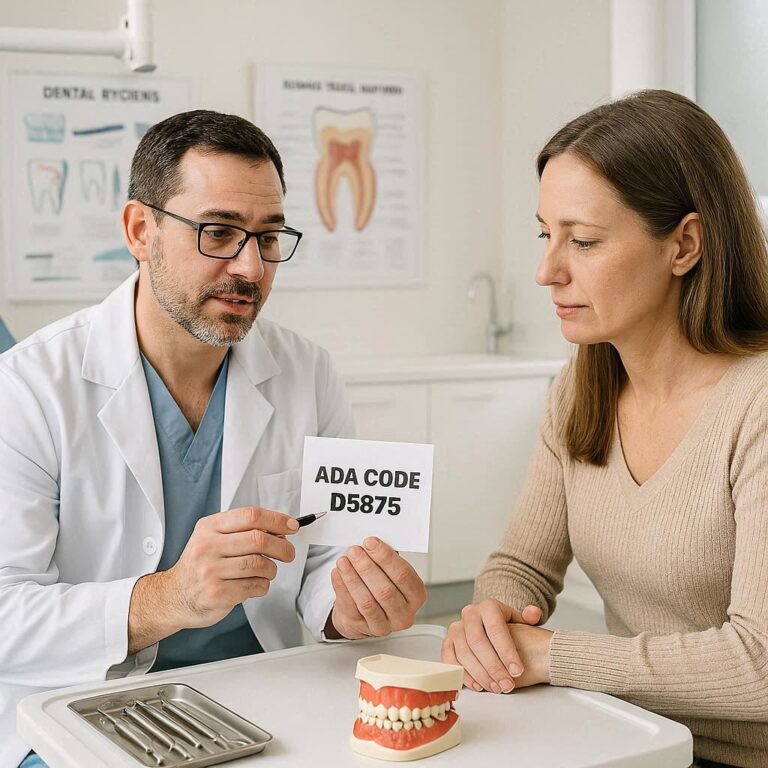
If you are considering dental implants, you are likely already dealing with a major dental health decision. The last thing you need is to add insurance confusion to your stress list. But here is the good news: understanding the system is entirely possible. It all starts with a handful of specific codes.
These codes, officially known as Current Dental Terminology (CDT) codes, are published by the American Dental Association (ADA). They are the universal language that your dentist uses to talk to your insurance company. When you know what these codes mean, you stop being a passive passenger in the process and become an active participant in your own care.
In this guide, we are going to pull back the curtain on these codes. We will explore what they are, why they matter, and—most importantly—how you can use this knowledge to make your dental implant journey smoother, more predictable, and potentially more affordable.
What Are ADA Dental Codes and Why Do They Matter?
Before we dive into the specifics of implants, let’s establish a foundation. The American Dental Association maintains a set of codes that describe every possible dental procedure, from a simple cleaning to complex oral surgery.
Think of it this way: your dentist’s office is like a high-end kitchen. They have all the ingredients (skills, technology, materials) to make you a beautiful meal (your new smile). The ADA codes are the menu items. When your dentist submits a claim to your insurance, they aren’t writing a novel about what they did. They are simply listing the menu items (codes) they used. The insurance company then looks at their own list (your policy) to see which menu items they are willing to pay for.
Why this matters for you:
-
Transparency: Knowing the codes allows you to verify that the work being billed matches the work you received.
-
Predictability: You can call your insurance company before treatment starts and ask, “What is my coverage for code D6010?” instead of asking a vague question about “implants.”
-
Appeal Power: If a claim is denied, knowing the exact code that was rejected allows you and your dentist’s office to have a precise conversation about why, and how to fix it.
For dental implants, these codes are particularly important because implant treatment is rarely a single procedure. It is a journey involving multiple steps over several months. Each step has its own code, and each code may be treated differently by your insurance plan.
The Core ADA Codes for Dental Implants: A Breakdown
When you receive a treatment plan for a dental implant, it will likely include a combination of several codes. Let’s break down the most common ones you will see. These codes are the pillars of implant dentistry billing.
Surgical Placement Codes (The Foundation)
This is where the physical process begins. The surgical placement codes cover the actual procedure of inserting the implant fixture (the titanium screw) into your jawbone.
| ADA Code | Procedure Description | What to Know |
|---|---|---|
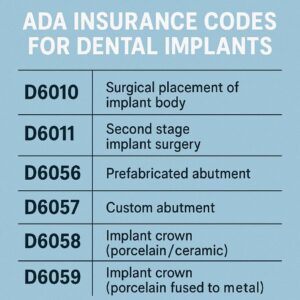
| D6010 | Surgical placement of implant body: endosteal implant | This is the “main” implant code. An endosteal implant is the root-form screw placed directly into the bone. If you are getting a standard single implant, this is likely the surgical code you will see. |
| D6011 | Second stage implant surgery | This code is used when the implant is placed, but then covered by gum tissue to heal. A second minor surgery is then needed to expose the top of the implant and attach a healing abutment. Not all cases require this separate code; sometimes a healing abutment is placed during the initial surgery. |
| D6013 | Surgical placement of mini implant | This code is specific to mini dental implants, which are smaller in diameter and sometimes used to stabilize dentures. They are a different category than standard, traditional implants. |
Important Note: D6010 is often the most contested code with insurance. Many dental insurance plans, especially older or more basic ones, explicitly exclude this code, meaning they will not pay anything towards the surgical placement of the implant itself.
Abutment and Restoration Codes (The Visible Part)
Once the implant has successfully fused with your jawbone (a process called osseointegration), the next step is to build the tooth that sits on top of it. This involves an abutment (the connector piece) and the crown (the artificial tooth).
| ADA Code | Procedure Description | What to Know |
|---|---|---|
| D6056 | Prefabricated abutment | This is the code for a stock or prefabricated abutment. It is a standard piece that connects the implant to the crown. Many insurance plans will cover a portion of this, though they may consider it part of the crown procedure. |
| D6057 | Custom abutment | This is used when a lab needs to create a custom-milled abutment for a specific case, often for aesthetic reasons or to correct the angle of the implant. It is generally more expensive than a prefabricated abutment. |
| D6058 | Abutment supported porcelain/ceramic crown | This is the code for the crown itself—the part that looks like a natural tooth. It attaches to the abutment. If you are getting a single implant, this is the final code in your treatment plan. |
| D6060 | Implant supported retainer for a FPD | This code is used when an implant is being used as an anchor (or abutment) for a bridge. Instead of a single crown, the implant supports a false tooth that is part of a larger bridge structure. |
| D6065 | Implant supported crown (titanium abutment) | A variation for crowns that are specifically supported by a titanium abutment. |
Surgical Support Codes (The Essentials)
Before an implant can be placed, the jawbone must be healthy and have enough volume to support it. Sometimes, additional procedures are necessary to prepare the site.
| ADA Code | Procedure Description | What to Know |
|---|---|---|
| D7210 | Surgical extraction of an erupted tooth | If the tooth you are replacing is still in your mouth, it must be extracted. This code is for a simple surgical extraction. If the tooth is impacted or requires more complex removal, a different code (like D7220 or D7230) may apply. |
| D7951 | Sinus augmentation via a lateral approach | This is a common procedure for the upper back jaw (maxilla). If there isn’t enough bone height due to the sinus cavity, the surgeon will lift the sinus membrane and place bone graft material. This is often referred to as a “sinus lift.” |
| D7953 | Bone replacement graft for ridge preservation | After a tooth is extracted, the socket can be filled with bone graft material to preserve the ridge and prevent bone loss. This is often done at the same time as the extraction to ensure a strong foundation for a future implant. |
| D7960 | Frenectomy | Sometimes, a tight band of tissue (frenum) can interfere with an implant or denture. This is a minor surgical procedure to remove or loosen it. |
| D7999 | Unspecified oral surgery procedure | This is a catch-all code. While it can be legitimate for unique procedures, be cautious. If you see this code on a treatment plan without a clear explanation, ask your dentist to clarify what it covers. A more specific code is always better for insurance clarity. |
Imaging and Diagnostic Codes
Before any surgery, your dentist needs a detailed map of your mouth and jawbone. This involves specific types of x-rays.
| ADA Code | Procedure Description | What to Know |
|---|---|---|
| D0367 | Cone beam CT (CBCT) capture and interpretation | This is the gold standard for implant planning. Unlike a traditional 2D x-ray, a CBCT scan creates a 3D image of your jaw, teeth, nerves, and sinuses. It allows the surgeon to plan the implant placement with incredible precision. It is a critical step for safety and success. |
| D0350 | Oral/facial photographic images | Sometimes, dentists take clinical photographs for documentation, treatment planning, or to submit to a laboratory. |
How Insurance Typically Treats These Codes
Now that you know the codes, let’s talk about the reality of insurance coverage. It is crucial to understand that most standard dental insurance plans were not designed for dental implants.
Historically, dental insurance was built around a philosophy of prevention and basic restoration (fillings, root canals, crowns). Implants are a relatively modern, premium solution. Because of this, many plans view them as a “major” service with low annual maximums, or they exclude them entirely.
Here is a general breakdown of how insurance plans commonly approach implant-related codes:
The “Missing Tooth” Clause
This is arguably the most important concept to understand. Many insurance policies have a clause stating they will not cover an implant to replace a tooth that was missing before the policy began. If you lost a tooth years ago and are now getting a new insurance plan, they may consider it a pre-existing condition and deny coverage for the implant.
The Hierarchy of Coverage
When an insurance plan does offer implant benefits, they usually follow a hierarchy:
-
Diagnostic Codes (e.g., D0367): These are often covered well, typically at 80% or 100%, as they fall under diagnostic or preventative categories.
-
Surgical Extraction (e.g., D7210): If the tooth is present and needs removal, this is usually covered as a standard procedure, often at 50-80% depending on your plan’s classification.
-
Bone Grafting (e.g., D7951, D7953): Coverage here is highly variable. Some plans consider this a necessary surgical adjunct and will cover it at the same rate as oral surgery. Others consider it “not a covered benefit” because it is done in preparation for an implant, which itself may not be covered.
-
Implant Placement (D6010): This is the most variable. If covered at all, it is usually under “major” services, with a 50% coinsurance after your deductible.
-
Abutment and Crown (D6056, D6058): This is often where patients get a surprise. Even if the implant placement (D6010) is not covered, the crown (D6058) is often covered. Why? Because insurance plans are built to cover crowns. Even if the “post” (implant) under it isn’t covered, they will sometimes pay for the “tooth” (crown) on top, considering it a standard restoration.
A Realistic Scenario
Let’s put this into a simple table to illustrate how a typical, moderately good PPO plan might handle a single implant case.
| Procedure | ADA Code | Plan Classification | Typical Patient Coinsurance | Notes |
|---|---|---|---|---|
| Consult & Exam | D0150 | Diagnostic | 0-20% | Often covered fully after deductible. |
| CBCT Scan | D0367 | Diagnostic | 0-20% | Usually covered, but may require pre-authorization. |
| Extraction | D7210 | Oral Surgery | 20-50% | Covered if tooth is present. |
| Bone Graft | D7953 | Oral Surgery | 20-50% | Coverage varies; sometimes bundled with extraction. |
| Implant Fixture | D6010 | Major | 50%+ | This is the biggest question mark. Often excluded. |
| Abutment | D6056 | Major | 50%+ | May be covered if D6010 is approved. |
| Crown | D6058 | Major | 50%+ | Usually covered, even if D6010 is denied. |
Note: These are general guidelines. Your specific plan may vary wildly.
Decoding Your Treatment Plan: A Step-by-Step Guide
When your dentist presents you with a treatment plan, it can look like a spreadsheet of jargon. Here is how to read it like a pro.
-
Locate the Codes: Scan the left-hand column for the 5-digit D-codes (e.g., D6010, D6058).
-
Check the “Insurance Estimate” Column: Many offices provide an estimate of what your insurance might pay. Remember, this is not a guarantee.
-
Identify the “Patient Portion”: This is the amount you are responsible for. It includes your deductible, coinsurance, and any non-covered services.
-
Look for Bundled Procedures: Sometimes, a dentist might bundle the abutment and crown into a single line item. Ask for clarification. It helps to know the individual cost of the parts.
-
Ask About Pre-Authorization: Before starting treatment, your dentist’s office can send a pre-authorization (or pre-determination) to your insurance company. This is not a guarantee of payment, but it is a formal estimate from the insurer. It is the single most valuable step you can take to avoid billing surprises.
A crucial conversation to have:
“Before we begin, I’d like to request a pre-authorization for all the planned ADA codes, especially D6010, to understand exactly what my plan’s liability will be.”
Strategies to Maximize Your Dental Implant Insurance Benefits
Navigating insurance is not just about understanding codes; it’s about strategy. Here are some practical ways to make your benefits work harder for you.
1. Time Your Treatment with Your Plan Year
Most dental insurance plans have an annual maximum (often between $1,000 and $2,000). If your implant treatment spans multiple stages, you can strategically schedule them across two plan years to double your maximum benefit.
-
Year 1: Perform the extraction, bone graft, and place the implant (D6010) in the fall.
-
Year 2: Allow the implant to heal over the plan renewal date (January 1st), then perform the abutment and crown placement early in the new year.
This allows you to potentially use two years’ worth of annual maximums to cover the total cost.
2. Understand Your Plan’s Frequency Limitations
Insurance plans often have frequency limitations, like “one crown per tooth in any 5-year period” or “one CBCT scan every 3 years.” If you have had recent work on the same tooth, it could affect coverage. Make sure your dentist’s office checks these limitations before submitting claims.
3. Leverage Your Medical Insurance
This is a lesser-known but powerful strategy. While dental insurance is often limited, your medical insurance may cover portions of implant treatment, especially the surgical components.
If the tooth loss was due to:
-
An accident or trauma
-
A congenital condition
-
Pathology (like a tumor or cyst)
-
The necessity of a sinus lift (D7951) or bone graft for functional reasons
…your medical plan might be the primary payer for those surgical codes. It’s worth asking your oral surgeon’s office if they are willing to submit claims to your medical insurance first.
4. Use In-Network Providers
This is a major factor. If your dentist is “in-network” with your PPO plan, they have contracted rates. This means the fees for each ADA code are discounted. An out-of-network provider can balance bill you for the difference between their fee and what the insurance allows.
Tip: Ask the front desk staff, “Are you a participating provider for my insurance plan? If so, what are the negotiated rates for the codes in my treatment plan?”
5. Consider a Dental Discount Plan
If your insurance offers little to no implant coverage, or if you don’t have insurance, look into dental discount plans. These are not insurance, but rather membership programs that offer a flat discount (often 15-30%) on procedures based on their ADA codes. For expensive codes like D6010, this can result in significant savings.
Common Mistakes and How to Avoid Them
Even with the best intentions, mistakes happen. Being aware of common pitfalls can save you time, frustration, and money.
Mistake 1: Assuming “Implant” Means Everything is Covered
A patient hears “implants are covered” and assumes the entire process is paid for. In reality, “coverage” might mean a 50% coinsurance up to a $1,500 annual max, leaving the patient with thousands in out-of-pocket costs.
Solution: Always ask for the specific coverage percentages for each ADA code, not just a general statement.
Mistake 2: Not Verifying the “Missing Tooth” Clause
You start treatment only to find out the implant placement is denied because the tooth was extracted ten years ago.
Solution: Before signing a treatment plan, call your insurance and ask directly: “Does my policy have a missing tooth clause? If so, does it apply to implant placement (D6010)?”
Mistake 3: Ignoring the “Year of Service”
The date of service for each code matters. If your crown is seated on December 28th, it counts against that year’s maximum. If it’s seated on January 3rd, it counts against the new year’s max.
Solution: Work with your dentist’s scheduling coordinator to strategically schedule the final crown delivery to align with your financial goals.
Mistake 4: Relying on Verbal Estimates
A customer service representative says, “Yes, it looks like implants are covered.” You proceed with treatment, and a month later, you receive an explanation of benefits (EOB) stating the claim was denied.
Solution: Get everything in writing. A pre-authorization is the closest thing to a guarantee you can get. If a rep gives a verbal confirmation, ask them to note your account and provide a reference number.
The Future of Implant Coverage
The landscape is slowly changing. As dental implants become the standard of care for tooth replacement, more insurance plans are beginning to adapt. We are starting to see:
-
Alternative Benefit Designs: Some companies are introducing plans with higher annual maximums specifically designed for major care.
-
Tiered Networks: Plans where patients pay a higher premium for access to a “premier” network that includes enhanced implant benefits.
-
Integration with Medical: A slow but growing trend of better integration between dental and medical insurers, recognizing that oral health is systemic health.
However, for the foreseeable future, patients should still expect to pay a significant portion of implant treatment out-of-pocket. The key is to turn that unpredictable cost into a predictable, planned expense by using the tools we’ve discussed.
A Final Word on Working with Your Dental Team
Your dental team is your ally. The administrative staff—the treatment coordinators and billing specialists—are the experts who deal with these codes every single day. They have a wealth of knowledge about which insurance companies are most cooperative and which codes require specific documentation.
When you approach them with a foundational understanding of ADA codes, you elevate the conversation. Instead of a patient asking, “How much is this going to cost?” you become a collaborative partner asking, “For code D6010, does my plan have a missing tooth clause? I’d like to request a pre-authorization for this and D6058 before we schedule the surgery.”
This shift in dynamic makes the process smoother, builds trust, and ensures there are no surprises.
Conclusion
Navigating the world of ADA insurance codes for dental implants might initially seem like an insurmountable challenge, but it is a skill you can absolutely master. By familiarizing yourself with the core codes like D6010 for the implant fixture and D6058 for the final crown, you gain the clarity needed to have informed, productive conversations with both your dentist and your insurance provider. Remember, a successful implant journey isn’t just about the surgical outcome; it’s also about a financial process that feels transparent and manageable.
Armed with this knowledge, you can move forward with confidence. You understand the importance of pre-authorizations, the strategic value of timing your treatment across plan years, and the potential to leverage your medical insurance for surgical components. Your goal is to transform a complex billing process into a predictable roadmap, ensuring that your path to a restored smile is as smooth and stress-free as possible.
Frequently Asked Questions (FAQ)
1. Is the ADA code D6010 always covered by dental insurance?
No, it is not always covered. D6010 is frequently either a non-covered benefit or is subject to a “missing tooth clause.” It is essential to verify coverage with your specific plan before beginning treatment.
2. If my insurance doesn’t cover D6010, does that mean they won’t cover anything?
Not necessarily. Many plans will still cover the crown (D6058) and abutment (D6056) even if they deny the implant fixture itself. They may also cover the extraction and bone graft. Ask your dentist to submit separate pre-authorizations if needed.
3. What is the difference between D6010 and D6013?
D6010 is for a standard, traditional endosteal (root-form) implant. D6013 is the specific code for a mini dental implant, which is narrower and often used for stabilizing dentures rather than replacing a single tooth.
4. Why does my treatment plan have a code D7999 (unspecified procedure)?
D7999 is a catch-all code for an oral surgery procedure that doesn’t have a specific code. While sometimes necessary, it’s best to ask your dentist to clarify exactly what this code represents, as insurance companies may be less likely to cover a non-specific code.
5. Can I use my medical insurance for a sinus lift (D7951) or bone graft (D7953)?
Yes, in many cases. If the procedure is deemed medically necessary due to trauma, pathology, or a congenital defect, your medical insurance may be the primary payer. It’s worth asking your surgeon’s office to file a claim with your medical plan.
6. What is a pre-authorization and do I need one?
A pre-authorization (or pre-determination) is a request sent to your insurance company before treatment begins. It provides a written estimate of what they will pay. It is highly recommended for implant treatment to avoid unexpected out-of-pocket costs.
Additional Resource
For the most up-to-date and official information on CDT codes, we recommend visiting the American Dental Association’s official website. They provide the authoritative source for the codes discussed in this article.
American Dental Association (ADA) – CDT Codes
Note: This link directs to the official ADA resource for the Current Dental Terminology (CDT) code set, ensuring you have access to the most accurate and current information.