Dental Extraction and Implant
Hearing the words “tooth extraction” can feel a little scary. Adding “dental implant” to the conversation might sound even more intense. But here is the truth millions of people have discovered: replacing a damaged tooth with an implant is one of the most reliable, life-changing decisions you can make for your oral health.
You are not alone. Every year, over five million dental implants are placed in the United States alone. Most of those start with an extraction.
This guide walks you through everything you need to know. No confusing jargon. No unrealistic promises. Just honest, clear information to help you feel confident about your next steps.
Whether you are dealing with a broken tooth, severe decay, or an infection that won’t quit, you have come to the right place.

Understanding the Basics: Why Remove a Tooth?
Before we talk about implants, let us discuss why a dentist might recommend removing a natural tooth. This decision is never taken lightly. Dentists always prefer to save your original teeth whenever possible.
However, some situations leave no practical choice.
Severe Tooth Decay Beyond Repair
When cavities grow deep enough to destroy most of the tooth structure, a simple filling or crown may no longer work. If less than 30% of healthy tooth remains, restoration becomes unstable. Bacteria can hide in places your toothbrush cannot reach. In these cases, extraction stops the infection from spreading to neighboring teeth or your jawbone.
Advanced Gum Disease (Periodontitis)
Gum disease is sneaky. It starts with minor bleeding when you floss. Over time, the infection destroys the bone holding your teeth in place. Once a tooth becomes loose because of bone loss, it acts like a wobbly fence post. No amount of cleaning will tighten it. Removing that tooth protects the bone and gums around adjacent teeth.
Irreparable Fractures or Trauma
A crack can run vertically down the root of a tooth. Sometimes, this split reaches below the gum line. Other times, a fall or sports injury breaks a tooth so badly that pieces shift apart. In both scenarios, bacteria invade the crack. Pain becomes constant. Extraction eliminates the source of that pain.
Overcrowding or Orthodontic Reasons
Braces need space to straighten crooked teeth. Occasionally, one extra tooth or a baby tooth that never fell out blocks proper alignment. Removing that tooth creates room for the rest to move into healthier positions.
Infection or Abscess Risk
An abscess is a pocket of pus at the root tip. While root canal treatment can save many abscessed teeth, some infections are too aggressive. If the tooth has already had a root canal and the infection returns, extraction may become the safer route.
Important note: Always ask your dentist why they recommend an extraction. A good dentist will show you your X-rays and explain exactly what they see. If you feel unsure, get a second opinion. Responsible dentists encourage this.
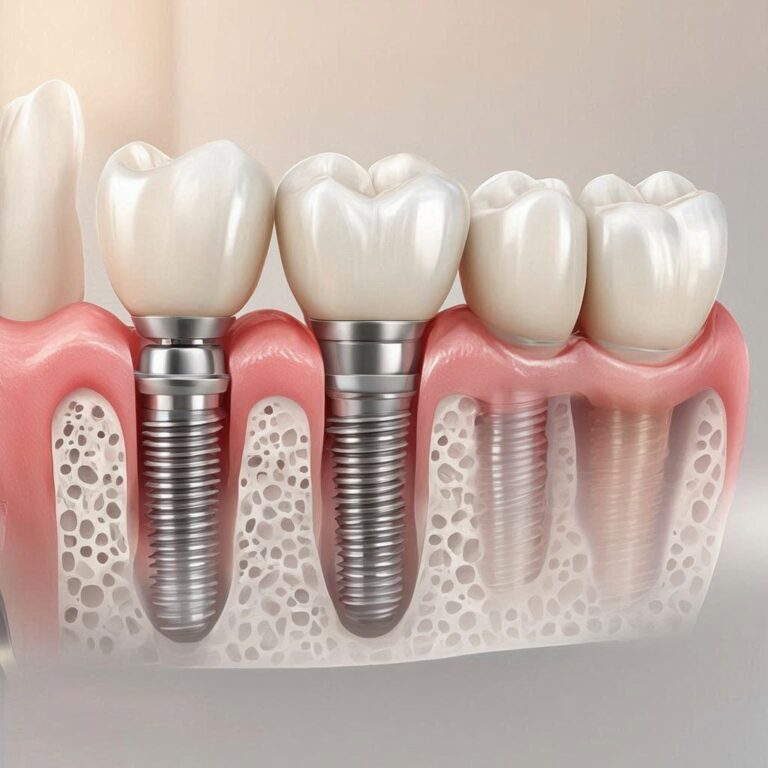
What Is a Dental Implant? (A Simple Explanation)
Imagine a perfect replica of your natural tooth root, made from medical-grade titanium. That is a dental implant.
The implant itself is a small screw that your oral surgeon places directly into your jawbone. Over several months, your bone grows tightly around this screw. This process is called osseointegration. It sounds complicated, but it simply means your body accepts the implant as part of you.
Once the implant fuses with your bone, your dentist attaches an abutment (a small connector) and then a custom-made dental crown on top. The final result looks, feels, and functions like a natural tooth.
Why Implants Are So Popular Today
| Feature | Dental Implant | Traditional Bridge | Removable Denture |
|---|---|---|---|
| Looks like natural tooth | Yes | Often | Rarely |
| Stimulates jawbone | Yes | No | No |
| Requires altering healthy teeth | No | Yes | No |
| Removable | No | No | Yes |
| Longevity | 20+ years to lifetime | 7–15 years | 5–10 years |
| Feels stable when eating | Yes | Mostly | Sometimes |
This table explains why implants have become the gold standard. They preserve your bone. They do not damage neighboring teeth. And they never slip or click when you talk or laugh.
The Complete Step-by-Step Process of Dental Extraction and Implant
Now for the part you really want to know: what actually happens during the procedure? Let us break this down into clear, simple steps.
Step 1: Initial Consultation and Imaging
Your journey begins with a thorough exam. The dentist will take X-rays, often a 3D scan called a CBCT (cone beam computed tomography). This scan shows the exact shape and density of your jawbone. It reveals the position of nerves, sinuses, and adjacent tooth roots.
During this visit, your dentist will also review your medical history. Conditions like uncontrolled diabetes, active gum disease, or heavy smoking can affect implant success. Be honest with your provider. Most situations can still be managed successfully with extra precautions.
Step 2: Tooth Extraction (If the Tooth Is Still Present)
If your damaged tooth is still in your mouth, the dentist will remove it first. There are two types of extractions:
Simple extraction: Used when the tooth is fully visible above the gum line. The dentist loosens the tooth with an instrument called an elevator and removes it with forceps. You will feel pressure but not sharp pain because of local anesthesia.
Surgical extraction: Needed when the tooth has broken off at the gum line or hasn’t fully erupted. The surgeon makes a small incision in your gum to access the tooth. Sometimes they cut the tooth into sections for easier removal.
Most implant-ready extractions are surgical. This allows the surgeon to inspect the bone and plan exactly where the implant will go.
Step 3: Bone Grafting (If Necessary)
Here is an honest reality: many people who need extractions also need bone grafting. Why? Because when a tooth is infected or has been missing for a while, the surrounding bone shrinks.
Think of your jawbone like a garden. A healthy tooth root constantly “waters” the bone, stimulating it to stay dense and thick. Remove that root, and the bone slowly dissolves away.
A bone graft rebuilds that lost foundation. The surgeon places grafting material (often from a donor source or synthetic material) into the extraction socket. Over four to six months, this material fuses with your natural bone to create a solid base for the implant.
Do not skip this step if your dentist recommends it. Placing an implant into weak bone is like building a house on sand. It will fail.
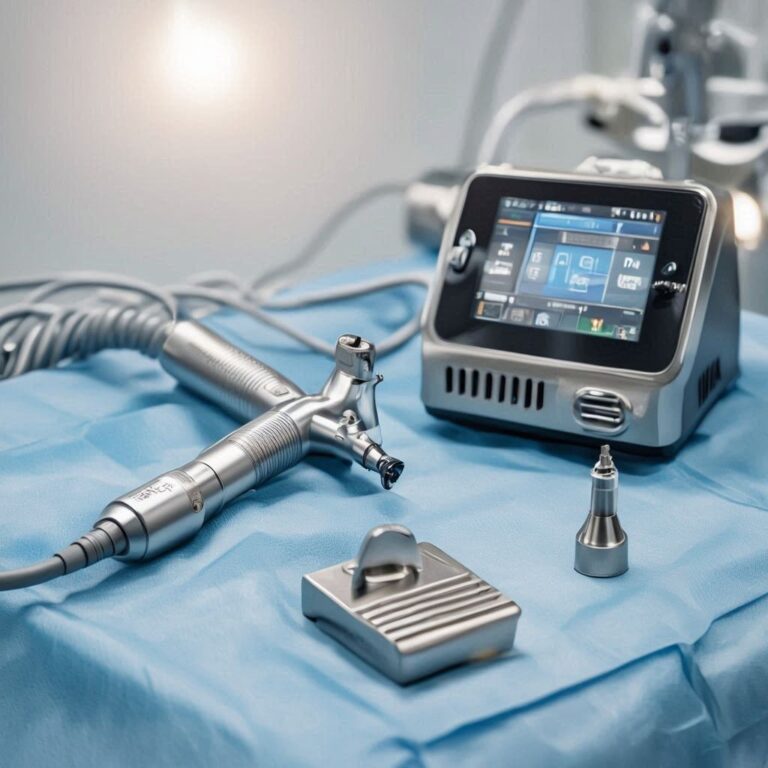
Step 4: Implant Placement
Once your bone is ready, the implant placement surgery takes about 60 to 90 minutes for a single tooth. Here is what happens:
- Your surgeon numbs the area completely. For anxious patients, sedation options (like laughing gas or oral medication) are available.
- They make a tiny incision in your gum to expose the bone.
- A special drill creates a precise hole exactly the size of your implant.
- The titanium implant screw is twisted into place.
- A healing cap or cover screw is placed on top.
- Your gum is stitched closed over or around the implant.
Most patients report less discomfort than they expected. The pressure and noises (drilling, tapping) can feel strange, but pain is minimal.
Step 5: Osseointegration (The Healing Phase)
Now your body does the real work. Over the next three to six months, your bone cells grow into the microscopic pores of the implant surface. This creates a biological lock stronger than any glue.
During this time, you will eat soft foods and avoid chewing directly on the implant site. Your dentist may give you a temporary partial denture or flipper to fill the space for cosmetic reasons. However, this temporary tooth must not press on the healing implant.
Step 6: Abutment Placement
Once osseointegration is complete, a small second surgery uncovers the top of the implant. The healing cap is removed, and an abutment (a metal or ceramic post) is screwed onto the implant. This post pokes through your gum and will hold your final crown.
This appointment is quick—often 15 to 20 minutes. Your gum needs two to four weeks to heal around the abutment before the final crown can be made.
Step 7: Final Crown Placement
Your dentist takes digital scans or traditional impressions of your mouth. These are sent to a dental lab where a ceramic crown is custom-made to match the color, shape, and size of your natural teeth.
About two to three weeks later, you return. The dentist checks the fit and color match, then cements or screws the crown onto the abutment. Adjustments are made to ensure your bite feels comfortable.
Congratulations. You now have a new tooth.
Types of Dental Implants (Which One Is Right for You?)
Not all implants are the same. Your specific situation determines which type works best.
Endosteal Implants (Most Common)
These are the screw-shaped implants we have been describing. They go directly into the jawbone. They work for over 95% of patients with adequate bone height and width.
Zygomatic Implants
For people with severe bone loss in the upper jaw, standard implants may not be possible. Zygomatic implants are much longer. They anchor into the cheekbone (zygoma) instead of the upper jaw. This avoids the need for extensive bone grafting. However, this procedure requires a specialist with advanced training.
Mini Implants
These are narrower (less than 3mm in diameter) than standard implants (usually 3.5 to 5mm). Mini implants are sometimes used to stabilize lower dentures. They are not ideal for replacing single teeth because they are less strong and more likely to fracture under chewing forces.
Same-Day Implants (Immediate Loading)
Some dentists advertise “teeth in a day.” In specific cases, they place the implant and attach a temporary crown on the same visit. This sounds convenient, but it carries higher risks. The implant has no time to fuse with bone before being forced to chew. Most experts recommend waiting the full healing period for the best long-term success.
Important note: Be wary of any dentist who promises same-day implants for every case without thoroughly explaining the increased risk of failure. Your long-term health matters more than short-term convenience.
Cost Breakdown: What to Budget for a Dental Extraction and Implant
Let us talk money openly and honestly. Dental implants are an investment. They cost more upfront than bridges or dentures. However, they last much longer and prevent future bone loss, which saves you money over a lifetime.
Here is a realistic breakdown of costs in the United States (before insurance):
| Procedure | Average Cost Range |
|---|---|
| Initial consultation and 3D CBCT scan | $150 – $500 |
| Surgical tooth extraction | $200 – $600 (simple); $400 – $1,100 (surgical) |
| Bone graft (if needed) | $300 – $1,200 per site |
| Implant placement surgery | $1,500 – $2,500 |
| Abutment | $300 – $600 |
| Custom crown | $1,000 – $2,500 |
| Total for single tooth (without bone graft) | $3,200 – $6,200 |
| Total for single tooth (with bone graft) | $3,500 – $7,400 |
Does Insurance Cover Implants?
Traditional dental insurance often excludes implants or covers only a small portion (10–30%). However, many plans will cover the extraction and crown portion. Some medical insurance plans may contribute if the extraction is due to trauma or tumor removal.
Ways to Make Implants Affordable
- Dental schools: Teaching clinics offer reduced fees (often 40–60% less) because students perform procedures under expert supervision.
- In-house membership plans: Many dental offices offer annual plans with discounts of 10–20% on implants for uninsured patients.
- CareCredit and third-party financing: Monthly payment plans with zero interest if paid within 6–12 months.
- FSA/HSA accounts: Use pre-tax dollars to pay for eligible procedures.
Do not let cost alone stop you from exploring implants. Many patients find that a bridge or denture fails after ten years, requiring replacement. Over 30 years, replacing a bridge twice often costs more than one implant that lasts a lifetime.
Pain, Recovery, and What You Actually Feel
Let me reassure you about something most patients worry about: pain.
During the Procedures
Both extraction and implant placement happen under strong local anesthesia. You will feel pressure, vibration, and strange sounds. You will not feel sharp pain. If you do feel discomfort, raise your left hand (not your right, which might be near the surgical site). The dentist will stop and add more numbing medicine.
The First 24 Hours After Surgery
When the anesthesia wears off, you will feel soreness. Most patients describe it as a deep ache, similar to a bad bruise. Over-the-counter ibuprofen (Advil, Motrin) or prescribed medication controls this effectively.
You may also experience:
- Minor bleeding (controlled with gauze pressure)
- Swelling of your cheek or lip
- Difficulty opening your mouth wide
Ice packs applied for 15 minutes on, 15 minutes off during the first 12 hours dramatically reduce swelling.
Days 2 through 7
Swelling peaks around day two or three, then slowly goes down. Stick to soft foods like yogurt, mashed potatoes, scrambled eggs, and smoothies. Avoid hot drinks, spicy foods, and anything crunchy.
You will rinse with warm salt water (one teaspoon salt in one cup of warm water) four to five times daily. Do not spit forcefully. Let the water fall out of your mouth.
Weeks 2 through 12
Most patients return to normal activities within two to three days. By one week, you feel mostly normal except for some tenderness when pressing on the area. By week three, you forget anything happened—except for the missing tooth space.
During osseointegration, you must avoid putting direct chewing pressure on the implant. Your dentist will give you specific instructions based on your case.
What About Eating?
You can eat normally on the opposite side of your mouth. Avoid sticky foods (caramel, taffy) and very hard foods (nuts, hard candy) near the implant during healing. Most patients find they can eat steak, apples, and crusty bread without issue once the final crown is placed.
Success Rates and Risks (Being Honest With You)
Implants are remarkably successful. But no medical procedure has a 100% success rate.
Average Success Rates
| Location in Mouth | Success Rate (10+ years) |
|---|---|
| Lower front (incisors) | 98–99% |
| Lower back (molars) | 95–97% |
| Upper front | 96–98% |
| Upper back | 92–95% |
Reasons Implants Fail
Early failure (within first few months):
- Infection at the surgical site
- The implant was placed into insufficient bone
- Patient smoked heavily during healing
- Uncontrolled diabetes or other medical condition
Late failure (after crown placement):
- Poor oral hygiene leading to peri-implantitis (gum disease around the implant)
- Bruxism (teeth grinding) without a protective night guard
- Mechanical fracture of the crown or abutment (rare with modern materials)
How to Maximize Your Success
- Stop smoking. Smokers have twice the failure rate of nonsmokers. If you cannot quit completely, at least stop for two weeks before and three months after surgery.
- Control your blood sugar. If you have diabetes, keep your HbA1c below 7.0% before implant placement.
- Clean meticulously. Implants do not get cavities, but they can get gum disease. Brushing, flossing, and regular cleanings are essential.
- Wear a night guard if you grind. Grinding creates forces up to 500 pounds per square inch. Implants cannot absorb this shock like natural teeth.
Important note: Peri-implantitis is the number one cause of late implant failure. It is silent and painless until advanced. Never skip your annual implant checkups. Your dentist will probe around the implant and take periodic X-rays to catch this early.
Extraction and Implant vs. Alternatives
You always have options. Let us compare honestly.
Bridge (Traditional Fixed Bridge)
A bridge files down the two healthy teeth next to the gap. Three connected crowns (one false tooth in the middle, two caps on the adjacent teeth) fill the space.
Pros:
- Completed in 2–3 weeks
- Less expensive upfront ($2,500 – $5,000)
- No surgery required
Cons:
- Destroys healthy enamel on adjacent teeth
- Does not prevent jawbone loss
- Average lifespan 10–15 years
- Food can get trapped underneath, causing decay of the anchor teeth
Removable Partial Denture
A plastic or metal framework with a false tooth that clips onto neighboring teeth.
Pros:
- Lowest cost ($800 – $2,000)
- Non-invasive
Cons:
- Unstable; moves when you eat or speak
- Accelerates bone loss (no root to stimulate bone)
- Can cause decay on teeth it touches
- Most patients find them annoying or embarrassing
Do Nothing
Leaving a gap after extraction is always an option. But consider this:
- Adjacent teeth tilt into the space
- The opposing tooth drifts upward (or downward) seeking contact
- Bone loss accelerates
- Chewing efficiency decreases
- You may develop TMJ problems from uneven bite
Most dentists strongly advise replacing every missing tooth except possibly the very last molar in the back.
Realistic Timeline: From Extraction to Final Crown
Patience is the hardest part of this process. Your body needs time to heal. Here is what a typical schedule looks like.
| Phase | Duration | What Happens |
|---|---|---|
| Consultation and planning | 1–2 visits (1–2 weeks) | Scans, treatment plan, cost estimate |
| Extraction + bone graft (if needed) | 1 visit | Tooth removed, graft placed |
| Bone graft healing | 4–6 months | Graft fuses with natural bone |
| Implant placement | 1 visit (60–90 minutes) | Titanium screw placed |
| Osseointegration | 3–6 months | Bone grows around implant |
| Abutment placement | 1 visit (15–20 minutes) | Connector attached |
| Gum healing | 2–4 weeks | Tissue shapes around abutment |
| Crown fabrication | 2–3 weeks | Lab makes custom crown |
| Final crown placement | 1 visit | Permanent tooth attached |
Total elapsed time: 7 to 12 months for most patients.
If you do not need a bone graft, subtract four to six months. If you need a large graft or sinus lift (upper back molars), add three to six months.
I know this sounds long. But remember: you are building something that should last 30, 40, or 50 years. A few months of patience is a small price.
Special Situations and Frequently Asked Questions
Can I Get an Implant Years After an Extraction?
Yes. Even if you lost a tooth ten years ago, you can still get an implant. However, you will almost certainly need a bone graft. The longer a tooth has been missing, the more bone you have lost. Expect grafting and a longer overall timeline.
What If I Have Osteoporosis?
Osteoporosis itself is not a contraindication. However, certain medications are. Bisphosphonates (Fosamax, Actonel, Boniva, and especially intravenous forms like Reclast or Zometa) increase the risk of osteonecrosis of the jaw—a condition where the jawbone fails to heal after surgery. If you take these medications, your dentist will consult your prescribing physician before proceeding.
Can Pregnant Women Get Implants?
No ethical dentist will perform elective implant surgery during pregnancy. The stress, anesthesia, X-rays, and medications pose unnecessary risks to the developing baby. Wait until after delivery and completion of breastfeeding.
How Old Is Too Old?
Age alone is never a barrier. Healthy 80 and 90-year-olds receive implants successfully. The key is overall health, not the number on your birthday cake.
What About Metal Allergies?
True titanium allergy affects less than 0.6% of the population. If you have a known metal allergy, zirconia (ceramic) implants are available. They are white and metal-free, though they have slightly lower long-term data than titanium.
Preparing for Your Procedure: A Checklist
Follow these steps for the smoothest experience.
Two weeks before:
- Tell your dentist about all medications, supplements, and herbs you take (aspirin, blood thinners, St. John’s wort, vitamin E, fish oil can increase bleeding)
- Fill any antibiotic or pain medication prescriptions
- Arrange for someone to drive you home if using sedation
- Buy soft foods (mashed potatoes, applesauce, Greek yogurt, protein shakes, pudding)
The night before:
- Get a full night’s sleep
- No alcohol for 24 hours before surgery
- Follow fasting instructions if receiving IV sedation (usually nothing by mouth after midnight)
The morning of:
- Take prescribed medications with a small sip of water (unless told otherwise)
- Brush your teeth gently (but not the surgical area if specified)
- Wear loose, comfortable clothing with short sleeves
- Remove contact lenses, jewelry, and dentures
What to bring:
- Insurance card and ID
- Payment method
- List of current medications
- Lip balm (your lips will get dry)
- Headphones and music if noise bothers you
Aftercare and Long-Term Maintenance
Your implant crown cannot get a cavity. But the gum and bone around it are vulnerable. Follow these rules.
Daily Home Care
- Brush twice daily with a soft or extra-soft toothbrush. Pay special attention to the gum line around the implant.
- Floss daily using implant-specific floss or superfloss with a stiffened end to thread under the crown.
- Water flossers (Waterpik) are excellent for blasting away food particles around implants.
- Interdental brushes (tiny bottle brushes) clean the curved spaces between implant crowns.
Professional Maintenance
- Cleanings every six months. Your hygienist will use plastic or carbon-fiber instruments instead of metal ones to avoid scratching the implant surface.
- Annual X-rays to check the bone level around the implant.
- Peri-implant probing every year to measure gum pocket depths.
Signs Something Is Wrong
Contact your dentist immediately if you notice:
- Bleeding when brushing around the implant
- Red, puffy, or receding gums around the implant
- A bad taste or odor from the area
- The crown feels loose or wobbly
- Pain when biting on the implant (normal soreness after placement resolves; new pain years later is concerning)
Do not ignore these signs. Early peri-implantitis is reversible with deep cleaning. Late-stage disease may require surgery or implant removal.
Real Patient Stories (Anonymized)
“I put off replacing a broken molar for six years because I was terrified of the implant process. When I finally did it, the worst part was the anticipation. The actual placement took 45 minutes. I watched Netflix on my phone. Recovery was easier than a wisdom tooth extraction. Now I forget which tooth is even the implant.” — Sarah, 42
“I lost a front tooth in a bike accident. The temporary flipper denture was annoying, but waiting for the bone graft to heal was the hardest part. Nine months later, my implant crown looks so natural that my own mother can’t tell which one it is. Worth every penny.” — David, 29
“I have diabetes and was told implants might fail. My endocrinologist worked with my dentist to get my blood sugar stable. Three years later, my implant is solid. The key was honest communication between my doctors.” — Robert, 61
Additional Resources
For more detailed, evidence-based information on dental implants, visit the American Academy of Implant Dentistry’s patient education page:
🔗 Link: https://www.aaid.com/patients/
This resource includes a search tool to find accredited implant dentists in your area, video animations of procedures, and a cost calculator.
Conclusion
A dental extraction followed by an implant is a journey of several months that rewards you with decades of confident eating, smiling, and speaking. The process involves removing a hopeless tooth, allowing your bone to heal (possibly with a graft), placing a titanium root, waiting for fusion, and finally attaching a beautiful ceramic crown. While the upfront cost and time commitment exceed alternatives like bridges or dentures, the long-term benefits—bone preservation, no damage to adjacent teeth, and natural function—make implants the modern gold standard. Your best next step is a consultation with a qualified implant dentist who will show you your X-rays and create a personalized timeline.
Frequently Asked Questions (FAQ)
1. Is a dental implant painful to get placed?
No. Local anesthesia completely numbs the area during surgery. Most patients report less discomfort than a routine filling afterwards.
2. How long does a dental implant last?
With proper home care and regular dental visits, most implants last 20 years to a lifetime. The crown may need replacement after 10–15 years of wear.
3. Can I get an implant if I have gum disease?
Yes, but only after your gum disease is treated and stabilized. Active, uncontrolled gum disease significantly increases implant failure risk.
4. Will my insurance cover any part of an extraction and implant?
Many plans cover the extraction (80% or more) and sometimes the crown (50%). Few cover the implant itself. Check your specific policy or ask your dentist’s insurance coordinator.
5. How soon can I return to work after implant surgery?
Most people return to desk jobs the next day. For physically demanding jobs, wait 2–3 days. You will need to avoid heavy lifting or strenuous activity for one week.
6. What happens if my implant fails?
Your dentist will remove the failed implant, allow the bone to heal for several months, and then place a new implant (often at a reduced fee or no charge if covered by warranty).
7. Can I have an MRI scan with a dental implant?
Yes. Titanium is non-ferromagnetic, meaning it is not attracted to magnets. MRI scans are completely safe with dental implants.
8. Why does the whole process take so many months?
Your body needs time to grow bone around the implant. Rushing this biological process leads to failure. The waiting period is not arbitrary; it is based on decades of research.
9. Do implants feel different from natural teeth?
Once healed, most people cannot feel a difference. The crown has no nerve, so you will not feel hot or cold sensitivity. But you will feel pressure and texture normally.
10. Is there an age minimum for dental implants?
Yes. Jaw growth must be complete. For most people, this happens by age 18–20 for females and 20–22 for males. Implants placed earlier will shift out of position as the jaw grows.