The Ultimate Guide to Tooth Extraction Recovery
The moment you leave the dentist’s chair after a tooth extraction, a new chapter begins: recovery. This period, often met with a mix of relief and apprehension, is a critical biological process where your body works diligently to heal and repair. While a tooth extraction is a common dental procedure, the path to a fully healed socket is a complex journey that demands respect, care, and knowledge. A successful recovery is not merely about managing pain; it’s about actively fostering an environment where bone can regenerate, soft tissue can close, and your oral health can be restored without complication.
This definitive guide is designed to be your companion through every stage of this journey. We will move beyond the simple list of “dos and don’ts” and delve into the why behind every recommendation. From the first crucial 24 hours to the surprising changes that occur months later, we will explore the intricate biology of healing, equip you with evidence-based strategies for comfort, and empower you with the knowledge to distinguish normal healing from potential warning signs. Our goal is to transform your recovery from a passive waiting game into an informed, proactive process, ensuring your path to a healthy, pain-free smile is as smooth and swift as possible.
1. The First 24 Hours: The Critical Foundation for Healing
The first day after your extraction is arguably the most important period in your entire recovery journey. The actions you take—and avoid—during this time set the stage for everything that follows. The primary goals are to protect the blood clot that forms in the socket, control bleeding, minimize swelling, and manage pain effectively.
Immediate Post-Operative Care: The First Hour
As you are dismissed from the dental office, you will likely have a piece of gauze firmly placed over the extraction site. Your dentist will have you bite down on this gauze with steady, firm pressure. This pressure is not arbitrary; it is the primary mechanism to achieve hemostasis—the stopping of blood flow. By compressing the open ends of the blood vessels in the socket, you encourage the formation of a stable clot.
It is common to experience some oozing of blood and saliva for the first few hours. This mixture can look alarmingly red, but it is usually a small amount of blood diluted with saliva. Avoid the urge to spit it out, as this can dislodge the forming clot. Instead, gently swallow it or let it drip into a tissue if necessary. You will be slightly numb from the local anesthetic, so take care not to bite your cheek, lip, or tongue.
Managing Bleeding: The Role of the Gauze Pack
You should keep the initial gauze pack in place for 30 to 60 minutes exactly as your dentist instructs. After this time, you can carefully remove it. If active bleeding persists (not just pink-tinged saliva), prepare a new piece of moistened gauze, fold it into a small pad, place it directly over the extraction socket, and bite down with firm pressure for another 30 minutes. Repeat this process as necessary.
A helpful trick is to place a moistened tea bag (black tea is best) over the site instead of gauze. Black tea contains tannic acid, which helps contract blood vessels and promotes clotting. Ensure the tea bag is cool or at room temperature. If bleeding hasn’t significantly subsided after 4-6 hours, contact your dentist.
The Ice Pack Protocol: Strategic Swelling Management
Swelling is the body’s natural inflammatory response to trauma. While it’s a part of healing, excessive swelling can increase pain and delay recovery. The most effective way to minimize swelling is through the strategic application of a cold compress or ice pack.
-
Method: Use a flexible ice pack or a bag of frozen peas wrapped in a thin cloth or towel. Do not apply ice directly to the skin.
-
Timing: Apply the ice pack to the outside of your cheek, near the extraction site, in a cycle: 20 minutes on, 20 minutes off.
-
Duration: This cyclical icing is most effective within the first 18-24 hours after the procedure. After 36 hours, swelling typically peaks and then begins to subside, at which point heat may be more beneficial.
Navigating the Initial Pain: Medication Guidance
As the local anesthetic wears off, you will begin to feel discomfort. Getting ahead of the pain is far easier than trying to chase it down once it’s severe.
-
Prescription Pain Medication: If your dentist has prescribed a pain reliever, take the first dose as recommended, often before the numbness fully subsides. Follow the dosage instructions meticulously and be aware of potential side effects, especially if opioids are prescribed. Use these only as long as absolutely necessary due to their risk of dependency and side effects like nausea and constipation.
-
Over-the-Counter (OTC) Options: For mild to moderate pain, non-steroidal anti-inflammatory drugs (NSAIDs) like ibuprofen (Advil, Motrin) are often highly effective. Ibuprofen not only relieves pain but also reduces inflammation, targeting two key issues simultaneously. Acetaminophen (Tylenol) is excellent for pain relief but does not reduce inflammation. Your dentist may recommend a combination of the two. Always follow dosage instructions and confirm with your dentist that these medications are safe for you, especially if you have underlying health conditions.
The Nothing-by-Mouth Rule: Why Fasting is Fundamental
You should avoid eating or drinking anything until the numbness has completely worn off. This is primarily a safety precaution to prevent you from accidentally burning or biting yourself. Furthermore, consuming food or hot liquids too early can disrupt the fragile clot. Start with cool, liquid foods once the numbness has subsided.
2. Understanding the Healing Process: A Biological Timeline
To truly cooperate with your body during recovery, it helps to understand the remarkable biological processes unfolding in your jawbone. Healing is not a single event but a cascade of overlapping stages.
Stage 1: The Blood Clot (Hour 0): Your Body’s Natural Bandage
The moment the tooth is removed, the body’s emergency response begins. Blood fills the empty socket and begins to coagulate. This blood clot is not just a plug; it is a vital biological dressing that protects the underlying bone and nerve endings from air, food, and bacteria. It serves as the foundational matrix into which cells migrate to begin rebuilding. Protecting this clot is the single most important objective of early recovery. Its disruption leads to the painful condition known as dry socket.
Stage 2: Inflammation (Days 1-3): The Cleanup Crew Arrives
Within the first 24-48 hours, the inflammatory stage is in full swing. White blood cells (neutrophils and macrophages) infiltrate the clot to break down and remove any debris, bacteria, and damaged tissue. This necessary process is what causes the swelling, redness, and warmth you feel around the site. The pain you experience peaks during this phase as inflammatory chemicals stimulate nerve endings. While uncomfortable, this inflammation is a critical cleanup operation that prepares the site for new tissue growth.
Stage 3: Granulation Tissue Formation (Days 3-10): The Scaffold for New Growth
As the inflammation begins to subside, a new type of tissue forms within and over the clot. This is called granulation tissue. Rich in new blood vessels (angiogenesis) and collagen fibers, it appears as soft, pinkish, and fragile-looking tissue. Granulation tissue is the building block for the eventual gum tissue and is the scaffold upon which new bone will be laid down. It is highly vascular, which is why the site may still bleed easily if disturbed during this time.
Stage 4: Soft Tissue Healing (Weeks 1-4): Closing the Door
Over the next few weeks, the gum tissue (epithelium) gradually grows over the top of the granulation tissue, closing the wound. By the end of the first month, the socket should be completely covered by smooth, pink gum tissue. However, the healing beneath the surface is far from complete. The socket will appear shallower as the gum tissue matures and contracts.
Stage 5: Bone Remodeling (Months 1-6): The Final Reconstruction
The most prolonged phase of healing occurs deep within the jawbone. The empty socket, which once held the root of the tooth, is gradually filled in with new bone through a process called osteogenesis. Specialized cells called osteoblasts deposit new bone matrix, starting from the walls and floor of the socket and slowly working inward. This bone is initially immature and soft but will gradually remodel and strengthen over 3 to 6 months, eventually blending in with the surrounding jawbone. This process is crucial for maintaining the structural integrity of your jaw, especially if you are considering a dental implant in the future.
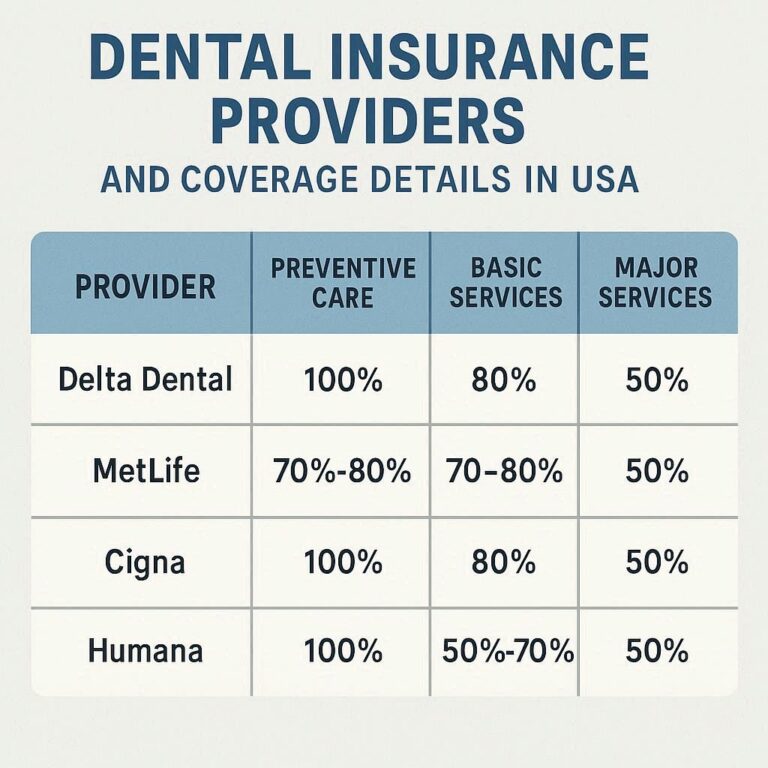
The Biological Timeline of Socket Healing
| Stage | Timeframe | Key Process | What You See/Feel | Patient Priority |
|---|---|---|---|---|
| 1. Blood Clot | 0 – 24 hours | Hemostasis; clot formation | Bleeding subsides; socket filled with dark red clot | Protect the clot at all costs |
| 2. Inflammation | 1 – 3 days | White blood cells remove debris | Peak swelling, pain, and redness | Manage pain and swelling |
| 3. Granulation | 3 – 10 days | Formation of vascular tissue | Pink, soft tissue in socket; pain decreases | Maintain gentle hygiene |
| 4. Soft Tissue Closure | 2 – 4 weeks | Gum tissue grows over socket | Socket covered by smooth gum; looks healed | Resume normal, gentle brushing |
| 5. Bone Remodeling | 1 – 6 months | New bone fills the socket | Nothing visible; process is subsurface | Protect area if considering future implants |
3. The Recovery Diet: Fueling Healing from the Inside Out
Nutrition is a powerful tool that is often overlooked in recovery. The body requires specific nutrients, calories, and hydration to fuel the demanding process of tissue regeneration. The right diet can accelerate healing, while the wrong choices can lead to complications.
Phase 1: Liquids Only (Day 1)
Stick to cool or lukewarm liquids. Avoid hot beverages as they can increase blood flow and dissolve the clot.
-
Recommended: Water, cool broths, apple juice, milk, protein shakes (eaten with a spoon, not a straw), lukewarm herbal tea, unsweetened yogurt, smoothies (without seeds), and nutritional supplement drinks (Ensure, Boost).
-
Avoid: Carbonated drinks, coffee, hot tea, alcohol, and anything acidic like orange juice.
Phase 2: Soft, Nutrient-Dense Foods (Days 2-7)
As tenderness permits, you can introduce soft, bland foods that require minimal chewing.
-
Recommended:
-
Dairy: Scrambled eggs, cottage cheese, soft cheeses, pudding, sugar-free ice cream or gelato.
-
Grains: Oatmeal, cream of wheat, mashed potatoes, well-cooked pasta, pureed soups.
-
Protein: Mashed bananas, applesauce, avocado, hummus, flaky fish, tofu, Greek yogurt.
-
-
Key Nutrients: Focus on foods high in protein (for tissue building), Vitamin C (for collagen formation), Vitamin A (for cell growth), Zinc (for immune function), and Calcium (for bone health).
Phase 3: Gradual Reintroduction of Solid Foods (Week 2+)
You can slowly begin to add more solid foods as your comfort level allows. Start with tender, easy-to-chew options and continue to avoid chewing directly on the extraction site.
-
Recommended: Steamed vegetables, soft-cooked meats like chicken or meatballs, soft bread, rice.
-
Foods and Beverages to Strictly Avoid (for at least 7-10 days):
-
Crunchy & Sharp: Chips, nuts, popcorn, pretzels (can break into sharp pieces and get lodged).
-
Chewy: Steak, bagels, chewy candy.
-
Spicy & Acidic: Hot sauce, citrus fruits (can irritate the wound).
-
Extremely Hot: Soup, coffee (can disrupt clot).
-
Alcohol: Impairs healing and can interact with medications.
-
9. Conclusion: Your Partner in a Successful Recovery
A successful tooth extraction recovery is an active partnership between you and your dental professional, guided by knowledge and careful attention. By understanding the biology of healing, adhering to dietary and hygiene protocols, and respecting your body’s need for rest, you empower yourself to navigate this journey with confidence. Remember, patience is not passive; it is the conscious practice of allowing the intricate and powerful processes of your body to work their magic, layer by layer, day by day, until healing is complete.
10. Frequently Asked Questions (FAQs)
Q1: When can I stop worrying about dry socket?
A: The risk of dry socket is highest in the first 3-5 days after the extraction. After one week, the granulation tissue is usually well-formed and stable, and the risk drops significantly.
Q2: Is it normal to see white tissue in the socket?
A: Yes, in most cases. Around 3-5 days post-extraction, you may notice a white or yellowish material in the socket. This is often fibrin, a protein involved in clotting, or the formation of granulation tissue. It is a normal part of healing and should not be mistaken for pus. Pus is usually accompanied by increasing pain, swelling, a foul taste, and fever.
Q3: How long will the numbness last after the procedure?
A: The numbness from local anesthetic typically wears off within 2-4 hours. If you experience prolonged numbness (paresthesia) lasting days or weeks, it could indicate nerve irritation during the procedure. This is more common with wisdom tooth extractions and should be reported to your dentist, though it often resolves on its own slowly.
Q4: When can I resume my normal workout routine?
A: Avoid strenuous exercise and heavy lifting for at least 5-7 days. Elevated blood pressure and heart rate from exertion can cause throbbing pain, increase swelling, and potentially disrupt the blood clot. Light walking is encouraged.
Q5: My stitches are coming out. Is this a problem?
A: It depends on the type of stitches. Dissolvable stitches typically begin to loosen and fall out on their own within 3-7 days, which is perfectly normal. If you have non-dissolvable stitches, they will need to be removed by your dentist at your follow-up appointment, usually after 7-10 days. If non-dissolvable stitches fall out early, contact your dentist.
11. Additional Resources
-
American Dental Association (ADA) – MouthHealthy: Provides patient-friendly information on a wide range of oral health topics, including extractions. https://www.mouthhealthy.org/
-
American Association of Oral and Maxillofacial Surgeons (AAOMS): An excellent resource for more complex procedures like wisdom tooth extractions and implant surgery. https://www.aaoms.org/
-
Journal of the American Dental Association (JADA): For those interested in the clinical and scientific research behind dental procedures and healing. https://jada.ada.org/
-
Your Dentist’s Patient Portal: Always your first and most important resource. Many practices provide detailed post-operative instructions and a direct line for questions via their online portals.
Date: September 18, 2025
Author: The Editorial Team at Apex Oral Health
Disclaimer: This article is intended for informational purposes only and does not constitute medical advice. Always follow the specific instructions provided by your dentist or oral surgeon and consult with them for any health concerns or before making any decisions related to your treatment or recovery.