How Many Phases in Dental Implant? A Complete Step-by-Step Guide
If you are considering replacing a missing tooth, you have probably heard that dental implants are the gold standard. But when you start researching the process, things can get confusing quickly. You hear words like “abutment,” “osseointegration,” and “healing cap.” It feels overwhelming.
So, let us answer the big question right away: How many phases are there in a dental implant?
Generally, a standard dental implant procedure involves three main clinical phases. However, depending on your bone health and medical history, some dentists break it down into four distinct stages.
Think of it like building a house. You need a strong foundation, the walls, and finally the interior decoration. Dental implants work the same way. In this guide, we will walk through every single phase in plain English. No confusing medical jargon. Just honest, clear information to help you understand what happens before, during, and after surgery.
The Big Picture: Why Phases Matter
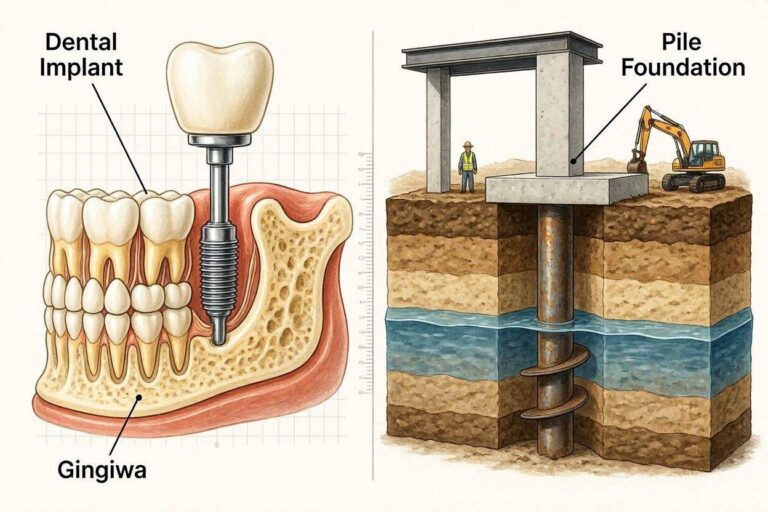
Dental implants are not like getting a filling. You do not walk in and walk out with a new tooth in one hour (despite what some advertisements say). Implants require a biological process. Your jawbone needs time to grow around the titanium screw. This process is called osseointegration, and it takes patience.
By breaking the treatment into phases, your dentist can:
- Ensure the implant fuses correctly with the bone.
- Adjust the treatment if something goes wrong.
- Give your mouth time to heal between major steps.
Important note for readers: Every mouth is different. Some people heal faster. Others need extra steps like bone grafting. The phases below represent the ideal journey. Your personal timeline may vary slightly, and that is perfectly normal.
Phase 0: The Initial Consultation and Treatment Planning
Before we count the surgical phases, we must talk about the planning stage. Many guides skip this, but it is the most critical part.
During this pre-phase, your dentist does not touch your teeth yet. Instead, they gather information. You will likely receive:
- Digital X-rays (Panoramic): To see the roots of neighboring teeth and the nerves in your jaw.
- CBCT Scan (3D imaging): This is the gold standard. It shows the exact height and width of your bone.
- Medical history review: Conditions like uncontrolled diabetes or heavy smoking affect success rates.
Do you need bone grafting?
This is where the dentist decides if you need a “Phase 0.5.” If you have lost bone due to gum disease or long-term tooth loss, you may need a bone graft. This adds 3 to 6 months to your overall timeline.
Quote from a restorative dentist: “Skipping the planning phase is like building a bridge without measuring the river. The scans tell us exactly how many phases and how much time the patient needs.”
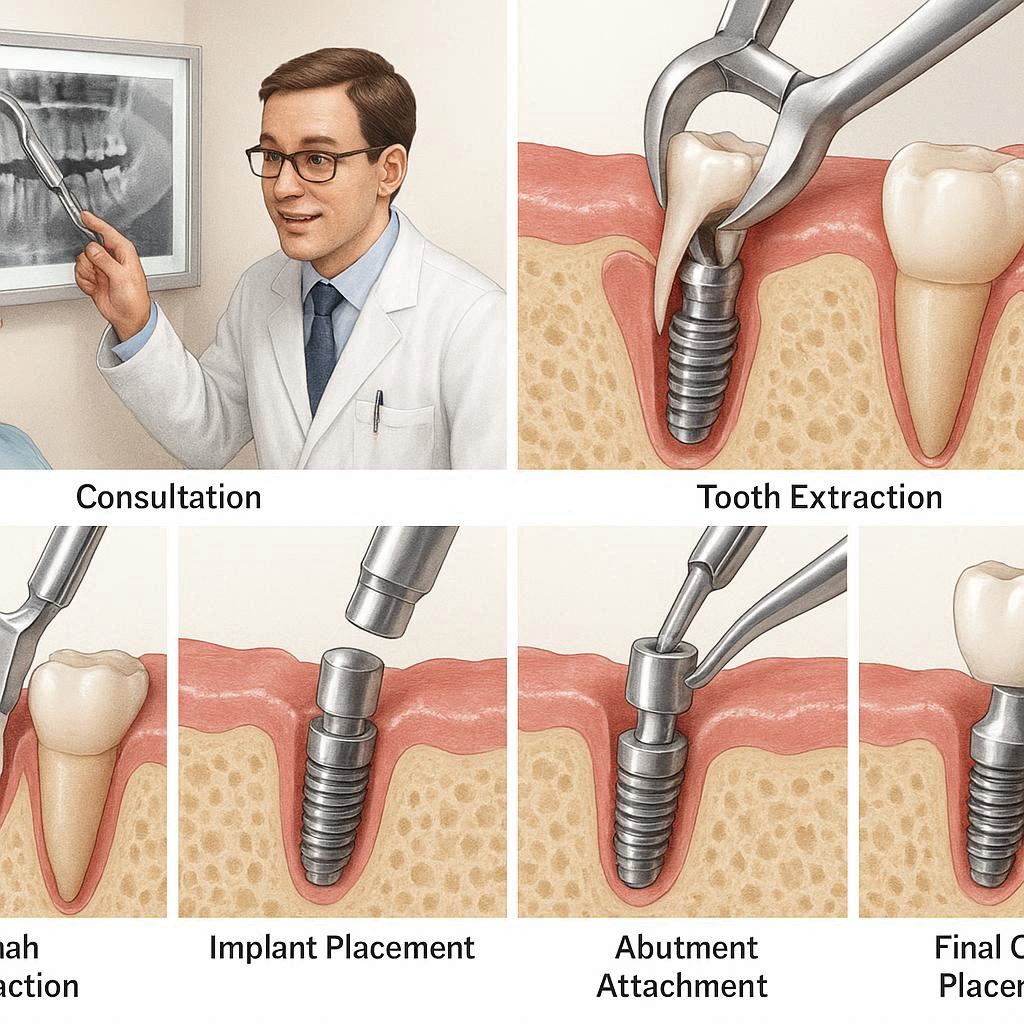
Phase 1: The Surgical Placement (Tooth Root Replacement)
This is the first official surgical phase. It is the day you get the titanium screw placed into your jawbone.
What happens during this visit?
- Anesthesia: The area is numbed completely. You can also opt for sedation if you feel anxious.
- Incision: The dentist makes a small cut in your gum to expose the bone.
- Drilling: A precise series of drills prepares the hole in the bone.
- Placement: The titanium implant is screwed into place.
- Covering: A healing cap or cover screw is placed on top, and the gum is stitched closed.
How long does this phase take?
The surgery itself takes between 30 and 60 minutes for a single tooth. For multiple implants, it might take 2 hours.
What do you feel?
You should feel pressure but not pain. You will hear drilling and tapping sounds. That is normal. After the numbness wears off, you will feel soreness similar to a tooth extraction.
Immediate recovery (First 7-14 days)
- Stick to soft foods (yogurt, soup, smoothies).
- Do not spit or use a straw (this dislodges the blood clot).
- Use ice packs on your cheek to reduce swelling.
Phase 2: Osseointegration (The Waiting Game)
Technically, this is not a “surgical phase” because the dentist is not doing anything active. But it is the most important biological phase. You must wait for the bone to grow onto the surface of the implant.
How long is this phase?
- Lower jaw: Usually 3 to 4 months.
- Upper jaw: Usually 4 to 6 months (the bone is softer here).
During this time, you will walk around with a gap in your smile or a temporary partial denture. You must avoid putting heavy chewing pressure directly on the implant site.
Signs of successful integration
- No mobility in the implant.
- No pain when tapping the area.
- Healthy pink gums with no bleeding.
| Factor | Speeds up healing | Slows down healing |
|---|---|---|
| Health | Non-smoker, controlled diabetes | Heavy smoker, uncontrolled diabetes |
| Bone quality | Dense jawbone | Soft or low-density bone |
| Medication | None | Bisphosphonates (bone meds) |
| Location | Front lower jaw | Back upper jaw |
Phase 3: Abutment Connection (Uncovering the Implant)
Once osseointegration is confirmed (via X-ray or physical exam), you enter the second surgical phase. Some modern “one-stage” implants skip this step, but for most traditional implants, this is necessary.
What is an abutment?
An abutment is a small connector piece. It sits on top of the implant and holds your future crown. Think of it as the “neck” of the tooth.
The procedure (Usually 15-30 minutes)
- Numbing: Local anesthesia is applied.
- Re-opening: The dentist makes a tiny hole in the gum to expose the top of the implant.
- Removing the cover screw: The small screw protecting the implant is taken out.
- Placing the abutment: The abutment is screwed into the implant.
- Healing: The gum tissue is sutured around the abutment, not over it. This trains the gums to form a nice collar (like a turtleneck) around the future tooth.
Do you need a second surgery?
Yes, this counts as a minor surgery. However, it is much less intense than Phase 1. Most patients say the discomfort is mild, like a day of gum soreness.
Healing time for Phase 3
The gums need about 2 to 4 weeks to heal around the abutment before the dentist can take impressions for the final crown.
Phase 4: The Restoration (Placing the Final Tooth)
This is the exciting phase. You finally get your tooth! This phase is purely prosthetic (restorative). There is no surgery involved unless you count impressions as surgery (you do not).
Step-by-step for the final crown
- Impression: The dentist takes a digital scan or a putty mold of your abutment. This goes to a dental lab.
- Laboratory work: A technician builds your custom crown. They match the color, shape, and size to your natural teeth. This takes 2 to 3 weeks.
- Try-in: You come back to the office. The dentist places the crown on the abutment without cementing it. You check the bite and the color.
- Final placement: Once you are happy, the dentist cements or screws the crown permanently onto the abutment.
What does the crown feel like?
It should feel exactly like a natural tooth. You should be able to floss around it (though flossing is different—you use a special threader or a water flosser).
Is this the last phase?
Yes. Once the crown is cemented, the treatment is complete. However, you enter a “maintenance phase” for life. This means regular check-ups every 6 months to check the tightness of the screw and the health of the gum.
Summary Table: The 4 Phases at a Glance
| Phase | Name | Duration of Step | Healing Time | Pain Level (1-10) |
|---|---|---|---|---|
| 1 | Implant Placement | 30-60 min | 3-6 months | 4-6 (first 3 days) |
| 2 | Osseointegration | (Passive wait) | 3-6 months | 0 (No pain) |
| 3 | Abutment Connection | 15-30 min | 2-4 weeks | 2-3 |
| 4 | Crown Restoration | 30 min (2 visits) | None | 0 |
Special Cases: When There Are More Than 4 Phases
Sometimes, the answer to “how many phases in dental implant” is 5 or 6. This happens when your mouth needs extra preparation.
Case 1: Bone Grafting (Adds 1 phase)
If you have significant bone loss, Phase 0 becomes a real surgical phase. The dentist takes bone from a donor or a synthetic source and packs it into the socket. You wait 4 to 9 months for new bone to grow before you can do Phase 1.
Case 2: Sinus Lift (Upper back teeth)
The upper back jaw (molars) sits right below your sinus cavity. If there is not enough bone height, the dentist must lift the sinus membrane and pack bone under it. This adds a dedicated phase of 6 to 12 months.
Case 3: Immediate Loading (Fewer phases)
Some specific cases allow for “Teeth-in-a-Day.” Here, Phases 1, 3, and 4 happen in one appointment. The implant is placed, an abutment is attached, and a temporary crown is screwed on immediately. However, you cannot bite with that tooth for 6 months. This is only for patients with excellent bone density.
Warning: Do not let a dentist promise you a permanent tooth in one day unless you fully understand the risks. Immediate loading has a higher failure rate than the traditional phased approach.
A Realistic Timeline: From Start to Finish
Let us put all the phases together into a realistic calendar for a standard patient (no bone graft).
- Month 1, Week 1: Consultation, X-rays, and CT scan.
- Month 1, Week 2: Phase 1 – Implant placement surgery.
- Month 1 to Month 4: Phase 2 – Healing and osseointegration. You wear a flipper (temporary plastic tooth) if needed.
- Month 4, Week 1: Phase 3 – Abutment connection surgery.
- Month 4, Week 3: Healing complete around abutment.
- Month 4, Week 4: Impressions for the crown.
- Month 5, Week 2: Phase 4 – Final crown placement.
Total time: Approximately 5 to 6 months for a lower tooth. 7 to 8 months for an upper tooth.
Practical Tips for Each Phase
Navigating these phases successfully requires good habits. Here is a helpful list for each stage.
During Phase 1 (Surgery week)
- Stock up on mashed potatoes, protein shakes, and scrambled eggs.
- Sleep with your head elevated for the first 3 nights to reduce swelling.
- Take prescribed antibiotics exactly as directed.
During Phase 2 (The waiting months)
- Do not chew ice or hard candy on the implant side.
- Use a soft-bristled toothbrush.
- If you grind your teeth at night, ask for a night guard. Grinding can shake the implant loose during healing.
During Phase 3 (Abutment recovery)
- The abutment is metal and might be visible if you smile wide. Do not worry. The crown will cover it.
- You might feel a “tapping” sensation when you touch the abutment with your tongue. This is normal.
During Phase 4 (Final crown)
- Test the bite carefully. If the crown feels too high, tell the dentist immediately. A high bite can cause jaw pain.
- Ask for a copy of your implant warranty. Most good implants have a lifetime warranty on the screw.
Frequently Asked Questions (FAQ)
1. Can I do all phases in one day?
No, not for a standard implant. While “immediate load” implants exist, they are rare and risky. For most people, the bone needs 3-6 months of healing. Rushing this leads to failure.
2. Which phase hurts the most?
Phase 1 (the initial placement) causes the most post-operative soreness. However, most patients say it hurts less than a tooth extraction. Phase 3 (abutment) is much easier.
3. How long do I have to wait between Phase 3 and Phase 4?
Usually 2 to 4 weeks. This allows the gum tissue to mature and form a tight seal around the abutment. If the dentist takes the impression too early, the crown might not fit snugly, allowing bacteria to enter.
4. What happens if I skip Phase 2 healing?
The implant will fail. If you put a crown on an implant that has not fused to the bone, chewing forces will break the microscopic bone connection. The implant will become loose and fall out.
5. Are the phases different for full mouth implants (All-on-4)?
Yes. For full arch replacements (all teeth on top or bottom), the phases are condensed. You usually get a fixed temporary bridge on the same day as surgery (Phase 1 and 3 combined). Then you wait 6 months for a permanent bridge (Phase 4). But the concept of “healing time” remains the same.
6. Can I wear temporary teeth during Phase 2?
Yes. Most dentists provide a “flipper” (removable partial denture) or a temporary bridge. However, you must remove it at night and keep it very clean so it does not trap plaque against the healing implant.
Risks and Honest Realities
Let us be honest. Implants are highly successful (over 95% after 10 years), but things can go wrong.
- Peri-implantitis: This is gum disease around the implant. It happens if you skip cleanings. It is not reversible like natural tooth gum disease. It requires special treatment.
- Screw loosening: Over years, the tiny abutment screw can loosen. This is not a failure. The dentist simply tightens it in 5 minutes.
- Failed osseointegration: In about 5% of cases, the bone rejects the implant during Phase 2. You will know because the implant feels wobbly or hurts when pressed. The dentist removes it, lets the bone heal (2 months), and tries again.
Note from the author: Do not panic if you need a second try. Failed implants are usually due to hidden infections or smoking. If you quit smoking and treat the infection, the second attempt almost always works.
How to Reduce the Number of Phases (Speed Up Healing)
You cannot skip phases, but you can make them shorter.
- Stop smoking. Smokers have a 15% higher failure rate. If you quit 2 weeks before surgery and stay quit for 4 months, your healing time may drop by 1 month.
- Take Vitamin D and Calcium. Strong bones fuse faster. Ask your dentist for a blood test to check your Vitamin D levels.
- Avoid NSAIDs like Ibuprofen. Believe it or not, high doses of ibuprofen can slow down bone healing. Use Tylenol (acetaminophen) for pain instead, unless your dentist says otherwise.
Conclusion: Your Roadmap to a New Tooth
Understanding how many phases in a dental implant gives you control over your treatment. To summarize the journey:
- Three to four phases are standard: Placement, Healing (osseointegration), Abutment, and Crown.
- Plan for 5 to 8 months from the first consultation to the final bite.
- Patience during Phase 2 is the secret to a lifelong tooth. Do not rush the bone healing.
You are not just buying a tooth. You are investing in a process that mimics nature. When done correctly, following these phases strictly, your dental implant will last 20, 30, or even 50 years. Take it one phase at a time, follow your dentist’s instructions, and you will smile confidently for decades to come.
Additional Resource
For a deeper understanding of how to care for your implant after the final phase, read the official patient guide from the American Academy of Implant Dentistry (AAID). They offer free PDF downloads on home care and maintenance.
👉 Click here to visit the AAID patient education library (Opens in a new tab – Safe and official resource)