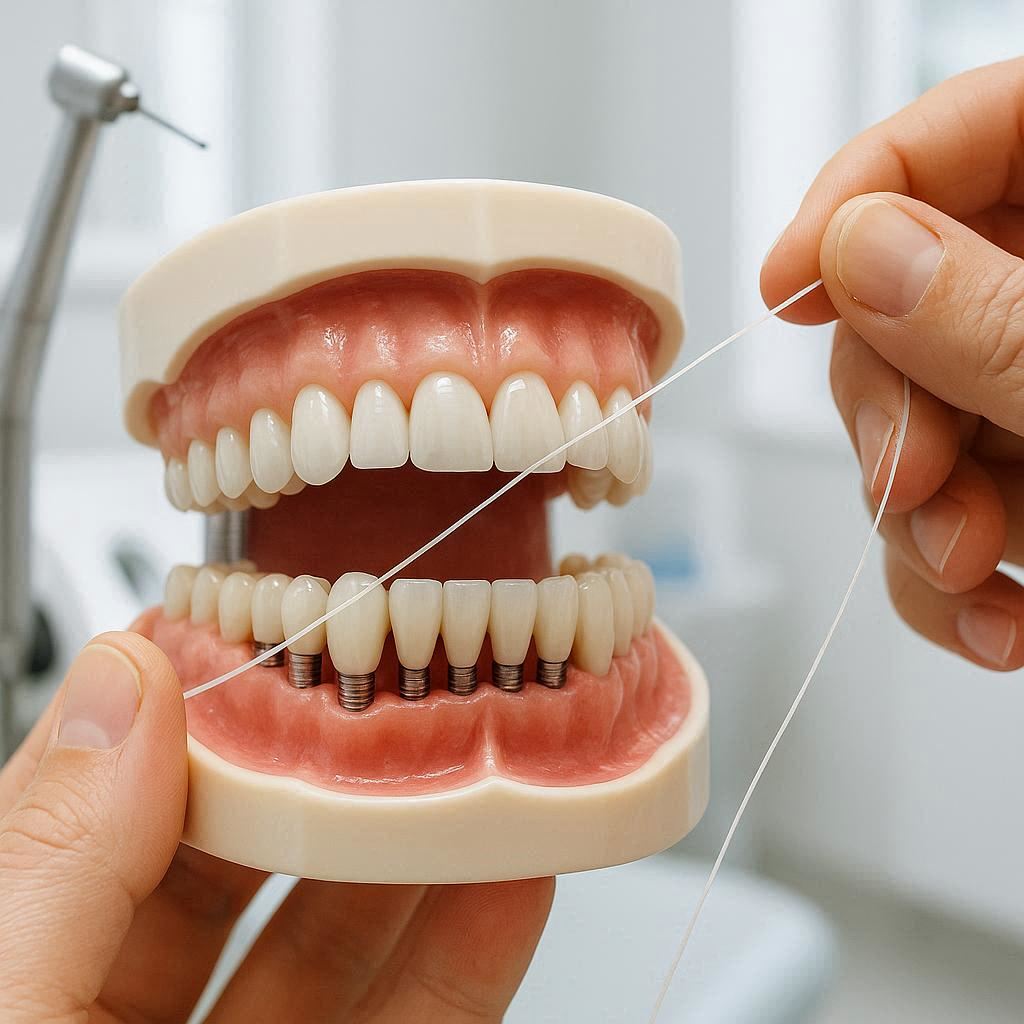
How to Floss Full Dental Implants
You have invested time, money, and hope into your full dental implants. They have changed your life. You can eat an apple again. You can smile without hesitation.
But here is the honest truth no one tells you in the recovery room. Implants can fail. Not because of the surgery. Not because of the bone. But because of something much simpler. Neglected cleaning.
Flossing full dental implants is not the same as flossing natural teeth. The rules are different. The tools are different. And the stakes are much higher.
This guide walks you through every step. No confusing dental jargon. No unrealistic promises. Just practical, honest advice you can use starting today.
Why Flossing Full Dental Implants Is Different from Natural Teeth
Natural teeth have a ligament. This soft tissue acts like a tiny shock absorber. It connects the tooth root to the jawbone. It also provides a natural seal against bacteria.
Dental implants do not have this ligament. The implant fuses directly to the bone. This process is called osseointegration. It makes the implant incredibly strong. But it also creates a weak point.
That weak point is the gum tissue around the implant. Without a ligament, the gum does not attach as tightly. Bacteria can sneak into this tiny space. Over time, this causes a condition called peri-implantitis. Think of it like gum disease, but for implants. It can destroy the bone around your implant. And once the bone is gone, the implant becomes loose.
Flossing is your main defense. But you cannot use regular floss the regular way. You need specific techniques and tools.
Essential Tools for Cleaning Full Dental Implants
Before we talk about technique, let us talk about your toolkit. Using the wrong tool is worse than not flossing at all. It can damage the implant surface or leave bacteria behind.
Here is a comparison of the most common tools. Keep this table handy.
| Tool | Best For | Avoid If | How Often to Replace |
|---|---|---|---|
| Super floss (spongy floss) | Wide spaces between implants | Tight contacts between teeth | After each use (single-use sections) |
| Interdental brushes | Larger gaps and under fixed bridges | Very narrow spaces | Every 5-7 days or when bristles fray |
| Water flosser (oral irrigator) | Overall gum health and hard-to-reach areas | Low water pressure at home | Tip every 3-6 months |
| Implant-specific floss (PTFE) | Tight spaces without scratching | You have a fixed full-arch bridge | After each use |
| Floss threaders | Getting floss under a fixed bridge | Single crowns with normal gaps | After each use (floss) |
Important note: Never use metal picks or sharp instruments around your implants. They can scratch the titanium surface. Scratches become hiding spots for bacteria. No amount of flossing removes bacteria from a scratched surface.
Your Starter Kit for Full Dental Implants
If you have a full set of implant-supported teeth (like a fixed bridge or All-on-4), you need these three items:
- Super floss – The thick, spongy section cleans wide spaces. The regular floss section threads under bridges.
- Interdental brushes – Choose the smallest size that fits without force. You should feel gentle resistance, not pain.
- Water flosser – This is not optional for full implants. It is essential. More on this below.
Step-by-Step: How to Floss Full Dental Implants Correctly
Let us divide this section based on the type of implant restoration you have. The technique changes depending on whether you have single implants, a fixed bridge, or a removable overdenture.
For Single Dental Implants (One Crown)
A single implant crown looks like a natural tooth. But the space between the crown and the adjacent teeth is often tighter. Regular floss can shred or get stuck.
What you need: PTFE floss (slippery, tape-like) or super floss.
The correct technique:
- Wash your hands thoroughly.
- Cut about 18 inches of floss.
- Wrap the ends around your middle fingers. Leave two inches to work with.
- Gently guide the floss between the implant crown and the natural tooth.
- Do not snap the floss down. Slide it slowly.
- Once the floss passes the contact point, curve it into a C-shape against the side of the implant crown.
- Slide the floss up and down, going slightly below the gumline. You should feel a small pocket. That is normal.
- Lift the floss out through the side. Do not snap it back up.
- Repeat on the other side of the implant.
Common mistake: Using a sawing motion. This cuts the gum tissue and creates inflammation. Use a gentle up-and-down movement.
For Fixed Full-Arch Implant Bridges (All-on-4, All-on-6)
This is where most people struggle. A fixed bridge replaces an entire arch of teeth. It does not come out. You cannot remove it for cleaning. The space between the bridge and the gum is often very tight.
You need a combination approach. Flossing alone is not enough. Here is the complete daily routine.
Step 1: Rinse with Water Flosser First
Before you insert any floss or brush, use a water flosser on the lowest pressure setting. Aim the tip at a 90-degree angle to the bridge. Gently trace the gumline where the bridge meets the tissue.
Do this for two minutes. Use warm water. It feels better and reduces sensitivity.
Step 2: Thread the Floss Under the Bridge
Take a floss threader. It looks like a plastic needle with a large eye. Push the threader under the bridge from the cheek side to the tongue side. Pull the floss through until you have equal lengths on both ends.
Now you have floss wrapped around the implant pillar. This is the part that comes through the gum.
Step 3: Clean Each Implant Pillar
Wrap the floss around one side of the pillar. Make a C-shape. Slide it up and down three to four times. Go slightly below the gumline. Repeat on the other side of the same pillar.
Move to the next pillar. Use a fresh section of floss each time. Do not reuse floss between pillars. You will just move bacteria around.
Step 4: Use an Interdental Brush Under the Bridge
After flossing, take the smallest interdental brush that fits under your bridge. Insert it gently. Move it back and forth two to three times. Then rotate it. This scrubs the underside of the bridge where floss cannot reach.
Step 5: Final Water Flosser Rinse
One last pass with the water flosser. This time, use a slightly higher pressure setting. Flush out everything you loosened. You will see tiny food particles in the sink. That is a good sign.
For Implant-Supported Overdentures (Removable)
If you have an overdenture that snaps onto implants, your cleaning routine is different. You remove the denture completely for cleaning.
Daily cleaning steps:
- Remove the denture. Rinse it under cool water.
- Clean the underside of the denture with a soft denture brush. Do not use regular toothpaste. It is too abrasive for the attachments.
- Use a small interdental brush or a special abutment cleaning brush to clean around each implant in your mouth. The implants stay in your jaw. The denture covers them.
- Floss between the implant abutments if there is space. Most overdenture implants are not connected. You can use super floss normally.
- Soak the denture in a denture cleaning solution for the recommended time.
- Rinse the denture thoroughly before putting it back in your mouth.
Note from the author: Never sleep with your overdenture in place. Your gums need time to recover. Sleeping without the denture reduces inflammation and prevents fungal infections.
A Realistic Daily Routine for Full Dental Implants
Let us be honest. The technique above takes time. When you first start, it might take twenty minutes. That is normal. You are learning a new skill. After two weeks, you will do it in five to seven minutes.
Here is a simplified daily checklist. Print it out. Tape it to your bathroom mirror.
Morning (3 minutes)
- Rinse with water flosser (low pressure)
- Use interdental brush under bridge (30 seconds)
- Final water flosser rinse (high pressure)
Night (7 minutes)
- Water flosser – entire arch (2 minutes)
- Thread floss under bridge
- Floss each implant pillar (3-4 minutes)
- Interdental brush under bridge (1 minute)
- Final water flosser – highest comfortable pressure (1 minute)
- Rinse mouth with non-alcoholic mouthwash (30 seconds)
Weekly (Sunday, 10 minutes)
- Same as nightly routine, plus:
- Inspect all implant areas with a small mirror
- Check for redness, swelling, or bleeding
- Replace your interdental brush
- Soak your water flosser tip in white vinegar (1 part vinegar, 3 parts water) for 30 minutes
Signs You Are Flossing Incorrectly
Your body will tell you if something is wrong. Listen to it. Here are common signs that your technique needs adjustment.
Bleeding every time you floss
- Normal for the first week. Not normal after that.
- You might be flossing too aggressively or not enough.
- See your dentist if bleeding continues beyond two weeks.
Pain during flossing
- Gentle pressure only. Sharp pain means stop.
- You might have a loose crown or an infection.
- Make an appointment.
Floss shredding or getting stuck
- Your implant crown might have a rough edge.
- The space between teeth might be too tight.
- Ask your dentist to check the crown contour.
Bad taste or bad breath that won’t go away
- This often means trapped food or bacteria.
- You are missing a spot.
- Try a smaller interdental brush.
Red, puffy gums around one implant
- Early sign of peri-implantitis.
- Do not wait. Call your dentist this week.
The Water Flosser: Your Best Friend for Full Implants
If you only buy one additional tool, buy a water flosser. It is not a replacement for flossing. It is a complement. But for full dental implants, it is almost mandatory.
Why water flossers work so well for implants:
- The water jet reaches 2-3mm below the gumline. String floss only reaches 0.5-1mm.
- It flushes out debris without scratching the implant.
- It massages the gum tissue. This improves blood flow and healing.
- It is easy to use. You do not need manual dexterity.
How to choose a water flosser for implants:
| Feature | Why It Matters |
|---|---|
| Adjustable pressure | Start low. Increase slowly over weeks. |
| Multiple tips | A soft tip or orthodontic tip works best. |
| Large reservoir | You need at least 90 seconds of continuous water. |
| Magnetic charging | No battery anxiety. Always ready. |
The correct technique with a water flosser:
- Lean over the sink. Close your lips slightly but leave a gap for water to drain.
- Start with the lowest pressure setting.
- Aim the tip at the gumline. Hold it at a 90-degree angle.
- Pause for 2-3 seconds between each tooth.
- Trace the entire arch. Then do a second pass.
- For fixed bridges, angle the tip slightly upward to reach under the bridge.
Do not use a water flosser on open wounds or right after implant surgery. Wait for your dentist’s approval. Usually four to six weeks after placement.
Common Myths About Flossing Dental Implants
Let us clear up some misinformation. You might hear these things from friends or even online forums. Most are not true.
Myth 1: “Implants don’t need flossing because they can’t get cavities.”
False. Implants do not get cavities. But they get peri-implantitis. This is worse than a cavity. A cavity is fixable. Bone loss around an implant often is not.
Myth 2: “A water flosser is enough by itself.”
False. Water flossers are excellent. But they do not remove biofilm completely. Biofilm is the sticky layer of bacteria. You need mechanical disruption from floss or a brush.
Myth 3: “You only need to floss once a week.”
Dangerously false. Bacteria regrow every 24 hours. If you skip a day, you let bacteria build a stronger colony. Floss daily. No exceptions.
Myth 4: “Bleeding means you should stop flossing.”
False for the first week. True after that. Initial bleeding means inflammation is present. Gentle flossing actually stops the bleeding over time. But if bleeding continues for two weeks, see your dentist.
Myth 5: “Any floss works fine.”
False. Waxed floss can leave waxy residue on implants. Unwaxed floss shreds. Use PTFE floss or super floss specifically.
Troubleshooting Common Problems
You will face obstacles. Everyone does. Here is how to solve the most common issues.
Problem: I cannot get floss between my implants. The space is too tight.
Solution: Ask your dentist to check the contact point. Sometimes the crowns are too tight. A small adjustment fixes this. In the meantime, use a water flosser on high pressure and an extra-fine interdental brush.
Problem: Floss always shreds when I try to remove it.
Solution: You are pulling the floss back through the contact point. Do not do this. Instead, release one end of the floss and pull it out through the side. This is called a “floss out” technique.
Problem: My gums hurt for hours after flossing.
Solution: You are using too much pressure or the wrong tool. Switch to super floss. It is softer. Reduce pressure by half. If pain continues, see your dentist. You might have an ill-fitting crown.
Problem: I have arthritis and cannot hold floss easily.
Solution: Use floss holders or floss picks designed for implants. Better yet, focus on interdental brushes and a water flosser. Many people with dexterity issues do well with a countertop water flosser and pre-threaded flossers.
Problem: I have a gag reflex when flossing the back implants.
Solution: Try different positions. Stand up. Lean slightly forward. Breathe through your nose. Use flavored floss (mint or cinnamon) to distract your brain. Start with the front teeth. End with the back. Over time, your reflex will calm down.
How Often Should You See Your Dentist?
Flossing at home is not enough. You need professional monitoring. Here is a realistic schedule.
Every 3 to 4 months:
- Professional cleaning around implants
- Your hygienist uses special plastic or titanium instruments
- They check pocket depths around each implant
- Healthy pockets are 3mm or less. 4mm needs monitoring. 5mm or more needs treatment.
Once per year:
- X-rays to check bone levels
- Your dentist compares new X-rays to old ones
- Any bone loss should be 0.5mm or less per year
Immediately (do not wait for your next appointment):
- An implant feels loose
- You see pus around an implant
- You have swelling that spreads to your face or neck
- Pain when biting on the implant
Important note: Regular dental insurance often does not cover implant cleanings. Ask about pricing before you go. Many offices offer a “peri-implant maintenance” code. It costs more than a regular cleaning. It is worth every penny.
What Happens If You Do Not Floss Your Implants?
Let me be direct. This is not fear-mongering. This is reality based on dental literature and clinical experience.
Month 1-3 without flossing:
You notice nothing. Your gums might look slightly redder. No pain. Everything feels fine.
Month 4-6:
Your gums bleed when you brush. You have bad breath in the morning. Food gets stuck more often.
Month 7-12:
Pockets form around the implants. You can push a toothpick 4-5mm below the gumline. Bacteria multiply. Bone loss begins. You cannot see it. You cannot feel it. But it is happening.
Year 2-3:
X-rays show moderate bone loss. Your dentist recommends a deep cleaning. This costs several hundred dollars. You might need antibiotics placed under the gum.
Year 4-5:
One or more implants show significant bone loss. Treatment options include surgery (bone grafting) or implant removal. Removing a failed implant costs more than placing a new one. And you may not have enough bone for a replacement.
Year 5+:
Peri-implantitis. Advanced bone loss. Implants become mobile. You lose your investment. You lose the bone. You face complex reconstruction.
I have seen this happen to people who thought they were “too busy” to floss. Do not be that person.
Adapting Your Technique for Special Situations
Not everyone has the same mouth. Here are adjustments for specific needs.
If You Smoke or Use Tobacco
Tobacco reduces blood flow to your gums. This sounds bad, but it has one deceptive effect. Your gums will not bleed even when they are infected. You cannot rely on bleeding as a warning sign.
What to do:
- Floss with extra attention. Assume you have inflammation even without bleeding.
- See your dentist every 3 months, not 4.
- Consider a disclosing solution. This is a dye that stains plaque. You see exactly where you missed.
If You Have Diabetes
High blood sugar feeds bacteria. You are at higher risk for peri-implantitis. Your healing is slower. Your immune response is weaker.
What to do:
- Floss twice per day, not once.
- Use a water flosser with diluted mouthwash (1 part mouthwash, 2 parts water).
- Keep your blood sugar controlled. This is the single most important factor.
- Tell your hygienist about your A1C levels before each cleaning.
If You Have a Strong Gag Reflex
This is more common than people admit. You are not alone.
What to do:
- Floss while watching television. Distraction helps.
- Use a smaller floss threader. The larger ones trigger the reflex.
- Try flossing in the shower. The warm water relaxes your throat.
- Breathe out slowly through your mouth while flossing the back teeth.
- Ask your dentist about desensitization techniques.
If You Care for Someone Else’s Implants
Maybe you help an aging parent or a partner with limited mobility. This requires patience.
What to do:
- Have the person lie down with their head tilted back. This opens the mouth naturally.
- Use a headlamp or bright light. You need to see what you are doing.
- Use a water flosser first. It is less invasive than string floss.
- Work in sections. Do the left side. Take a break. Do the right side.
- Never force anything. If the person winces, stop and adjust.
Product Recommendations (What Actually Works)
I do not endorse specific brands. But I can tell you what features matter. Use this as your shopping guide.
Super Floss:
Look for “spongy floss” or “implant floss” in the package. The thick section should be soft, not scratchy. Oral-B Super Floss is the most common. Generic versions work if they have the same three-part design (stiff end, spongy section, regular floss).
Interdental Brushes:
Choose stainless steel wire with plastic coating. Never use uncoated wire. The brand does not matter. The size matters. Buy a variety pack. Use the smallest that fits without bending the wire.
Water Flosser:
Countertop models have more power than cordless ones. If you have counter space, buy a countertop model. Look for at least 10 pressure settings. The Waterpik brand is the most researched. But cheaper brands work if they have adjustable pressure and a Pik Pocket tip.
Floss Threaders:
These are all similar. Buy the cheapest. They break often. Keep a backup pack.
Mouthwash:
Avoid alcohol. Alcohol dries the mouth. Dry mouth means more bacteria. Look for cetylpyridinium chloride or essential oils (Listerine Zero is alcohol-free). Prescription chlorhexidine is for short-term use only. Do not use it daily.
A Note on Cost vs. Value
Let us talk money. This is uncomfortable but necessary.
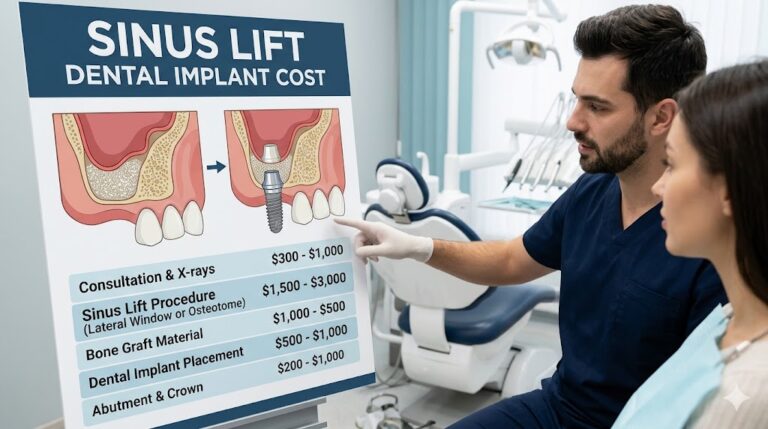
A full set of dental implants costs between $20,000 and $50,000 per arch. Sometimes more.
A pack of super floss costs $5.
A water flosser costs $40 to $100.
A professional implant cleaning costs $150 to $300, four times per year.
If you skip flossing, you risk losing a $5,000 implant. Replacing that implant costs another $5,000 to $8,000. And that is if you have enough bone. Often, you do not.
Flossing is not expensive. Not flossing is expensive.
Think of your floss as insurance. Five minutes per day protects a fifty-thousand-dollar investment. That is a return on investment that Wall Street cannot beat.
Frequently Asked Questions (FAQ)
Q: Can I use a regular toothbrush on my implants?
Yes, but use a soft-bristled brush. Medium or hard bristles scratch the implant crown. Scratching leads to plaque buildup. Replace your toothbrush every three months.
Q: How do I know if I am flossing correctly?
Your gums should look pink and feel firm. They should not bleed. You should not feel pain. If you are unsure, ask your hygienist to watch you floss at your next appointment. They will correct your technique in thirty seconds.
Q: What if I miss a day of flossing?
Do not panic. Miss one day? Floss extra carefully the next day. Miss three days? Use your water flosser first, then floss gently. Your gums might bleed. That is normal after a break. Resume your routine. The bleeding will stop within a week.
Q: Can flossing damage my implants?
Proper flossing does not damage implants. Improper flossing (snapping, sawing, using metal tools) can damage the gum attachment. Always be gentle. When in doubt, use less pressure.
Q: Should I floss before or after brushing?
Either is fine. But be consistent. Most dentists recommend flossing first. This loosens debris. Then brushing removes it. Then mouthwash rinses everything away. That is the ideal order.
Q: My dentist said I do not need to floss under my fixed bridge. Is that true?
No. That is incorrect advice. Every fixed bridge on implants requires cleaning underneath. If your dentist said this, ask for clarification. Some very low-profile bridges have no space for floss. In that case, you need a water flosser and interdental brushes exclusively. But “no floss needed” is never true.
Q: How long does it take to become good at flossing implants?
Most people feel comfortable after two weeks. After one month, it becomes automatic. After three months, you can do it in the dark. Be patient with yourself in the beginning.
Q: What is the single biggest mistake people make?
Using too much force. People think harder means cleaner. The opposite is true. Gentle, consistent pressure is more effective. Imagine you are flossing a ripe strawberry. That is the right amount of pressure.
Additional Resource
For a visual demonstration of proper implant flossing technique, the American Dental Association maintains a free patient education library. Visit MouthHealthy.org and search for “implant flossing.” You will find short, clear videos showing each step. No registration required.
Conclusion
Learning how to floss full dental implants correctly takes a few minutes of practice and a lifetime of consistency. Use super floss or PTFE floss daily, add a water flosser for deep cleaning, and never skip your professional maintenance appointments. Your implants can last thirty years or more. The difference between success and failure is often just five minutes of gentle, thorough cleaning each night. Protect your smile. Protect your investment. Floss today.