Dental Implants for Bottom Dentures
If you are reading this, you probably know the feeling. Your bottom denture clicks when you talk. It shifts when you eat. You might have stopped ordering salads or apples in restaurants. You are not alone.
Millions of people struggle with traditional lower dentures every day. The good news is that dental implants for bottom dentures have changed the game. They offer a real solution to a very frustrating problem.
But let us be clear. This is not a magic trick. It is a medical procedure with real benefits, real costs, and real recovery time. This guide will give you everything you need to know. No fluff. No false promises. Just honest, practical information to help you make the right choice.
We will cover how implants work, who is a good candidate, what the surgery feels like, how much you should expect to pay, and what life looks like after healing.
Why Bottom Dentures Are So Difficult
Traditional bottom dentures have a tough job. Your tongue is a strong muscle. It moves constantly. It pushes against the lower denture while you speak, eat, and swallow.
Your upper denture has a natural advantage. It gets suction from the roof of your mouth. That suction holds it in place fairly well.
Your lower jaw is different. It has less surface area. There is no roof for suction. Saliva and tongue movement work against the denture. This is why lower dentures often feel loose, even when they are made perfectly.
Common Complaints We Hear
- The denture floats up during a meal
- Clicking sounds when speaking
- Sore spots on the gums
- Difficulty tasting food
- Feeling embarrassed in social settings
- Avoiding healthy, crunchy foods
These problems are not signs of weakness or poor adjustment. They are mechanical limitations of traditional lower dentures. Your body is working as designed. The denture is fighting against nature.
“I wore a regular lower denture for twelve years. I never felt secure. I stopped smiling in photos. Getting implants gave me my confidence back. It is not perfect, but it is night and day better.” — Richard, 67, Florida
What Are Dental Implants for Bottom Dentures?
Let us start with a clear definition.
Dental implants are small posts made of titanium. A surgeon places these posts into your jawbone. Over time, your bone grows around the titanium. This creates a strong, permanent anchor.
When we talk about implants for bottom dentures, we are not talking about replacing each missing tooth with a separate crown. That is possible, but it is very expensive and rarely necessary for a full arch.
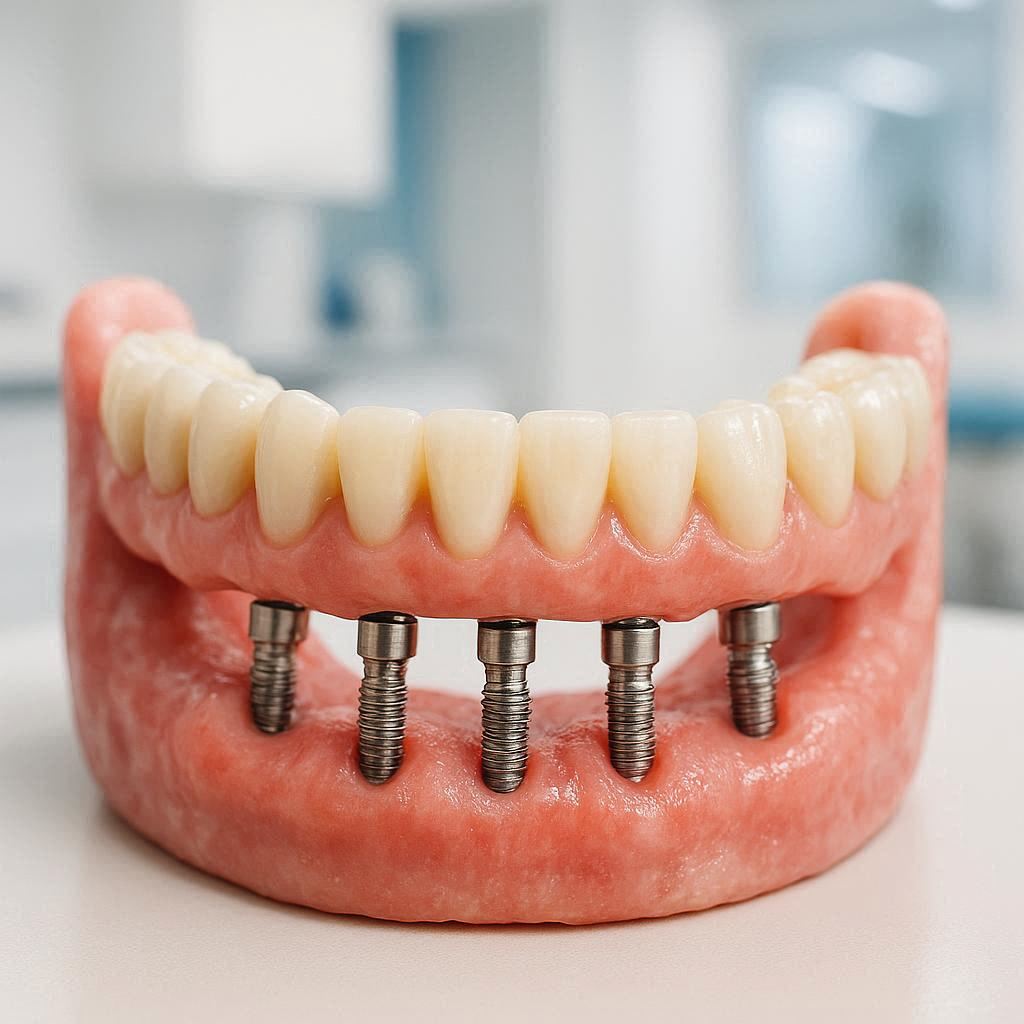
Instead, most people get two to six implants on the bottom jaw. Those implants connect to a bar or ball attachments. Your denture then snaps or screws onto those attachments.
Think of it like this. Your denture becomes a removable appliance that locks into fixed anchors. It does not float. It does not rock. It stays put until you remove it for cleaning.
The Basic Components
| Component | Role | Material |
|---|---|---|
| Implant post | Screws into jawbone | Titanium or zirconia |
| Abutment | Connects post to denture | Titanium or gold alloy |
| Locator attachment | Snaps denture into place | Nylon or plastic |
| Denture base | Holds replacement teeth | Acrylic resin |
| Reinforcement bar (optional) | Connects multiple implants | Metal alloy |
Types of Implant-Supported Bottom Dentures
Not all implant dentures are the same. You have options. Each option has different costs, benefits, and maintenance needs.
1. Two-Implant Overdenture
This is the most common and most affordable option. Two implants go into the front of your lower jaw. Your denture snaps onto ball or locator attachments.
Best for: People with healthy bone in the front of the jaw. Those on a tighter budget who still want real stability.
Pros:
- Lower cost (usually 3,000–7,000 per arch)
- Simple surgery
- Easy to clean
- Can upgrade later
Cons:
- Less stability than more implants
- Denture may still move slightly in back
- Attachments wear out every 1–2 years
2. Four-Implant Overdenture (Bar-Retained)
Four implants support a thin metal bar. Your denture clips onto this bar. The bar distributes pressure evenly across all four implants.
Best for: People with moderate bone density. Those who want strong stability without a fixed bridge.
Pros:
- Very stable
- Even pressure distribution
- Denture can be removed for cleaning
- Long lifespan
Cons:
- More expensive (7,000–12,000)
- Bar requires professional cleaning
- Slightly bulkier denture base
3. Six or More Implants (Fixed Hybrid)
Six or more implants support a fixed bridge. You cannot remove this yourself. Your dentist removes it once a year for professional cleaning.
Best for: People with excellent bone density. Those who want the closest experience to natural teeth.
Pros:
- Rock-solid stability
- No rocking or movement
- Natural chewing power
- No adhesive needed ever
Cons:
- Highest cost (15,000–30,000+)
- Complex surgery
- Harder to clean between appointments
- Requires significant bone volume
Comparison Table: Which Option Fits Your Life?
| Feature | 2 Implants | 4 Implants | 6+ Implants (Fixed) |
|---|---|---|---|
| Removable by you | Yes | Yes | No (dentist only) |
| Relative stability | Good | Very good | Excellent |
| Average chewing force | 50–70% of natural | 70–85% of natural | 90%+ of natural |
| Need for adhesive | No | No | No |
| Cleaning difficulty | Easy | Moderate | Complex |
| Bone graft likely | Maybe | Often | Almost always |
| Upfront cost | $$ | $$$ | $$$$$ |
Who Is a Good Candidate?
Dental implants require healthy bone. Your jawbone must be thick and dense enough to hold the posts securely. If bone loss has occurred, you may need a bone graft before implants.
Ideal Candidate Checklist
- You have good general health
- Your gums are free of active disease
- You do not smoke heavily (or are willing to quit for 4–6 months)
- You have enough jawbone height and width
- You are committed to good oral hygiene
- Your expectations are realistic
Medical Conditions That Affect Success
Some conditions make implants riskier. This does not mean you cannot get them. It means you need extra planning and monitoring.
- Uncontrolled diabetes
- Active cancer treatment (especially radiation to the jaw)
- Severe immune disorders
- Heavy smoking (more than one pack per day)
- Certain medications (bisphosphonates for osteoporosis)
Important Note: Always tell your dentist about every medication you take. Even over-the-counter supplements can affect healing. Being honest protects your health.
The Step-by-Step Process
Getting implants is not a one-day event. It is a journey. The entire process usually takes four to twelve months. Sometimes longer if you need bone grafting.
Let me walk you through each stage.
Step 1: Consultation and Planning (1–2 visits)
Your dentist will take a 3D CT scan of your jaw. This scan shows bone density, nerve locations, and sinus positions. They will also take impressions of your current denture.
During this visit, ask every question on your mind. Write them down beforehand. A good dentist will spend 30–60 minutes with you explaining the plan.
Step 2: Preparatory Work (if needed)
If your bone is too thin or soft, you need a graft. A bone graft adds material to your jaw. This material can come from your own body, a donor, or synthetic sources.
Healing from a graft takes four to nine months. This is normal. Rushing leads to failure.
Step 3: Implant Placement Surgery
On surgery day, you will receive local anesthesia. Many dentists also offer sedation if you feel nervous.
The surgeon makes small incisions in your gum. They drill precise holes into the bone. The implant posts are screwed into those holes. Then the gum is stitched closed.
Most people describe the feeling as pressure, not pain. You should feel no sharp pain during the procedure.
Step 4: Healing and Osseointegration
This is the most important phase. Osseointegration means your bone grows directly onto the titanium surface. This takes time.
- Lower jaw: 3–6 months
- Upper jaw: 4–8 months
During this time, you will wear your existing denture. It may have a soft liner to protect the healing implants.
Step 5: Uncovering and Abutment Placement
Once healed, the dentist makes a small opening in your gum to expose the implant top. They attach a small metal post called an abutment. This is what your denture will connect to.
This procedure is minor. Most people need only local numbing.
Step 6: Denture Fabrication
Your dentist takes new impressions with the abutments in place. A dental lab builds your new denture around these attachments. This takes two to four weeks.
You may receive a temporary denture during this waiting period.
Step 7: Delivery and Adjustment
Your new denture is placed. The dentist checks your bite, comfort, and fit. They will show you how to attach and remove the denture correctly.
Expect to return for small adjustments over the next few weeks. This is normal. Your mouth is learning to work with the new setup.
Step 8: Long-term Maintenance
You will see your dentist once or twice per year for checks. They will inspect the attachments, clean the abutments, and tighten anything that has loosened slightly.
The nylon inserts in locator attachments wear out. Plan to replace them every 12–24 months. This is a quick, inexpensive appointment.
What Does the Surgery Feel Like?
Many people worry about pain. Let me give you an honest answer.
The surgery itself is not painful because of anesthesia. You will feel pushing, drilling vibration, and pressure. But not sharp pain.
The first 48 hours after surgery are uncomfortable. You will have swelling and mild to moderate soreness. Over-the-counter pain medication usually controls this. Most people compare it to having a tooth pulled.
By day three, the worst is over. By day seven, you feel mostly normal. You can eat soft foods and return to desk work the next day in most cases.
Pain Scale (1–10)
| Time Point | Typical Discomfort |
|---|---|
| During surgery | 1–2 (pressure only) |
| Hours 0–6 after | 4–5 |
| Day 1–2 | 5–6 |
| Day 3–5 | 2–4 |
| Day 7 onward | 0–2 |
Heavier procedures (bone grafts, six implants) cause more swelling. But even then, most patients manage fine with ice packs and ibuprofen.
Realistic Benefits of Implant Bottom Dentures
Let me be honest. Implants are expensive. They take time. The surgery sounds scary. So why do millions of people choose them?
Because the benefits change daily life.
1. No More Adhesives
No pastes. No powders. No strips. No gooey residue to scrape off your gums at night. Your denture stays in place because of mechanical connection, not sticky chemicals.
2. Eat Real Food Again
You can bite into an apple. You can eat corn on the cob. You can chew steak on both sides of your mouth. Patients report eating salads, nuts, and crusty bread without worry.
3. Speak Clearly
Words like “sixty” and “seventy” stop sounding mushy. The clicking noise disappears. Your tongue moves freely because the denture is not floating.
4. Preserve Bone
When you lose teeth, your jawbone melts away. This is called resorption. Implants stimulate your bone like natural roots did. Your face keeps its shape. You avoid the sunken, collapsed look that long-term denture wearers develop.
5. Confidence in Public
No more excuses. No more covering your mouth. No more checking in every mirror to see if the denture slipped. You will laugh, talk, and eat without thinking about your teeth.
“I used to cut my food into tiny pieces at restaurants. Now I just eat. Nobody would ever know my teeth are not real.” — Linda, 72, Oregon
The Downsides (Be Honest With Yourself)
I promised you realism. So here are the real disadvantages.
Cost Is Significant
Even the most affordable option costs thousands of dollars. Insurance covers little or nothing. You will likely pay out of pocket or finance the treatment.
Surgery Carries Real Risks
- Infection (low risk with proper care)
- Nerve injury (rare, but possible numbness in lip or chin)
- Implant failure (5–10% over 10 years)
- Sinus problems (for upper implants, not lower)
Healing Takes Patience
You cannot rush biology. If you need a bone graft, you wait nearly a year for final teeth. Some people find this frustrating.
Maintenance Is Not Zero
You still need to clean. You still need professional checks. The attachments wear out. Nothing is truly permanent.
Not Everyone Can Get Them
Poor bone, uncontrolled diabetes, heavy smoking, and certain medications rule out implants for some people. Your dentist should be honest with you if you are not a candidate.
Cost Breakdown (Real Numbers for 2026)
Prices vary wildly by location. A clinic in New York City charges more than a clinic in rural Alabama. The dentist’s training matters too.
Below are national averages in the United States. Use these as starting points.
| Procedure | Low End | Average | High End |
|---|---|---|---|
| Two implants + overdenture | $3,000 | $5,500 | $8,000 |
| Four implants + bar | $7,000 | $10,000 | $15,000 |
| Six implants + fixed bridge | $15,000 | $22,000 | $35,000+ |
| Bone graft (per site) | $500 | $1,200 | $3,000 |
| CT scan | $250 | $400 | $800 |
| Replacement nylon inserts (per year) | $50 | $100 | $200 |
Ways to Pay
- Dental insurance (covers 10–30% of implants for some plans)
- CareCredit or other medical credit cards
- In-house financing (ask your dentist)
- Dental schools (30–50% lower cost)
- Medical credit unions
- FSA or HSA accounts (tax-free dollars)
Important Note: Do not choose a dentist based only on price. Implant surgery requires skill. A failed implant costs more to fix than a successful one costs upfront.
Recovery Timeline: What to Expect Week by Week
First 24 Hours
- Some bleeding is normal
- Keep gauze in place for 1–2 hours
- Apply ice packs (20 minutes on, 20 off)
- Eat only cold or room-temperature soft foods
- Do not rinse or spit forcefully
- Sleep with head elevated
Days 2–3
- Swelling peaks around 48 hours
- Use warm compresses after first 24 hours
- Brush other teeth gently
- Rinse with warm salt water (very gently)
- Take prescribed or OTC pain relief as needed
Days 4–7
- Swelling goes down noticeably
- Bruising may appear (yellow or purple on chin/neck)
- Return to soft, warm foods
- Most people return to work
Weeks 2–4
- Gums look pink again
- Stitches dissolve or are removed
- You forget the implants are there most of the time
- Return to normal brushing and flossing around the area
Months 3–6 (Healing Phase)
- No pain or discomfort
- You eat normally with your old denture
- Bone slowly grows onto implants
- Follow-up x-rays confirm healing progress
After Final Denture Delivery
- First week: Practice inserting and removing
- Two weeks: Bite feels natural
- One month: You stop thinking about your denture
- Six months: You wonder why you waited so long
How to Clean Implant Bottom Dentures
Cleaning is easier than you think. But you must do it correctly every day. Neglect leads to inflammation around the implants. That inflammation can cause bone loss.
Daily Cleaning Routine (5 minutes)
Step 1: Remove the denture
Gently pull up on the handles or use a removal tool. Do not pry with metal objects.
Step 2: Clean the denture
Use a soft brush and non-abrasive paste. Scrub all surfaces, especially the inside where it touches your gums. Rinse thoroughly.
Step 3: Clean the implants in your mouth
Look at the small metal abutments in your jaw. Use a soft brush or special interproximal brush to clean around each one. Pay attention to the gum line.
Step 4: Rinse your mouth
Swish with warm water or alcohol-free mouthwash.
Step 5: Soak the denture (overnight)
Place the denture in water or a mild soaking solution. Do not let it dry out. It can warp.
Step 6: Reinsert in the morning
Rinse the denture again. Snap it back onto the attachments. You are ready for the day.
Products You Will Need
- Soft-bristled denture brush
- Non-abrasive denture paste
- Interproximal brushes (small cone-shaped brushes)
- Soaking cup with lid
- Denture removal tool (optional but helpful)
What to Avoid
- Regular toothpaste (too abrasive for denture acrylic)
- Hard-bristled brushes (scratch the surface)
- Bleach products (damage metal attachments)
- Boiling water (warps the base)
- Metal scrapers (scratch the abutments)
How Long Do Implant Bottom Dentures Last?
This is a fair question. You are investing significant money and time. You want to know how long the results will last.
| Component | Average Lifespan | Range |
|---|---|---|
| Titanium implant post | 20+ years to lifetime | 95% success at 10 years |
| Abutment | 15+ years | Rarely fails |
| Denture base and teeth | 8–12 years | 5–15 depending on wear |
| Nylon locator inserts | 1–2 years | Easy, cheap replacement |
| Metal bar (if used) | 15+ years | Very durable |
The implants themselves almost never fail after the first year, provided you maintain good oral health. The denture part does wear out. You can have a new denture made for the same implants when needed.
Reasons Implants Fail (First Year)
- Poor bone quality at placement
- Infection around the implant
- Overloading before healing completes
- Heavy smoking during healing
- Uncontrolled medical conditions
- Trauma or accident
After one year, the success rate exceeds 95% for lower jaw implants.
Implants vs. Other Options
You have choices. Let us compare implants to other ways of dealing with loose bottom dentures.
Option 1: Do Nothing
Cost: $0
Pros: No money or time
Cons: Denture stays loose. Bone keeps melting. Face shape changes over time. Quality of life does not improve.
Option 2: Denture Reline
Cost: 200–500
Pros: Cheap. Quick.
Cons: Temporary fix (6–12 months). Does not stop bone loss. Denture still floats.
Option 3: New Traditional Denture
Cost: 1,000–3,000
Pros: New fit. Better appearance.
Cons: Same mechanical problems. Still no retention. Bone loss continues.
Option 4: Soft Rebase with Adhesive
Cost: 10–30 per month for adhesive
Pros: Low upfront cost
Cons: Messy. Temporary. Adhesive loses holding power by afternoon. Does not stop bone loss.
Option 5: Implant Overdenture
Cost: 3,000–15,000
Pros: Permanent solution. Stops bone loss. No adhesive. Real stability.
Cons: Surgery. Cost. Healing time.
Option 6: Fixed Implant Bridge (All-on-X)
Cost: 15,000–35,000+
Pros: Most stable option. Closest to natural teeth. Never remove at home.
Cons: Most expensive. Harder to clean. Complex to repair if damaged.
Our take: If you can afford it and qualify medically, implants are the best long-term solution for lower denture problems. The difference in daily comfort is dramatic.
Frequently Asked Questions (FAQ)
1. Do dental implants for bottom dentures hurt?
The surgery is not painful due to local anesthesia. Recovery causes mild to moderate discomfort for 2–5 days. Most people manage with over-the-counter pain relievers.
2. How much do dental implants for bottom dentures cost?
Two implants plus a denture typically costs 3,000–8,000. Four implants with a bar cost 7,000–15,000. A full fixed bridge starts around $15,000.
3. Can I get implants if I have bone loss?
Possibly. Many people need a bone graft first. This adds 4–9 months to the timeline. Your dentist will evaluate your CT scan to give you an honest answer.
4. How long does the whole process take?
Plan for 4–12 months. Bone grafting extends this to 9–14 months. Rushing leads to failure, so patience is important.
5. Will my insurance pay for any of this?
Some dental insurance plans cover 10–30% of implant costs. Call your provider and ask for your specific “implant surgical placement” and “implant supported denture” benefits.
6. Can I sleep in my implant bottom denture?
No. Remove it every night to let your gums rest and to clean everything properly. Sleeping in dentures increases infection risk.
7. What happens if an implant fails?
The dentist removes the failed implant. After the bone heals (another 3–6 months), they may place a new implant in a slightly different position. Most failed implants can be replaced.
8. Can I get implants on both top and bottom?
Yes. Many people do. The top jaw has softer bone and sinus cavities, so it is more complex. But implant-supported upper dentures are also very successful.
9. Will people be able to tell I have implants?
No. Your denture looks like a normal denture. The implants are hidden in your jaw. The only difference is your denture will not move when you talk or eat.
10. Am I too old for dental implants?
No. Age alone does not disqualify you. Dentists place implants in patients in their 80s and 90s. Your general health matters much more than your birthdate.
Common Myths About Bottom Implant Dentures
Let me clear up some misinformation circulating online.
Myth #1: Implants are experimental.
False. Modern dental implants have been used successfully since the 1980s. Over 5 million implants are placed each year in the US alone.
Myth #2: The denture is permanent and never comes out.
Only fixed bridges are non-removable. Most implant dentures snap on and off for cleaning. You remove them nightly.
Myth #3: You can eat anything with no limits.
Most things, yes. But you should still avoid chewing ice, opening packages with your teeth, or biting hard candies. These habits damage natural teeth too.
Myth #4: The procedure takes one day.
Some clinics advertise “teeth in a day.” That means temporary teeth on the same day as surgery. The permanent denture still requires months of healing. Be skeptical of promises that sound too easy.
Myth #5: Implants always fail if you smoke.
Smoking increases failure risk significantly. But light smokers (less than 10 cigarettes per day) who quit during healing have reasonable success rates. Heavy smokers should strongly consider quitting for good before pursuing implants.
Questions to Ask Your Dentist Before Starting
Walk into your consultation prepared. Write these down and take them with you.
- How many lower implant overdentures have you placed?
- What is your success rate with patients like me?
- Do I need bone grafting? How much will that cost and how long will it take?
- Which attachment system do you recommend for my case and why?
- Do you offer sedation for nervous patients?
- What happens if an implant fails? Do you offer a warranty or replacement policy?
- Who will be placing the implants? You or a specialist?
- Can I see before-and-after photos of your lower implant cases?
- What is the total all-in cost including CT scans, surgery, denture, and adjustments?
- What financing options do you offer?
A confident, honest dentist will answer all of these without hesitation. If they dodge questions or seem rushed, consider a second opinion.
Real Patient Stories (Names Changed for Privacy)
Case 1: Margaret, 74, retired teacher
Problem: Wore lower denture for 22 years. Could not keep it from lifting when eating. Stopped going to dinner parties.
Solution: Two implants with locator attachments.
Result after 1 year: Eats steak, corn, and apples. Goes out to eat weekly. Says she feels “like a normal person again.”
Cost paid: $6,200 total.
Case 2: David, 59, construction worker
Problem: Lost lower teeth in accident. Wore denture but could not chew tough foods. Bone had significant loss.
Solution: Bone graft (6 months healing), then four implants with bar-retained denture.
Result after 2 years: Chews with full force. Forgot he has a denture for hours at a time.
Cost paid: $13,500 total (financed over 24 months).
Case 3: Eleanor, 81, retired nurse
Problem: Gums sore from denture rubbing. Could not wear denture for more than 4 hours without pain.
Solution: Two implants with soft reline in denture.
Result after 9 months: Wears denture all day comfortably. No more sores. Eats soft foods without pain.
Cost paid: $4,800 (limited income, dental school placement).
Case 4: Robert, 68, smoker (1 pack/day)
Problem: Loose denture. Quit smoking for 3 months before surgery.
Solution: Two implants.
Result: One implant failed at month 5. Second implant successful. Remade denture on single implant plus gum suction. Robert regrets not quitting smoking permanently.
Cost paid: 5,000plus1,500 to remove failed implant.
These stories show the range. Most people do very well. But your habits and biology matter.
Additional Resource
For a deeper dive into implant technology, clinical studies, and finding a qualified provider near you, visit the American Academy of Implant Dentistry patient education section.
👉 Link: AAID Patient Resources – Dental Implants Explained
(Open in a new tab. This is a trusted, non-commercial source for unbiased implant information.)
Final Thoughts: Is This Right for You?
Here is my honest take after researching and speaking to dozens of patients and dentists.
If your traditional bottom denture makes you miserable, and you have the health and budget for implants, you will likely wonder why you did not do it sooner. The improvement in daily quality of life is that significant.
If you are on a tight budget or have health conditions that make surgery risky, a well-made traditional denture with a soft liner and good adhesive may still work acceptably. Not everyone needs implants.
If you fall somewhere in the middle, consider two implants. They offer the biggest improvement for the lowest cost. You can always add more implants later if you want even more stability.
The most important step is getting a consultation with an experienced implant dentist. Not a general dentist who places one implant per year. Find someone who does this work daily.
Bring your questions. Be honest about your health and budget. Listen to their realistic assessment.
Then make the choice that fits your life, your mouth, and your peace of mind.
Conclusion
Dental implants for bottom dentures transform loose, uncomfortable lower dentures into stable, secure appliances that let you eat, speak, and smile with confidence. The process takes several months and costs between 3,000and15,000, but the improvement in daily quality of life is dramatic for most patients. If you have adequate bone and general health, two to four implants offer the best balance of cost, stability, and long-term satisfaction.
Disclaimer: This article is for informational purposes only and does not constitute medical or dental advice. Every person’s health situation is unique. Always consult with a licensed dental professional before making decisions about dental implants or any surgical procedure. The author and publisher are not responsible for any outcomes resulting from use of this information.