What to Do Before and After Teeth Whitening
You just booked a whitening session or bought a kit, and the excitement is real. You picture a brighter smile lighting up every photo and conversation. Then a quiet question creeps in: am I actually ready for this? Many people focus only on the treatment itself and overlook the crucial hours before and after. Those hours often determine whether your results look stunning and even or patchy and painful. This guide walks you through every practical step you can take, from the moment you schedule your appointment until weeks after the final session. You will learn how to prepare your enamel, manage sensitivity, choose the right foods, and protect your investment. No fluff, no miracle promises, just realistic, dentist-backed advice that puts you in control.
Understanding the Whitening Process Before You Start
Before diving into checklists and meal plans, you need a clear picture of what actually happens during whitening. This knowledge helps you understand why each preparation and aftercare step matters. It also protects you from chasing unrealistic expectations that leave you disappointed even when the treatment works perfectly.
How Teeth Whitening Actually Works
Whitening gels contain either hydrogen peroxide or carbamide peroxide as the active ingredient. These compounds break down into oxygen molecules that penetrate your enamel and reach the dentin layer beneath. The oxygen fragments the long-chain pigment molecules that cause discoloration, making them too small to reflect light in the same way. Your teeth appear whiter not because you stripped away stains like scrubbing a countertop, but because you changed the optical properties of the tooth structure itself.
This process temporarily dehydrates your teeth and makes the enamel slightly more porous. The porosity explains everything about the critical aftercare window. Imagine your enamel like a sponge that just got squeezed out. For roughly 24 to 48 hours after whitening, that sponge eagerly reabsorbs whatever liquid it contacts. If that liquid is water or clear saliva, the teeth stay bright. If that liquid is red wine, coffee, or soy sauce, the teeth drink up new stains faster and deeper than they ever would normally.
The Difference Between Professional and At-Home Whitening
Knowing which whitening path you choose shapes your preparation steps significantly. Professional in-office treatments use higher peroxide concentrations, typically between 25 and 40 percent hydrogen peroxide. Dental professionals apply protective barriers to your gums and sometimes use light or laser activation to accelerate the chemical reaction. The entire process finishes in one or two sessions lasting about 60 to 90 minutes each. Results appear immediately, but sensitivity tends to strike faster and more intensely.
At-home professional kits from your dentist use custom-fitted trays and a lower peroxide concentration, usually 10 to 22 percent carbamide peroxide. You wear these trays daily for one to two weeks. The gradual pace often produces less intense sensitivity, and the custom trays minimize gel contact with gums. Over-the-counter strips, pens, and pre-filled trays use the lowest concentrations allowed for unsupervised use. They cost less and deliver more modest results over a longer period. The preparation principles remain similar across all methods, but professional treatments demand stricter adherence to the pre-appointment routine because the stakes sit higher.
Important note: If you have visible cavities, cracked enamel, exposed roots, or active gum disease, address those issues before any whitening treatment. Peroxide seeping through a cavity or crack can reach the nerve inside your tooth and cause searing, lasting pain. A dental checkup before whitening is not a marketing suggestion; it is a safety requirement.
Setting Realistic Expectations Before You Begin
Whitening does not change the color of existing fillings, crowns, veneers, or bonding material. If you have a crown on a front tooth, that crown stays exactly the same shade while your natural teeth brighten. The mismatch becomes more obvious after whitening. Plan to replace any visible restorations after you achieve your desired shade if a uniform look matters to you.
Genetic factors determine your baseline tooth color, and whitening can lift that baseline only so far. Most people achieve between two and eight shades of improvement on a standard dental shade guide. Translucent edges of front teeth and the slightly yellower canine teeth tend to respond more slowly. Teeth with gray or blue undertones, often caused by certain antibiotics taken during childhood, prove more resistant to peroxide than yellow or brown discoloration. Whiten gradually and evaluate after each session. Chasing an impossibly white smile leads to over-treatment, translucent enamel, and irreversible damage.
What to Do Before Teeth Whitening
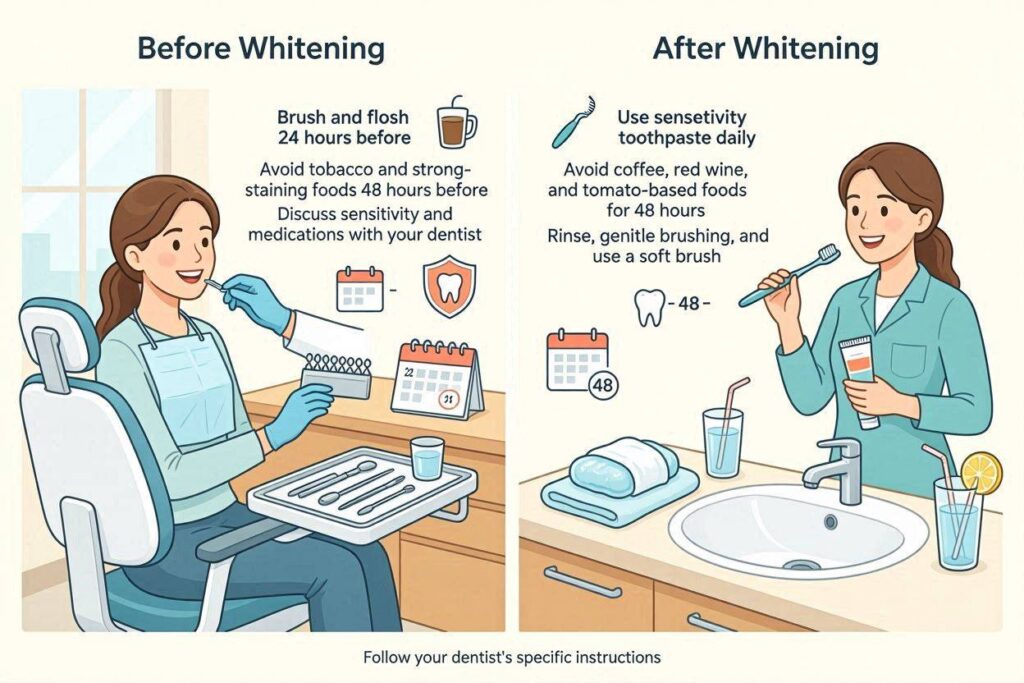
Preparation separates a comfortable, effective whitening experience from an unnecessarily painful one. Spend the week before your treatment building habits that strengthen your enamel, calm your gums, and set the stage for even results. Every step here comes from real clinical observations and patient feedback, not marketing brochures.
Schedule a Dental Examination First
The single most important preparation step happens in the dentist’s chair. A thorough examination identifies any issues that could turn a simple whitening session into an emergency. Your dentist checks for cavities, leaky fillings, enamel cracks, gum recession, and exposed root surfaces. Each of these conditions creates a pathway for peroxide to reach sensitive inner tooth structures.
If you plan to use an over-the-counter product and skip the dentist visit, at least perform an honest self-check. Run your tongue over your teeth. Do any areas feel rough, sharp, or unusually sensitive to temperature? Do your gums bleed when you floss? Any yes answer suggests you need a professional evaluation first. Spending money on whitening strips only to stop halfway through because of pain wastes both money and time.
During the examination, ask your dentist to assess the source of your discoloration. Surface stains from coffee and tea respond beautifully to whitening. Intrinsic stains from trauma, medication, or excessive fluoride exposure during childhood may require different approaches. Knowing the cause helps you predict results.
Complete Any Necessary Dental Work Beforehand
If your examination reveals cavities or defective restorations, complete those treatments before you whiten. Allow at least two weeks between a filling and a whitening session. Fresh fillings need time to bond fully to your tooth structure, and your tooth needs time to settle after the drilling. Rushing from the filling chair to the whitening light invites postoperative sensitivity that blurs the line between normal healing and whitening pain.
Gum tissue also deserves attention. If you have gingivitis or periodontitis, the inflamed tissue reacts poorly to peroxide contact. Bleeding, burning, and white chemical burns on the gums occur more often when inflammation already simmers beneath the surface. A professional cleaning one to two weeks before whitening removes tartar and plaque that block the gel from contacting your enamel evenly. Starting with a smooth, clean tooth surface maximizes results and minimizes the risk of patchy whitening.
Desensitize Your Teeth in the Weeks Before
Start using a desensitizing toothpaste containing potassium nitrate at least two weeks before your whitening appointment. Potassium nitrate calms the nerve inside each tooth by blocking pain signals from reaching the nerve endings. Brands like Sensodyne or Colgate Sensitive Pro-Relief work well, but generic equivalents with the same active ingredient deliver the same benefit.
Apply the toothpaste as usual, but add an extra step. After brushing at night, dab a small amount of the toothpaste directly onto your teeth with a clean fingertip and let it sit for five minutes before rinsing lightly or spitting without rinsing. This extended contact gives the potassium nitrate more time to penetrate the enamel and build up a protective effect around the nerves. Many patients who follow this routine report significantly less discomfort during and after whitening compared to those who start desensitizing only on treatment day.
Strengthen Your Enamel with Fluoride
Fluoride remineralizes weakened enamel and creates a more resilient surface for the whitening process. Use a fluoride mouthwash daily in the two weeks leading up to treatment. If your dentist offers a prescription-strength fluoride gel or varnish, accept the offer. One professional fluoride application a week before whitening can dramatically reduce sensitivity and improve the uniformity of your results.
At home, avoid rinsing your mouth with water immediately after using a fluoride product. Let the fluoride sit on your teeth as long as possible. The minerals need contact time to incorporate into the enamel matrix. Brushing with a fluoride toothpaste, spitting out the excess, and skipping the final rinse makes a measurable difference in enamel strength over just a few weeks.
Avoid Acidic Foods and Beverages Temporarily
Acidic substances soften enamel by temporarily demineralizing its outer layer. You want your enamel as hard and intact as possible before subjecting it to peroxide. For three to five days before whitening, limit citrus fruits, vinegar-based dressings, carbonated drinks, sports drinks, and sour candies. This is not a permanent lifestyle change, just a short-term strategic move.
If you do consume something acidic, rinse your mouth with plain water afterward and wait at least 30 minutes before brushing. Brushing immediately after acid exposure grinds the softened enamel and accelerates erosion. The waiting period allows your saliva to naturally neutralize the acids and begin re-hardening the enamel surface.
Gather Your Post-Whitening Supplies in Advance
The hours after whitening demand specific items that you do not want to hunt for while your teeth tingle. Before treatment day, stock your kitchen and bathroom with:
- A new soft-bristled toothbrush dedicated to gentle post-whitening care
- Desensitizing toothpaste and fluoride mouthwash
- Plain yogurt, milk, and mild cheese for the first meals
- White-fleshed foods like bananas, peeled potatoes, cauliflower, and plain chicken breast
- A reusable straw for drinking any liquids other than plain water
- Sugar-free gum containing xylitol to stimulate saliva flow without staining
- Over-the-counter pain relief like ibuprofen or acetaminophen, approved by your doctor, in case sensitivity peaks
Having these items ready removes the temptation to grab a coffee or a glass of wine right after treatment when your enamel pores gape open.
Brush and Floss Thoroughly Right Before
On the morning or afternoon of your whitening session, brush and floss with extra care. Remove every trace of plaque and food debris from every tooth surface. Plaque acts like a barrier between the whitening gel and your enamel. Any spot covered by plaque or tartar will whiten less than the surrounding area, leaving a blotchy result.
Flossing deserves special attention because interdental plaque hides where your brush cannot reach. Slide the floss gently below the gumline and curve it around each tooth. Rinse with water or an antibacterial mouthwash after flossing to wash away dislodged debris. Arrive at your appointment or start your at-home kit with a perfectly clean canvas.
Protect Your Lips and Gums
For at-home whitening, apply a thin layer of petroleum jelly or vitamin E oil along your gumline and on your lips before inserting trays or applying strips. This creates a hydrophobic barrier that repels the peroxide gel. Chemical burns on gums appear white and feel tender, and while they heal within a few days, they cause unnecessary discomfort and make the experience unpleasant.
Many people skip this step because instructions rarely emphasize it, but dental professionals apply gingival barriers religiously. The few seconds it takes to swipe a protective balm around your gums pay off in comfort. For in-office treatments, your dentist handles this protection, but you can still apply lip balm beforehand to prevent the extended mouth-opening from chapping your lips.
The Pre-Whitening Preparation Timeline
Organizing the steps into a timeline makes the routine feel manageable rather than overwhelming. Adjust the timing based on whether you booked a professional treatment or plan to start an at-home kit on a specific date.
Two Weeks Before
Begin using desensitizing toothpaste twice daily. Schedule and complete any outstanding dental work. Schedule a professional cleaning if you have not had one in the past six months. Start the nightly routine of applying desensitizing toothpaste directly to teeth and letting it sit before bed.
One Week Before
Receive a professional fluoride treatment if your dentist recommends it. Begin using fluoride mouthwash daily. Reduce consumption of acidic foods and beverages. Start paying attention to the foods and drinks that cause visible staining, and mentally prepare to avoid them during the post-whitening phase. Purchase your post-whitening supplies.
Three Days Before
Eliminate highly acidic items from your diet almost entirely. Increase your water intake to support healthy saliva production. Well-hydrated mouths produce more saliva, which naturally protects and remineralizes teeth. Confirm your appointment time or set your at-home whitening schedule.
The Night Before
Brush and floss thoroughly. Apply a final extended layer of desensitizing toothpaste. Get a good night’s sleep. Fatigue lowers your pain tolerance and makes any sensitivity feel more intense. Avoid alcohol and caffeine in the evening to ensure restful sleep.
The Day Of
Brush, floss, and rinse without swallowing any mouthwash. Eat a light, non-acidic meal about two hours before your appointment. Hunger during a long session distracts you, but a full heavy meal might make you uncomfortable reclining in the chair. If using at-home strips, eat before applying them since you cannot eat with strips in place. Avoid applying any lipstick or heavy lip products that might interfere with the treatment or stain the dental dam.
What to Do After Teeth Whitening
You just completed your whitening session. Your teeth look visibly brighter in the mirror, and you feel a surge of confidence. Now comes the most important 48 hours of your entire whitening journey. The decisions you make in this window determine whether your results last months or fade within weeks.
The Critical First 48 Hours: The White Diet
Dental professionals describe the first two days after whitening as the period when teeth remain most susceptible to re-staining. The peroxide temporarily dehydrates the enamel and opens microscopic pores. As the enamel rehydrates with your saliva, those pores gradually close, trapping the new brighter color. If you introduce dark pigments during rehydration, the pores trap those pigments instead.
The term “White Diet” describes a temporary eating plan consisting of foods and drinks that are pale or colorless. The rule remains simple: if it would stain a white cotton shirt, it will stain your freshly whitened teeth. This rule applies strictly for 48 hours and with moderation for the following week.
Foods to Eat Freely
Plain chicken or turkey breast, white fish like cod or tilapia, and tofu provide satisfying protein without any pigment risk. White rice, plain pasta with butter or a white cream sauce, and peeled white potatoes offer filling carbohydrates. Cauliflower, peeled cucumbers, and white onions work well for vegetables. Bananas, peeled apples, and pears give you fruit options. Dairy products like plain yogurt, milk, cottage cheese, and mild white cheeses such as mozzarella or cream cheese support the diet perfectly. Egg whites and clear broths round out the menu.
Foods to Avoid Completely
Coffee, tea, red wine, cola, and any dark-colored sodas top the danger list. These beverages penetrate the open pores faster than almost anything else. Dark sauces including soy sauce, tomato sauce, barbecue sauce, balsamic vinegar, and curry must disappear from your plate temporarily. Berries, cherries, grapes, pomegranate, and beets carry intense natural pigments. Chocolate and candy containing artificial dyes undo hours of whitening effort. Mustard, ketchup, and paprika-based seasonings add color you do not want. Even some seemingly innocent items like green tea can stain, as can any food or drink that leaves a visible tint on your tongue.
Managing the First Meal After Whitening
Wait at least one hour after finishing your whitening session before eating or drinking anything except plain water. Your teeth need this initial settling period. When you do eat, choose something cool or room temperature. Hot foods and drinks increase blood flow to the teeth and can amplify sensitivity while the nerves remain irritable.
A perfect first meal might include plain yogurt, a peeled banana, and a glass of milk. Scrambled egg whites with a slice of untoasted white bread and cream cheese make another safe choice. Small, soft bites minimize chewing pressure on potentially sensitive teeth. Chew slowly and deliberately.
Hydration Strategies That Protect Your Results
Water becomes your best friend during the aftercare period. Drink plain, still water throughout the day. Water rinses away food particles and dilutes any staining compounds that accidentally enter your mouth. It also supports saliva production, which is your body’s natural remineralization system.
When you cannot avoid a colored beverage after the initial 48-hour window, use a straw and position it toward the back of your mouth so the liquid bypasses your front teeth. This technique applies to iced coffee, smoothies, and even soup if you find yourself craving something not entirely white. Rinse your mouth with plain water immediately after finishing any non-water drink.
Oral Hygiene After Whitening: Gentle Is Key
Brush your teeth gently with a soft-bristled toothbrush and desensitizing toothpaste. Use lukewarm water because cold water can trigger sharp sensitivity in freshly whitened teeth. Avoid electric toothbrushes for the first two to three days if you normally use one. The vibration can aggravate sensitive nerve endings. Switch back to a manual brush with light pressure.
Floss carefully, but do not skip it. Removing food particles between teeth prevents localized staining and maintains gum health. If your gums feel tender from accidental peroxide contact, floss gently and avoid snapping the floss against the gum tissue. A water flosser on the lowest setting offers an alternative if manual flossing causes too much discomfort.
Avoid mouthwashes containing alcohol, strong flavorings, or coloring agents during the first week. Alcohol dries your mouth and irritates sensitive tissues. Many commercial mouthwashes also contain dyes that could stain the open enamel pores. Stick to clear, alcohol-free fluoride rinses or plain saltwater rinses. A saltwater rinse made from half a teaspoon of salt dissolved in a cup of warm water soothes irritated gums and maintains oral cleanliness.
Managing Post-Whitening Sensitivity
Some sensitivity after whitening is normal and expected. The sensation usually feels like a mild electric shock or a dull ache when teeth encounter air, cold, or sweet substances. This happens because the peroxide molecules temporarily irritate the nerves inside your teeth. The nerves calm down within a few days, but those days can feel uncomfortable if you do not manage them proactively.
Continue using desensitizing toothpaste with every brushing session. Apply a small amount directly to the most sensitive teeth with a clean finger and leave it on for ten minutes before rinsing gently. Potassium nitrate blocks pain signals from the nerve, and consistent application works better than sporadic use.
Over-the-counter anti-inflammatory medication like ibuprofen can help if your dentist confirms it is safe for you. Take it before the sensitivity peaks rather than waiting until you feel miserable. Ice water and cold foods provide temporary relief for some people, but for others, cold triggers worse pain. Learn your own response pattern and adjust accordingly.
If sensitivity persists beyond a week or feels sharp and localized rather than diffuse and dull, contact your dentist. Prolonged sharp pain may indicate that peroxide reached a nerve through an undetected crack or cavity.
Lifestyle Adjustments for the First Week
Your teeth remain slightly more porous for about a week after whitening, even after the critical 48-hour window closes. Smoking during this period deposits tar and nicotine deep into the enamel pores, causing yellowing that proves extremely difficult to reverse. If you smoke, try to abstain for at least a week, and ideally use the whitening experience as motivation to quit entirely.
Avoid acidic beverages and foods for the first few days. Carbonated drinks, even clear ones like sparkling water, introduce carbonic acid that can erode the temporarily softened enamel. Citrus fruits and vinegar-based dressings carry the same risk. Gradually reintroduce these items after three or four days, and rinse with water after consuming them.
Postpone any non-urgent dental treatments for at least two weeks. Teeth need time to stabilize before undergoing cleanings, fillings, or bonding. If you plan to replace visible fillings or crowns to match your new shade, wait two to four weeks for the color to settle fully.
Using Whitening Maintenance Products Correctly
Your dentist may provide or recommend take-home maintenance products. These usually consist of lower-concentration peroxide gels in custom trays or pre-filled disposable trays. The purpose is not to whiten further but to maintain your achieved shade.
Use maintenance products according to your dentist’s specific instructions, typically once every one to three months for a session or two. Overusing maintenance products keeps your enamel in a constant state of porosity and leads to chronic sensitivity and enamel thinning. More is not better. Think of maintenance like touching up your roots at a salon, not like washing your hair every day.
The Post-Whitening Aftercare Timeline
A structured timeline removes guesswork and helps you build new habits that protect your investment without feeling restricted forever.
First 2 Hours
Do not eat or drink anything except plain, room-temperature water. Do not brush your teeth. Allow the effects of the treatment to settle. If you received in-office whitening, the fluoride or post-treatment gel your dentist applied needs time to absorb. Relax and let your saliva begin the natural rehydration process.
First 24 Hours
Stick to the strict White Diet. Every meal and snack should consist of pale, non-staining items. Brush gently with desensitizing toothpaste using lukewarm water. Avoid hot or cold foods and drinks. Rinse with plain water after any food intake. Do not use any mouthwash except a dentist-provided or clear fluoride rinse. Manage sensitivity with desensitizing toothpaste applications and approved pain relief if needed.
48 Hours
Continue the White Diet. Begin flossing gently if you skipped it on the first day due to tenderness. The most critical rehydration window closes around the 48-hour mark, but keep playing it safe. You have come this far. A single cup of coffee now can still cause noticeable staining.
Days 3 Through 7
Gradually reintroduce non-white foods, but continue avoiding the major staining culprits like coffee, red wine, and dark sauces. If you must drink coffee, use a straw, drink it quickly rather than sipping over hours, and rinse with water immediately. Continue using desensitizing toothpaste and a soft-bristled brush. Resume gentle electric toothbrush use if desired.
Week 2
Return to normal eating with mindfulness about staining habits. Resume your regular oral hygiene routine but consider keeping the desensitizing toothpaste as your daily option. The potassium nitrate benefits your long-term comfort. Begin using any maintenance whitening products only as directed. Schedule a follow-up shade evaluation with your dentist if you are tracking results.
Month 1 and Beyond
Assess your results honestly. If you achieved the shade you wanted, transition fully into maintenance mode. If you want additional brightening, discuss a second round with your dentist rather than overusing at-home products. Evaluate your daily habits and adjust to minimize new staining. Use a straw for coffee and tea, rinse after wine, and maintain excellent brushing and flossing routines.
Common Mistakes People Make Before and After Whitening
Learning from others’ errors costs you nothing and saves you from frustration. These mistakes surface repeatedly in dental practices and online forums.
Skipping the Pre-Whitening Dental Checkup
Undetected cavities or cracks turn a cosmetic procedure into a painful emergency. The cost of a checkup is a fraction of the cost of an emergency root canal. Whitening is safe only on intact, healthy teeth.
Assuming Over-the-Counter Products Work the Same as Professional Ones
Over-the-counter products contain lower peroxide concentrations and use generic trays that allow gel to leak onto gums. They work for minor surface stains but rarely produce dramatic results on deeper discoloration. Understanding this prevents disappointment and the temptation to overuse the products.
Eating and Drinking Normally Immediately After Treatment
The single most common reason for disappointing whitening results is immediate consumption of staining foods and drinks. You invest time, money, and comfort into whitening. Throwing away the results with a single cup of coffee feels like lighting cash on fire.
Over-Whitening in Pursuit of an Unrealistic Shade
Chasing a toilet-bowl white smile leads to translucent, blue-tinged enamel that looks unnatural and feels perpetually sensitive. Teeth are not supposed to glow in the dark. A healthy, natural white looks brighter against your skin tone than an artificial bleached shade.
Using Whitening Products on Crowns, Veneers, or Fillings
Peroxide does not bleach porcelain, composite, or metal restorations. Whitening around existing dental work only increases the color mismatch. If you have visible restorations, plan to replace them after achieving your desired natural tooth shade.
Neglecting Gum Protection
Chemical burns on gums hurt and look alarming. A thin barrier of petroleum jelly or a properly fitted tray prevents this entirely. Treat your gums like the sensitive tissue they are, not like an afterthought.
Brushing Too Hard or Too Soon After Whitening
Vigorous brushing immediately after whitening abrades the temporarily softened enamel and causes more sensitivity. Wait an hour, use a soft brush, and apply light pressure.
Diet and Nutrition: The White Diet Explained in Depth
The White Diet concept deserves a dedicated section because it confuses many people. It does not mean you eat only white sugar and white bread. It means you eat whole, nourishing foods that happen to lack intense color pigments.
Sample White Diet Meal Plan for 48 Hours
Breakfast: Plain Greek yogurt topped with peeled and sliced banana. A glass of milk or water.
Lunch: Baked chicken breast with a side of plain white rice and steamed cauliflower. Water to drink.
Snack: Cottage cheese with peeled apple slices. Plain water or white grape juice diluted with water.
Dinner: Pan-seared white fish like cod or tilapia with mashed peeled potatoes made with milk and butter. A side of plain pasta with a small amount of cream sauce.
Dessert: Vanilla ice cream or plain cheesecake (without colored toppings or sauces).
This menu provides protein, carbohydrates, healthy fats, and fiber without introducing a single staining pigment. You will not starve, and you might discover new appreciation for simple, whole foods.
The Science Behind Pigment Penetration
Tooth enamel consists of tightly packed mineral crystals called hydroxyapatite. Between these crystals run microscopic channels that allow fluids to flow in and out of the tooth. Peroxide whitening temporarily enlarges these channels. Chromogens, the pigment molecules in food and drink, slip into the widened channels and lodge there. As the enamel remineralizes, the channels close around the trapped chromogens, locking the stain inside the tooth structure.
This locking mechanism explains why a single glass of red wine after whitening can cause deeper, more permanent staining than a glass of red wine on any other day. The timing matters as much as the substance.
Gradual Reintroduction of Colored Foods
After 48 hours, start adding back one colored food per day. This gradual approach lets you notice if any particular food triggers sudden sensitivity or visible staining. If you eat tomato sauce and berries on the same day and your teeth look dull the next morning, you will not know which food caused it. Slow reintroduction gives you control and information.
Continue avoiding the worst offenders like coffee, red wine, and dark sodas for a full week. When you finally indulge, rinse with water immediately afterward and brush gently 30 minutes later. The rinsing dilutes the pigment concentration, and the delayed brushing removes surface residue without damaging softened enamel.
Managing Sensitivity: A Comprehensive Approach
Sensitivity after whitening ranges from barely noticeable to genuinely disruptive. Understanding your options empowers you to choose the right relief strategy.
Why Whitening Causes Sensitivity
The oxygen molecules released by peroxide penetrate through the enamel into the dentin, which contains tiny tubules that lead directly to the nerve chamber. When these oxygen molecules contact the fluid inside the tubules, they create a temporary inflammatory response in the nerve. This response manifests as the sharp, shocking sensation you feel when cold air or water hits the tooth.
Dehydration of the tooth during treatment also contributes to sensitivity. The enamel loses some of its fluid content, which changes how it transmits temperature and pressure to the nerve. Rehydration over 24 to 48 hours usually resolves this component of sensitivity.
Desensitizing Agents and How to Use Them
Potassium nitrate works by penetrating the dentin tubules and calming the nerve endings. It does not seal the tubules; it simply prevents them from firing pain signals. Stannous fluoride, found in some specialty toothpastes, creates a physical barrier over exposed dentin by depositing a layer of mineral compounds.
For maximum effect, use a toothpaste that contains both potassium nitrate and fluoride. Apply it before your whitening session as a pretreatment, immediately after, and twice daily for at least a week following the procedure. The extended application method where you dab the toothpaste onto sensitive teeth and leave it for ten minutes boosts the effectiveness dramatically.
Professional Desensitizing Treatments
Your dentist can apply desensitizing varnishes or gels that contain higher concentrations of fluoride or other compounds like glutaraldehyde or hydroxyethyl methacrylate. These seal the dentin tubules quickly and provide immediate relief that lasts for days or weeks. If you know from past experience that whitening causes you significant pain, request a professional desensitizing treatment immediately after your whitening session. The few extra minutes in the chair transform your recovery experience.
Home Remedies That Actually Help
Saltwater rinses reduce gum inflammation and create a neutral pH environment that supports remineralization. Dissolve half a teaspoon of salt in a cup of warm, not hot, water and swish gently for 30 seconds. Repeat two to three times daily during the sensitive period.
Clove oil contains eugenol, a natural compound with mild anesthetic and anti-inflammatory properties. Dilute a drop of clove oil in a teaspoon of coconut oil and dab it onto the sensitive tooth with a clean cotton swab. Avoid getting straight clove oil on your gums because it can cause irritation.
Avoid home remedies involving acidic substances like lemon juice or apple cider vinegar. These erode enamel and worsen sensitivity long-term even if they provide a temporary distracting sensation.
Oral Hygiene Routine Adjustments
Your normal oral hygiene routine might need tweaks during the week after whitening. These adjustments protect your results and your comfort without sacrificing cleanliness.
Brushing Technique and Products
Switch to a soft or extra-soft toothbrush if you normally use a medium or hard brush. Hard bristles abrade enamel even under normal conditions, and whitened enamel needs extra gentleness. Hold the brush with just your fingertips, not your whole fist. The reduced grip pressure naturally lightens the force you apply.
Angle the brush at 45 degrees to your gumline and use small, circular motions rather than aggressive back-and-forth scrubbing. Spend two full minutes brushing, but do not over-brush. Brushing for five minutes in an attempt to keep teeth white only wears down enamel.
Use desensitizing toothpaste exclusively during the first week. After that, you can alternate with your regular toothpaste or stick with the desensitizing formula permanently. There is no downside to long-term potassium nitrate use.
Flossing Without Irritating Sensitive Gums
If your gums feel tender from peroxide exposure, flossing might seem daunting. However, leaving plaque between teeth invites gum inflammation and localized staining. Use waxed floss, which slides more smoothly between tight contacts. Floss gently, curving the floss around each tooth in a C-shape and moving it up and down rather than sawing back and forth.
A water flosser on the lowest pressure setting works wonderfully for sensitive gums. The water stream removes debris without mechanical scraping. Fill the reservoir with lukewarm water to avoid temperature shock.
Mouthwash Choices Matter
Many commercial mouthwashes contain alcohol, artificial colors, and strong flavorings that sting sensitive tissues and potentially stain open enamel pores. During the first week, use a clear, alcohol-free fluoride mouthwash recommended by your dentist. Alternatively, plain water rinses or saltwater rinses serve the purpose without introducing any risk.
After the first week, you can return to your preferred mouthwash, but consider choosing one without added dyes. The connection between mouthwash color and tooth staining is small but real, especially when enamel pores remain slightly open.
Lifestyle Habits That Protect or Destroy Whitening Results
Long-term results depend far more on daily habits than on the whitening treatment itself. Understanding which habits help and which hurt lets you make informed choices.
Smoking and Tobacco Use
Tobacco smoke deposits tar and nicotine onto teeth in a sticky film that penetrates enamel quickly. Whitened teeth absorb these deposits even faster than non-whitened teeth because the enamel surface remains more receptive to pigments for weeks after treatment. If quitting smoking entirely is not realistic for you right now, at least avoid smoking for a week after whitening and rinse your mouth with water after each cigarette.
Chewing tobacco and snuff create direct, prolonged contact between staining agents and tooth surfaces. The damage they cause to whitening results happens rapidly and thoroughly. Combined with the gum recession and oral cancer risks, tobacco products rank as the single worst habit for a bright smile.
Coffee, Tea, and Wine Strategies
You do not need to give up your morning coffee or evening wine permanently. A few simple strategies dramatically reduce their staining impact. Drink through a straw whenever possible, positioning it toward the back of your mouth. Finish your drink in one sitting rather than nursing it over several hours. The duration of exposure matters as much as the intensity of the pigment.
After finishing a staining beverage, rinse your mouth with plain water immediately. If you can brush 30 minutes later, do so gently. Keep a disposable toothbrush or travel-sized toothpaste at your desk if you drink coffee throughout the workday.
Alternate sips of your staining drink with sips of water. This dilution technique reduces the pigment concentration reaching your teeth. Some coffee drinkers find that switching to a lighter roast reduces staining, as darker roasts contain more chromogens.
Sports Drinks and Energy Drinks
These beverages combine staining potential with high acidity, creating a double threat. The acid softens enamel while the pigments seep in. If you rely on these drinks for athletic performance or long work shifts, use a straw, rinse with water after, and consider sugar-free electrolyte tablets dissolved in water as a less damaging alternative.
Oral Hygiene Consistency
The simplest, most effective way to protect whitening results is consistent oral hygiene. Brush twice daily for two minutes. Floss once daily. Visit your dentist for cleanings every six months. Plaque and tartar accumulate pigments and make teeth look yellow even when the enamel beneath remains white. A professional cleaning removes this superficial discoloration and restores brightness.
Follow-Up Care and Long-Term Maintenance
Whitening is not permanent. Over months and years, teeth gradually reabsorb pigments from food and drink. A proactive maintenance plan stretches the time between touch-ups and keeps your smile consistently bright.
Touch-Up Treatments: When and How Often
Most people benefit from a touch-up treatment every six to twelve months, depending on their diet and habits. Coffee drinkers, red wine enthusiasts, and smokers might need touch-ups closer to three or four months apart. The key indicator is your own satisfaction. When you look in the mirror and feel your smile could use refreshing, it is time.
Use the lowest peroxide concentration that achieves your goal. A single session with a lower concentration often brightens teeth back to the desired shade without causing the sensitivity of a full treatment course. Do not assume you need the same intensity as your initial whitening.
Custom Trays as a Long-Term Investment
If you initially whitened with over-the-counter products and want to simplify maintenance, consider investing in custom-fitted trays from your dentist. These trays fit precisely, prevent gel leakage, and allow you to apply the gel evenly. The upfront cost pays off in reduced product waste, less gum irritation, and more predictable results over many touch-up cycles.
Lifestyle Tweaks That Extend Results
Small daily habits accumulate into months of preserved brightness. Rinsing with water after meals washes away pigment before it settles into enamel. Chewing sugar-free gum with xylitol after meals stimulates saliva flow, which naturally cleanses teeth and neutralizes acids. Eating crunchy fruits and vegetables like apples, carrots, and celery at the end of a meal provides a gentle abrasive action that scrubs surface stains.
These habits cost almost nothing and require minimal effort, yet they rival expensive maintenance products in effectiveness.
Monitoring Enamel Health Over Years
Long-term whitening enthusiasts sometimes develop enamel thinning because they chase ever-brighter shades with too-frequent treatments. Pay attention to signs of enamel erosion: teeth that look translucent at the edges, increased sensitivity to temperature and sweets, and a yellowish appearance as the underlying dentin begins to show through thinning enamel.
If you notice these signs, stop all whitening treatments and consult your dentist. Enamel does not regenerate, but remineralization treatments and habit changes can halt further damage. A slightly less white smile with intact enamel is infinitely better than a brilliantly white smile built on eroded, painful teeth.
Tables for Quick Reference
Whitening Methods Comparison
| Method | Peroxide Concentration | Typical Duration | Results Timeline | Sensitivity Risk | Best For |
|---|---|---|---|---|---|
| In-Office Professional | 25-40% hydrogen peroxide | 1-2 sessions of 60-90 min | Immediate | Moderate to High | Fast, dramatic results |
| Dentist-Supervised Home Kit | 10-22% carbamide peroxide | 1-2 weeks of daily use | Gradual | Low to Moderate | Controlled, even whitening |
| Over-the-Counter Strips | 6-10% hydrogen peroxide | 1-4 weeks of daily use | Gradual | Low to Moderate | Budget-friendly mild whitening |
| Whitening Pens | 5-10% hydrogen peroxide | Spot treatment, variable | Slow | Low | Targeted touch-ups |
| Whitening Toothpaste | Abrasives, minimal or no peroxide | Daily use, ongoing | Very Gradual | Very Low | Surface stain removal only |
White Diet Food Guide
| Category | Safe to Eat | Avoid |
|---|---|---|
| Protein | Chicken breast, turkey, white fish, tofu, egg whites | Red meat, soy-marinated meats, salmon |
| Dairy | Milk, plain yogurt, cottage cheese, mozzarella, cream cheese | Colored cheeses, yogurt with fruit or dyes |
| Grains | White rice, plain pasta, white bread, plain crackers | Whole wheat, rye, seeded breads |
| Vegetables | Cauliflower, peeled potatoes, white onions, peeled cucumber | Tomatoes, beets, carrots, spinach, broccoli |
| Fruits | Bananas, peeled apples, peeled pears | Berries, cherries, grapes, pomegranate |
| Beverages | Water, milk, white grape juice (diluted) | Coffee, tea, red wine, cola, dark juices |
| Condiments | Butter, plain cream sauce, small amounts of salt | Soy sauce, ketchup, mustard, vinegar, hot sauce |
| Desserts | Vanilla ice cream, plain cheesecake, white cake | Chocolate, berry desserts, colored candy |
Sensitivity Management Options
| Option | How It Works | When to Use | Effectiveness |
|---|---|---|---|
| Potassium Nitrate Toothpaste | Calms nerve endings | 2 weeks before and daily after | High |
| Fluoride Varnish (Professional) | Seals dentin tubules | Immediately after whitening | Very High |
| Saltwater Rinse | Reduces gum inflammation | 2-3 times daily during sensitivity | Moderate |
| Ibuprofen (if approved) | Reduces nerve inflammation | As needed for discomfort | High for pain relief |
| Extended Toothpaste Application | Concentrated nerve calming | Nightly after whitening | Moderate to High |
| Avoid Cold/Hot Triggers | Prevents nerve stimulation | First 2-3 days | Preventative |
Important Notes for Readers
Note on Safety: Teeth whitening is a safe cosmetic procedure for healthy teeth and gums. It does not weaken enamel structurally, despite the temporary softening effect that resolves with remineralization. However, whitening while pregnant or nursing lacks sufficient safety research. Most dentists recommend postponing treatment until after pregnancy and breastfeeding.
Note on Results: Your results depend on the type of staining, your enamel thickness, your genetic baseline color, and your adherence to aftercare instructions. Two people using the identical product can achieve noticeably different results. Measure your satisfaction by your own before-and-after photos, not by someone else’s smile on a product advertisement.
Note on Sensitivity: Experiencing some sensitivity does not mean something went wrong. It signals that the whitening process is working. However, sharp, localized, or persistent pain beyond a week warrants a dental visit. Never power through severe pain in hopes of better results.
Note on Maintenance: Whitening is not a one-time event. Budget for touch-ups and commit to the daily habits that protect your investment. A well-maintained smile stays bright for years with minimal additional effort and cost.
Additional Resource
For in-depth information about peroxide safety and the science of tooth discoloration, visit the American Dental Association’s patient education page on whitening:
ADA Patient Education: Whitening
Conclusion
Teeth whitening delivers a confidence boost that goes far beyond aesthetics, but the real magic happens in the preparation and the aftercare. Spending two weeks desensitizing and strengthening your enamel, then committing to a strict White Diet for the first 48 hours, turns a risky, potentially painful procedure into a smooth, predictable experience. Protecting your investment with mindful daily habits and scheduled touch-ups ensures your brighter smile stays bright for years rather than weeks. When you treat your teeth with patience and consistency, they reward you with a naturally radiant smile that looks healthy, not processed.
Frequently Asked Questions
Can I drink water immediately after teeth whitening?
Yes, you can and should drink plain, room-temperature water immediately after whitening. Water helps rehydrate your teeth and wash away residual peroxide without introducing any staining pigments. Avoid sparkling water for the first 48 hours because the carbonation introduces acidity.
How long do teeth whitening results typically last?
Results typically last between six months and two years, depending heavily on your diet, oral hygiene, and whether you use tobacco products. Regular touch-ups every six to twelve months maintain the brightness without requiring another full treatment course.
Will teeth whitening damage my enamel permanently?
No, professional teeth whitening does not permanently damage healthy enamel. The temporary softening and porosity resolve as your enamel remineralizes over 24 to 48 hours. Problems arise only with overuse or application on already compromised teeth.
Why do my teeth look blotchy after whitening?
Blotchy results usually indicate uneven plaque or tartar coverage during the whitening session, or uneven dehydration of the tooth surface. The blotchiness typically resolves as the teeth fully rehydrate over the next few days. If it persists beyond a week, consult your dentist.
Is sensitivity after whitening a sign of damage?
Mild to moderate sensitivity after whitening is normal and temporary, not a sign of permanent damage. It indicates that the peroxide is working and the nerves are responding. Persistent, sharp, or localized pain lasting more than a week requires professional evaluation.
Can I use whitening strips right after a professional cleaning?
Wait at least one week after a professional cleaning before using whitening products. Cleanings sometimes leave gums slightly irritated and teeth temporarily more sensitive. Giving your mouth time to settle reduces the likelihood of discomfort.
How soon can I drink coffee after teeth whitening?
Wait at least 48 hours for the absolute minimum safe window. A full week produces significantly better, longer-lasting results. When you do resume coffee, use a straw, finish it quickly, and rinse with water immediately after.
Do natural whitening remedies like baking soda work?
Baking soda provides mild abrasive action that removes surface stains but does not change the intrinsic color of your teeth. It cannot produce the same depth of whitening as peroxide-based treatments. Overuse of abrasive substances wears down enamel over time.
Can teenagers whiten their teeth?
Most dentists recommend waiting until at least age 14 to 16, when the tooth pulp has fully matured and the permanent teeth have settled. Younger teens have larger pulp chambers that make them more susceptible to sensitivity and potential nerve damage. Parental guidance and dentist supervision are essential.
What should I do if I accidentally ate something staining during the first 48 hours?
Rinse your mouth with water immediately. Brush gently with desensitizing toothpaste 30 minutes later. Do not panic. One small slip does not usually ruin your entire result, especially if you respond quickly. Resume strict adherence to the White Diet for the remainder of the window.
Disclaimer: This article provides educational information based on current dental research and clinical practice. It does not constitute medical or dental advice. Consult a licensed dentist before beginning any teeth whitening treatment, especially if you have existing dental conditions, restorations, or sensitivity issues. Individual results vary based on numerous factors including genetics, enamel condition, and adherence to aftercare protocols.