How Much Bone is Needed for Dental Implants?
You sit in the dental chair, reviewing your panoramic X-ray with the dentist. The dark spaces where teeth once lived tell a story of loss, but what concerns the dentist more is what you cannot see clearly on that two-dimensional image: the actual volume and density of bone beneath your gums. When the dentist mentions you might not have enough bone for implants, the words land with unexpected weight. You thought losing the tooth was the problem. Now you discover that the foundation beneath it has been quietly disappearing. This revelation surprises many patients, yet bone requirements represent the single most common obstacle to implant treatment. Understanding what bone you need, why it matters, and what can be done when it is insufficient transforms this potential roadblock into a manageable step in your implant journey.
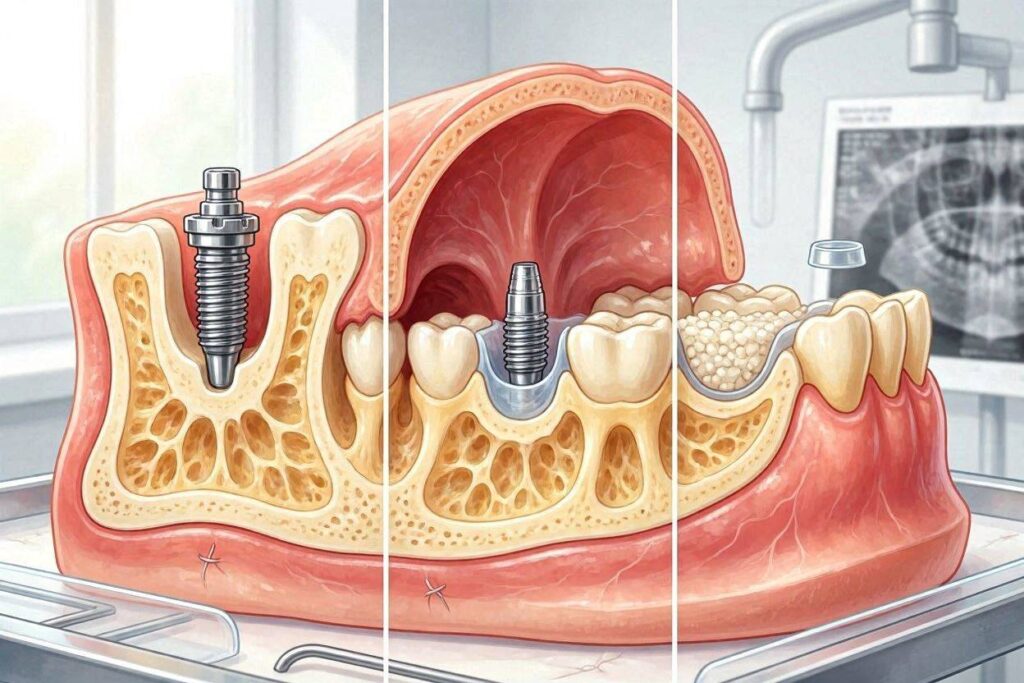
Understanding the Relationship Between Bone and Implants
Dental implants do not simply rest in the jaw. They fuse to it through osseointegration, a biological process where living bone cells attach directly to the titanium surface. This fusion demands intimate contact between implant and bone along the entire surface. Gaps prevent osseointegration. Inadequate bone volume cannot support this process no matter how skilled the surgeon.
Why Bone Matters for Implant Success
Bone serves as the biological and mechanical foundation for dental implants. It provides the living cells that create osseointegration. It supplies the blood vessels that sustain healing. It offers the structural rigidity that resists chewing forces. Without sufficient bone in the right locations, implants lack the environment needed for long-term survival.
The mechanical demands on implant-supporting bone are substantial. Normal chewing generates forces between 70 and 150 pounds per square inch on posterior teeth. People who clench or grind can generate forces exceeding 500 pounds per square inch. The bone surrounding an implant must absorb and distribute these forces without failing. Adequate bone volume, density, and architecture make this possible.
Biologically, bone houses the osteoblasts and osteoclasts that constantly remodel the implant-bone interface. This living tissue responds to forces, repairs microdamage, and maintains the osseointegration throughout the implant’s lifetime. Inadequate bone compromises this biological maintenance system.
The Consequences of Insufficient Bone Volume
Placing an implant into insufficient bone produces predictable problems. The implant may fail to achieve primary stability at surgery, moving when tested. Even if initially stable, thin bone surrounding the implant may resorb under functional loading, exposing implant threads. This thread exposure creates plaque-retentive surfaces that trigger peri-implantitis.
Bone deficiency near critical anatomical structures creates additional dangers. Placing an implant too close to the inferior alveolar nerve due to inadequate bone height in the lower jaw risks permanent nerve damage. Implants that protrude into the sinus cavity through insufficient bone in the upper jaw create chronic sinus problems. These complications often require implant removal and extensive reconstruction.
How Teeth Preserve Jawbone Naturally
Understanding why bone disappears after tooth loss clarifies why grafting becomes necessary. Natural teeth connect to the jawbone through the periodontal ligament, a specialized tissue that transmits chewing forces to the surrounding bone. This mechanical stimulation signals osteoblasts to maintain bone density. The ligament contains cells that respond to force by triggering bone formation.
When a tooth is extracted, this stimulation stops. The body interprets the absence of force as a signal that the bone in that area is no longer needed. Osteoclast activity increases. Osteoblast activity decreases. Bone resorption begins within weeks and continues progressively. The alveolar ridge, the specific bone that housed the tooth roots, resorbs both vertically and horizontally. Width decreases first, followed by height. Over years, significant bone volume disappears, altering facial contours and compromising implant sites.
Minimum Bone Requirements for Standard Implants
Dental implant placement follows established dimensional requirements developed through decades of clinical research. These requirements account for the implant’s mechanical needs, the surrounding bone’s biological response, and the long-term stability of the restoration.
Height Requirements
Implant length, which corresponds to bone height, determines how much surface area contacts bone. Longer implants provide greater surface area for osseointegration and better resistance to forces. The minimum bone height for standard implants generally measures 10 millimeters, though shorter implants have expanded treatment options for compromised sites.
Standard implants typically range from 8 to 16 millimeters in length. The 10-millimeter implant represents a common minimum for posterior sites where chewing forces are highest. Shorter implants measuring 6 to 8 millimeters have demonstrated acceptable success rates in specific situations, particularly in the lower front jaw where bone is dense and forces are lower.
Beyond the implant itself, bone height must accommodate anatomical structures. In the lower back jaw, the inferior alveolar nerve canal runs approximately 8 to 10 millimeters below the ridge crest in dentate patients, less in those with long-term tooth loss. The implant must stop at least 2 millimeters above this canal. This safety margin protects the nerve from direct trauma during placement and from pressure or inflammation during healing.
In the upper back jaw, the maxillary sinus floor limits available bone height. Following tooth loss and sinus expansion, as little as 2 to 3 millimeters of bone may remain beneath the sinus. Standard implants require a minimum of 10 millimeters of bone height in this region. When less exists, sinus augmentation becomes necessary.
Width Requirements
Bone width, measured from cheek to tongue, must surround the implant with adequate thickness on all sides. Standard implants measure between 3.5 and 6 millimeters in diameter. The minimum bone width requirement equals the implant diameter plus 2 millimeters of bone on each side.
A standard 4-millimeter diameter implant therefore requires a minimum of 8 millimeters of bone width. This ensures at least 2 millimeters of bone thickness on the cheek side and 2 millimeters on the tongue side. Thinner bone on the cheek side, in particular, risks resorption that exposes implant threads. Once threads become exposed, bacterial colonization follows, and peri-implantitis often results.
Narrower implants measuring 3 to 3.5 millimeters in diameter can be placed in ridges measuring 5 to 6 millimeters wide, though they carry higher fracture risk and are typically reserved for lower front teeth with lower forces. Wider implants measuring 5 to 6 millimeters suit molar sites but require correspondingly wider ridges.
Proximity to Adjacent Structures
Bone requirements extend beyond the implant dimensions. Implants must maintain safe distances from adjacent tooth roots, other implants, and anatomical landmarks. The minimum distance from an implant to an adjacent natural tooth root measures 1.5 to 2 millimeters. This space preserves the blood supply that enters the bone through the periodontal ligament space. Encroaching on this zone can devitalize the adjacent tooth.
Between adjacent implants, the minimum distance measures 3 millimeters. Closer placement compromises the interimplant bone, which relies on blood supply from both sides. Insufficient interimplant bone often results in crestal bone loss and papilla loss, creating unaesthetic black triangles between implant crowns.
The implant must sit at least 2 millimeters from the buccal and lingual cortical plates, the dense outer bone layers. These plates provide critical blood supply to the healing bone. Violating them compromises healing and risks long-term bone loss.
Bone Quality Classifications and Their Impact
Bone quantity, measured in millimeters, tells only part of the story. Bone quality, the density and architecture of the bone, equally influences implant success. Lekholm and Zarb classified jawbone into four types that guide treatment planning.
Type I Bone: Dense Cortical
Type I bone consists almost entirely of dense cortical bone with minimal marrow spaces. This bone type appears most commonly in the anterior lower jaw. It offers excellent primary stability when the implant engages the dense cortex. The surgeon feels significant resistance during drilling, and the implant seats with high insertion torque.
However, Type I bone presents challenges. Its limited blood supply, dependent primarily on periosteal vessels rather than intramedullary vessels, slows healing. The dense bone heats more during drilling, requiring careful irrigation and sharp drills to prevent thermal necrosis. Despite slower initial healing, long-term success rates in Type I bone rank among the highest.
Type II Bone: Thick Cortical with Dense Cancellous
Type II bone combines a thick layer of cortical bone over dense trabecular bone. This bone type, common in the posterior lower jaw and anterior upper jaw, provides the ideal implant environment. The cortical layer delivers excellent primary stability. The cancellous bone provides good vascularity for healing.
Osseointegration proceeds predictably in Type II bone. Standard healing timelines of three to four months in the mandible and four to six months in the maxilla apply. Success rates in Type II bone approach the highest levels documented for any bone type.
Type III Bone: Thin Cortical with Dense Cancellous
Type III bone features a thin cortical layer over favorable cancellous bone. Common in the anterior upper jaw, this bone type provides less primary stability than Types I or II because the thin cortex offers limited initial grip. Surgeons may underprepare the implant site slightly, allowing the implant to compress the bone for improved stability.
Healing in Type III bone often requires additional time. The softer bone remodels more extensively around the implant during osseointegration. Careful occlusal management protects the implant during this vulnerable period. Success rates remain high with proper technique and adequate healing time.
Type IV Bone: Minimal Cortical with Loose Cancellous
Type IV bone, predominating in the posterior upper jaw, challenges implant surgeons. A very thin cortical layer covers low-density cancellous bone with large marrow spaces. Achieving primary stability in this bone proves difficult. The implant may spin without engaging firmly, and insertion torque values often fall below the thresholds associated with successful osseointegration.
Surgical technique modifications improve outcomes in Type IV bone. Undersized preparation leaves more bone for the implant to compress. Osteotomes condense bone laterally rather than removing it with drills. Wider implants engage more bone surface area. Extended healing times of six months or longer allow adequate osseointegration before loading. Despite these measures, success rates in Type IV bone fall below other bone types, and careful case selection remains essential.
Diagnosing Bone Availability
Modern imaging technology provides detailed assessment of bone quantity and quality before surgery. This diagnostic phase prevents surprises during implant placement and allows proper planning for grafting when necessary.
Two-Dimensional Imaging
Panoramic radiography offers a broad view of the jaws, showing bone height relative to anatomical structures. This imaging reveals the vertical bone available above the inferior alveolar nerve canal in the lower jaw and below the maxillary sinus in the upper jaw. It also screens for pathology such as cysts, tumors, or retained root tips.
However, panoramic images suffer from magnification and distortion. Measurements taken from these images require correction factors. More critically, panoramic images provide no information about bone width or quality. A panoramic image may show adequate bone height while the ridge proves far too narrow for implant placement. For this reason, panoramic imaging serves as a screening tool rather than a definitive diagnostic for implant planning.
Three-Dimensional Cone Beam Computed Tomography
CBCT imaging revolutionized implant dentistry by providing accurate three-dimensional views of the jaw anatomy. This technology uses a cone-shaped X-ray beam that rotates around the patient, capturing data that software reconstructs into detailed three-dimensional images. Radiation exposure from dental CBCT is significantly lower than medical CT scans while providing adequate resolution for implant planning.
CBCT scans reveal bone dimensions in all planes. The dentist measures bone height, width, and the precise location of anatomical structures with sub-millimeter accuracy. The software allows virtual implant placement, testing different sizes and positions before surgery. Bone density can be assessed through Hounsfield unit measurements, correlating with the Lekholm and Zarb classification.
The scan also reveals critical details invisible on two-dimensional images. The exact path of the inferior alveolar nerve canal, sometimes present as a bifid variant with two canals, becomes clear. The sinus membrane thickness and any pathology are visualized. Lingual concavities in the lower back jaw, which can perforate during implant placement, are identified. This information prevents surgical complications.
Clinical Examination Findings
Imaging alone does not provide complete assessment. Clinical examination reveals soft tissue contours, ridge shape, and the relationship of the proposed implant site to the planned restoration. The surgeon palpates the ridge, assessing width and identifying sharp or irregular contours. Periodontal probing around adjacent teeth evaluates the health of neighboring structures.
Study models mounted on an articulator allow evaluation of the space available for the restoration. The restorative dentist determines whether adequate mesial-distal space exists for the implant crown and whether the interarch space accommodates the abutment and crown components. These prosthetic considerations may override surgical bone availability, determining whether an implant is even restorable.
Bone Grafting: Creating Volume Where Needed
When diagnostic assessment reveals inadequate bone, grafting procedures add volume where nature has subtracted it. Modern bone grafting techniques reliably rebuild the foundation for implant placement.
Socket Preservation
The simplest bone grafting procedure prevents bone loss rather than rebuilding it. Socket preservation, also called ridge preservation, places bone graft material into an extraction socket immediately after tooth removal. This intervention maintains the ridge dimensions that would otherwise collapse during healing.
After atraumatic extraction, the surgeon debrides the socket thoroughly, removing granulation tissue and infection. Bone graft material, either allograft, xenograft, or alloplast, fills the socket to the level of the surrounding bone. A collagen membrane or other barrier covers the graft, containing the particles and excluding soft tissue ingrowth. Sutures close the site, or the membrane may be left exposed.
Studies comparing socket preservation to unassisted extraction healing demonstrate significantly better ridge dimension maintenance with grafting. Width loss averages 1.5 to 2 millimeters with preservation versus 3 to 4 millimeters without. Height loss similarly reduces. This preserved bone often eliminates the need for more extensive grafting at the time of implant placement.
Guided Bone Regeneration
Guided bone regeneration, commonly called GBR, rebuilds bone in deficient ridges using the principle of selective tissue exclusion. Bone graft material fills the defect. A barrier membrane excludes faster-growing soft tissue cells from the graft site, allowing slower-growing bone cells to populate the area without competition.
GBR addresses localized ridge deficiencies, such as dehiscence defects where implant threads become exposed on the cheek side, or fenestration defects where a window of bone is missing. Particulate graft material placed over the exposed implant surface is covered with a resorbable or non-resorbable membrane. The membrane maintains space for bone formation while excluding gingival connective tissue and epithelium.
Healing requires four to nine months depending on defect size. Non-resorbable membranes, typically made of titanium-reinforced polytetrafluoroethylene, require a second surgery for removal. Resorbable membranes, made of collagen, eliminate this second surgery but may provide less space maintenance. The surgeon selects the membrane type based on defect morphology and treatment goals.
Block Bone Grafts
Large ridge deficiencies exceeding the capacity of particulate grafts require block grafts. These grafts use a solid piece of bone, either harvested from the patient or obtained from a tissue bank, secured to the deficient ridge with small titanium screws.
Autogenous block grafts harvest bone from the patient’s own body. Intraoral donor sites include the back of the lower jaw, the chin area, or the cheekbone region. These grafts incorporate and revascularize more predictably than other graft types because they contain living bone cells and growth factors. However, they require a second surgical site, increasing operative time and post-operative discomfort.
Allogeneic block grafts use processed human bone from tissue banks. These grafts eliminate donor site morbidity but incorporate more slowly, as they lack living cells. They serve as scaffolds into which the patient’s own bone gradually grows. Cortical allogeneic blocks provide excellent structural support for implant placement.
Block grafts heal for four to six months before implant placement. During this period, the graft revascularizes and integrates with the native bone. Premature implant placement into an unhealed graft risks failure of both the graft and the implant.
Sinus Lift Procedures
The maxillary sinuses, air-filled cavities above the upper back teeth, often expand into the space previously occupied by tooth roots after extractions. Sinus lift surgery, or sinus augmentation, raises the sinus membrane and places bone graft material beneath it, increasing bone height for implant placement.
The lateral window technique, the traditional approach, creates a small bony window in the side of the maxilla. The surgeon carefully elevates the sinus membrane from the sinus floor, creating a space that is then filled with graft material. The window is covered with a membrane, and the site heals for six to nine months before implant placement.
The transcrestal technique, also called the osteotome technique, accesses the sinus through the implant site itself. After drilling to within 1 to 2 millimeters of the sinus floor, osteotomes fracture the sinus floor upward. Graft material placed into the osteotomy elevates the membrane. This less invasive approach works when only 2 to 4 millimeters of additional height is needed and the ridge width is adequate.
Sinus augmentation success rates exceed 95 percent in healthy patients. Sinus membrane perforation, the most common complication, occurs in 10 to 30 percent of procedures. Small perforations often seal spontaneously or can be repaired with a collagen membrane. Large perforations may require aborting the procedure and allowing healing before reattempting.
Implant Options for Compromised Bone
Bone grafting, while effective, adds time, cost, and surgical procedures to implant treatment. Alternative implant designs and techniques sometimes allow placement in compromised bone without grafting.
Short Implants
Short implants, defined as those measuring less than 8 millimeters in length, expand treatment options for patients with limited bone height. Early short implants showed higher failure rates than standard implants, but modern surface treatments and surgical protocols have narrowed this gap significantly.
Current short implants feature aggressive thread designs that maximize surface area within the limited length. Roughened surfaces enhance osseointegration. Placement technique emphasizes minimal trauma and high primary stability. When these conditions are met, short implants demonstrate success rates comparable to standard implants in posterior sites, provided the bone quality is adequate.
Short implants work particularly well in the posterior lower jaw where bone height is limited by the inferior alveolar nerve. They avoid the need for nerve repositioning surgery. In the posterior maxilla, short implants combined with a minimal sinus lift provide an alternative to extensive sinus grafting.
Narrow Diameter Implants
Narrow diameter implants, measuring 3 to 3.5 millimeters in diameter, fit into ridges too thin for standard implants. They find primary application in the lower front teeth region, where the natural teeth are narrow and the available ridge often measures only 5 to 6 millimeters wide.
These implants carry limitations. Their reduced diameter means reduced resistance to fracture, particularly under lateral forces. They should not be used in posterior sites with high occlusal loads unless the patient has a protected occlusion. Their smaller surface area provides less bone-to-implant contact, potentially compromising long-term stability in compromised bone.
Narrow implants also serve as temporary anchorage devices or as support for overdentures when multiple implants distribute forces. In these applications, their reduced dimensions become advantageous, allowing placement in ridges that would otherwise require grafting.
Zygomatic Implants
Zygomatic implants represent the most dramatic solution for severe maxillary bone loss. These implants, measuring 30 to 50 millimeters in length, anchor in the zygomatic bone, or cheekbone, rather than the maxillary ridge. They bypass the sinus entirely, entering the oral cavity in the posterior maxilla and engaging the dense zygomatic bone above.
This technique, developed by Professor Per-Ingvar Brånemark, requires advanced surgical training. The implant path traverses the maxillary sinus, with the implant body passing through the sinus cavity while the tip engages the zygomatic bone. Placement requires general anesthesia and carries risks including orbital penetration, infraorbital nerve injury, and sinus complications.
Zygomatic implants provide immediate function in many cases, allowing placement of a fixed prosthesis the same day. They eliminate the need for extensive bone grafting and shorten treatment time dramatically for patients with severe maxillary atrophy. However, they represent a significantly more invasive procedure with higher surgical risk, reserved for patients who lack other options.
Angled Implants and All-on-Four
The All-on-Four treatment concept uses angled posterior implants to maximize the use of available bone in patients with moderate to severe ridge resorption. Rather than placing all implants vertically, the posterior implants angle up to 45 degrees, increasing the distance between anterior and posterior implants while avoiding anatomical structures.
This angulation exploits the available bone more efficiently. The anterior implants engage the bone remaining in the front of the jaw. The tilted posterior implants reach the denser bone in the canine pillar region while emerging farther back, providing better support for a full-arch prosthesis. The resulting prosthesis can extend posteriorly without cantilevering excessively.
All-on-Four treatment often eliminates the need for bone grafting in patients who would otherwise require significant augmentation. The technique allows immediate loading in many cases, with the patient receiving a fixed provisional prosthesis the day of surgery. Success rates for this approach, when performed by experienced surgeons in appropriately selected patients, compare favorably with traditional approaches.
Measuring Bone: What Numbers Actually Matter
Critical Measurements for Treatment Planning
| Measurement | Minimum Value | Ideal Value | Measurement Method |
|---|---|---|---|
| Bone height (posterior mandible) | 10 mm above nerve | 12+ mm | CBCT |
| Bone height (posterior maxilla) | 6-8 mm below sinus | 10+ mm | CBCT |
| Bone width | Implant diameter + 4 mm | 6+ mm for 4 mm implant | CBCT |
| Distance to adjacent tooth | 1.5-2 mm | 2+ mm | CBCT or periapical |
| Distance between implants | 3 mm | 3+ mm | CBCT |
| Buccal bone thickness | 2 mm | 2+ mm | CBCT |
These measurements guide surgical planning. Values below the minimum require either grafting or selection of alternative implant designs. Values at or above the ideal provide predictable outcomes with standard protocols.
How Surgeons Evaluate Bone Density
Intraoperative assessment of bone quality supplements preoperative imaging. During drilling, the surgeon feels the resistance of the bone, correlating with density. Type I bone offers firm resistance at every step. Type IV bone offers little resistance, with the drills advancing almost effortlessly.
Insertion torque, measured as the implant is placed, provides an objective assessment. Values above 35 Newton-centimeters indicate good primary stability and predict successful osseointegration. Values below 15 Newton-centimeters raise concerns and may prompt the surgeon to select a different implant or alter the loading protocol.
Resonance frequency analysis offers a non-invasive method of assessing implant stability. A small transducer attaches to the implant, and the device measures the resonance frequency of the implant-bone complex. The resulting Implant Stability Quotient value ranges from 1 to 100, with values above 70 indicating high stability and values below 60 suggesting caution before loading.
The Relationship Between Time Without Teeth and Bone Loss
Pattern of Bone Resorption After Extraction
Bone loss following tooth extraction follows a predictable pattern. The most rapid resorption occurs during the first three to six months, with the buccal plate, the bone on the cheek side, resorbing faster and more extensively than the lingual plate. Width loss precedes height loss. After the first year, the rate of resorption slows but continues indefinitely.
Studies document average width loss of 3 to 4 millimeters and height loss of 1.5 to 2 millimeters during the first six months after extraction. Over subsequent years, additional resorption of 0.5 to 1 percent of bone height annually continues. Long-term edentulous patients may lose so much bone that standard implant placement becomes impossible without extensive grafting.
When to Place Implants After Extraction
Timing of implant placement significantly influences bone preservation. Immediate placement at the time of extraction preserves bone best but requires adequate remaining bone and absence of infection. Early placement, four to eight weeks after extraction, allows soft tissue healing while limiting bone resorption. Delayed placement, three to four months after extraction, allows complete hard and soft tissue healing but results in more bone loss. Late placement, years after extraction, faces the greatest bone deficiency.
The optimal timing balances infection control, bone preservation, and soft tissue management. Infected sites with active purulence should not receive immediate implants. Sites with thin buccal bone benefit from socket grafting and delayed placement. Each case requires individualized timing based on these factors.
Realistic Expectations for Bone Grafting Outcomes
Bone grafting does not perfectly recreate the original anatomy. Grafted bone, even when successful, differs from native bone in density, vascularity, and remodeling capacity. Patients should understand the realistic goals and limitations of grafting procedures.
Ridge augmentation can restore width adequately for implant placement in most cases. Height restoration proves more challenging, particularly in the posterior maxilla where sinus pneumatization continues over time. Some vertical bone gain achieved through grafting may resorb over years, though the bone typically remains adequate for implant support.
Graft success rates vary by procedure type, defect size, and patient factors. Small socket preservation grafts succeed in over 95 percent of cases. Larger block grafts and sinus lifts succeed in 90 to 95 percent of cases. Complications including infection, membrane exposure, graft resorption, and incomplete incorporation occur in a minority of cases. When complications arise, revision grafting can often salvage the site.
Conclusion
Dental implants require adequate bone in three dimensions: sufficient height to accommodate the implant length while maintaining safe distance from nerves and sinuses, sufficient width to surround the implant with at least 2 millimeters of bone on all sides, and sufficient quality to achieve primary stability and support osseointegration. When natural bone falls short of these requirements, socket preservation, guided bone regeneration, block grafting, and sinus lifts reliably rebuild the necessary foundation. Alternative approaches including short implants, narrow implants, and angled implant concepts sometimes bypass grafting requirements altogether. Modern diagnostic imaging, particularly CBCT, allows precise pre-surgical assessment so that bone deficiencies are identified and addressed before implant placement, not discovered as intraoperative surprises.
Frequently Asked Questions
How do I know if I have enough bone for implants?
A cone beam CT scan provides the definitive answer. This three-dimensional imaging shows your bone height, width, and density with sub-millimeter accuracy. Your dentist measures these dimensions against the implant size planned for your case and determines whether sufficient bone exists.
Does bone grafting hurt?
Bone grafting procedures are performed under local anesthesia, so the procedure itself is painless. Post-operative discomfort varies by procedure extent. Socket preservation causes minimal discomfort, similar to an extraction. Larger block grafts cause more significant soreness for several days, managed with prescribed pain medication.
How long does bone grafting take to heal?
Small grafts mature in three to four months. Sinus lifts require six to nine months. Large block grafts may need six to nine months. Your surgeon confirms graft maturity through follow-up imaging before scheduling implant placement. Rushing this timeline risks implant failure.
Can bone grafting fail?
Graft failure occurs in a small percentage of cases. Signs include graft particle exfoliation, persistent swelling, infection, or lack of consolidation on follow-up imaging. Failed grafts can usually be revised after the site heals. Smoking, poor oral hygiene, and uncontrolled medical conditions increase failure risk.
Is there an age limit for bone grafting?
No absolute age limit exists. Healthy older adults heal bone grafts successfully. The limiting factors are medical status, not chronological age. Patients with uncontrolled diabetes, active cancer treatment, or certain medications may not be candidates.
Can I get implants without bone grafting?
Some patients with moderate bone deficiency can receive short implants, narrow implants, or angled implants that avoid the need for grafting. Your specific anatomy determines whether these alternatives apply to your case.
How much does bone grafting cost?
Costs vary widely by procedure type and graft material. Socket preservation typically costs $400 to $800. Guided bone regeneration ranges from $800 to $2,500. Block grafts range from $1,500 to $3,000. Sinus lifts range from $1,500 to $3,000 per side. These costs are separate from implant placement fees.
Will my dental insurance cover bone grafting?
Coverage varies by plan. Many dental plans cover a portion of bone grafting when it is medically necessary for implant placement. Medical insurance may cover grafting related to trauma or congenital defects. Your dental office can provide a pre-treatment estimate for your specific plan.
Additional Resource
American Academy of Periodontology: Dental Implant Information
https://www.perio.org/for-patients/periodontal-treatments-and-procedures/dental-implant-procedures/