How Are Dental Implants Aligned? The Science of Precision Placement
The placement of a dental implant is a surgical act of three-dimensional precision. The human eye cannot see through gum tissue or bone, yet the implant must be positioned with sub-millimeter accuracy to avoid nerves and sinuses, to engage the maximum volume of healthy bone, and, critically, to support a final crown that looks and functions like a natural tooth. The question “How are dental implants aligned?” is fundamentally a question about how a surgeon transforms a 3D virtual plan into physical reality. The alignment process is a fusion of advanced radiographic imaging, computer-aided design, and a physical guidance system called a surgical guide. This guide will take you step-by-step through the entire alignment journey, from the initial cone beam CT scan to the final, precisely angled implant in your jaw, explaining the technology and the clinical judgment that make modern implant alignment one of the most predictable procedures in medicine.
The Foundational Principle: Restoratively-Driven Placement
The most critical conceptual shift in modern implantology is the principle of restoratively-driven placement. In the early days of implant dentistry, the surgeon would look at the available bone and place the implant where the bone was. The restorative dentist would then have to figure out how to build a crown on an implant that might be in a compromised, unaesthetic, or functionally difficult position. This often led to bulky, poorly contoured crowns and a high rate of prosthetic complications.
Modern alignment is the reverse of this process. The planning begins with the desired final position of the tooth. The restorative dentist, often a prosthodontist or a specially trained general dentist, designs the final crown digitally first. They position the ideal tooth shape and size on a computer screen, within a virtual model of the patient’s mouth. Only once the final tooth position is established is the implant position determined. The implant is then placed in the computer model so that it emerges through the center of the biting surface of the back teeth or through the cingulum (the back surface) of the front teeth. This ideal emergence profile is what allows the final crown to be screw-retained, which is the most biologically sound method of attaching a crown because it avoids cement being trapped under the gum. The implant is the servant of the final tooth, not the other way around. This philosophy dictates every subsequent step of the alignment process.
The Diagnostic Foundation: The Cone Beam CT (CBCT) Scan
The journey of implant alignment begins with a Cone Beam Computed Tomography (CBCT) scan. This is a specialized, low-radiation 3D X-ray that captures a digital volume of your entire maxillofacial anatomy. Unlike a standard panoramic 2D X-ray, which flattens a curved jaw into a single distorted image, a CBCT allows the surgeon to slice through the data in any plane: axial, coronal, sagittal, or even a custom curved plane along the jawline.
On the CBCT, the surgeon can measure the exact height and width of the available bone ridge with millimeter accuracy. They can visualize the precise location and shape of the inferior alveolar nerve canal, which runs through the lower jaw, and trace its path. A violation of this nerve is the most significant surgical risk in implantology, potentially causing permanent numbness of the lip and chin. In the upper jaw, the CBCT reveals the floor of the maxillary sinus and the thickness of the bone separating the sinus from the mouth. The surgeon assesses the density of the bone, classifying it from soft D4 bone to dense D1 bone, as this dictates the drilling protocol. Without a CBCT, implant placement is a blind procedure. The standard of care has evolved to the point where placing an implant without a 3D scan is a deviation from accepted clinical practice, except in the most trivially simple, single-tooth cases where the anatomy is overwhelmingly favorable.
Digital Planning: The Virtual Implant Placement
The raw CBCT data is imported into specialized implant planning software, such as coDiagnostiX, SimPlant, or Blue Sky Plan. This software becomes the virtual operating room. It is here that the alignment is born, in a risk-free, infinitely adjustable digital environment. The process is a methodical, step-by-step digital rehearsal of the surgery.
First, the surgeon segments the data, isolating the bone, the teeth, and the nerve canal into distinct, color-coded 3D models. Next, an intraoral optical scan of the patient’s mouth, taken with a digital wand scanner, is imported and fused with the CBCT data. This fusion of the optical scan of the teeth and gums with the radiographic scan of the bone is what creates a complete, virtual patient. The surgeon can now see the teeth, the gums, and the underlying bone in perfect alignment on a single screen.
The restorative dentist then digitally places the final crown in its ideal position. With the crown fixed, the surgeon selects a virtual implant from a digital library of implant types and sizes. The surgeon manipulates the virtual implant in three dimensions: mesio-distally (front-to-back), bucco-lingually (cheek-to-tongue), and apico-coronally (depth). The goal is to place the implant so it is completely encased in bone on all sides, with at least 1.5 to 2 millimeters of bone on the facial side, to preserve the blood supply to that critical facial bone plate. The implant platform must be positioned at the correct depth below the future gum line, typically 3 to 4 millimeters apical to the planned gum margin for a front tooth, to create a natural emergence profile. The angle must be such that the screw access hole for the final crown emerges through the back of the tooth or the center of the chewing surface. The software provides real-time feedback, warning the surgeon if the implant is too close to the nerve or if it perforates the facial bone plate.
“The digital planning session is the actual surgery. When I am at the computer, placing the virtual implant, I am making all the important decisions. The physical surgery is simply the faithful execution of that plan. If the digital plan is perfect, and the guide is well-made, the surgical outcome is a foregone conclusion.” — An Implant Surgeon Using Fully Guided Surgery
The Role of the Radiographic and Surgical Guide Stent
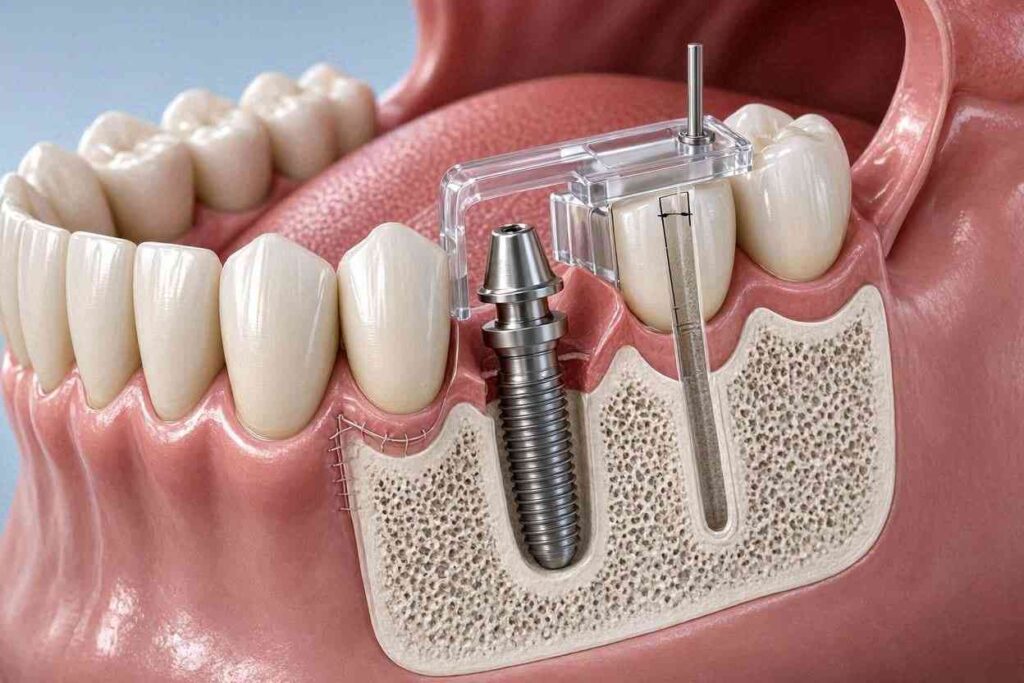
The bridge between the virtual plan and the surgical reality is the surgical guide. This is a custom-made, 3D-printed appliance, typically made of a hard, clear biocompatible resin, that fits precisely over the patient’s remaining teeth, the gum tissue, or is anchored directly to the bone with fixation pins. The guide is the physical output of the digital plan.
The design of the guide is generated directly from the planning software. The software places virtual sleeves, which are hollow metal cylinders, at the exact planned position, angle, and depth of each implant. The 3D printer then fabricates the guide body with these sleeves embedded within it. On the day of surgery, the guide is seated in the patient’s mouth. It fits like a lock and key. The surgeon then inserts a series of precision drills through the sleeves. Each sleeve is of a specific diameter that corresponds exactly to a specific drill in the guided surgery kit. The sleeve physically constrains the drill, preventing any deviation. The surgeon cannot angle the drill differently or drift to one side. The guide dictates the exact osteotomy, the precise hole in the bone. The implant is then placed through the same sleeve, ensuring it is driven into the exactly planned position. There are different levels of guidance: a pilot guide only constrains the very first drill, while a fully guided system constrains every single drill and the implant placement itself. The fully guided protocol, when executed correctly, achieves an accuracy of placement that is within 0.5 to 1.0 millimeter of the virtual plan.
Surgical Factors: Achieving Primary Stability in the Aligned Position
The alignment is not just about geometry; it is about biology. The implant must achieve primary stability, a mechanical friction-lock within the bone at the time of placement. Without primary stability, the implant will fail to osseointegrate. The surgeon aligns the implant not just in a position that is anatomically safe, but in a position that maximizes this initial stability.
The density of the bone is a major factor. In the posterior maxilla (upper back jaw), the bone is often soft. The surgeon may choose to “undersize” the final drill, using a drill one size smaller than the implant diameter, to create a tighter, more compressive fit. This is called under-preparation. The tapered design of the implant, acting like a wedge, also enhances primary stability. The alignment must also respect the biotype of the gum tissue. In a patient with thin, scalloped gums, the implant platform must be positioned deeper to hide the metal and create a thicker tissue cuff. The alignment process is a constant balancing act between the ideal prosthetic position, the anatomical limitations, and the biological demand for a stable, well-vascularized healing environment.
The Special Case of Zygomatic and Pterygoid Implant Alignment
In a patient with a severely resorbed upper jaw, where no bone remains in the posterior region to place a conventional implant, the alignment principles change dramatically. A zygomatic implant is an extremely long implant, up to 50 millimeters, that is anchored in the dense zygomatic bone of the cheekbone. A pterygoid implant engages the pterygoid plate behind the upper jaw.
The alignment of these implants is an advanced, specialist-level skill. The starting point is not the jaw ridge, but the remote anchorage bone. The CBCT planning for a zygomatic implant requires tracing the exact path of the implant through the maxillary sinus, ensuring it does not violate the orbit of the eye, and achieving a bi-cortical anchorage in the zygomatic bone. The surgical guide for these cases often has a more complex design, with stabilizing pins to ensure it does not shift during the high-torque placement. This represents the furthest frontier of implant alignment, where the principles of restoratively-driven placement must be adapted to the available remote bone.
The table below summarizes the key technologies in the alignment workflow.
| Technology | Role in Alignment | Accuracy Level |
|---|---|---|
| CBCT Scan | 3D visualization of bone, nerves, and sinuses | Diagnostic foundation (0.1-0.3mm voxel size) |
| Intraoral Optical Scan | 3D capture of teeth and gum surface for virtual fusion | 10-20 micron accuracy |
| Implant Planning Software | Virtual implant placement, prosthesis design, guide design | Core of the alignment plan |
| 3D-Printed Surgical Guide | Physical transfer of the digital plan to the surgical site | 0.5-1.0mm deviation from plan |
| Guided Surgery Kit | Precision drills and implant drivers that fit the guide sleeves | Sleeve-to-drill tolerance < 0.1mm |
Computer-Guided vs. Freehand Surgery: A Critical Comparison
The alignment of an implant can be achieved through two different surgical philosophies: freehand and computer-guided. In a freehand approach, the surgeon studies the CBCT scan mentally, but places the implant without a physical guide. They rely on their experience, their visual estimation of the bone axis, and a series of direction indicators. A skilled, high-volume surgeon can achieve good results with a freehand technique, but it is inherently less precise, particularly in the angle of placement and the depth control.
The computer-guided approach, using a 3D-printed guide as described, is the current gold standard for precision. The literature is clear: guided surgery significantly reduces deviations in the angular and apical position of the implant compared to freehand placement. The guide is not a crutch; it is a safety and precision instrument. It is particularly valuable for the novice surgeon and, for the expert surgeon, it allows the execution of complex, minimally invasive, flapless surgeries where no gum incisions are made. However, a guide is only as accurate as the plan it is based on and the stability of its fit in the mouth. A poorly fitting guide due to a bad intraoral scan or an improperly designed guide can introduce error. The guide is a tool, and like any tool, its accuracy depends on the skill of the user.
Important Note: If a surgeon tells you they can “eyeball” your implant placement and that a CBCT or surgical guide is unnecessary, seek a second opinion. The alignment of an implant is a permanent, irreversible positioning of a medical device in your body. Modern technology has made guesswork obsolete.
Post-Placement Alignment Verification
The alignment process is not fully complete until it has been verified. After the implant is placed, many surgeons will take a post-operative CBCT or a periapical X-ray. This image is compared directly to the virtual plan. The surgeon checks that the implant is at least 1.5 millimeters away from the nerve, that the facial bone plate is intact, and that the implant platform is at the planned depth.
This verification step is a mark of a meticulous practitioner. It closes the loop. It provides documented proof that the alignment was executed correctly. If a deviation is detected, and it is clinically significant, the surgeon may decide to remove the implant immediately and replace it correctly, or in a less critical scenario, note the deviation for the restorative dentist so they can compensate in the design of the custom abutment. The final alignment of the tooth, as seen by the patient, is also a product of the abutment design. A custom, angled abutment can correct a minor angular deviation of the implant, bringing the screw access hole to the ideal location. The implant body itself is the fixed foundation; the abutment is the adjustable connector that fine-tunes the final alignment of the crown.
Conclusion
Dental implants are aligned through a digitally driven process that begins with a 3D CBCT scan, proceeds through virtual implant placement in planning software guided by the ideal final position of the tooth, and is physically executed using a 3D-printed surgical guide that constrains the drills to the pre-planned angle, depth, and position with sub-millimeter accuracy. This restoratively-driven, fully guided protocol has replaced freehand surgery as the gold standard for precision, ensuring the implant is biologically safe, mechanically stable, and prosthetically ideal. The final alignment is verified with a post-operative X-ray, and any minor angular deviation can be corrected with a custom abutment.
Frequently Asked Questions (FAQ)
Q: How accurate is a guided implant surgery compared to freehand?
A: Highly accurate. A meta-analysis of clinical studies has shown that fully guided implant surgery achieves an average angular deviation of less than 3 degrees and a positional deviation at the implant platform of less than 1.0 millimeter from the virtual plan, which is significantly more precise than freehand placement.
Q: Can a surgical guide guarantee I will not have nerve damage?
A: A surgical guide is a powerful safety tool, but it is not an absolute guarantee. The accuracy of the guide depends on a well-designed plan that maintains a safety zone of at least 1.5 millimeters from the nerve. If the guide is used correctly, and the plan is well-made, the risk of nerve injury is dramatically reduced, but it cannot be reduced to zero.
Q: Do all dentists use a CBCT and a surgical guide for implant placement?
A: No, but they should. The standard of care is rapidly moving toward universal CBCT and guided surgery. A dentist who places implants without a CBCT is practicing below the modern standard of care, and you have the right to insist on a 3D-guided procedure.
Q: What if my mouth does not have enough teeth to hold a surgical guide?
A: A guide can be stabilized by the bone itself using temporary fixation pins, or it can be mucosa-supported, resting on the gum tissue. A tooth-supported guide is the most accurate, but edentulous (toothless) patients can still be treated with a fully guided protocol using bone pins or a mucosa-supported guide with a radiographic template.
Additional Resource:
For an in-depth look at the digital implant workflow, the International Team for Implantology (ITI) provides open-access consensus papers on digital technologies in implant dentistry: ITI Digital Dentistry Resources.