How To Floss Around A Dental Implant: The Definitive Guide
Flossing a dental implant is not the same as flossing a natural tooth. The anatomy is different, the materials are different, and the consequence of improper technique is not a simple cavity but a destructive bone infection called peri-implantitis. A dental implant lacks the protective periodontal ligament that surrounds a natural tooth root. The gum tissue around an implant forms a weaker, more permeable seal, making the daily mechanical disruption of bacterial biofilm around the implant an absolute, non-negotiable biological necessity. The question “How to floss around a dental implant?” is one of the most critical questions any implant patient can ask, and the answer is a specific, evidence-based technique using specialized tools. This guide will teach you the precise method for flossing a single implant crown, an implant-supported bridge, and a full-arch fixed hybrid prosthesis, ensuring you can protect your investment for a lifetime.
The Biological Reason Implant Flossing Is Non-Negotiable
A natural tooth is attached to the bone by a network of collagen fibers called the periodontal ligament. This ligament is a dynamic, living suspension system. It contains blood vessels that deliver immune cells and oxygen to the gum tissue. The gum fibers insert perpendicularly into the root surface, creating a strong, reinforced barrier against bacterial invasion. When you floss a natural tooth, you are cleaning a surface that has a robust, living defense behind it.
A dental implant has none of this. The implant is fused directly to the bone. There is no periodontal ligament. The gum tissue around the implant heals with a cuff of collagen fibers that run parallel to the implant surface, not perpendicular. This parallel orientation creates a structurally weaker seal that is more easily penetrated by bacterial toxins. The sulcus, the shallow crevice between the gum and the implant abutment, is the frontline of a silent war. The enemy is biofilm, a sticky, organized community of bacteria that continuously forms on the abutment surface. If this biofilm is not physically scraped away daily, it triggers a chronic inflammatory response called peri-implant mucositis. The gums become red, swollen, and bleed easily. If left untreated, the inflammation extends to the bone, causing progressive, irreversible bone resorption. This is peri-implantitis. The implant, once solid, can become loose and fail. The entire catastrophic cascade begins with a biofilm that was not mechanically disrupted. Flossing is not an optional cosmetic ritual for an implant; it is the single most important act you perform to prevent bone loss and ensure your implant survives for decades.
The Critical Material Difference: Why You Cannot Use Standard Floss on Every Implant
A common and damaging mistake is to use a standard waxed or unwaxed string floss on an implant restoration with the same aggressive, snapping motion used on natural teeth. This is dangerous for two reasons. First, the surface of the titanium abutment and the implant crown is highly polished to resist plaque accumulation. Aggressive flossing with a standard string floss can scratch this polished surface, creating microscopic grooves that become new havens for bacteria. Second, the shape of an implant crown and abutment is different from a natural tooth. The implant abutment is often concave, curving inward, and a thin string floss cannot effectively clean this curved, three-dimensional surface. You must use specialized, implant-specific floss that is designed to clean a broader, curved contour without scratching the restoration.
The Specialized Tools for Implant Flossing
A standard spool of drugstore floss is insufficient for comprehensive implant care. You must assemble a specific set of tools designed for the unique geometry of implant restorations.
- Implant-Specific Floss (Woven or Tufted): This floss is thicker, wider, and softer than standard floss. It often has a fuzzy, tufted, or woven section that acts like a soft brush, mechanically scrubbing the concave abutment surface and the inner wall of the crown.
- Superfloss (Three-Component Floss): This is the essential tool for implant bridges and full-arch fixed hybrids. It has a stiff, threader end for passing under bridges, a soft, spongy, wide middle section for scrubbing the intaglio surface and abutments, and a short section of standard floss.
- Interdental Brushes (Proxabrushes) with Plastic-Coated Wire: These small, conical brushes are ideal for cleaning the open spaces between an implant crown and an adjacent natural tooth, and for scrubbing the vertical, cylindrical surfaces of exposed abutments. The wire core must be coated in plastic to prevent scratching the titanium.
- Water Flosser with a Non-Metal Tip: A countertop water flosser delivers a pulsating stream of water that hydraulically flushes biofilm and food debris from the peri-implant sulcus and from under bridges. It is a critical adjunctive tool, not a replacement for physical flossing.
“I see the damage from improper flossing all the time. A patient comes in with a beautiful implant crown, but the gum is angry and bleeding. They are proud of how well they floss, but they are using a thin, waxed string and snapping it forcefully against the abutment. They are not cleaning the abutment effectively, and they are traumatizing the gum. Switching them to an implant-specific, tufted floss and teaching a gentle, circumferential shoeshine motion is often an instant fix.” — A Dental Implant Hygienist and Educator
Step-by-Step Flossing Technique for a Single Implant Crown
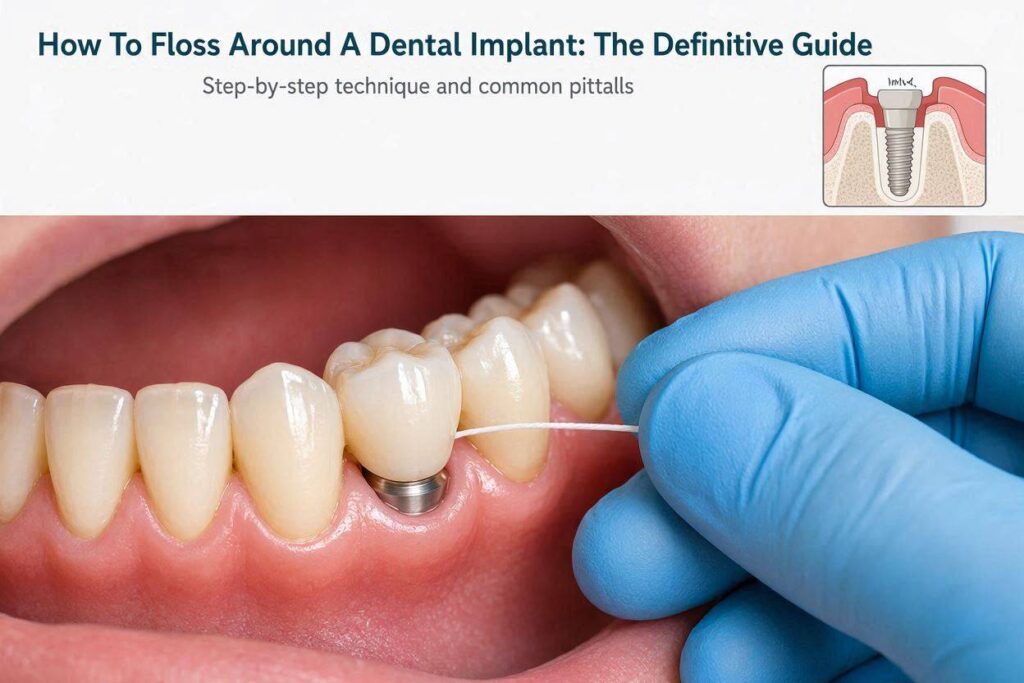
A single, standalone implant crown is the most straightforward restoration to floss. The goal is to clean the entire circumference of the abutment, where it emerges from the gum, and the inner walls of the crown.
- Select the Correct Floss: Use an implant-specific, tufted or woven floss. If the contact between the implant crown and the adjacent tooth is very tight, you may need to use a floss threader to pass the floss through the contact area without shredding it.
- Insert the Floss Gently: Gently work the floss through the contact point between the implant crown and the adjacent tooth. Do not snap it through, as this can damage the gum papilla.
- Form a C-Shape and Encircle the Implant: Once the floss is past the contact point, wrap it into a C-shape around the implant crown. The floss should hug the curved surface of the crown and abutment.
- The Circumferential Shoeshine Motion: Pull the floss taut against the abutment surface. Use a back-and-forth shoeshine motion, moving the floss horizontally against the abutment. You are mechanically scraping the biofilm off the titanium or zirconia surface. Move the floss up and down slightly to access the full depth of the sulcus, but the primary motion is horizontal and scrubbing. Do not use a forceful, vertical sawing motion, which can cut the delicate gum attachment.
- Clean Both Sides: Repeat the C-wrap and shoeshine motion on the opposite side of the implant crown, accessing the abutment from the other interproximal space.
- Floss the Adjacent Natural Teeth Normally: The natural teeth adjacent to the implant still have a periodontal ligament and are susceptible to decay. Floss them with standard string floss using the traditional up-and-down, hugging motion.
Flossing an Implant-Supported Bridge or a Fixed Full-Arch Hybrid
A bridge that connects two or more implant crowns, or a full-arch fixed hybrid bridge, presents a different challenge. There is an undersurface, the intaglio, that must be cleaned, and there is no way to pass standard floss between the false teeth and the gum tissue.
The Superfloss Technique: This is the definitive method for cleaning under an implant bridge.
- Take a strand of Superfloss. Identify the stiff, threader end.
- Pass the stiff end under the most posterior aspect of the bridge, between the bottom of the bridge and the gum tissue, and pull it through from the cheek side to the tongue side.
- Once the spongy, wide middle section of the floss is centered under the bridge, grip both ends of the floss tightly.
- Pull the spongy section firmly against the underside (intaglio surface) of the bridge. Use a broad, back-and-forth shoeshine motion, scrubbing the entire width of the underside.
- Move the floss to the next section of the bridge, working from the back to the front, scrubbing each segment of the intaglio. You should feel the friction of the spongy material against the pink acrylic or zirconia.
- After the Superfloss scrub, use the interdental brush to clean the vertical spaces between each individual implant abutment. Scrub the round, curved surfaces of the abutments.
- Finish with a water flosser on a low-to-medium setting to hydraulically flush away all the dislodged biofilm and debris.
The table below provides a quick-reference cleaning protocol.
| Restoration Type | Primary Flossing Tool | Motion | Frequency |
|---|---|---|---|
| Single Implant Crown | Implant-specific tufted/woven floss | C-wrap, horizontal shoeshine against abutment | Once daily |
| Implant-Supported Bridge | Superfloss | Shoesine motion scrubbing the intaglio surface; interdental brush on abutments | Once daily |
| Fixed Full-Arch Hybrid (All-on-X) | Superfloss + Water Flosser | Superfloss shoeshine on intaglio; interdental brush on abutments; water flosser flush | Once daily (Superfloss), twice daily (water flosser) |
Important Note: If your gums bleed when you floss around your implant, this is not a sign that you should stop flossing. Bleeding upon gentle probing or flossing is the clinical definition of peri-implant mucositis, an active bacterial infection in the gum cuff. The bleeding is caused by the biofilm you are trying to remove. If the bleeding persists for more than a week of diligent, proper flossing, you must see your implant dentist or hygienist for a professional evaluation and cleaning. Healthy peri-implant tissue does not bleed.
The Flossing Don’ts: Common Errors to Avoid
- Do not snap the floss through the contact point. This can traumatize the gum papilla, which is irreplaceable once lost.
- Do not use a thin, waxed standard floss on the abutment. It will not effectively clean the concave surface and can scratch the abutment.
- Do not use a sawing, up-and-down motion against the gum. The motion is a gentle, horizontal scrubbing action.
- Do not ignore the abutment surface. The floss must physically contact the titanium or zirconia abutment, not just the crown margin.
- Do not reuse the same section of floss for multiple teeth. You will simply transfer bacteria from one site to another.
Conclusion
To floss around a dental implant correctly, you must use an implant-specific tufted or woven floss, wrap it in a C-shape around the crown, and use a gentle, horizontal shoeshine motion to mechanically scrub the curved surface of the titanium or zirconia abutment just below the gumline, where bacterial biofilm accumulates. For an implant bridge or a fixed full-arch hybrid, Superfloss is the essential tool for accessing and scrubbing the intaglio surface, followed by an interdental brush for the vertical abutments and a water flosser for a final hydraulic flush. The goal is the daily, complete disruption of the biofilm before it can mineralize and trigger the bone-destroying infection of peri-implantitis.
Frequently Asked Questions (FAQ)
Q: Can I use a water flosser instead of string floss around my implant?
A: A water flosser is an excellent adjunct, but it should not be used as the sole method of cleaning. It flushes loose debris and disrupts superficial biofilm, but it cannot mechanically scrape the tenacious, adherent biofilm off the abutment surface the way a physical floss or interdental brush can. The combination of physical flossing followed by a water flosser flush is the gold standard.
Q: What if my implant crown is connected to a natural tooth in a bridge?
A: This is a tooth-implant-supported bridge and is a more complex cleaning scenario. The natural tooth side must be flossed normally, and the implant side must be flossed with the implant-specific technique. The area under the pontic (the false tooth) must be cleaned with Superfloss.
Q: Is there a special floss for zirconia implants?
A: The same implant-specific, non-abrasive floss used for titanium implants is safe and effective for zirconia implants. The key is to avoid any abrasive material that could scratch the highly polished surface.
Q: How do I know if I am flossing deeply enough around my implant?
A: You should feel the floss gently slide into the sulcus until there is a slight, soft resistance. You should not force it deeper. The goal is to clean the abutment surface within the sulcus, not to go as deep as possible. Your implant hygienist can use a plastic probe to measure the depth and show you the correct zone.
Additional Resource:
For a visual guide on flossing techniques for dental implants, the American Academy of Periodontology provides patient education videos: AAP Patient Education.