Are Stitches Needed For Dental Implants?
The decision to get a dental implant is a significant step toward restoring your smile, your chewing function, and your self-confidence. Modern implantology has achieved remarkable success rates, often cited above 95 percent. Yet, when you are sitting in the dental chair, staring at the ceiling, your mind races with questions. One of the most common and immediate questions patients ask—sometimes right after the implant is placed, sometimes while their mouth is still numb—is, “Are stitches needed for dental implants?” It is a logical question. You have just had a precisely engineered titanium post inserted into your jawbone. What happens next? How does the gum tissue heal? Do you need to come back to get sutures removed, or will they dissolve on their own?
The straightforward answer is that in the vast majority of dental implant cases, stitches are indeed required. Dental implant placement is a surgical procedure. Even with flapless, minimally invasive techniques, the dentist often makes a small incision in the gum tissue to access the underlying bone. Once the implant fixture is securely anchored in the jawbone, the soft tissue must be closed over or around the implant to create a protected environment for healing. Stitches, also known as sutures, are the primary tool for achieving this closure. They hold the gum tissue in the correct position, control bleeding, and prevent food debris and bacteria from invading the surgical site. Understanding the “why,” “what,” and “how” of these stitches will dramatically reduce your anxiety and prepare you for a smooth recovery.
This comprehensive guide will walk you through every aspect of sutures in the context of dental implant surgery. We will explore the different types of stitches your dentist might use, whether they dissolve or need removal, and the critical role they play in successful osseointegration. We will also discuss the rare scenarios where stitches might not be needed, how to care for your sutures at home, and what to expect during the healing process. Our goal is to provide you with a reliable, in-depth, and reassuring resource that answers every question you have about this essential step in your implant journey.
The Biological Rationale: Why Sutures Are a Fundamental Step
To understand why stitches are almost always used, it helps to visualize what happens during a standard dental implant procedure. The dentist or oral surgeon makes an incision in the gum (gingiva) to expose the jawbone. A series of precisely sized drills creates an osteotomy, a channel in the bone that exactly matches the dimensions of the implant. The implant, a sterile titanium or zirconia screw, is then threaded into this channel. At this point, the implant is in the bone, but the gum tissue is still open. If the gum is left open, the implant could be exposed to the oral environment, which is teeming with bacteria. The blood clot that forms around the implant could be dislodged. The delicate healing process could be compromised.
Stitches serve to close this wound. They bring the edges of the gum tissue together, which is called primary closure. This closure serves several biological purposes. First, it establishes a barrier against bacterial infiltration. The mouth is a septic environment, and bone is sterile. Sutures help maintain the sterility of the bone healing zone. Second, they stabilize the blood clot. A stable blood clot is the body’s natural bandage and the scaffold for new tissue growth. Third, they control hemostasis, minimizing post-operative bleeding and oozing. Fourth, they maintain the position of the gum tissue. If the gum is allowed to pull away, the final cosmetic result—the “pink aesthetics” around the final crown—might be compromised. The dentist often wants the gum to heal in a specific scalloped shape around the implant, and sutures can guide this process.
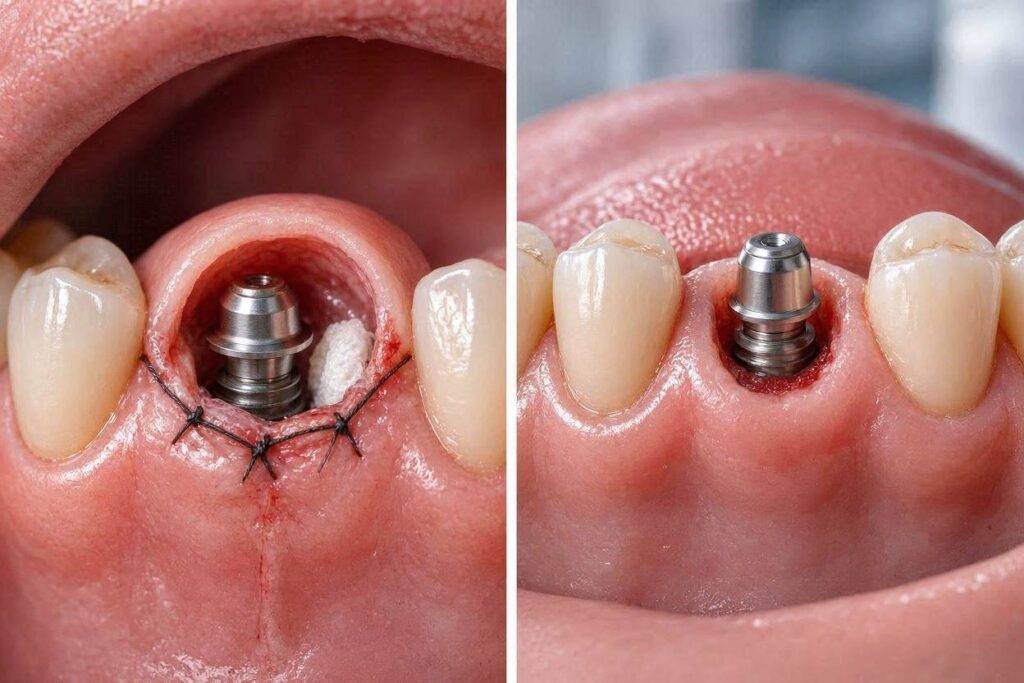
In a two-stage implant procedure, the implant is completely buried under the gum tissue. The sutures close the gum flap entirely over the implant cover screw. This requires a watertight seal. The patient waits several months for the bone to fuse to the implant (osseointegration) without any visible post in the mouth. In a one-stage procedure, a healing abutment is attached to the implant at the time of placement. This abutment sticks out through the gum. Stitches are still placed around the healing abutment to close the rest of the incision. The suture technique in a one-stage procedure is slightly different but equally important. The common thread is that an incision was made, and an incision must be closed for proper healing.
The Risks of Not Suturing
Imagine if a patient refused sutures. What could go wrong? The list of potential complications is long and entirely preventable. Without sutures, the wound would heal by secondary intention. This means the gap fills in with granulation tissue from the bottom up. This process is slower, more painful, and results in more scar tissue. The aesthetics are usually poor.
A more immediate risk is the loss of the blood clot, leading to a condition known as “dry socket” in the context of tooth extraction. While true “dry socket” is less common with implants than with extractions, the exposure of the bone can lead to localized osteitis, an inflammation of the bone that is very painful. The wound would trap food debris, which acts as a bacterial nidus, potentially causing a peri-implant infection. An infection at the implant site during the early healing phase can prevent osseointegration, leading to implant failure. The implant, which is a foreign body, can become colonized by bacteria, and the body will not integrate with an infected surface.
Furthermore, the gum tissue could heal in an unpredictable and unaesthetic position. The dentist plans the implant position not just in the bone but also relative to the future crown. The gum tissue is the frame for the crown. If the frame heals in a haphazard way, the final tooth may look unnaturally long or have uneven gum contours. Sutures are a tool for precision healing. They allow the surgeon to control the biology and ensure the outcome is predictable and beautiful.
Types of Sutures Used in Dental Implant Surgery
Not all stitches are created equal. Your dentist chooses a specific suture material and technique based on the surgical approach, the location in the mouth, and the tension on the wound. Let us break down the two main categories: resorbable and non-resorbable sutures.
Resorbable Sutures: The “Dissolving” Stitches
These are the most common type of sutures used in modern implant dentistry. As the name suggests, they are designed to be broken down by the body’s natural processes over time. The dentist does not need to remove them. You simply wait for them to disappear. This is a huge convenience for the patient and reduces the number of postoperative appointments.
The most popular resorbable suture materials are chromic gut, polyglycolic acid (PGA), and polylactic acid (PLA). Chromic gut is a natural product treated with chromium salts to slow its absorption. It is soft, pliable, and has been used for decades. It maintains its tensile strength for about 7 to 10 days and is completely absorbed within 21 to 28 days. PGA and PLA sutures are synthetic polymers. They tend to elicit less tissue reaction than gut and have a more predictable absorption rate. They often maintain their strength for 14 to 21 days and are absorbed in 60 to 90 days.
For implant surgery, long-lasting resorbable sutures like PGA are often preferred. The doctor wants the sutures to remain strong during the critical first two weeks of soft tissue healing. If the stitches dissolve too quickly, the wound edges could separate before the tissue has gained sufficient strength. You might notice these stitches starting to feel loose or falling out after one to two weeks. This is normal and a sign that they are doing their job.
Non-Resorbable Sutures: The “Removable” Stitches
These sutures are made of materials that the body cannot break down. They must be manually removed by the dentist after the tissue has healed. Common materials include silk, nylon, polyester, and ePTFE (expanded polytetrafluoroethylene).
Silk is a natural fiber that is extremely easy for the dentist to handle and tie. It is soft and comfortable for the patient. However, silk is a braided material. Braids have tiny spaces between the fibers, which can wick bacteria and fluid along the suture line into the wound. This “wicking effect” is a disadvantage for implant surgery where a sterile environment is paramount. Because of this, silk is less commonly used in deeper implant closures.
Nylon and ePTFE are monofilament sutures. They are smooth, single strands that do not harbor bacteria. They are excellent choices when the dentist wants a very clean, non-reactive closure, especially for delicate aesthetic areas. The downside is that they can be a little harder to tie, and the knot can feel a bit stiff. Nylon sutures are typically removed after 7 to 14 days. ePTFE sutures, which are incredibly inert and biocompatible, can sometimes be left in place for several weeks if the tension on the wound is high, such as in a gum graft combined with an implant.
| Suture Type | Material Examples | Absorption/Removal | Common Use in Implants |
|---|---|---|---|
| Resorbable (Synthetic) | PGA, PLA | Hydrolysis over 60-90 days | Submerged (two-stage) closures, graft containment |
| Resorbable (Natural) | Chromic Gut | Enzymatic over 21-28 days | General soft tissue closure |
| Non-Resorbable (Monofilament) | Nylon, ePTFE | Manual removal, 7-21 days | Aesthetic zones, high-tension flaps |
| Non-Resorbable (Braided) | Silk | Manual removal, 7-10 days | Superficial closure only (less common for implants) |
Your dentist will tell you what type of suture was used. If you are unsure, ask at the end of the procedure. Knowing whether you need a follow-up for suture removal is a practical matter that affects your schedule.
Suture Techniques: How the Dentist Closes the Wound
The material is only half the story. The technique the surgeon uses to place the sutures is an art form in itself. The goal is not just to tie the wound shut but to create a passive, tension-free closure that allows the tissue to heal with minimal scarring and perfect contours.
The most basic technique is the simple interrupted suture. The surgeon passes the needle through one side of the incision, across the gap, and out the other side, then ties a knot. Each stitch is independent. If one stitch breaks or loosens, the others remain secure. This is a very reliable and common technique for implant surgery.
For larger flaps or when the doctor wants to precisely approximate the wound edges, they might use a horizontal mattress suture or a vertical mattress suture. These techniques involve passing the needle twice: once deep and once superficial. They provide excellent wound edge eversion, which means the skin edges turn outward slightly. As the wound heals and contracts, the scar flattens instead of puckering inward. Mattress sutures are particularly useful for closing extraction sockets where an implant has been placed immediately.
A specialized technique in implant dentistry is the sling suture. This is used around a healing abutment in a one-stage procedure. The suture wraps around the abutment like a sling, pulling the gum tissue tightly against the post. This ensures the gum adapts intimately to the abutment, creating a tight cuff that prevents bacteria from creeping down the implant. This technique is crucial for “non-submerged” healing.
The continuous suture is a single long thread that is woven back and forth across the incision with a knot only at the two ends. This is faster to place and removes, but if one loop breaks, the entire suture line can loosen. It is often used for long incisions, such as those in a full-arch implant case (like All-on-4).
Note on Tension-Free Closure: A fundamental surgical principle is that the flap must be closed without pulling. If the tissue is stretched too tight, the blood supply is cut off, and the wound edges die (necrosis). This is a disaster for an implant. To achieve a tension-free closure, the surgeon may need to make a releasing incision in the gum or the periosteum (the lining over the bone). Sutures are the final step, but they are only effective if the surgeon has mobilized the flap correctly first.
The Step-by-Step Surgical Workflow with Sutures
Let us walk through a typical two-stage implant surgery, focusing on when and how sutures come into play. This will give you a clear picture of the entire intraoperative experience.
You arrive for your surgery. The area is numbed with local anesthetic, often combined with sedation for your comfort. You feel no pain. The surgeon makes an incision, typically along the crest of the gum ridge or slightly toward the tongue or cheek side. The incision design is planned based on the three-dimensional position of the implant in the bone, as seen on your cone beam CT scan. A full-thickness flap is reflected, meaning the gum and the periosteum are lifted as one layer to expose the bone.
The surgeon then drills the osteotomy. The sequence of drills is carefully managed to avoid overheating the bone. Once the implant is placed, the surgeon inspects it for primary stability. It should feel rock-solid in the bone. A cover screw is placed on top of the implant. This low-profile screw seals the internal channel of the implant so that bone and soft tissue do not grow into the screw hole during the healing phase.
Now, the suturing begins. The flap is repositioned over the cover screw. The surgeon checks that the tissues meet without tension. Using a needle holder and a fine, curved suture needle, the surgeon places the sutures. Each stitch is a deliberate act. The needle penetrates the gum, a knot is tied, and the process repeats. The surgeon might use 4 or 5 individual simple interrupted sutures to close a one-centimeter incision. For a larger graft or multiple implants, there could be many more.
At the end, the wound is a thin, sealed line. The implant is completely buried. You feel the stitches with your tongue—they feel like a small, rough seam or a few tiny bumps. The surgeon will give you post-operative instructions. You must avoid disturbing the area with your tongue, your toothbrush, or hard foods. The sutures are now the guardians of the sterile bone underneath. You go home and wait for the magic of osseointegration to happen.
After 3 to 6 months, you return for the second stage. The surgeon makes a tiny incision to expose the cover screw, removes it, and places a healing abutment. This second surgery might also require one or two tiny sutures, but it is much less involved than the first.
How Implant Type Influences the Need for Sutures
The specific design of the implant and the surgical protocol can influence the suture plan. A standard bone-level implant placed in healed, thick bone with plenty of keratinized gum tissue might only need a few simple sutures. A wide-diameter implant or an implant placed in a fresh extraction socket (immediate implant) usually requires more extensive flap elevation and therefore more sutures.
Immediate implants are placed the same day a tooth is extracted. The extraction socket is always wider than the implant. There is often a gap between the implant and the socket wall, which is filled with bone graft material. To contain this graft, the surgeon must close the socket completely with a membrane and sutures. This “socket seal” technique often requires intricate suture patterns to make the gum tissue stretch over the graft without tension. This is one of the scenarios where you will definitely feel many stitches.
In flapless implant surgery, a small punch of tissue is removed, and the implant is placed through this tiny hole without a large flap. In these rare cases, a suture may not even be necessary. The tissue hole is so small that it heals quickly on its own. However, if the surgeon decides a suture would help secure a healing cap or a small graft, one or two sutures might be placed even in a flapless case. The rule of thumb remains: if an incision is made into the jawbone, a suture is usually required to close it.
The Healing Timeline: What to Expect with Your Stitches
The presence of sutures in your mouth is a temporary but important experience. Knowing the day-by-day healing timeline will help you differentiate between normal recovery and potential complications.
Days 1-3: The Inflammatory Phase
In the first 72 hours, the wound is in a state of acute inflammation. This is a normal and necessary healing process. You can expect some minor bleeding or oozing, which mixes with saliva and looks pink. The sutures will be clearly visible, and the area will be tender and swollen. The sutures themselves are doing their job of holding the clot and the tissue. You must be very gentle. Avoid spitting, using a straw, or rinsing vigorously. These actions create negative pressure that can dislodge the clot.
Days 4-7: The Proliferative Phase Begins
The swelling subsides. The sutures may start to feel a little looser. This is because the tissue is swelling less and the sutures are beginning to stretch slightly or the tissue is contracting. If you have non-resorbable sutures, they are still strong and secure. You might start to see a white film over the sutures. This is not pus; it is a fibrinous clot, a normal part of the healing process that consists of dead cells and tissue fluid. It acts as a biologic dressing.
Weeks 2-3: Suture Degradation or Removal
If you have resorbable sutures, they will start to break down. You might find small suture fragments in your mouth. You might see that a knot is missing. Do not pull on any loose ends. If a suture is dangling and annoying your cheek or tongue, call your dentist. They can easily trim it. If you have non-resorbable sutures, this is the typical window for removal. The dentist appointment takes only a minute. They use a fine scissor and a pick to gently lift the suture knot, snip one side, and pull it out. You feel a tiny tug but no pain.
Weeks 4 and Beyond: Tissue Maturation
The suture sites have now sealed. The gum tissue continues to mature and strengthen. The scar tissue remodels. The color of the gum returns to a healthy pink. Underneath, the bone is busy fusing to the implant. The stitches have done their job, and the baton has been passed to your body’s long-term healing processes.
How to Care for Your Sutures at Home
The responsibility for the success of the implant does not end when you leave the dental chair. Your home care routine in the first two weeks is critical for preventing suture breakdown and wound infection.
- Gentle Rinsing: For the first 24 hours, do not rinse at all. After 24 hours, you can begin gentle rinsing with warm salt water. Mix one teaspoon of salt in a cup of warm water. Do not swish vigorously. Gently hold the water in the area and let it dribble out. This helps keep the suture line clean of food debris. Some dentists prescribe a chlorhexidine mouth rinse (Peridex, Periogard). If prescribed, use it as directed, typically twice a day. Chlorhexidine is excellent at killing bacteria but can stain your teeth brown with prolonged use, so follow the prescription exactly.
- Brushing: Avoid brushing the surgical site directly for the first week. Brush all your other teeth normally, but stay away from the sutures. A toothbrush bristle caught on a suture knot can yank it out prematurely. After the first week, you can start gently cleaning the teeth adjacent to the site with a soft-bristled toothbrush.
- Diet: Eat a soft diet. Foods like yogurt, scrambled eggs, mashed potatoes, smoothies, and soup are your staples. Avoid anything that requires biting down with the surgical site. Do not eat crunchy, sharp foods like chips, popcorn, or nuts. These can puncture the suture line or lodge between the stitches. Avoid spicy foods, which can irritate the wound.
- Habits: Do not smoke. This cannot be overstated. Smoking drastically reduces blood flow to the gum and bone. It is the single most significant risk factor for implant failure and suture-line necrosis. The chemicals in smoke cause vasoconstriction, starving the healing tissues of oxygen. If you cannot quit permanently, you must refrain absolutely during the first 2 to 4 weeks of healing.
- Physical Activity: Avoid strenuous exercise for the first 48 hours. Increased blood pressure can cause bleeding at the suture site. You can gradually resume normal activity after a few days.
If you notice a sharp piece of suture poking your tongue or cheek, do not cut it yourself with household scissors. This is an infection risk. A bit of orthodontic wax, available at a pharmacy, can be placed over the sharp spot to make you comfortable until you can see the dentist.
Recognizing Complications with Sutures
While complications are rare, you are the first line of defense in identifying a problem. A healthy healing suture line should look slightly red at the edges for a day or two, then progressively less red. It should not be grossly swollen, exude thick yellow or green pus, or cause severe, escalating pain.
A suture abscess can form if bacteria get trapped in a suture track. This appears as a small pimple on the suture line. It may be tender. Gentle warm salt water rinses can sometimes help it drain on its own, but you should inform your dentist. They might want to remove the offending suture early.
Suture dehiscence is the fancy term for the wound opening up. This is not an emergency, but it is a concern. If the sutures come out too early or the tissue tears, you will see a white or yellowish patch of exposed tissue or bone. The implant cover screw might become visible. Do not panic, but call your office immediately. The dentist will evaluate it. Sometimes a small opening will heal on its own by secondary intention. The dentist might prescribe a course of antibiotics as a precaution and have you use chlorhexidine rinses more frequently to keep the area clean. A large dehiscence might require re-suturing, though this is uncommon.
An allergic reaction to the suture material is extremely rare, especially with modern synthetic materials. Chromic gut, being a biological product, has a slightly higher, though still very low, rate of local tissue reaction. Signs would be intense itching, a red rash around the site, or unusual swelling beyond the normal postoperative course. An antihistamine can often manage a mild reaction, but the dentist might opt to remove the sutures early and manage the wound without them.
Important Note: A mild fever in the first 24 hours post-surgery can be a normal inflammatory response. A fever that starts after the third day, especially with increasing pain and pus, is a sign of infection. This requires immediate professional attention.
The Special Case of Bone Grafts and Sutures
Dental implants are frequently accompanied by a bone grafting procedure. If your jawbone is too thin or too short, the surgeon will add bone graft material at the time of implant placement or as a separate procedure. Sutures are absolutely critical in these cases.
The bone graft material, whether it is from your own body, a cadaver, an animal source, or a synthetic lab, is particulate. Think of it like wet sand. The surgeon molds it around the implant to build up the missing bone contour. If this particulate graft is not contained, it will wash away into the mouth. A membrane, usually a collagen sheet, is placed over the graft. The membrane acts as a barrier, keeping the fast-growing gum tissue cells out and allowing the slow-growing bone cells to populate the graft. The sutures are what hold this entire assembly—the graft, the membrane, and the gum—in place.
A “protective” or “hermetic” seal is the goal. The surgeon often uses a complex suturing pattern, combining mattress sutures and interrupted sutures, to spread the tension across the flap. The suture material in a grafting case is often a synthetic resorbable material that will last long enough for the gum to form a seal. Premature suture loss in a grafting case almost always leads to partial loss of the graft material. You will see white granules appearing at the suture line. If this happens, call your dentist. They may need to surgically remove the exposed membrane and loose graft particles, which is a setback in your treatment timeline.
Conclusion
Stitches are an integral and almost universal part of the dental implant surgical process, serving as the biological gatekeepers that protect the bone and guide the soft tissue toward predictable, aesthetic healing. Whether your dentist chooses resorbable sutures that dissolve on their own or non-resorbable ones that require a quick removal visit, their purpose is to stabilize the wound, prevent infection, and ensure the implant remains a sterile, undisturbed foundation for your new tooth. By understanding the types of sutures, the timeline of healing, and the essential rules of at-home care, you become an active participant in the success of your implant, transforming a potentially anxious experience into a confident journey toward a restored smile.
FAQ
Do all dental implants require stitches?
Nearly all implant placements require at least one or two stitches. An incision is made to access the bone, and this incision must be closed to protect the healing implant. Only very rare flapless procedures might heal without any sutures.
How long do stitches stay in after dental implant surgery?
Non-resorbable stitches are usually removed after 7 to 14 days. Resorbable stitches begin to loosen and dissolve over a 2 to 3-week period and are gone completely within 4 to 8 weeks.
Can stitches come loose after implant surgery?
Yes, it is common for sutures to feel looser after a few days as the swelling subsides. If a suture comes completely out early, the wound might open slightly. Contact your dentist if you see a visible opening or exposed bone.
What color are dental implant stitches?
They vary based on material. Chromic gut is often brown or tan. PGA sutures are typically violet or undyed. Nylon sutures can be black, blue, or clear. Silk sutures are black.
Is it painful when dental implant stitches are removed?
No, suture removal is a quick and virtually painless procedure. You may feel a slight tug or tickle as the dentist snips the knot and slides the thread out. No anesthetic is needed.
Additional Resources
For more information on the surgical aspects of dental implants, visit the American Academy of Implant Dentistry: https://www.aaid.com/