Tooth Implant Removal: A Complete, Honest Guide to What Happens When Implants Fail
Let’s talk about something many people worry about but few discuss openly: tooth implant removal.
You probably got your dental implant hoping it would last a lifetime. Most do. But sometimes, things don’t go as planned. Maybe you feel discomfort. Maybe your implant feels loose. Or perhaps a dentist recently told you that your implant needs to come out.
First, take a deep breath. You are not alone. Thousands of people go through this procedure every year. The good news? Modern dentistry makes removal safe, predictable, and far less scary than you might imagine.
This guide walks you through everything. No jargon. No scare tactics. Just honest, clear information to help you make the best decision for your health and peace of mind.
Why Would Someone Need Tooth Implant Removal? (The Real Reasons)
Let’s get one thing straight upfront: needing an implant removed does not mean you did something wrong. In fact, most failures happen for biological or mechanical reasons that have nothing to do with how well you brushed or flossed.
Here are the most common reasons dentists recommend removal.
Peri-Implantitis: The Silent Problem
Peri-implantitis is the number one cause of late implant failure. Think of it as gum disease, but around an implant instead of a natural tooth.
Bacteria builds up under the gum line. Your body fights back with inflammation. Over time, that inflammation destroys the bone holding the implant in place.
Signs to watch for:
- Red or swollen gums around the implant
- Bleeding when you brush near the area
- A bad taste or odor coming from the site
- The implant feels slightly mobile
Catching it early can sometimes save the implant. But once too much bone disappears, removal becomes the only safe option.
Mechanical Breakdown: When Parts Wear Out
Dental implants are marvels of engineering, but they are not indestructible. The visible crown (the part you see) attaches to the implant body through a small screw called an abutment screw.
That screw can loosen. It can fracture. In some cases, the crown itself cracks or breaks.
Most mechanical issues can be repaired without removing the entire implant. But if the implant body cracks? Or if the internal threads strip beyond repair? Removal becomes necessary.
Nerve Damage or Persistent Pain
Sometimes, an implant simply hurts. Not the normal post-surgery soreness, but a deep, burning, or electric-shock-type pain.
This often means the implant sits too close to the inferior alveolar nerve (the main nerve running through your lower jaw). Removing the implant usually stops the pain completely.
Allergic Reactions (Rare but Real)
Less than 1% of people have a true allergy to titanium, the metal used in most implants. Symptoms include chronic swelling, hives, eczema-like rashes around the mouth, and a persistent burning sensation.
If you have a confirmed titanium allergy, your dentist will remove the implant and replace it with a zirconia (ceramic) alternative.
Poor Positioning from the Start
Even skilled surgeons sometimes place an implant in a less-than-ideal position. Maybe it angles toward your natural teeth. Maybe it sits too high or too low. Perhaps it crowds the adjacent roots.
Poor positioning leads to cleaning difficulties, bite problems, and chronic discomfort. Removal followed by a better-placed implant usually solves everything.
Sinus Problems from Upper Implants
Upper back teeth sit directly below your sinuses. If a dentist places an implant without enough bone height, it can protrude into the sinus cavity.
Symptoms include chronic sinus infections, a feeling of pressure, headaches, and post-nasal drip. Removing the implant allows the sinus membrane to heal.
Failed Osseointegration (The Implant Never Fused)
Osseointegration is the fancy term for your jawbone growing tightly around the implant surface. This process takes three to six months.
Sometimes, it never happens. The implant stays loose. This is called early failure, and it usually shows up within the first year.
Common causes of failed integration:
- Poor bone quality or quantity
- Overheating the bone during surgery
- Contamination of the implant surface
- Uncontrolled diabetes or smoking
- Radiation therapy to the jaw
The good news about early failure? Removal is usually straightforward because the implant hasn’t fused tightly to your bone yet.
Aesthetic Concerns
Sometimes an implant looks wrong. Maybe the gum tissue around it never healed into a natural shape. Maybe you can see a dark metal line through your gums. Perhaps the crown color or shape never matched.
When non-surgical fixes fail, removing and redoing the implant often produces a much better cosmetic result.
The Two Types of Removal: Simple vs. Complex
Not all implant removals are the same. Your experience depends entirely on how long the implant has been in place and how tightly your bone has grown around it.
| Feature | Simple Removal | Complex Removal |
|---|---|---|
| Time since placement | Less than 6 months | More than 1 year |
| Bone integration | None or minimal | Complete |
| Procedure duration | 15–30 minutes | 45–90 minutes |
| Anesthesia | Local only | Local + possible sedation |
| Recovery time | 3–7 days | 10–14 days |
| Need for bone graft | Rarely | Usually |
| Cost range | 500–1,500 | 1,500–5,000+ |
Let me explain both scenarios so you know what to expect.
Simple Removal (For Recently Placed or Non-Integrated Implants)
Imagine your implant is like a screw in a piece of drywall. If you try to remove it right away, it comes out easily. That’s simple removal.
This happens when:
- The implant failed to integrate during the healing period
- You decided to remove it soon after placement
- The implant became loose on its own
What the dentist does:
- Numb the area completely
- Make a small incision in the gum to expose the implant top
- Attach a special removal tool (like a reverse screwdriver)
- Unscrew the implant gently
- Place a few sutures (stitches)
The whole thing takes less than half an hour. Most people feel only pressure, no pain.
Complex Removal (For Osseointegrated Implants)
Now imagine that same screw but set in solid concrete. That’s a fully integrated implant. Your bone has grown into every microscopic crevice of the implant surface.
You cannot simply unscrew it. That would break your jaw.
How dentists handle complex removal:
Method one: Reverse torque
The dentist applies very strong counter-clockwise force using a special tool. This breaks the bone-implant bond. It works best for round or slightly textured implants.
Method two: Trephine drilling
A hollow drill (called a trephine bur) cuts around the implant, creating a core of bone with the implant inside. The dentist removes the whole core. This preserves maximum bone for later grafting.
Method three: Piezoelectric surgery
A special ultrasonic tool vibrates at a frequency that cuts bone but not soft tissue. The dentist carefully loosens the implant from all sides. This is the most precise method and causes the least damage to surrounding bone.
Method four: Lasers (rare)
Some high-end dental laser systems can vaporize the tissue interface around implants. This is not widely available.
In all complex cases, expect a bone graft afterward. The hole left behind needs to fill in before you can consider a new implant.
Important note: Do not let anyone tell you that all implant removals are “easy.” A fully integrated implant requires skill and experience. Choose a dentist or oral surgeon who performs at least 10–20 removals per year.
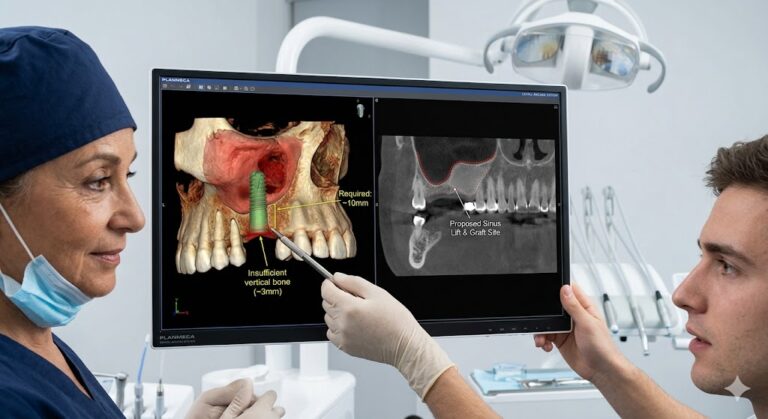
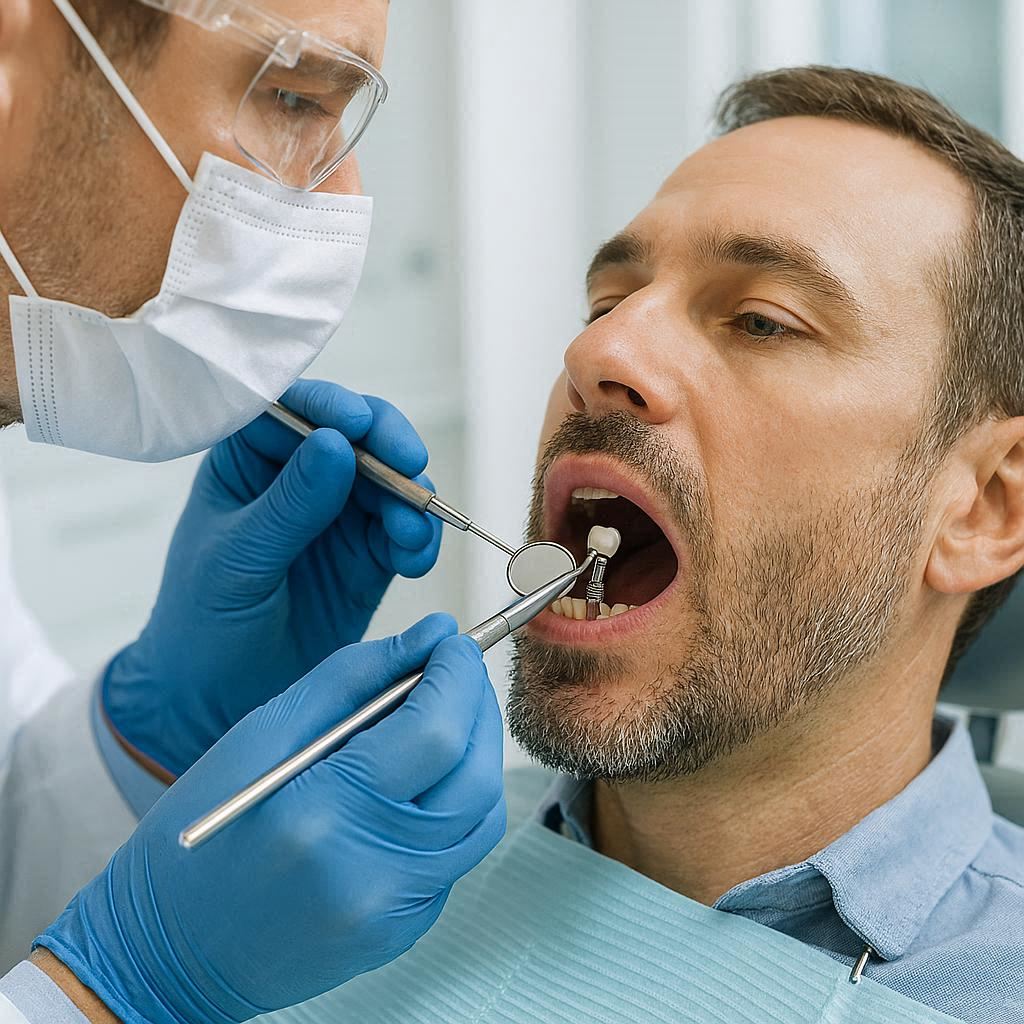
The Step-by-Step Procedure (What Happens on the Day)
Knowing exactly what will happen reduces anxiety. Let me walk you through a typical complex removal appointment.
Before You Arrive
Your dentist will take a 3D scan called a CBCT (cone beam CT). This shows:
- The exact position of the implant
- How much bone surrounds it
- The proximity to nerves and sinuses
- Any damage to adjacent teeth
Never agree to implant removal without this scan. It is your safety net.
Step One: Anesthesia and Sedation
Local anesthesia numbs the entire area. You will not feel sharp pain. You might feel pressure, tapping, or vibration.
For complex cases or anxious patients, options include:
- Oral sedation (a pill like triazolam or Valium)
- Nitrous oxide (laughing gas)
- IV sedation (you remain conscious but very relaxed)
- General anesthesia (completely asleep – rare for this procedure)
Most people do fine with local anesthesia alone. Do not feel pressured into sedation if you do not want it. But also do not be ashamed to ask for it if you feel nervous.
Step Two: Gum Access
The dentist makes a small incision through your gum directly over the implant. They fold back a tiny flap of tissue to expose the implant’s top surface.
This sounds dramatic, but the incision is smaller than a fingernail. It heals quickly.
Step Three: Removing the Crown and Abutment
If you still have a crown attached, the dentist unscrews it first. Sometimes old crowns are cemented on. In that case, they may need to drill or cut the crown off.
Do not worry about saving the crown. It will not fit a new implant anyway. The important thing is getting to the implant body itself.
Step Four: Loosening the Implant
This is the main event. The method depends on your case.
For simple removal: The dentist uses a reverse driver tool. It grabs the internal hex or other connection and unscrews the implant. You will hear clicking sounds. That is normal.
For complex removal: The dentist may use a trephine drill. This feels like a lot of vibration. You might hear a high-pitched whine. Some offices use music or headphones to help you relax.
Patient quote:
“I was terrified before my implant removal. But honestly? It just felt like weird pressure and some noise. Never actual pain. The worst part was the numbing shots at the beginning.” — David, 52
Step Five: Cleaning the Socket
Once the implant comes out, the dentist examines the hole. They remove any:
- Granulation tissue (inflamed soft tissue)
- Infected bone fragments
- Scar tissue
Then they flush the socket with sterile saline. Sometimes they use an antibiotic solution.
Step Six: Bone Grafting (In Most Complex Cases)
If you lost significant bone around the implant, your dentist will likely place a bone graft. This fills the defect and prepares the site for a future implant or simply to maintain jawbone volume.
Types of bone grafts used:
- Allograft (donor bone from a tissue bank) – most common
- Xenograft (animal bone, usually cow or pig) – excellent results
- Synthetic graft (lab-made materials) – good alternative
- Autograft (your own bone from another site) – rarely needed here
The graft material looks like tiny granules of sand. The dentist packs it into the socket and covers it with a membrane. This membrane keeps soft tissue from growing into the bone space.
Step Seven: Closing Up
The dentist places sutures to close the gum flap. Most use dissolvable stitches that disappear in 7–14 days. You will not need to return for suture removal unless they use non-dissolvable material.
You receive gauze to bite on for 20–30 minutes. This controls initial bleeding.
Step Eight: Recovery Instructions
Your dentist provides written aftercare instructions. Follow them exactly. The next section covers what to expect.
Recovery and Healing: What Is Normal and What Is Not
Healing after implant removal is usually easier than the original implant surgery. Your body already did the hard work of building bone. Now it just needs to fill a hole.
The First 24 Hours
Normal experiences:
- Oozing blood (pink saliva is fine)
- Swelling that slowly increases
- Dull, aching pain (controlled with medication)
- Difficulty opening your mouth wide
- Numbness from anesthesia wearing off
What to do:
- Apply ice packs (20 minutes on, 20 minutes off)
- Take prescribed or recommended pain relievers
- Eat only soft, cool foods (yogurt, smoothies, pudding)
- Sleep with your head elevated
- Gently rinse with warm salt water after 12 hours
What to avoid:
- No spitting or using straws (this dislodges blood clots)
- No hot foods or drinks
- No strenuous activity
- No smoking (absolutely critical – smoking dramatically increases infection risk)
- No brushing near the surgical site
Days 2 Through 7
Swelling usually peaks on day two or three. Then it gradually improves. Bruising may appear on your cheek or under your chin. This is normal and fades within a week.
Pain expectations:
- Days 1–2: Moderate pain, requiring medication
- Days 3–4: Mild to moderate, using over-the-counter options
- Days 5–7: Minor discomfort, often no medication needed
Your dentist will prescribe either:
- A strong NSAID (like ibuprofen 600–800mg)
- A combination of acetaminophen + ibuprofen (very effective)
- An opioid (rare, only for complex cases or severe pain)
Most people find they only need pain medication for three or four days.
Diet progression:
- Days 1–3: Liquids and purees
- Days 4–7: Soft foods (eggs, mashed potatoes, oatmeal)
- Week 2: Semi-soft foods (pasta, steamed vegetables)
- Week 3+: Gradually return to normal diet
Signs of Complications (When to Call Your Dentist)
While complications are uncommon, they do happen. Call your dentist immediately if you experience:
- Bleeding that soaks through gauze after one hour of firm pressure
- Swelling that worsens after day three instead of improving
- Fever over 101°F (38.3°C)
- Pus or foul drainage from the site
- Difficulty breathing or swallowing
- Numbness that spreads beyond the surgical area
- Pain that severe pain medication cannot control
Do not wait to “see if it gets better.” These symptoms require prompt attention.
When Can You Return to Normal Activities?
| Activity | When it is safe |
|---|---|
| Driving | Immediately (unless you had sedation) |
| Work (desk job) | 1–2 days |
| Work (physical job) | 5–7 days |
| Exercise (light) | 3–5 days |
| Exercise (heavy) | 7–10 days |
| Swimming | 2 weeks |
| Flying | 2–3 days (check with your dentist) |
| Brushing near site | After 1 week (gentle) |
| Flossing near site | After 2 weeks |
Long-Term Healing Timeline
- 2 weeks: Gum tissue looks mostly healed. Sutures have dissolved or been removed.
- 4–6 weeks: The extraction socket feels smooth. Most swelling is gone.
- 3 months: Significant bone healing has occurred.
- 4–6 months: Complete bone healing (if you had a graft).
- 6–12 months: Ready for a new implant (if desired).
Important note: Everyone heals differently. Some people bounce back in three days. Others need two full weeks to feel normal again. Both are fine. Listen to your body, not the calendar.
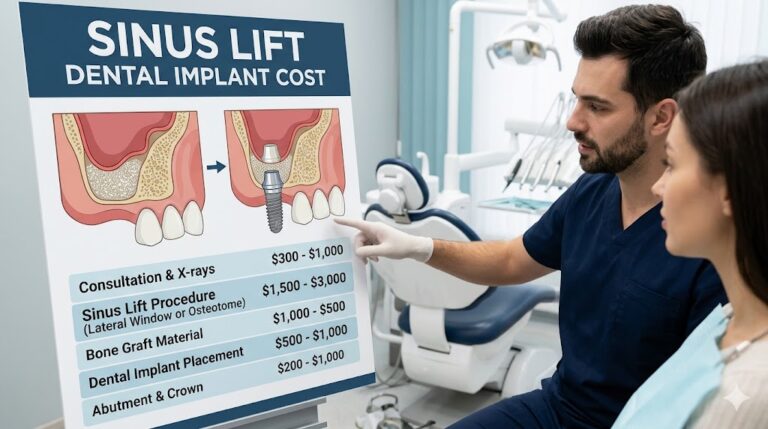
Cost of Tooth Implant Removal (Real Numbers, No Surprises)
Let’s talk money. Implant removal can range from surprisingly affordable to genuinely expensive. The difference depends entirely on complexity.
Breakdown by Procedure Type
| Service | Typical cost (USD) | Notes |
|---|---|---|
| Consultation + CBCT scan | 250–500 | Essential for safety |
| Simple removal (non-integrated) | 500–1,500 | Often includes local anesthesia |
| Complex removal (integrated) | 1,500–3,500 | Requires surgical skill |
| Extremely complex removal | 3,500–6,000+ | May need a specialist (oral surgeon) |
| Bone graft (small) | 500–1,000 | Often needed after complex removal |
| Bone graft (large) | 1,000–3,000 | Requires membrane and advanced technique |
| Sedation (IV or oral) | 300–800 | Optional but helpful for anxiety |
| General anesthesia | 1,000–2,000 | Rarely needed |
Total Estimated Costs
Scenario one: Early failure, simple removal
- CBCT scan: $300
- Simple removal: $800
- No bone graft needed
- Total: Approximately $1,100
Scenario two: Peri-implantitis, complex removal
- CBCT scan: $400
- Complex removal: $2,500
- Bone graft with membrane: $1,500
- Total: Approximately $4,400
Scenario three: Fully integrated, failed implant from years ago
- CBCT scan: $500
- Extremely complex removal (oral surgeon): $4,000
- Large bone graft: $2,500
- Total: Approximately $7,000
Does Insurance Cover Implant Removal?
This varies wildly. Here is the honest breakdown:
Dental insurance: Many plans cover “surgical extraction of a failed dental implant” under their major services category. Coverage typically ranges from 50% to 80% after you meet your deductible. However, some plans explicitly exclude implant-related procedures. Call your insurance company and ask this exact question: “Is CPT code D6100 (surgical removal of a failed implant) covered under my plan?”
Medical insurance: Sometimes yes, sometimes no. If your implant removal is medically necessary (nerve compression, chronic sinusitis, infection spreading beyond the mouth), medical insurance may cover it. You will need pre-authorization and a letter of medical necessity from your dentist.
No insurance? Many dental schools offer implant removal at reduced rates. A dental school removal might cost 500–1,500 total, including the graft. The trade-off is longer appointment times and appointments scheduled by students under supervision.
Payment Options to Ask About
- In-house payment plans (interest-free or low-interest)
- CareCredit (healthcare credit card)
- LendingClub for Healthcare
- Medical credit cards
- Health Savings Account (HSA) or Flexible Spending Account (FSA)
Important: Do not choose a dentist solely based on the lowest price. Implant removal requires skill. A bad removal can fracture your jaw or damage adjacent teeth. Pay for experience.
Replacing a Removed Implant: What Are Your Options?
Just because your implant failed does not mean you cannot have another one. In fact, most people go on to have a successful second implant. But timing matters.
Option One: Immediate Replacement (Same-Day Implant)
In rare cases where:
- The removal was simple
- No infection was present
- You have excellent bone volume
- The site is favorable
Your dentist might place a new implant immediately after removal. This saves time and healing phases.
Success rate: Comparable to normal implants (around 95%) when criteria are met. But not everyone qualifies.
Option Two: Delayed Replacement (The Most Common Path)
This is the standard approach:
- Remove the failed implant
- Place a bone graft
- Wait 4–6 months for healing
- Place a new implant
- Wait 3–6 months for osseointegration
- Attach a new crown
Total timeline: 7–12 months from removal to new crown.
Success rate with bone grafting: Over 95% in non-smokers with controlled health conditions.
Option Three: Do Nothing (Leave the Space)
Not every failed implant needs replacement. Many people choose to:
- Accept the gap: If the missing tooth is not visible when you smile, some patients simply live without it. This costs nothing and avoids further surgery.
- Use a removable partial denture: A small, flipper-style tooth that clips onto adjacent teeth. Costs 500–1,500. Not comfortable long-term but works as a temporary or permanent solution.
- Get a dental bridge: The adjacent teeth support a false tooth in the middle. This requires shaving down healthy teeth, which many people want to avoid. Cost: 2,000–5,000 for a three-unit bridge.
- Try a resin-bonded bridge (Maryland bridge): A metal wing bonds to the back of adjacent teeth. Less destructive but less durable. Cost: 1,500–3,000.
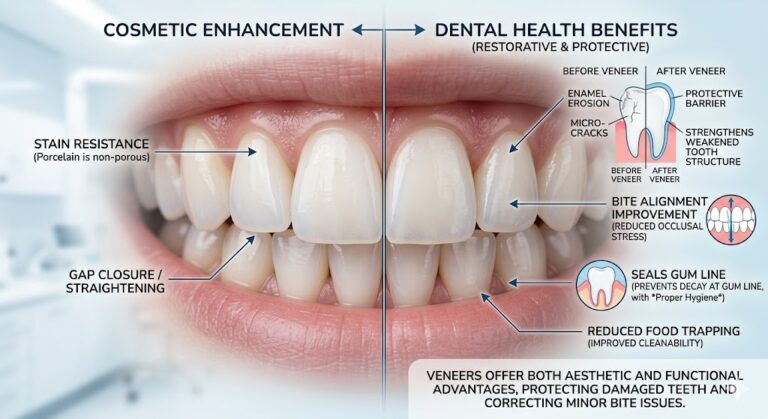
Option Four: Zirconia Implants (For Titanium Allergies)
If you had a confirmed titanium allergy or simply prefer metal-free, zirconia implants offer an alternative. They are white, one-piece implants made of ceramic.
Pros:
- No metal sensitivity risk
- Excellent gum tissue response
- No corrosion concerns
Cons:
- Cannot angle placement like titanium
- Higher fracture risk in thin diameters
- Less long-term data (still good, but newer)
Success rate: Approximately 92–95% at five years. Very good but slightly behind titanium.
Should You Try Again? Honest Risk Factors
Some people should think carefully before attempting a second implant.
Higher risk of second failure:
- Uncontrolled diabetes (HbA1c over 8.0)
- Heavy smoking (more than 10 cigarettes per day)
- Previous radiation to the jaw
- Medications like bisphosphonates (for osteoporosis)
- Untreated gum disease elsewhere in your mouth
- Chronic heavy alcohol use
Good candidates for a second implant:
- Non-smokers or light smokers
- Well-controlled diabetes
- No active infection at removal
- Good oral hygiene
- Willing to follow post-op instructions perfectly
Quote from an oral surgeon:
“I have placed second implants for hundreds of patients whose first implant failed. The vast majority succeed. The key is understanding why the first one failed and fixing that variable before trying again.” — Dr. Sarah Chen, DDS, MD
Preventing Future Implant Failure (What You Can Control)
You cannot control everything. But you can dramatically reduce your risk of another failure through simple daily habits.
Home Care That Actually Makes a Difference
Water flossing: A water flosser (like Waterpik) is not optional for implant owners. It blasts bacteria from the implant-gum interface better than string floss alone. Use it every single day.
Interdental brushes: Tiny bottlebrush-shaped cleaners that fit between teeth and under the implant crown. Use the correct size for your implant. Your dentist can show you which one fits.
Low-abrasive toothpaste: Avoid “whitening” or “baking soda” toothpastes. They scratch the implant surface, creating hiding spots for bacteria. Use a gel toothpaste without harsh abrasives.
Electric toothbrush with sensitive head: Oscillating-rotating brushes (Oral-B or Sonicare) clean implants effectively. Use the gentlest setting and the softest brush head.
Professional Maintenance Schedule
- Every 3 months: If you have a history of peri-implantitis
- Every 6 months: Standard recall for healthy implants
- Annually: Implant-specific exam with probing depths and X-rays
Your hygienist needs special instruments. Plastic or titanium scalers, not standard metal ones. Confirm your dental office has implant-safe instruments before your appointment.
Lifestyle Changes That Protect Implants
If you smoke: Set a quit date. Smoking reduces blood flow to your gums by up to 40%. It triples the risk of implant failure. Even cutting down helps, but quitting is best.
If you grind your teeth (bruxism): Get a nightguard. Grinding applies 500–1,000 pounds of force to your implant. This can fracture screws, crowns, or even the implant body itself.
If you have diabetes: Keep your blood sugar controlled. Every 1-point increase in HbA1c above 7.0 raises failure risk by approximately 30%.
If you take medications for osteoporosis: Discuss this with your prescribing physician and dentist. Bisphosphonates (Fosamax, Actonel, Boniva) and RANKL inhibitors (Prolia) increase the risk of osteonecrosis of the jaw after implant surgery. You may need a drug holiday or alternative therapy.
What to Ask Before Agreeing to Implant Removal
You have the right to be fully informed. Before scheduling the procedure, ask your dentist these questions.
Questions about the dentist’s experience:
- “How many implant removals have you performed in the past year?”
- “Do you use a CBCT scan for every removal?”
- “What method do you plan to use for my specific case?”
- “Will you be doing the procedure personally or will a resident/student be involved?”
Questions about the procedure:
5. “Do I need a bone graft after removal?”
6. “What type of graft material will you use?”
7. “Will you use a membrane over the graft?”
8. “What sedation options do you offer?”
9. “How long do you expect the procedure to take?”
Questions about costs:
10. “What is the total cost including the graft, CBCT, and follow-up visits?”
11. “Do you accept my insurance for this procedure?”
12. “Do you offer payment plans?”
13. “What is not included in your quoted price?”
Questions about recovery:
14. “What pain medication will you prescribe?”
15. “When can I return to work?”
16. “What signs of complications should I watch for?”
17. “Do you have an after-hours emergency number?”
Questions about the future:
18. “When can I consider a new implant?”
19. “What success rate do you see with second implants?”
20. “Do you recommend any changes to my home care routine?”
A dentist who answers these questions clearly and patiently is a dentist worth trusting. One who rushes or dismisses your concerns? Consider finding someone else.
Patient Stories: Real Experiences with Implant Removal
Names changed for privacy, but these are real cases from dental literature and clinical reports.
Maria’s Story: Early Failure at 4 Months
Maria, age 58, received a lower left molar implant. At her three-month check, everything looked fine. But at four months, she noticed the crown felt “wobbly.”
Her dentist took an X-ray. The bone looked healthy, but the implant had never integrated. No one knows why.
The removal: Simple, 20-minute procedure. Local anesthesia only. No bone graft needed because the bone was healthy.
Recovery: Three days of soft foods. Mild ibuprofen for two days.
Outcome: She waited three months, then received a new implant. The second one successfully integrated. She has had it for six years with no problems.
James’s Story: Peri-Implantitis After 8 Years
James, age 65, had a successful upper premolar implant for eight years. Then he noticed bleeding when brushing. Within six months, the implant became noticeably loose.
X-rays showed severe bone loss around the implant. Peri-implantitis had destroyed over 70% of the supporting bone.
The removal: Complex trephine removal. The dentist used a hollow drill to remove the implant with a core of bone. James chose IV sedation for comfort.
Recovery: The first week was tough. Significant swelling and bruising. He needed prescription pain medication for five days.
Outcome: A large bone graft filled the defect. After six months of healing, he decided against a second implant. He uses a small partial denture instead. He is happy with his decision.
Robert’s Story: Nerve Pain After Placement
Robert, age 42, had a lower right second premolar implant. From day one, he felt a strange electric sensation when biting. It became worse over two years.
A CBCT scan revealed the implant tip sat within 0.5 mm of the inferior alveolar nerve. Too close.
The removal: Complex piezoelectric removal. The dentist used an ultrasonic tool to carefully loosen the implant. Total time: 55 minutes.
Recovery: Moderate swelling for one week. The nerve pain stopped immediately after removal.
Outcome: After grafting and healing, a new implant was placed slightly shallower. Robert now has no pain with a functional implant.
Linda’s Story: Titanium Allergy Misdiagnosed
Linda, age 47, developed chronic, unexplained facial swelling after her implant placement. She saw three specialists. Everyone said the implant looked fine.
Finally, a dentist suggested a titanium patch test. It came back positive for titanium allergy.
The removal: Complex removal of a fully integrated implant. Linda chose general anesthesia due to anxiety.
Recovery: Standard two-week recovery with bone grafting.
Outcome: After full healing, Linda received a zirconia (ceramic) implant. Her swelling never returned. She says the process was hard but worth it.
Alternatives to Removal: Can You Save a Failing Implant?
Sometimes removal is avoidable. Before consenting to extraction, ask about these salvage options.
Non-Surgical Decontamination (For Early Peri-Implantitis)
If peri-implantitis is caught very early (pocket depths less than 5 mm, minimal bone loss), your dentist can try:
- Mechanical debridement: Special plastic instruments clean the implant surface
- Air polishing: A powder spray (glycine or erythritol) blasts bacteria off
- Laser therapy: Some diode lasers can sterilize the implant surface
Success rate for early treatment: 60–80% with good home care.
Surgical Debridement (Open Flap)
For moderate peri-implantitis (5–7 mm pockets, moderate bone loss), your dentist may:
- Cut a flap to expose the implant threads
- Clean the surface with special instruments
- Place a bone graft into the defect
- Close the flap
This works about 50–70% of the time to arrest disease and save the implant.
Explantation with Immediate Replacement
Some dentists offer “implant replacement surgery” where they remove the failed implant and place a new one in the same appointment. This works best for:
- Loose or non-integrated implants
- Mechanical failures (broken screw, not broken implant body)
- Minimal infection
Ask if you are a candidate. Not everyone is.
When Salvage Is Not Worth It
Honestly? Sometimes salvage attempts cost nearly as much as removal and replacement, with lower success rates. You might spend 3,000tryingtosaveanimplantwitha505,000 to remove and replace it when it fails anyway.
Consider removal directly if:
- Bone loss exceeds 50% of the implant length
- The implant is mobile
- You have a confirmed allergy
- The implant is fractured
- Two previous salvage attempts have failed
Finding the Right Professional for Implant Removal
This is not a procedure for a general dentist who places five implants a year. You want someone with specific experience.
Who Performs Implant Removals?
| Provider Type | Appropriate For | Not Ideal For |
|---|---|---|
| General dentist | Simple removals, non-integrated implants | Complex or integrated implants |
| Periodontist | Most peri-implantitis cases, moderate complexity | Cases needing general anesthesia |
| Oral surgeon | All types, especially complex or near nerves | Simple cases (but still fine) |
| Prosthodontist | Implant with broken crown/screw | Full implant body removal |
How to Vet a Provider
Step one: Ask for their annual removal volume. “Less than five per year” is a red flag.
Step two: Request to see before-and-after CBCT scans of their removal cases. A confident provider will share examples.
Step three: Read reviews specifically searching for words like “implant removal,” “extraction,” or “failed implant.” Ignore reviews about routine cleanings.
Step four: Verify they have a CBCT machine in-office or immediate access to one. Removal without recent CBCT is dangerous.
Step five: Ask about their backup plan for complications. “I’ll refer you to an oral surgeon” is not a backup plan.
Red Flags to Avoid
- “We don’t need a CBCT; an X-ray is fine.” (False. X-rays miss 40% of relevant anatomy.)
- “All implant removals are simple.” (False. They are lying or inexperienced.)
- “You don’t need a bone graft.” (Often false after complex removal.)
- “I’ve done thousands of these.” (For a common extraction, sure. For implant removal? Unlikely.)
- No clear estimate before the procedure.
Emotional Side of Implant Failure: It Is Okay to Feel Frustrated
Let’s pause the clinical talk for a moment. Implant failure hurts in ways that go beyond physical pain.
You invested time. You invested money. You tolerated surgery and healing. You probably felt excited about having a functional, beautiful tooth again. And now someone is telling you it needs to come out.
That sucks. It really does.
Many patients report feeling:
- Anger at themselves (even when it’s not their fault)
- Anger at their dentist (sometimes justified, often not)
- Embarrassment (as if others will judge them)
- Anxiety about future dental work
- Financial stress
- Distrust of dentistry entirely
All of these feelings are normal. Give yourself permission to have them.
What helps:
- Talk to a trusted friend or family member about how you feel
- Write down your questions and concerns before appointments
- Bring an advocate (someone who can take notes and ask questions)
- Seek a second opinion (this often reduces anxiety)
- Remember that one failed implant says nothing about your worth as a person
What does not help:
- Blaming yourself without evidence
- Avoiding follow-up care because you feel ashamed
- Assuming all future implants will fail (they won’t)
Perspective from a dental psychologist:
“Implant failure triggers the same emotional pathways as other medical treatment failures. Patients often need permission to grieve the outcome they hoped for. Once they process that grief, they can make clear decisions about next steps.” — Dr. Michael Torres, PhD
Frequently Asked Questions (FAQ)
How painful is tooth implant removal?
With proper anesthesia, you should not feel sharp pain during the procedure. You will feel pressure, vibration, and possibly some pulling sensations. Afterward, most people describe the pain as a dull ache, similar to a tooth extraction, manageable with over-the-counter or prescription medication.
Can an implant removal be done in one visit?
Yes. In almost all cases, the procedure is completed in a single appointment lasting 20–90 minutes. Complex cases with grafting still finish the removal portion in one visit. You will not need multiple removal appointments.
Will my insurance cover tooth implant removal?
It depends on your plan. Many dental insurance policies cover removal under major services. Medical insurance may cover it if medically necessary. Call your insurance with the specific CPT code D6100 to get a definitive answer before scheduling.
How long does it take to heal after implant removal?
Most people feel back to normal in 7–10 days. Complete bone healing (especially with a graft) takes 4–6 months. You can function normally long before the bone fully heals.
Can I get a new implant after removal?
Yes. Most patients are excellent candidates for a new implant after appropriate healing and grafting. Success rates for second implants exceed 95% when the cause of first failure is addressed.
What happens if I do nothing and leave the failed implant?
Leaving a failed implant in place is not recommended. Mobile implants can damage adjacent teeth. Infected implants can cause bone loss that spreads. In rare cases, chronic infection from a failed implant can affect your overall health. Removal is safer than leaving it.
How do I know if my implant is failing?
Common signs: mobility (looseness), bleeding or pus from the gums around it, bad taste or smell, progressive pain when biting, gum recession showing metal threads, or changes in how your bite feels.
Is tooth implant removal expensive?
Costs range from 500forasimpleremovalto7,000 or more for complex removal with extensive grafting. Your specific anatomy and location significantly affect the price.
Do I need a bone graft after every removal?
No. If the removal is simple and the bone is healthy, you may not need a graft. However, most integrated implant removals leave a defect that benefits from grafting, especially if you want a future implant.
Can my regular dentist remove my implant, or do I need a specialist?
A general dentist can remove simple, non-integrated implants. For integrated implants, peri-implantitis cases, or implants near vital structures, see a periodontist or oral surgeon. Do not hesitate to ask for a referral.
Additional Resources
For more reliable, evidence-based information about dental implants, implant complications, and treatment options:
American Academy of Implant Dentistry (AAID)
Patient education section covering implant safety, failure rates, and when to seek consultation.
Visit: aaid-implants.org (search “patient resources”)
How to use this resource:
- Look for the “Find an Implant Dentist” tool to locate experienced providers in your area.
- Read their “Implant Complications” fact sheet for a balanced overview.
- Review their checklist for choosing an implant dentist before any new procedure.
Conclusion: Your Path Forward with Implant Removal
Tooth implant removal is a safe, routine procedure that thousands undergo every year. Simple removals take minutes with minimal recovery. Complex removals require surgical skill but reliably resolve pain, infection, and mechanical failure. After healing, most people successfully receive a new implant or choose a non-implant alternative. You have options, and you do not have to live with a failing implant.
Disclaimer: This article provides general information and does not constitute medical or dental advice. Every case is unique. Always consult with a licensed dentist or oral surgeon about your specific situation before making treatment decisions. The author and publisher disclaim any liability for any adverse effects arising from the use or application of information contained in this guide.