What Does Dental Implant Look Like
Losing a tooth changes more than your smile. It shifts how you eat, how you speak, and how you feel when you look in the mirror. You start researching solutions. You hear the phrase “dental implant” over and over. But a question lingers in your mind: What does a dental implant actually look like?
The answer is not a single snapshot. A dental implant is not one piece. It is a system of components, each with a distinct appearance and purpose. Some parts sit hidden beneath your gum. One part bridges the gap between the hidden and the visible. And the final part is what you and everyone else will see: a replacement tooth that looks remarkably real.
This guide takes you through every visual detail. You will see the textures, the colors, the shapes, and the subtle design features that make modern implants work. You will understand what your eye can see and what remains cleverly concealed. By the end, you will have a clear, complete, and realistic mental picture of this life-changing restoration.
Understanding the Multi-Layered Structure of an Implant
Most people imagine a dental implant as a single object that looks like a screw with a tooth on top. This oversimplification can create confusion and unrealistic expectations.
In reality, a dental implant is a sophisticated assembly of three distinct parts. Each part has unique visual characteristics, materials, and a specific function. Think of it like a tiny architectural project designed to replace both the root and the crown of a natural tooth.
The Three Core Components at a Glance
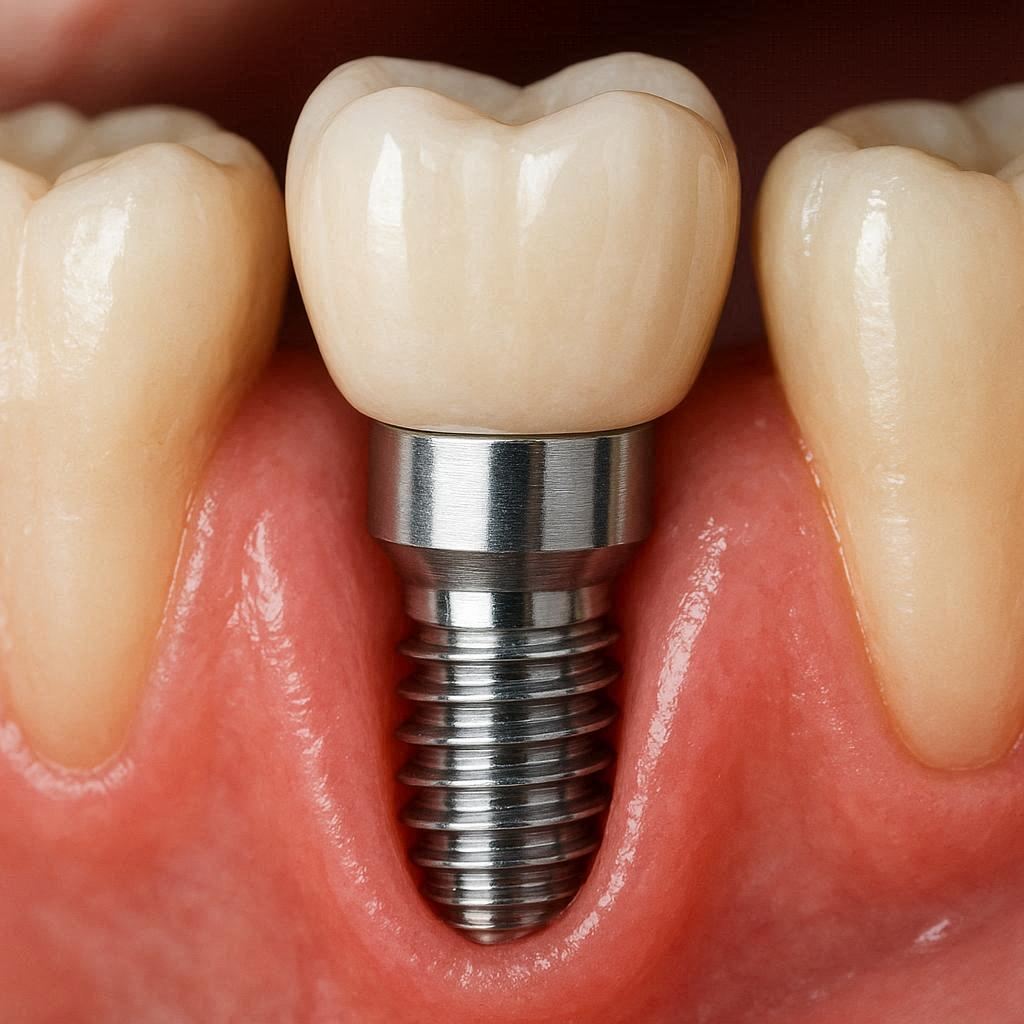
The standard dental implant system consists of the implant fixture, the abutment, and the prosthetic crown. These three pieces work together to mimic nature’s design.
First, the implant fixture anchors into your jawbone. This is the “root” of the new tooth. Second, the abutment connects the fixture to the visible world. It acts as a connector or a miniature post. Third, the prosthetic crown sits on top. This is the part that looks like a tooth.
Together, they form a seamless replacement. But individually, they each have a very different appearance. Let’s break down the visual identity of each component.
Important Note: Some implant systems combine the abutment and fixture into one piece, but the classic three-piece system is the most common and offers the best flexibility for natural-looking results.
The Implant Fixture: The Hidden Foundation
When you ask what a dental implant looks like, you often picture the part that goes into the bone. This is the implant fixture. You will never see it after placement. It hides completely under your gum tissue. But its design is a marvel of engineering and biological science.
Basic Shape and Profile
The implant fixture resembles a precision-machined screw or cylinder. It is small. A typical implant measures between 6 and 16 millimeters in length and 3 to 7 millimeters in diameter. To picture this, look at a standard wooden pencil eraser. The diameter of the implant is slightly smaller than that eraser.
The body of the fixture tapers slightly, much like the natural root of a tooth. It is wider at the top, near the gum line, and gently narrows toward the bottom. This tapered shape provides stability and mimics the natural anatomy of a tooth root.
The External Threads
One of the most striking visual features is the presence of external threads. These look exactly like the threads you see on a metal screw or bolt. They spiral around the cylindrical body from near the tip to the upper portion.
These threads serve a critical mechanical purpose. They engage with the jawbone and create primary stability the moment the surgeon places the implant. Under a microscope, these threads often have a roughened surface texture to maximize bone-to-implant contact.
Surface Texture and Color
The fixture is not shiny like a polished piece of jewelry. Modern implants feature a microscopically roughened surface, achieved through techniques like sandblasting and acid etching. To the naked eye, this surface looks matte or frosted, similar to a finely textured stone.
The color is typically a muted, warmish grey. Implants are made from biocompatible materials. The two most common are commercially pure titanium and a titanium alloy called Ti-6Al-4V. Titanium gives the fixture its characteristic dark grey metallic hue.
A newer option is zirconia, a type of high-strength ceramic. Zirconia fixtures are brilliant white. This color offers an aesthetic advantage. If gum tissue is thin or recedes slightly over time, a white implant is far less noticeable than a grey one.
| Feature | Titanium Implant | Zirconia Implant |
|---|---|---|
| Color | Matte grey, metallic | White, tooth-like |
| Surface Appearance | Frosted, slightly rough | Smooth in polished areas, micro-rough on the body |
| Material Feel | High-tech, engineering-grade metal | Dense, high-strength ceramic |
| External Threads | Clearly visible, sharply defined | Visible but often slightly less sharp definition |
| Risk of Grey Show-Through | Possible if gums are very thin | Virtually none |
The Internal Connection
Look closely at the top of an implant fixture, and you will see a precisely engineered hollow space. This is the internal connection. It is invisible after placement but crucial to the implant’s function.
Depending on the brand, this connection may look like a hexagonal socket, a conical depression, or a more complex geometric shape. Imagine the top of a Phillips head screw, but far more intricate. This chamber receives and locks the next component into place. It ensures a tight, bacteria-proof seal.
The Abutment: The Critical Connector
If the implant fixture is the hidden root, the abutment is the translator. It sits partially above the gum line and serves as a docking station for the visible crown. Its appearance changes depending on the material and the manufacturing process.
Stock vs. Custom Abutments
A stock abutment is a pre-fabricated, off-the-shelf component. It comes in standard shapes and sizes. Visually, it often looks like a small metal or ceramic cylinder with a slight angle. While functional, it may not perfectly follow the natural, scalloped contours of your gum line.
A custom abutment is different. A dental technician designs it from a digital scan of your mouth. It looks like a miniature, sculpted tooth prepared for a crown. The lower part mirrors the natural emergence profile of a tooth root as it comes out of the gum. This creates a far more lifelike visual transition between the pink gum and the white crown.
The Appearance of Metal Abutments
Metal abutments are typically fabricated from titanium or gold-coated titanium. The titanium version shares the same matte, grey aesthetic as the implant fixture. A gold alloy abutment has a distinct, warm yellow appearance.
Why use gold? The gold color can be aesthetically beneficial in certain situations. If you have very thin or translucent gum tissue, a grey metal abutment might cast a shadow, making the gum appear dark. A gold abutment can neutralize this, creating a warmer, more natural pink tone in the surrounding tissue. The gold abutment is still completely hidden by the final crown, but its color impacts the overlying gum.
The Appearance of Ceramic Abutments
For the highest level of aesthetics, dentists often choose a ceramic abutment, usually made from zirconia. Its appearance is a game-changer. The abutment is completely white, sometimes with a subtle translucency that mimics a natural tooth.
It looks like a small, shaped, white post. When placed, it seamlessly blends with the final ceramic crown and the natural tooth color. If any recession occurs later, only a clean, white margin is visible, not a dark grey line. This makes ceramic abutments the gold standard for front teeth and other highly visible areas.
The Prosthetic Crown: The Visible Result
The crown is the part that answers the question, “What will my new tooth look like?” This is the restoration that reproduces the visible anatomy of a natural tooth. A well-made crown is indistinguishable from a real tooth to the casual observer.
A Detailed Look at Crown Anatomy
A dental implant crown copies the anatomy of a natural tooth perfectly. It has a rounded top with subtle depressions. It has defined cusps on back teeth or a smooth, contoured facial surface on front teeth. The surface has a gentle gloss that matches the light-reflecting properties of natural enamel.
The lower portion of the crown, the part near the gum, is critical. It must emerge from the gum line naturally. It should not look like a flat, straight cylinder. Instead, it flares slightly, with gentle curves that mimic the root emergence. This “emergence profile” is what makes the crown look like it is growing out of the gum, not just sitting on top of it.
Material Choices and Their Visual Differences
The material of the crown dictates its texture, color depth, and light interaction. Each option has a distinct look.
- Porcelain-Fused-to-Metal (PFM): These crowns have a metal substructure covered in porcelain. They look good from the front, but they can sometimes appear slightly opaque. The metal base does not allow light to pass through like a natural tooth. Near the gum line, you may see a thin, dark grey metal margin if the gums recede a little. The color is painted onto the surface, so it can look slightly flat compared to a full-ceramic crown.
- Full-Ceramic (Zirconia or E-max): These crowns represent the pinnacle of natural aesthetics. They contain no metal. Light enters the crown and bounces around, creating a depth and translucency that is remarkably similar to natural tooth enamel. E-max, made from lithium disilicate, has a particularly vivid, lifelike luster. Zirconia is immensely strong and can be layered with porcelain to create a nuanced, tooth-like appearance with subtle color variations and opalescence. The edge near the gum is white and clean.
- Resin Composite: This material is less common for permanent implant crowns but is sometimes used for temporary restorations. It mimics a tooth’s color but generally lacks the depth, translucency, and durable gloss of ceramic options. It is more prone to staining and wearing down over time.
How It Attaches: Screw-Retained vs. Cemented
The way a crown connects to the abutment creates a distinct visual feature. There are two main methods.
With a screw-retained crown, the crown has a small access hole on its chewing surface or the back of a front tooth. The dentist inserts a tiny screw through this hole to secure the crown to the underlying abutment. They then fill the hole with a tooth-colored composite resin. You may see a tiny, discreet filling-like spot upon very close inspection. The advantage is easy removal for maintenance without risking damage to the crown. The visual trade-off is that small access point.
With a cemented crown, the crown is a solid, flawless piece. The dentist cements it over the abutment just like a traditional crown on a natural tooth. Visually, it is perfect and uninterrupted. There is no access hole. The trade-off here is a small risk of excess cement getting trapped under the gum, which requires meticulous cleanup to avoid inflammation.
Temporary vs. Permanent: A Visual Timeline
Your journey includes a transitional phase. A temporary prosthesis protects the implant and shapes the gum tissue. It looks very different from the final, permanent masterpiece.
What a Healing Cap Looks Like
Immediately after implant placement, or during a second minor surgery, a dentist may place a healing cap, also called a healing abutment. This is a small, dome-topped cylinder made of metal or white plastic.
It protrudes a few millimeters through the gum. You might be able to see and feel this small, smooth bump. Its only job is to create a perfectly round, clean channel in the gum tissue. It does not look like a tooth at all. Think of it as a placeholder that sculpts the gum into an ideal shape for the final tooth.
The Immediate Temporary Crown
In some cases, you can leave the appointment with a fixed temporary tooth. This is common for front teeth where aesthetics are paramount. An immediate temporary crown is made from durable plastic or acrylic resin.
It looks like a simplified version of a tooth. It has the correct length, basic shape, and a shade that is close to your natural color. However, it lacks the nuanced characterizations of a final crown. The surface is smooth and uniform. You will not see the tiny ridges, subtle color flecks, or translucent edges that define a natural tooth.
Reader’s Note: A temporary crown is a functional and aesthetic stand-in. It is not built for heavy chewing. Treat it as a fragile preview of the final result.
The Appearance of a Temporary Removable Prosthesis
If you are missing multiple teeth, a temporary removable prosthesis, often called a “flipper,” fills the gap. This looks like a slim, acrylic retainer with one or more plastic teeth embedded in pink-colored gum acrylic. It is completely removable.
The fake gum base is a uniform, coral pink color. The attached teeth are a single, flat shade of white. It restores your smile during the healing phase, but the appearance is that of a basic denture, not a fixed, lifelike implant.
Single Tooth Implants: A Visual Walkthrough
Let’s zoom in on the most common scenario: replacing a single missing tooth. This step-by-step visual journey brings together all the components we have discussed.
The Seamless Final Result
Once the permanent crown is in place, the goal is total invisibility. Your eye should see only a tooth that continues the natural arch. The crown contacts the adjacent teeth perfectly. It should not look squeezed in or pushed out. The gum tissue wraps around the crown with a healthy, pink, knife-edged margin. There is no metal, no dark line, no detectable difference in contour.
From a conversational distance, and even upon close inspection, a successful single-tooth implant is visually imperceptible. You simply see a healthy, well-aligned tooth. This is the moment the skilled work of the surgeon, restorative dentist, and lab technician becomes a single, unified, natural-looking result.
Key Visual Details of a Maxillary Incisor Implant
A front tooth, a maxillary central incisor, presents the highest aesthetic challenge. The visual details here are the most demanding.
The crown must exhibit translucency at the biting edge. This creates a slight blue-grey or opalescent halo, exactly like a natural young tooth. The surface should have vertical micro-texture, tiny ridges that break up light reflection. The color is never a single flat shade. It transitions from a slightly darker, more saturated hue at the gum line to a lighter, more translucent edge. The gum tissue between the teeth, the papilla, must fill the triangular space completely, leaving no black hole.
The abutment for this tooth is almost always custom and ceramic. A grey metal interface here would be a catastrophic aesthetic failure. The white ceramic abutment supports the translucent crown and reflects light naturally through the gum.
Visual Details of a Mandibular Molar Implant
A lower, back tooth, a mandibular molar, faces different visual criteria. This tooth lives in a world of function, force, and shade.
It is not about translucency but about anatomical correctness. The crown has deep, defined grooves and pits on its chewing surface. The cusps are rounded and robust. The color is typically richer, with warm, yellow-brown undertones matching the highly mineralized natural molars nearby. Polished zirconia is an excellent choice here, as it looks powerfully natural in a high-force area.
The access hole for a screw-retained crown is positioned right in the middle of the chewing surface. The dentist fills it with a composite that matches a natural pit or groove. It becomes just another visual feature in the complex landscape of the occlusal surface.
Multiple Tooth Implants: Bridges and Full Arches
The visual narrative changes when you are replacing several teeth or a whole jaw. The concept remains the same, but the scale shifts, and new visual elements appear.
An Implant-Supported Bridge: What to Expect
An implant-supported bridge replaces two or more adjacent missing teeth. It looks like a series of connected, natural-looking crowns. Crucially, it does not rest on your gums with a pink acrylic base. It sits solely on two or more implants.
Visually, it appears as if the natural teeth have simply grown back together. The most important visual feature is the undersurface. There is a smooth, clean, convex space between the porcelain crowns and the gum ridge. You can clean under it with floss or an interdental brush. This open embrasure space is a hallmark of a well-designed implant bridge. It looks clean and modern, avoiding the bulky, food-trapping design of older bridges.
The Visual Anatomy of a Full-Arch Prosthesis
Replacing all teeth on an arch, often called “All-on-4” or “All-on-6,” results in a fixed, screw-retained, full-arch prosthesis. This is a hybrid prosthetic that looks unique.
It features a full set of beautiful, highly aesthetic crowns. The crowns are typically fabricated from high-grade acrylic composite or zirconia. Beneath the crowns is a small, precision-milled titanium bar or a solid, strong framework. This framework is completely covered by pink acrylic or pink porcelain that replicates natural gum tissue.
Visually, you see a complete set of gleaming white teeth on a bed of realistic pink tissue. The pink base extends and contours over the thin, strong inner bar. The dental technician paints the pink base with subtle stippling and color variations to mimic the texture and tone of real palate gum. The final result is a stunning, fixed full smile that transforms facial support.
Implant-Supported vs. Traditional Dentures: A Visual Comparison Table
A picture is worth a thousand words. A detailed comparison table can help you instantly grasp the visual hierarchy between a traditional removable denture and a fixed implant solution.
| Visual Feature | Traditional Removable Denture | Implant-Supported Fixed Prosthesis |
|---|---|---|
| Amount of Pink Acrylic | Extensive; covers the entire palate (upper) and large gum areas. | Minimal; a slim band of realistic pink tissue sits just above the teeth. |
| Presence of Metal | No visible metal; all acrylic. | No visible metal; hidden titanium bar inside the pink base. |
| Teeth Appearance | Standard, single-shade plastic teeth; can appear uniform and flat. | Custom-made ceramic or high-grade acrylic teeth; multi-layered, characterized, and lifelike. |
| Perceived Age | Often associated with advanced age due to bulk and visible plastic. | Youthful and strong; restores lip support and facial contours without the bulk. |
| Palate Coverage | Full acrylic coverage on the upper palate, reducing taste and sensation. | None; the palate is uncovered, preserving full taste sensation. |
| Stability | May slip, click, or drop while eating or speaking, a major visual and social cue. | Fixed; completely immobile. Functions identically to natural teeth. |
The “All-on-4” Concept: A Visual and Structural Breakdown
The “All-on-4” technique deserves a special focus. It is a revolution in full-mouth rehabilitation, and its final form has a distinct and consistent look.
Anatomy of the Final Prosthesis
The final hybrid denture for an All-on-4 is a masterpiece of prosthodontic art. Imagine a perfect, symmetrical row of highly aesthetic teeth. They have the light-dynamic properties of natural dentition. They are not purely white, but have a calibrated shade with subtle cervical color and translucent incisal edges.
Below these teeth, the pink acrylic base gently swells to replicate the contour of the natural gum and underlying alveolar bone. The technician carefully textures the base to create a stippled effect. This mimetic pink gum covers the junction between the prosthesis and the patient’s own soft tissue. The transition is not a flat, obvious line.
Transition Line Visibility
One of the most common visual concerns is the transition line where the prosthesis meets the natural gum. In a well-crafted All-on-4 prosthesis, this line is designed for hygiene and aesthetics.
Some prostheses have a polished, slightly concave surface at the gum line, allowing for easy cleaning access. The line is visible only upon very close inspection, and even then, it is designed as a clean, intentional seam. For patients with a high smile line, a maxillofacial dental technician can bring the ceramic or acrylic pink base to a feathered edge that blends so seamlessly that the line becomes virtually undetectable at a social distance.
Zygomatic Implants: A Special Visual Case
Zygomatic implants are a specialized solution for patients with severe bone loss in the upper jaw. Their appearance and the prostheses they support look different.
What the Implants Themselves Look Like
Zygomatic implants are dramatically longer than standard implants. A standard implant is up to 16mm. A zygomatic implant can be between 30 and 52.5 millimeters long. To visualize this, pick up a pen. The implant’s length is comparable to the pen’s cap.
The implant head, the part you could see in the mouth during surgery, has a smooth, polished collar that transitions to a threaded body. The head typically features an angulation mechanism, so it looks like a special, angled implant head designed to redirect the prosthetic connection.
The Prosthesis Supported by Zygomatic Implants
The final restoration looks identical to a standard full-arch fixed prosthesis: beautiful teeth on a pink base. The critical difference is the position of the implant heads inside the mouth. They emerge far back in the palate region, not along the ridge.
For a patient, the look and feel of the final prosthesis are the same. You see perfect teeth. You see natural pink acrylic gums. The long, angled anchors are completely hidden above the palate, covered by the pink base. The miracle of this design is that a patient with no bone can still receive a fixed, aesthetically flawless set of teeth that does not move.
Materials Deep-Dive: The Look and Feel of Cutting-Edge Ceramics
Modern dental aesthetics are defined by materials science. The visual character of your implant’s visible parts depends heavily on the ceramic used.
The Aesthetic Qualities of E-max
IPS e.max is a lithium disilicate glass-ceramic. Its visual identity is its vivid translucency and chameleon-like ability to blend with adjacent natural teeth. It comes in a wide variety of ingots with different opacity levels: High Translucency (HT), Medium Opacity (MO), and Low Translucency (LT).
Under a light, an E-max crown has a glassy, luminous quality. It interacts with light in a way that is uncannily similar to natural enamel. For a single front tooth implant, where the adjacent teeth are natural, E-max is often supreme. It has a life-like warmth that makes it visually indistinguishable.
The Robust Transparency of Zirconia
Zirconia, specifically yttria-stabilized tetragonal zirconia polycrystal (Y-TZP), has evolved. Early zirconia was strong but looked opaque and chalky white, like a piece of solid white plastic. Modern “high-translucent” zirconia is a different animal.
It has a milky, opalescent quality, like a crystal. It does not have the vivid clarity of E-max but possesses a deep, inherent warmth. Multi-layered zirconia blocks, where the color and translucency shift from the cervical to the incisal area, are milled into crowns that look incredibly natural. For full-arch prostheses and molar crowns, zirconia provides strength and a monolithic beauty that feels dense, permanent, and vitally organic.
The Dentist’s Laboratory: How Personalized Esthetics Are Created
No two teeth are exactly alike. The process of creating your implant crown is a blend of science and high art. The dental laboratory is where the true visual character is born.
Digital Smile Design and Virtual Blueprints
Your new smile often begins in a digital world. A dentist uses an intra-oral scanner, a wand-like camera, to capture thousands of images of your mouth. These images render as a precise, 3D digital model on a screen.
The dentist and technician use Digital Smile Design (DSD) software to design your new tooth. They analyze your facial proportions, your lip line, and the shape of your natural teeth. They build a virtual crown that is perfectly harmonic with your unique facial frame. You can even see a visual mock-up of the final result on a screen before a single bur touches a ceramic block.
The Layering of Porcelain by Hand
For the highest aesthetic demands, a master ceramist builds your crown entirely by hand. They take a die, an exact replica of the abutment, and begin to apply wet porcelain in layers.
They start with an opaque layer to block any show-through of the substructure. Then, they apply a body layer of dentin-shaded porcelain to build the core shape. Next, they apply a more translucent enamel layer. At the incisal edge, they may add a special translucent porcelain mixed with opalescent effects, creating a blue-grey or amber halo. They then fire it in a kiln. The result is a tiny, sculpted, multi-layered work of art that has a visual depth impossible to achieve with a single-layer material.
Immediate Load Implants: The “Teeth in a Day” Look
“Teeth in a Day” is a popular phrase, but the reality involves precise, transitional, and final visual stages.
What You See on the Day of Surgery
On surgery day, after the implants are placed, the restoring doctor connects a pre-fabricated, fixed temporary prosthesis. This is a full-arch bridge made of durable acrylic with plastic teeth. It is milled to the exact plan from the digital design.
The teeth are set in a pink acrylic base. The look is clean and acceptable. The teeth are a generic, nice shade of white and are perfectly straight. However, the level of artistic detail is minimal. The pink base lacks the nuanced stippling of a final prosthesis. This is a healing prosthesis designed to look good, not yet great, while your bone and gum tissue heal and reshape over the next 3-6 months.
The Transformation to the Final Prosthesis
After healing, you receive the definitive prosthesis. The difference is dramatic. The acrylic on the temporary is replaced by high-grade, multi-layered zirconia or individually layered porcelain. The flat, pink base is replaced by a sculpted, characterized gum replacement. The teeth have custom staining, micro-texture, and life-like incisal edges.
In a photograph, the final “Teeth in a Day” result looks like the smile of a person with perfect, natural dentition. The transition from the good-enough temporary to the excellent final is one of the great visual joys in implant dentistry.
The Influence of Abutment Material on Gum Color
The color of your gum tissue around an implant is a critical aesthetic marker. It sends a strong signal about the health and naturalness of the restoration.
The Grey Shadow Effect
If you have ever seen someone with a slight grey-blue hue on the gum near a dental crown, you have witnessed the grey shadow effect. This happens when a titanium abutment, or a titanium fixture, sits behind a thin curtain of gum tissue. The dark metal casts a cold shadow.
To test your own gum tissue, look in a mirror and pull up your lip. If you can see the outline of your natural tooth roots as slightly darker, warm-yellowish ridges under the pink gum, your tissue is thin and translucent. In this case, a grey titanium abutment is likely to create an unesthetic grey line. This is a critical pre-surgical conversation to have: “Do I need a white ceramic abutment to avoid a grey shadow?”
Achieving Warm, Pink Esthetics
A custom ceramic or zirconia abutment solves the grey shadow problem elegantly. The white ceramic reflects warm light back through the tissue. The result is a healthy, vibrant pink scallop that matches the gums of the adjacent teeth perfectly.
The ceramist can even tint the cervical part of the abutment and crown with a subtle pink porcelain to further enhance the optical illusion of a natural tooth emerging from the gum. Achieving this warm, pink esthetic is the difference between a good result and a great one.
Common Visual Complications and How to Spot Them
An honest guide must address what can go wrong. Knowing what looks normal and what signals a problem is essential.
Gum Recession and Exposed Threads
If the gum tissue recedes around an implant, the result is a visual that signals distress. You may see a grey, metallic margin appearing at the gum line. In severe cases, a portion of the roughened, threaded implant body may become exposed to the oral environment.
This is not just a cosmetic disaster. The exposed threads feel rough to your tongue. They can accumulate plaque and indicate a loss of supporting bone. An implant with exposed threads looks like a small, grey, machine screw sticking out of a pink gum. This is a clear sign that requiring immediate professional intervention is a must, not an option.
The “Too White” or “Flat” Crown
An implant crown must blend, not shout. A crown that is too white, opaque, and monochromatic stands out immediately. It looks like a piece of plastic. This flat, unnatural look commonly results from using an opaque, solid block of older-generation zirconia or a poorly made PFM crown with no depth.
A natural-looking crown requires an inner glow, a transition of color from the neck to the edge, and a surface texture that scatters light. A visually failed crown has none of these. It appears as a single, flat, white object that insists, “I am not a real tooth.”
Black Triangles and Open Embrasures
The small, triangular space between teeth at the gum line is called the papilla. If this papilla is missing, a black triangle, an empty, dark space, appears. It creates a dingy, unhygienic look and can trap food.
Black triangles occur when the implant position is incorrect, the bone support is insufficient, or the crown’s emergence profile is poorly designed. Visually, a black triangle is a dead giveaway of a prosthetically imperfect result. A skilled team designs the implant position and the crown contours precisely to coax the gum tissue into filling that space.
Visual Guide to the Surgical and Restorative Journey
For a patient, the visual journey happens in stages. Each appointment has a distinct visual outcome.
- Pre-Surgery: A gap or a failing tooth.
- Day of Surgery: If a tooth is removed, a blood clot and sutures in the socket. The implant is completely hidden.
- Integration Phase (3-6 Months): You see nothing above the gum line. The implant is buried and healing. You wear a temporary removable denture or a temporary bridge if needed.
- Uncovering/Stage 2: A small procedure reveals the implant. A healing cap is placed. You see a tiny, smooth metal or white button poking through the gum.
- Impression Appointment: The healing cap is removed, revealing a perfectly round, healthy gum channel. A scan body, a small geometrically-shaped piece, is screwed into the implant for a digital impression.
- Temporary Crown Phase: A screw-retained or cemented temporary crown is placed. The gum begins to mold to the perfect contour.
- Final Delivery: The temporary is removed. The final custom abutment is torqued in, and the final crown is secured. You see a perfect, lifelike tooth.
Comparing an Implant Crown to a Natural Tooth Under Magnification
Under 10x magnification, the visual differences between a natural tooth and a ceramic crown become fascinating.
A natural tooth has a surface covered in perikymata, fine horizontal wave-like grooves. These micro-structures scatter light in a uniquely organic way. A porcelain crown, even a highly aesthetic one, has a smoother, glassier surface. To compensate, the ceramist meticulously creates macro- and micro-texture with fine diamond burs, etching vertical lobes and horizontal striations.
Under the gum, of course, the visual difference is absolute. A natural tooth has periodontal ligament fibers attaching root to bone. An implant has a direct, rigid fusion of bone to its microscopically rough surface, a phenomenon called osseointegration. There is no ligament. This perfectly rigid connection is invisible to the eye but fundamental to the function.
Key Questions to Ask Your Dentist About Aesthetics
You are now more informed than 99% of patients. Use this knowledge in your consultation.
- “Will you use a stock or custom abutment for my case, and can you show me a model of each?”
- “Given my gum biotype, which is the thickness of my gum tissue, do you recommend a metal or a ceramic abutment to prevent a grey shadow?”
- “What material do you recommend for my final crown to achieve the most natural translucency and texture for a front tooth?”
- “How will you manage the emergence profile to ensure the crown looks like it is growing out of the gum, not just sitting on it?”
- “Can I see a mock-up in wax or digital form of the intended final tooth before we proceed?”
The Long-Term Visual Prognosis: 10, 20, and 30 Years Later
A well-made implant looks fantastic the day it goes in. But what about in 20 years?
With meticulous home care and professional maintenance, an implant-supported crown can look beautiful for decades. The ceramic itself will not decay and is highly resistant to staining. The perfection of the gum tissue depends on biology. A stable, knife-edged, healthy gingival collar can surround an implant for a lifetime.
The visual enemy is gradual, creeping recession or a slow-developing, often invisible bone loss around the implant, termed peri-implantitis. Long-term photographs are the best monitor. If you compare a photo from year one to year ten, the goals are stability of the gum level, maintenance of the interproximal papilla, and a persistent, healthy pink color with no bleeding on probing.
Conclusion
A dental implant is a three-part marvel of modern dentistry, visually divided into a hidden root-form fixture made of frosted, threaded titanium or white ceramic, a connecting abutment that can be metal or tooth-colored, and a visible crown crafted with meticulous artistry to mirror nature’s own design. From the precise, screw-like threads that grip the bone to the layered translucency of a custom ceramic crown, every visual detail serves a purpose of strength and mimicry. Understanding these visual components demystifies the process, turning anxiety into informed confidence for a restoration that can look faithfully real for decades.
Frequently Asked Questions (FAQ)
1. Can people tell I have a dental implant when I smile?
No, a well-made implant crown is indistinguishable from a natural tooth. Dentists and ceramists customize the shape, color, texture, and translucency to perfectly match your surrounding teeth.
2. Will the implant be visible if my gums recede?
It can be. If a grey titanium fixture or abutment is used and your gum recedes, a dark line may appear. Choosing a white zirconia abutment and implant minimizes this risk entirely.
3. What is the difference between a healing cap and an abutment?
A healing cap is a temporary small dome that shapes the gum. An abutment is the permanent precision connector that screws into the implant and holds the final crown.
4. Does a full-arch implant prosthesis look like a denture?
No. A fixed full-arch prosthesis is immobile and uses realistic pink porcelain or acrylic with high-end ceramic teeth. It looks like a perfect set of natural teeth and gums, not a removable plastic denture.
5. Why is there a small hole on the top of some implant crowns?
That is a screw access hole for a screw-retained crown. The dentist fills it with a tooth-colored composite, making it virtually invisible on back teeth or the back of front teeth.
Additional Resource:
For a highly detailed visual dictionary of implant components and clinical cases, visit the online gallery of the Academy of Osseointegration at www.osseo.org.
Disclaimer: This article is for informational purposes only and does not constitute medical advice. The visual descriptions of dental implants are based on typical presentations and can vary by manufacturer, technique, and individual patient anatomy. Always consult a licensed dentist for a personal examination and customized treatment plan.