Dental Implant Procedure Timeline
Deciding to get a dental implant is a big step toward comfort, confidence, and long-term oral health. But once you start researching, one question tends to pop up more than any other: How long does the whole process actually take?
The short answer is: It depends. No two mouths are the same. Some people walk into a dentist’s office in the morning and walk out with a temporary tooth by lunch. Others need several months of bone healing, gum treatment, or even sinus work before the first implant can be placed.
The honest timeline for a dental implant procedure usually ranges from three to twelve months. In complex cases, it can stretch to eighteen months.
This guide will walk you through every stage, from your first phone call to biting into an apple with your new tooth. No fluff. No unrealistic promises. Just a clear, friendly, and detailed roadmap.
Before the Clock Starts: Why Implants Take Time
Before we dive into the week-by-week and month-by-month breakdown, it helps to understand why dental implants aren’t a one-visit procedure.
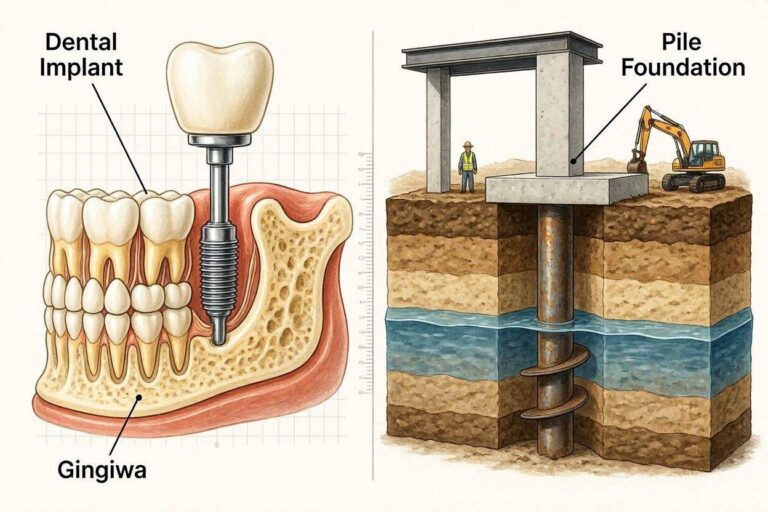
A dental implant is a tiny titanium screw that replaces your natural tooth root. Your jawbone needs to grow around that screw in a process called osseointegration. Think of it like this: if you plant a tree, you can’t just shove it into the ground and expect it to hold. You need to let the roots settle, grip the soil, and become part of the earth. The same goes for an implant.
Important note: Healing cannot be rushed. Skipping or shortening healing phases is the number one reason implants fail. A reliable dentist will never cut corners on waiting times.
Now, let’s walk through the entire journey.
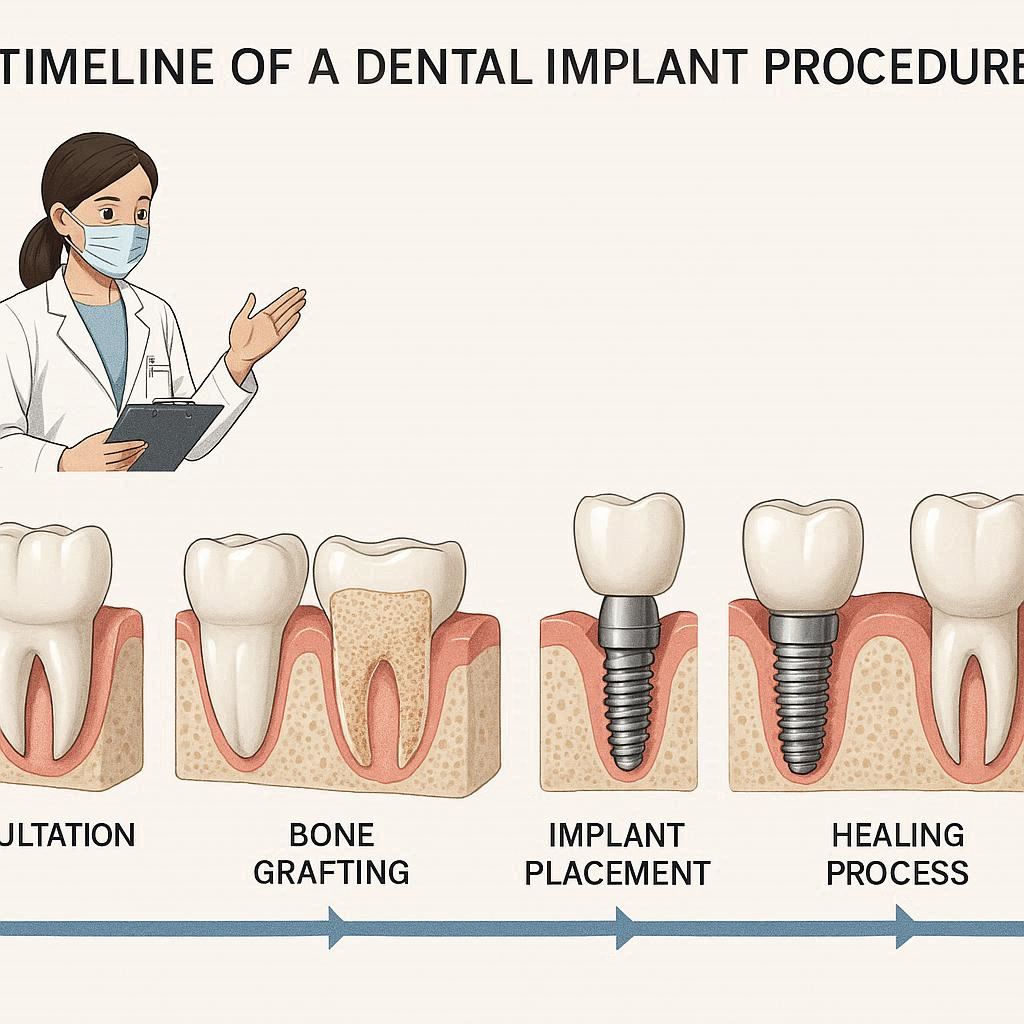
Stage 1: Initial Consultation and Treatment Planning (1–3 visits)
Your timeline starts long before any tools touch your mouth. This first phase is all about information, imaging, and honesty.
What happens during the consultation?
During your first visit, your dentist will:
- Examine your teeth, gums, and jawbone
- Take digital X-rays or a 3D CBCT scan (this is like a Google Earth map of your jaw)
- Review your medical history
- Ask about medications (some blood thinners or bisphosphonates affect implant success)
- Discuss your goals and budget
If you have active gum disease, tooth decay, or an infection in a neighboring tooth, your dentist will need to treat those issues first. Placing an implant into an unhealthy mouth is like building a house on a cracked foundation.
Will you need additional procedures?
This is where timelines start to diverge. Your dentist might discover that you don’t have enough bone to hold an implant. In that case, you will need one or more of these procedures before the implant can be placed:
| Additional Procedure | Purpose | Typical Healing Time |
|---|---|---|
| Bone graft | Add bone material to a deficient area | 4–9 months |
| Sinus lift | Raise the sinus floor to create bone height in the upper jaw | 4–8 months |
| Ridge preservation | Fill a tooth socket right after an extraction | 3–6 months |
| Gum disease treatment | Eliminate infection and inflammation | 4–8 weeks |
Note: Not everyone needs these. Many people have perfectly healthy bone and gums and can move straight to implant placement.
What you should ask at this stage
- “Based on my scan, do I need a bone graft or sinus lift?”
- “What is your success rate with implants in cases like mine?”
- “Can you show me a written timeline estimate?”
A good dentist will give you a range, not a fixed date. For example: “We are looking at four to six months, assuming your bone heals well.”
Stage 2: Preparatory Work (If Needed) – 2 to 9 months
Let’s address the elephant in the room: bone grafting is the single biggest reason implant timelines stretch past six months.
Bone grafting explained simply
When you lose a tooth, your jawbone begins to melt away. It’s a biological process called resorption. Your body says, “Well, we don’t need that bone anymore” and starts reabsorbing it. Over just one year without a tooth root, you can lose 25% of the bone width in that spot.
A bone graft rebuilds that lost terrain. The dentist places grafting material (often from a donor or synthetic source) into the area. Then you wait for your body to transform that material into living, healthy bone.
Realistic bone graft recovery
- First week: Some swelling, minor discomfort, and a soft-food diet.
- Week two to four: You feel mostly normal, but healing is happening deep below the surface.
- Month two to four: The graft fuses with your natural bone.
- Month four to nine (depending on graft size): You are ready for an implant.
“I had a large bone graft on my upper front jaw. My dentist told me six months. I was frustrated at first, but looking back, rushing would have been a disaster. Now my implant feels like a real tooth.” — Sarah, 52, Boston
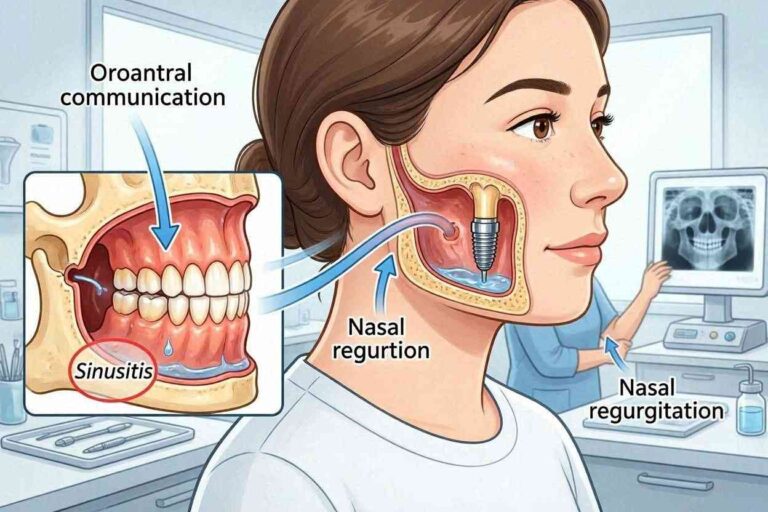
Sinus lift: a special case for upper molars
If you are missing an upper back tooth, your sinus cavity might have expanded downward into the space where bone should be. A sinus lift gently pushes the sinus up and adds bone beneath it. This adds about four to eight months to your total timeline.
Key takeaway: If your dentist recommends preparatory work, do not try to skip it. A shorter timeline with a failing implant is far worse than a longer timeline with a successful one.
Stage 3: Tooth Extraction (If the tooth is still present) – 1 day
If your damaged tooth is still in your mouth, it needs to come out before the implant goes in.
Immediate extraction vs. delayed extraction
There are two common approaches:
- Extraction and immediate implant placement: The dentist removes the tooth and places the implant in the same appointment. This works when there is no active infection and plenty of bone.
- Extraction, then wait: The dentist removes the tooth and lets the socket heal for 4–12 weeks before placing the implant. This is safer if there was an abscess, a cyst, or significant bone loss around the tooth.
What to expect on extraction day
- Local anesthesia (you stay awake but feel no pain)
- The dentist gently loosens and removes the tooth
- They clean the socket thoroughly
- A collagen plug or bone graft material may be placed
- Stitches (often self-dissolving) close the area
Recovery from extraction alone:
- Days 1–3: Some bleeding, swelling, and discomfort. Stick to cold foods and smoothies.
- Days 4–7: Swelling goes down. You can eat soft foods like scrambled eggs or pasta.
- Weeks 2–4: The gum tissue closes over the socket. The bone underneath continues to remodel.
If you are waiting between extraction and implant placement, you can ask for a partial denture or a flipper tooth to fill the gap cosmetically. This is temporary but helps with confidence and chewing.
Stage 4: Dental Implant Placement Surgery – 1 to 2 hours
This is the day most people think about. The actual surgery is shorter and less intense than you probably imagine.
Step-by-step during the surgery
- Numbing: You receive local anesthesia. If you are anxious, sedation options (like laughing gas or an oral pill) are available.
- Incision: The dentist makes a small cut in your gum to expose the bone underneath.
- Drilling (gentle and precise): Using a series of progressively wider drills, they create a hole exactly the size of your implant.
- Placement: The titanium implant is screwed into the hole.
- Covering: A healing cap or cover screw is placed on top of the implant. The gum is sutured over or around it.
Does it hurt?
You should feel no sharp pain during the surgery. You will feel pressure, vibration, and strange sounds (like scratching or tapping). After the anesthesia wears off (3–6 hours later), you will feel soreness similar to a difficult tooth extraction. Over-the-counter ibuprofen or prescribed pain relievers manage this well.
One implant or multiple?
| Number of Implants | Surgery Time (approx) | Recovery Similar To |
|---|---|---|
| 1 implant | 45–60 minutes | Single extraction |
| 2–3 implants | 60–90 minutes | Multiple extractions |
| Full arch (All-on-4) | 2–3 hours | Major oral surgery |
Important: You cannot drive yourself home if you receive sedation. Arrange a friend, family member, or rideshare.
Stage 5: Osseointegration – The Silent Healing Phase (3 to 6 months)
This is the longest and most critical phase of your dental implant timeline. And ironically, it is also the quietest. You won’t feel much happening, but deep inside your jawbone, biology is hard at work.
What is osseointegration?
Osseo means bone. Integration means joining together. Your bone cells grow right up against the titanium surface, locking the implant in place as if it were a natural tooth root.
This process was discovered by a Swedish orthopedic surgeon named Per-Ingvar Brånemark in 1952. Today, it is the gold standard for implant success.
What you will (and won’t) experience
- Weeks 1–2 post-surgery: You may have mild swelling, bruising, or tenderness. Your dentist will advise a soft-food diet and no chewing on the implant side.
- Weeks 3–8: You feel almost normal. The gum heals completely. You might forget you even have an implant.
- Months 3–6: The bone is fusing. You can usually eat a normal diet, but you should avoid extremely hard or sticky foods on that side (like nuts, caramels, or ice).
Signs of failed osseointegration (rare but real)
In about 2–5% of cases, the implant does not fuse properly. This is more common in smokers, people with uncontrolled diabetes, or those who grind their teeth heavily. Warning signs include:
- The implant feels loose or wiggly
- Persistent pain when chewing
- Redness or pus around the gum
- A dull ache that never goes away
If your dentist detects failure during a checkup, they will remove the implant, let the bone heal for a few months, and try again. A second attempt often succeeds.
How to help osseointegration succeed
- Do not smoke. Smoking reduces blood flow to the jawbone and doubles or triples failure rates.
- Keep your mouth clean. Gently brush around the implant area (your dentist will show you how).
- Wear a night guard if you grind your teeth.
- Attend all follow-up appointments. Your dentist needs to monitor healing with periodic X-rays.
Stage 6: Abutment Placement – One short visit (30–60 minutes)
Once osseointegration is complete, your implant is solidly anchored in bone. But you cannot put a crown directly onto an implant. You need a connector piece called an abutment.
Two ways to place the abutment
Method A (traditional): Second minor surgery
- The dentist numbs the area
- Makes a tiny incision to expose the top of the implant
- Removes the healing cap
- Screws on the abutment
- Places a temporary crown (optional) or healing collar
Method B (one-stage implant): No second surgery needed
If your dentist placed a “healing abutment” that sticks out through the gum from day one, you skip this incision. You simply unscrew the healing cap and attach the permanent abutment. This is faster and more comfortable.
Healing after abutment placement
The gum needs about 4 to 6 weeks to heal around the abutment. This creates a collar of healthy tissue that seals the area against bacteria. During this time:
- You will feel some minor tenderness for 2–3 days
- You may see a metal or pink-colored abutment peeking through your gum (this is normal)
- You continue eating soft foods for a few days, then return to normal
Note: Some dentists combine abutment placement and crown delivery into one visit. This is becoming more common with digital scanning technology. Ask your provider if you are a candidate.
Stage 7: Crown Fabrication – 2 to 4 weeks
Now you are in the home stretch. Your implant is solid. Your abutment is in place. All that remains is the visible tooth: the crown.
The laboratory phase (this is where waiting happens)
Your dentist takes impressions (either a traditional squishy material or a digital scan) and sends them to a dental lab. A technician handcrafts your crown to match the color, shape, and size of your natural teeth.
Why does this take weeks? Because quality crowns are not 3D-printed in ten minutes (unless you are using a same-day system like CEREC, which we will cover later). A good ceramic crown requires:
- Wax modeling
- Layering of porcelain for natural translucency
- Firing in a high-temperature oven
- Glazing and polishing
Temporary crown vs. permanent crown
If you received a temporary crown on your abutment, you can already smile and chew moderately. But temporary crowns are not strong enough for long-term use. They can crack or fall off.
When your permanent crown is ready, you return for a 20–30 minute appointment. The dentist removes the temporary crown (if any), tests the fit of the permanent crown, adjusts it, and cements or screws it onto the abutment.
What to look for in a good crown
| Feature | What It Means |
|---|---|
| Proper bite alignment | You should not feel the crown hitting first when you close your mouth |
| Smooth margins | Your tongue should not feel a sharp ledge between crown and gum |
| Natural color match | The crown should blend with adjacent teeth under all lighting |
| No food trapping | Floss should pass through the contact point with mild resistance |
Do not leave the dentist’s office until you are happy with all three. Adjustments take seconds. Living with an uncomfortable crown takes years.
The Complete Visual Timeline
Below is a realistic, month-by-month calendar for three common patient scenarios.
Scenario A: No bone graft, healthy gums, single tooth
| Phase | Duration | Cumulative Time |
|---|---|---|
| Consultation & scans | 1 week | Week 1 |
| Extraction (if needed) | 1 day | Week 1–2 |
| Implant placement | 1 hour | Week 2–3 |
| Osseointegration | 3–4 months | Month 4 |
| Abutment placement | 1 visit | Month 4 + 1 week |
| Gum healing | 4 weeks | Month 5 |
| Crown fabrication | 2–3 weeks | Month 5–6 |
| Final crown delivery | 1 visit | Month 6 |
Total: Approximately 5 to 7 months
Scenario B: Bone graft needed (single tooth)
| Phase | Duration | Cumulative Time |
|---|---|---|
| Consultation & scans | 1 week | Week 1 |
| Bone graft surgery | 1 hour | Week 2 |
| Graft healing | 4–6 months | Month 5 |
| Implant placement | 1 hour | Month 5–6 |
| Osseointegration | 4 months | Month 9–10 |
| Abutment + crown | 6–8 weeks | Month 11–12 |
Total: Approximately 10 to 13 months
Scenario C: Full arch (All-on-4 or similar)
| Phase | Duration | Cumulative Time |
|---|---|---|
| Consultation, CT, planning | 2–4 weeks | Month 1 |
| Extractions + implant placement (same day) | 2–3 hours | Month 1 |
| Temporary fixed bridge placed | Same day | Month 1 |
| Soft diet + healing | 4–6 months | Month 5–6 |
| Final framework try-in | 1–2 visits | Month 6–7 |
| Final permanent teeth delivered | 1 visit | Month 7–8 |
Total: Approximately 6 to 9 months (with immediate function on day one)
Important note on All-on-4: You leave with teeth on the day of surgery, but they are temporary. You must eat only very soft foods for the first 4–6 months. The final teeth are much stronger.
Same-Day Implants: What’s Real and What’s Marketing
You have probably seen ads promising “Teeth in a Day” or “Same Day Implants.” Are they real? Yes. Are they right for everyone? No.
What same-day implants actually mean
In a true same-day procedure, the dentist:
- Extracts the tooth (if present)
- Places the implant
- Screws on a temporary crown all in one appointment
You walk out with something that looks like a tooth. However, that temporary crown cannot bite into hard foods. It is there for appearance and light chewing. You will still wait 3–6 months for osseointegration before receiving a permanent crown that can handle normal biting forces.
Who is a candidate for same-day?
- People with thick, dense bone (no grafting needed)
- Non-smokers
- No active gum infection
- Front teeth (less chewing force than molars)
- Patients willing to follow strict dietary restrictions during healing
Who should avoid same-day?
- Back molars (too much chewing pressure)
- People who clench or grind
- Anyone needing a bone graft
- Patients with diabetes or autoimmune conditions that slow healing
“I wanted same-day implants for my two back molars. My dentist said no, and I was disappointed. Three years later, I am grateful he said no. Those implants are solid because we waited.” — David, 44, Texas
Be very skeptical of any dentist who promises you a permanent, fully functional tooth in one day. That is not biologically possible.
Pain, Recovery, and Diet: A Week-by-Week Reference
Let’s talk about what you will actually feel during each phase. Honest expectations reduce anxiety.
The first 72 hours after implant surgery
| Time | What to expect | What to do |
|---|---|---|
| 0–4 hours | Numbness, drooling, gauze in mouth | Rest with head elevated. Change gauze every 30–45 minutes. |
| 4–12 hours | Anesthesia wears off. Dull ache begins. | Take pain medication before the numbness fully disappears. Ice packs 20 mins on/off. |
| 12–24 hours | Swelling starts. Slight bleeding possible. | Drink cold smoothies, protein shakes, or broth. No spitting or straws. |
| 24–48 hours | Peak swelling. Bruising may appear. | Continue soft or liquid diet. Saltwater rinses (very gentle). |
| 48–72 hours | Swelling stabilizes. Pain decreases. | Transition to soft foods like yogurt, mashed potatoes, applesauce. |
Week 1–2 post-surgery
- Pain should be gone or very mild by day 5.
- Stitches may dissolve or require removal (ask your dentist).
- You can return to work or school after 2–3 days for a single implant. For multiple implants, take 4–5 days off.
- No heavy lifting, bending over, or strenuous exercise for one week (increases bleeding risk).
Weeks 3–4
- You can chew soft foods on the opposite side of your mouth.
- Avoid the implant side completely.
- Gentle brushing with an extra-soft toothbrush around the area.
- No flossing near the implant until your dentist says it is safe.
Months 2–6 (osseointegration phase)
- You can eat almost normally, but avoid:
- Nuts, popcorn, hard candies
- Sticky caramels or taffy
- Chewing ice or hard bread crusts
- Using the implant side for tough steak or raw carrots
- Resume normal exercise and sports (wear a mouthguard for contact sports).
Cost Considerations That Affect Your Timeline
Money and time are connected. Some people choose longer, cheaper routes. Others pay more to shorten the timeline. Both are valid, but you need the facts.
Average costs in the United States (without insurance)
| Procedure | Typical Range |
|---|---|
| Consultation + CT scan | $150–$500 |
| Single implant placement (surgery only) | $1,500–$3,000 |
| Abutment | $300–$600 |
| Crown | $1,000–$3,000 |
| Bone graft (simple) | $300–$1,000 |
| Sinus lift (complex) | $1,500–$3,000 |
| Full arch All-on-4 (per arch) | $15,000–$30,000 |
How cost can shorten or lengthen your timeline
- Same-day crown (CEREC): Costs $300–$800 more than a lab crown but saves 2–3 weeks of waiting.
- Premium implant brands (Straumann, Nobel Biocare): Higher upfront cost but slightly shorter osseointegration times in some studies (10–12 weeks instead of 16).
- Dental schools: Costs are 30–50% lower, but appointments take longer (3–4 hours per visit), and the overall timeline may stretch by 2–3 months due to teaching schedules.
- Dental tourism (Mexico, Costa Rica, Turkey): Lower prices but travel logistics can add months. Also, if complications arise, your local dentist may charge full price to fix someone else’s work.
Important: Never choose an implant provider based only on price. The cheapest implant often becomes the most expensive revision.
How to Keep Your Implant for Life (Maintenance Timeline)
Your implant surgery is not the end of the story. It is the beginning. With proper care, a dental implant can last 25+ years or even a lifetime. With neglect, it can fail within 3–5 years.
Daily home care
- Brush twice a day with a soft or extra-soft toothbrush.
- Use a water flosser (like Waterpik) around the implant crown daily.
- Traditional floss with a “super floss” or implant-specific floss once a day.
- Avoid abrasive toothpaste (whitening or baking soda types can scratch the crown surface).
Professional maintenance schedule
| Time After Final Crown | Recommended Action |
|---|---|
| 1 month | Check bite, crown fit, and gum health |
| 6 months | Professional cleaning with plastic instruments (metal scalers can scratch titanium) |
| 12 months | X-ray to check bone levels around implant |
| Annually thereafter | Cleaning + X-ray every 1–2 years |
| Every 3–5 years | Check screw tightness (for screw-retained crowns) |
Red flags: When to call your dentist sooner
- The crown feels loose (do not ignore this—a loose screw can damage the implant)
- Bleeding or swelling around the gum that lasts more than a few days
- Bad taste or odor coming from the implant area
- The crown chips or cracks
Do not wait for your annual checkup if you notice any of these.
Frequently Asked Questions (FAQ)
1. Can I get a dental implant the same day my tooth is pulled?
Yes, in select cases with enough bone and no infection. This is called immediate implant placement. You will still need 3–6 months of healing before a permanent crown.
2. How long after extraction can I wait to get an implant?
You can wait years, but your jawbone will shrink over time. If you wait more than 6–12 months, you will almost certainly need a bone graft. It is best to start the implant process within 3–6 months of losing the tooth.
3. Is the dental implant procedure painful?
The surgery itself is not painful due to anesthesia. The week after surgery brings soreness similar to a tooth extraction. Most people rate the pain as 2–4 out of 10. Over-the-counter pain relievers work well for most.
4. Can I smoke during the implant process?
Smoking significantly increases the risk of implant failure. If you cannot quit entirely, reduce as much as possible. Many dentists refuse to place implants in heavy smokers unless they commit to quitting for at least 2 weeks before and 2 months after surgery.
5. What happens if my implant fails?
The dentist removes the implant (a 15–30 minute procedure). The bone typically heals in 2–4 months. Then you can try again. Success rates for second attempts are still high (over 90% in healthy patients).
6. Will my insurance cover any of this timeline?
Most dental insurance covers part of the crown and abutment but little to none of the implant surgery itself. Medical insurance may cover bone grafts if the tooth loss resulted from an accident or tumor. Always ask for a pre-treatment estimate.
7. Can I get implants if I have diabetes?
Yes, but your blood sugar must be well-controlled (HbA1c under 7.0% ideally). Uncontrolled diabetes slows healing and increases infection risk. Your dentist may ask for a letter from your primary care doctor.
8. How long do I need to take off work?
For a single implant: 2–3 days. For multiple implants or bone grafting: 4–7 days. For full arch with sedation: 1–2 weeks of light duty (no heavy lifting or public-facing roles if significant swelling occurs).
9. What can I eat during the healing phases?
- First week: Smoothies, yogurt, soup, mashed potatoes, protein shakes
- Weeks 2–4: Scrambled eggs, pasta, soft bread, cooked vegetables, fish
- Months 1–6 (osseointegration): Normal diet except hard, sticky, or crunchy foods on the implant side
- After final crown: Everything, but avoid chewing ice or hard candies
10. Are mini implants faster?
Mini implants (smaller diameter) sometimes require less healing time, but they are not suitable for molars or heavy biting forces. They work best for lower front teeth or stabilizing dentures. Their long-term success rate is slightly lower than standard implants.
Additional Resource
For a deeper dive into the scientific research behind osseointegration, healing times, and brand comparisons, visit the American Academy of Implant Dentistry (AAID) patient education library:
👉 https://www.aaid.com/patients/index.html
This resource includes:
- A search tool to find accredited implant dentists in your area
- Downloadable patient guides
- Videos showing each step of the procedure
- Information on implant costs and financing
Conclusion
The dental implant procedure timeline typically ranges from three to twelve months, depending on your bone health, healing speed, and any preparatory work like bone grafts. The longest phase—osseointegration—cannot be rushed, but it is also the reason implants have a 95–98% success rate. From consultation to final crown, patience and honest communication with your dentist are your best tools for a lifelong, natural-feeling smile.