The Complete Guide to the Dental Implant Process
If you are missing one or more teeth, you have probably already looked into your options. Bridges can work. Dentures are common. But more and more people are choosing dental implants. Why? Because they feel, look, and function like natural teeth.
I remember talking to a friend who had lived with a gap in her smile for years. She was nervous about the procedure. “Is it painful? How long does it take?” she asked. After she finally went through with it, her only regret was not doing it sooner.
That is the power of a modern dental implant. But the road to a new tooth is not a single appointment. It is a process. And knowing that process step by step will remove your fear and help you plan your time and budget.
In this guide, we will walk through everything. No fluff. No confusing medical terms. Just honest, practical information to help you make the best decision for your smile.
What Exactly Is a Dental Implant?
Before we dive into the steps, let us clarify what we are talking about. A dental implant is not just the fake tooth you see in the mirror. It is a three-part system.
- The Implant Post: This is a small, screw-like piece of titanium (or zirconia). A surgeon places it into your jawbone. It acts as the artificial tooth root.
- The Abutment: This is a connector piece. It screws onto the top of the implant post. It sticks out just above your gum line.
- The Crown: This is the visible “tooth.” It is custom-made to match your natural teeth. The dentist attaches it to the abutment.
Important Note: The implant post and the bone need time to fuse together. This process is called osseointegration (pronounced ah-see-oh-in-teh-gray-shun). It is the secret to why implants are so strong and durable.
Think of it like building a house. You need a deep concrete foundation (the implant post). Then you add the floor connector (abutment). Finally, you put the beautiful house on top (the crown).
Is the Dental Implant Process Right for You?
Not everyone is an immediate candidate. Good dentists do a thorough check before saying “yes.” Here are five things they look for.
1. Healthy Jawbone
Your jawbone needs enough width, height, and density to hold the implant. If you have been missing a tooth for years, that area of bone may have melted away (resorption).
2. Healthy Gums
Active gum disease is a red flag. The dentist will need to treat any infection before starting implants. Placing an implant into infected gums is like planting a seed in mud. It will not hold.
3. Non-Smoker (or Willing to Quit Temporarily)
Smoking slows down healing. It also increases the risk of implant failure. Many surgeons ask patients to stop smoking for at least two weeks before and two months after surgery.
4. Good General Health
Conditions like uncontrolled diabetes or autoimmune disorders can affect healing. Talk to your dentist. They will work with your doctor to create a safe plan.
5. Commitment to Oral Hygiene
Implants do not get cavities, but they can get a disease called peri-implantitis (gum disease around the implant). You must brush, floss, and visit your hygienist regularly.
“The best candidate for a dental implant is not just someone with a missing tooth. It is someone who is willing to partner with their dentist for long-term success.” — Dr. Sarah Jenkins, Prosthodontist
The Complete Step-by-Step Dental Implant Process
Now, the main event. Here is the realistic timeline from day one to your final smile.
Step 1: Initial Consultation and Treatment Plan
Time: 60–90 minutes
This is where you meet your dental team. They are detectives gathering clues about your mouth.
What happens?
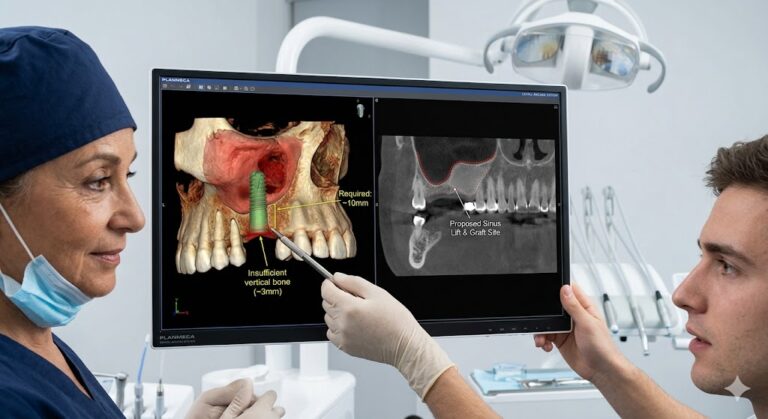
- X-rays or a 3D CBCT scan (a special machine that takes a 360-degree picture of your jaw)
- Gum evaluation
- Medical history review
- Discussion of your goals and budget
The “Hidden” Step: Bone and gum evaluation. If the scan shows you do not have enough bone, the dentist will discuss bone grafting (more on that later).
Questions to ask at this visit:
- How many implants have you placed?
- What type of implant system do you use?
- What is the total estimated cost (including the crown and abutment)?
- What happens if the implant fails?
| Question to Ask | Why It Matters |
|---|---|
| “Do you offer sedation?” | Helps manage anxiety during surgery. |
| “How long is the warranty?” | Some clinics offer 5–10 years of coverage. |
| “Who does the crown?” | Sometimes a separate lab makes it. Ask about quality. |
Step 2: Preparatory Procedures (If Needed)
Time: 3–12 months before the implant
This is the “get the ground ready” phase. Not everyone needs it. But if your dentist recommends it, do not skip it. It saves you from failure later.
Common preparatory procedures:
- Bone Grafting: The dentist adds bone powder (synthetic, bovine, or your own bone) to a weak area of the jaw. It takes 4–9 months to heal into solid bone.
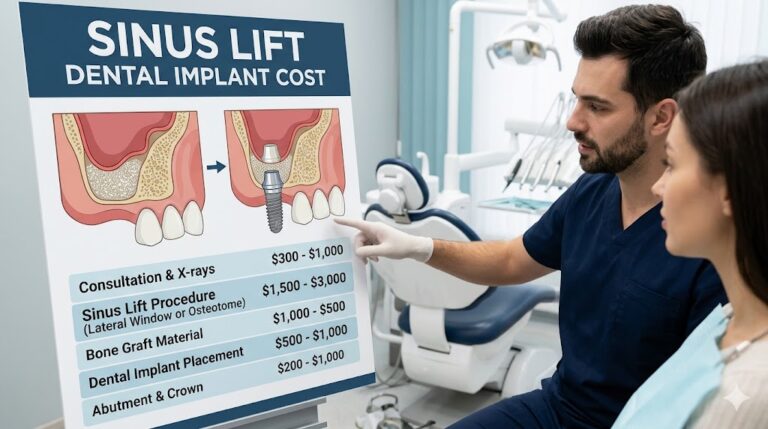
- Sinus Lift: For upper back molars. The sinus cavity is close to the jaw. The surgeon gently lifts the sinus membrane and places bone graft material.
- Tooth Extraction with Socket Preservation: If you have a broken tooth, the dentist removes it and immediately fills the hole with graft material. This keeps the bone from collapsing.
- Gum Disease Treatment: Deep cleaning (scaling and root planing) or laser therapy to eliminate bacteria.
Realistic warning: Adding these steps means your total treatment time will be longer. But rushing without them is the number one cause of implant failure.
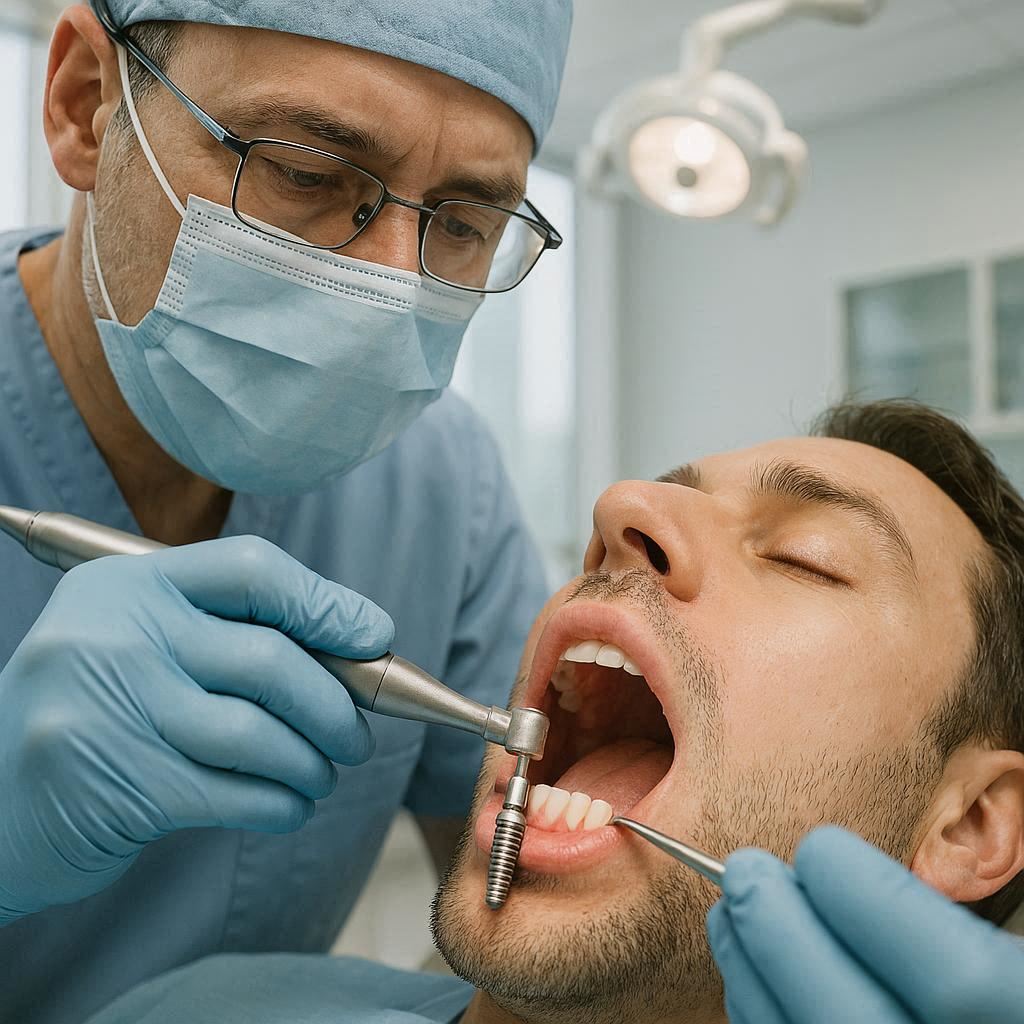
Step 3: The Implant Placement Surgery
Time: 60–90 minutes (for one implant)
This is the day you have been waiting for. But take a deep breath. Most patients say the anxiety is worse than the actual procedure.
On the day of surgery:
- Anesthesia: The dentist numbs the area with local anesthetic (like at a filling). You can also request sedation: nitrous oxide (“laughing gas”), oral pills, or IV sedation.
- Incision: The surgeon makes a small cut in your gum to expose the bone underneath.
- Drilling: They use a series of special drills to create a hole in the bone. The hole matches the exact size of your implant.
- Placement: They screw the titanium post into the hole.
- Closing: A healing cap (a small metal cover) is placed on top. The gum is either stitched closed around it or left open, depending on the technique.
You will feel: Pressure, vibration, and maybe some pushing. You should not feel sharp pain. If you do, raise your hand immediately.
After surgery, you go home. You do not stay overnight. This is an in-office procedure.
Step 4: Healing and Osseointegration
Time: 3–6 months
This is the longest part of the dental implant process. It is also the most critical. There is no shortcut for your body to do its work.
What is happening inside your jaw?
Bone cells grow right up against the titanium surface. They lock into the microscopic pores of the implant. This is osseointegration. When finished, the implant is as strong as a natural tooth root.
What you will experience during healing:
| Time After Surgery | What to Expect |
|---|---|
| Day 1–3 | Swelling, minor bleeding, soft foods only. Ice packs help. |
| Day 4–7 | Swelling goes down. Stitches dissolve or are removed. |
| Week 2–4 | Gum tissue looks pink and healthy. No pain. |
| Month 2–6 | You forget the implant is there. Bone fusion happens silently. |
During this time, you will wear a temporary solution.
- If the missing tooth is in front, you may have a flipper (a removable partial denture) or a temporary bridge.
- If it is a back tooth, you may just live without it for a few months.
Caution: Do not put pressure on the healing implant. Avoid chewing on that side. No hard candies, ice, or pens.
Step 5: Abutment Placement
Time: 30 minutes (minor procedure)
Once the implant is solidly fused to your bone, it is time to attach the connector piece: the abutment.
What happens?
- The surgeon numbs the area again (mild anesthesia).
- They make a tiny hole in the gum to expose the top of the implant.
- They remove the healing cap.
- They screw the abutment into the implant.
- They tighten it to a specific torque (measured in Newton-centimeters).
Two options for this step:
- Traditional abutment: The gum is stitched around the abutment. It heals for 2 weeks before the crown is made.
- Healing abutment (also called a gingival former): A wide, mushroom-shaped piece is placed to shape the gum. After 4–6 weeks, the gum has a nice, natural collar shape.
Pain level: Mild. Most people take ibuprofen and return to normal activities the same day.
Step 6: Crown Fabrication
Time: 2–4 weeks
Now for the artistic part. Your dentist takes impressions so the lab can craft your permanent tooth.
The steps in the lab:
- Impressions: The dentist uses a digital scanner (a wand that takes 3D photos) or a putty-like material to capture the shape.
- Shade matching: They choose a color that blends with your neighboring teeth. Wet, dry, and under different lights.
- Design: A dental ceramist builds the crown layer by layer. They add contours, ridges, and translucency.
- Firing: The crown is hardened in a high-temperature oven.
Materials for the crown:
| Material | Pros | Cons |
|---|---|---|
| Porcelain fused to metal | Strong, less expensive | Metal can show at the gum line. |
| Full zirconia | Extremely strong, white, no metal | Can be too hard on opposite teeth. |
| Lithium disilicate (E.max) | Most natural looking, excellent esthetics | Slightly less strong than zirconia. |
Cost note: The crown itself usually costs $1,000–$2,000 separate from the implant surgery. Always ask if the quote includes the crown.
Step 7: Crown Placement (The Final Visit)
Time: 30–45 minutes
This is the happy day. You walk in with a gap or a temporary tooth. You walk out with a brand new, permanent smile.
The procedure:
- The dentist removes the temporary abutment (if you had one).
- They try the crown in your mouth without cement. Check the bite. Check the color. Check the shape.
- If everything looks perfect, they clean and dry the abutment.
- They cement or screw the crown onto the abutment.
- They clean away any excess cement.
- They test your bite with articulating paper (it shows high spots).
Final check: Bite on it gently. Does it feel like your natural teeth? Does floss slide between it and the neighbor tooth? If something feels off, speak up. Adjusting now is free. Adjusting later costs time and money.
Congratulations! Your dental implant process is complete. You now have a tooth that can last 20, 30, or even 50 years with good care.
How Long Does the Entire Dental Implant Process Take?
This is the most common question. And the honest answer is: it depends.
Here are three realistic timelines.
| Scenario | Total Duration |
|---|---|
| Simple case (good bone, non-smoker, single tooth) | 4–6 months |
| Average case (extraction + bone graft + implant) | 7–9 months |
| Complex case (sinus lift + multiple bone grafts + implants) | 12–18 months |
A note on “Teeth in a Day” procedures:
Some clinics advertise implants and fixed teeth in 24 hours. This is real for some patients. It is called immediate loading. However, not everyone is a candidate. And these teeth are usually temporary “provisional” teeth. You still need 3–6 months of healing before your final, permanent crowns.
Be wary of any clinic that promises a final, permanent bridge in one day. That is unrealistic for 95% of cases.
Dental Implant Process Timeline Visual (Text-Based)
Let me give you a bird’s-eye view.
text
Month 0:  Consultation + Scans
Month 1:  (If needed) Bone graft placement
Month 4:  (After grafting) Implant placement surgery
Month 5-8: Osseointegration healing (quiet period)
Month 8:  Abutment placement
Month 9:  Crown impressions taken
Month 10: Permanent crown cemented
          --- DONE ---
Note: This assumes a bone graft was needed. Without a graft, subtract 3–4 months.
Pain, Discomfort, and Recovery: The Honest Truth
People are terrified of dental pain. I understand. But let me give you realistic expectations.
During the surgery: Zero sharp pain. The anesthetic works very well. You might feel the needle pinch for 10 seconds. After that, only pressure and vibration.
After the surgery (first 72 hours): This is the toughest window. Expect:
- Dull, throbbing ache (like a deep bruise)
- Swelling of the cheek or lip
- Minor bleeding (pink saliva)
- Difficulty eating hard foods
Pain scale average (1–10): Most patients report a 3 or 4 at its worst. Over-the-counter ibuprofen (Advil) or a prescription painkiller manages it well.
What helps healing:
- Ice packs (20 minutes on, 20 off) for the first 24 hours
- Sleeping with your head elevated
- Soft foods: yogurt, smoothies, mashed potatoes, scrambled eggs
- Warm salt water rinses (starting 24 hours after surgery)
- No spitting. No straws. No smoking.
When to call your doctor (signs of infection or failure):
- Fever over 101°F (38.3°C)
- Pain that gets worse after day 3 instead of better
- Pus or foul taste in your mouth
- The implant feels loose (this is very rare but serious)
Cost Breakdown of the Dental Implant Process
Let’s talk money. This is often the biggest barrier. Prices vary widely by location and dentist experience.
Average costs in the United States (without insurance):
| Component | Low range | High range |
|---|---|---|
| Consultation + CBCT scan | $150 | $500 |
| Bone graft (if needed) | $300 | $1,200 (per site) |
| Sinus lift (if needed) | $1,500 | $3,000 |
| Implant post placement | $1,500 | $2,500 |
| Abutment | $300 | $600 |
| Permanent crown | $1,000 | $2,500 |
| TOTAL per single implant | $3,500 | $8,500+ |
Ways to save money:
- Dental schools: Treatment by supervised students costs 50–60% less.
- Dental discount plans: Not insurance, but a membership card (e.g., Careington, Aetna Dental Access).
- Dental tourism: Mexico, Costa Rica, or Colombia offer quality implants for $1,000–$2,000 total. Do your research on the clinic.
- Flexible Spending Account (FSA) or Health Savings Account (HSA): Use pre-tax dollars.
Insurance reality check: Most basic dental insurance does NOT cover implants. However, some PPO plans cover the crown portion. Call your insurance and ask: “Is D6010 (implant placement) a covered benefit?”
What Can Go Wrong? Risks and Complications
No medical procedure is 100% risk-free. I want to be honest so you can make an informed choice.
Common (but usually minor) issues:
- Swelling and bruising: Normal. Resolves in 1 week.
- Nerve irritation: Temporary numbness of the lip or chin. Usually heals in 3–6 months.
- Gum recession around the crown: Happens slowly over years. Treatable with gum grafting.
Rare but serious issues (less than 5% of cases):
| Complication | Likelihood | Solution |
|---|---|---|
| Implant fails to osseointegrate | 2–5% | Remove implant. Graft bone. Try again. |
| Infection (peri-implantitis) | 3–8% over 10 years | Deep cleaning. Antibiotics. Surgery. |
| Damage to adjacent teeth | <1% | Avoid hitting neighbor roots during surgery. |
| Sinus perforation | 2% (upper molars) | Usually heals on its own. Sometimes needs repair. |
What “failure” looks like: The implant becomes mobile (wiggly). You feel pain on biting. An X-ray shows bone loss around the implant. The solution is to remove the implant, let the bone heal for 3 months, and place a new implant. Most patients succeed on the second attempt.
Key statistic: After 10 years, dental implants have a success rate of 90–95%. That is higher than dental bridges (85% at 10 years).
Long-Term Care: Making Your Implant Last a Lifetime
You have invested time, money, and healing. Do not waste it now. Caring for an implant is slightly different than caring for a natural tooth.
Do this every day:
- Brush twice daily: Use a soft or extra-soft toothbrush. A manual brush is fine. An electric brush is better.
- Floss once daily: Use unwaxed floss or “super floss” (thick floss with a stiff end). Thread it under the crown.
- Interdental brushes: These tiny brushes fit between the implant crown and the gum. They clean the “collar” where bacteria hide.
- Water flosser (Waterpik): Amazing for implants. The water jet cleans the sulcus (the shallow gum pocket).
Do not do this:
- Chew ice, hard candy, or pens. Implants have no ligament to absorb shock.
- Use metal scrapers at home. Use plastic or wooden toothpicks instead.
- Skip your hygiene appointments. You need professional cleaning every 6 months.
Professional maintenance schedule:
| Type of Visit | Frequency |
|---|---|
| Standard cleaning + exam | Every 6 months |
| X-rays (to check bone level) | Every 12–24 months |
| Implant torque check (tightness) | Once per year |
Can an implant get a cavity? No. The crown is made of ceramic or metal. But the tooth next to it can. And the gum around it can get infected. So do not neglect your natural teeth.
Dental Implant Process: Comparison with Alternatives
Sometimes an implant is not the best fit. Let us compare your options fairly.
| Feature | Dental Implant | Fixed Bridge | Removable Denture |
|---|---|---|---|
| Looks like natural tooth | Excellent | Good | Fair to poor |
| Feels like natural tooth | Excellent | Good | Poor |
| Requires shaving adjacent teeth | No | Yes (always) | No |
| Cleaning difficulty | Normal brushing/floss | Requires floss threaders | Remove and soak |
| Bone preservation | Yes (stimulates bone) | No (bone melts) | No (bone melts) |
| Average lifespan | 20+ years | 7–15 years | 3–8 years |
| Initial cost | Higher | Moderate | Lower |
| Long-term cost | Lower | Moderate | Higher (replacements) |
An example: A three-unit bridge costs $2,500–$5,000. It lasts 10 years. You replace it twice in 20 years. That is $7,500–$15,000. A single implant costs $4,000–$6,000. It lasts 20+ years. Long-term, the implant is cheaper.
Frequently Asked Questions (FAQ)
Q1: Is the dental implant process painful?
A: The procedure itself is not painful because of local anesthesia. Afterward, most people describe a dull ache for 2–3 days. Over-the-counter pain relievers work well. Think of it like a tooth extraction but with less immediate pain.
Q2: Can I get dental implants if I have bone loss?
A: Yes, but you will need a bone graft first. The surgeon adds bone material to the weak area. After 4–9 months of healing, you become a candidate. Do not let bone loss scare you away. It is a routine fix.
Q3: How long does the entire dental implant process usually take from start to finish?
A: For a simple case (no bone graft), plan on 4–6 months. If you need an extraction plus bone graft, plan on 8–10 months. Complex cases with sinus lifts can take 12–18 months.
Q4: Will my insurance cover any part of the dental implant process?
A: Most traditional dental insurance plans do not cover the implant post. However, some PPO plans cover the crown (40–50%) and the abutment. Always call your insurance company with the code D6010 (implant placement) and D6058 (abutment supported crown).
Q5: Is 70 years old too old for implants?
A: Age is not a barrier. Healthy 80 and 90-year-olds get implants successfully. The real factors are bone density, gum health, and medical stability (diabetes controlled, heart stable). Many seniors prefer implants to loose dentures.
Q6: Can I smoke during the dental implant process?
A: Smoking is strongly discouraged. Nicotine constricts blood vessels, reducing oxygen to the bone. Smokers have a 15–20% higher failure rate. If you cannot quit, talk to your dentist. They may prescribe special mouth rinses or adjust your healing protocol.
Q7: What happens if the implant fails?
A: First, do not panic. Failure occurs in 2–5% of cases. The dentist removes the implant (a simple 15-minute procedure). Your bone heals for 3 months. Then you try again with a slightly wider implant or a bone graft. Most patients succeed on the second attempt.
Q8: Can I have the implant and crown on the same day?
A: In very specific cases, yes. This is called “immediate loading.” But the “tooth” you receive that day is a temporary crown. You must eat only soft foods and avoid biting with it for 4–6 months. Permanent crowns come later. Be skeptical of anyone promising a permanent crown in one day.
Q9: Will people notice my implant crown?
A: A skilled dentist and lab technician can make an implant crown invisible. They match the color, shape, and translucency. The only person who will know is you and your dentist. Even close friends will not see it.
Q10: I have diabetes. Can I still get an implant?
A: Yes, if your diabetes is well-controlled. Your HbA1c level should be below 7.0 (ideally 6.5 or lower). Uncontrolled diabetes slows healing and increases infection risk. Work with your doctor to stabilize your blood sugar before starting.
Conclusion
The dental implant process is a journey, not a single appointment. It moves through seven clear steps: consultation, preparation (if needed), implant surgery, healing, abutment placement, crown creation, and final placement. For most people, the total timeline ranges from 4 months to one year. Yes, it requires patience. Yes, it costs more upfront than a bridge or denture. But you receive a permanent, natural-feeling tooth that preserves your jawbone and does not harm your neighboring teeth. With daily brushing and twice-yearly dental visits, your implant can serve you beautifully for 20 years, 30 years, or even a lifetime. That makes the process worth every single minute.
Additional Resource
For a deeper dive into the science of bone healing and implant materials, visit the American Academy of Implant Dentistry (AAID) patient education library.
👉 https://www.aaid.com/patients/
(Note: This link leads to a trusted, non-commercial professional organization. No affiliate relationship.)
Disclaimer: This article is for informational purposes only and does not constitute medical or dental advice. Every patient is unique. Always consult with a licensed dentist or oral surgeon to evaluate your personal health condition and determine the best treatment plan for you.