How Long Does It Take to Get Dental Implants?
If you are missing one or more teeth, you have probably asked yourself a very common and important question: how long does it take to get dental implants? The answer is not a simple number of days or weeks. It is a journey. For many, this journey leads to a restored smile, improved confidence, and the ability to eat all your favorite foods again. But understanding the time commitment is crucial before you begin.
The complete dental implant process can range from a few months to over a year. A single, straightforward implant in a healthy jaw might reach full completion in about three to four months. A complex case involving multiple extractions, bone grafts, and full-arch restoration can easily take twelve to eighteen months.
This wide range exists because a dental implant is not a single procedure. It is a series of carefully timed stages. Your body needs time to heal. Rushing the process compromises the final result. This guide will walk you through every phase, every waiting period, and every factor that influences your personal timeline. We will give you a clear, honest, and realistic picture so you can plan your life and your smile with confidence.
Understanding the Dental Implant Journey: It’s a Marathon, Not a Sprint
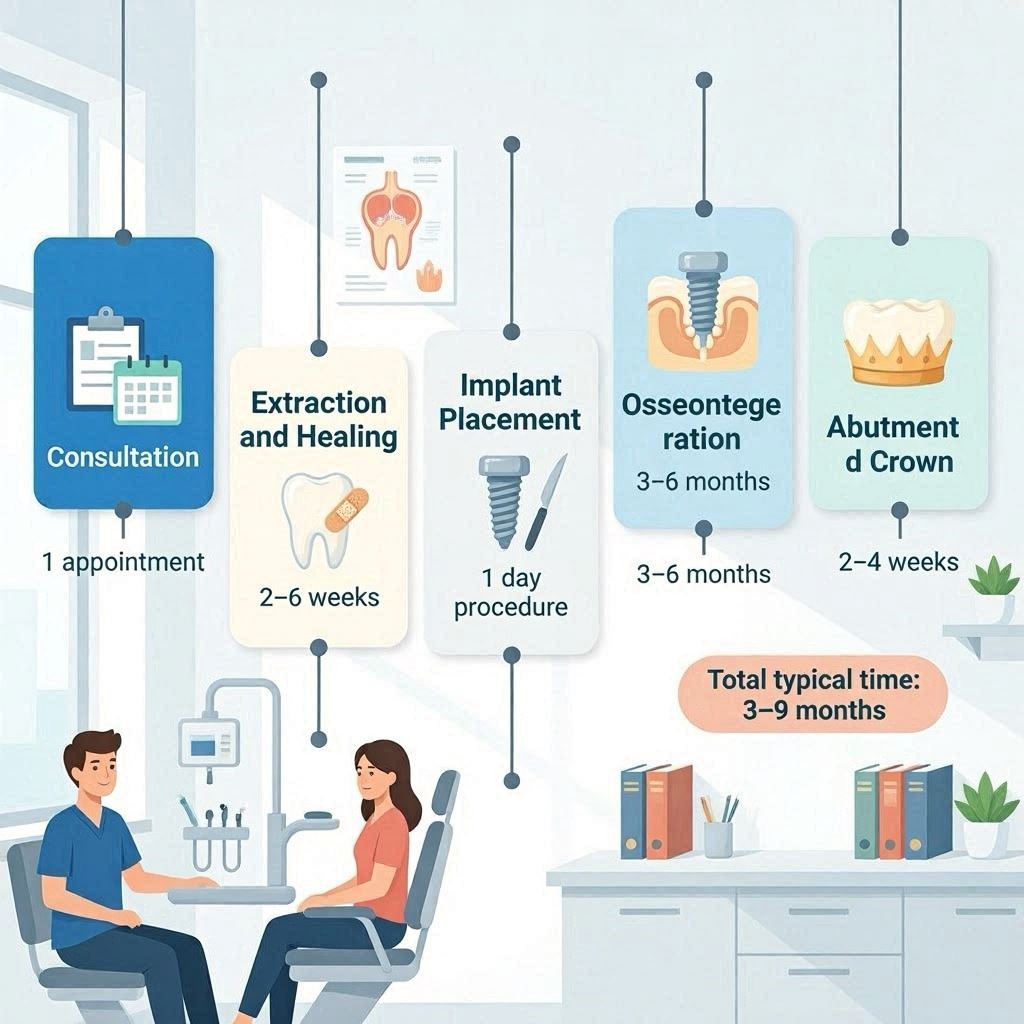
Before we dive into specific timelines, we need to understand what a dental implant actually is. This knowledge helps you appreciate why the process takes the time it does. A dental implant is a small, biocompatible titanium post. A skilled dentist or oral surgeon surgically places this post into your jawbone. Over time, your jawbone fuses directly to the titanium surface in a natural process called osseointegration. This fusion creates a rock-solid, permanent foundation. Once fused, the implant serves as an artificial tooth root. Your dentist then attaches a connector, called an abutment, and finally a custom-made porcelain crown on top.
This multi-component system is revolutionary, but biological fusion cannot be rushed. Think of it like planting a tree. You cannot simply stick a mature oak into the ground and expect it to stand firm in a storm. You plant a seed or a sapling. You nurture it. You wait for the roots to grow deep and strong into the surrounding earth. Only then can the tree support its full canopy. The implant is the root, and your jawbone is the earth. The waiting time is the period for root growth.
“The success of a dental implant doesn’t come from the surgery. It comes from the quiet, invisible months of healing that follow. Patience during this phase is the single greatest predictor of a lifetime of function.”
The final result looks, feels, and functions just like a natural tooth. You can bite an apple with confidence. You can smile broadly without a second thought. But the path to that result requires a partnership between you, your surgeon, and your restorative dentist. Time is the essential ingredient in that partnership.
The Step-by-Step Timeline: A Detailed Walkthrough
Let’s break down the entire journey into its core phases. Each phase has a purpose and a typical duration. We will explore what happens, why it matters, and how long you can expect it to take.
Phase 1: The Initial Consultation and Evaluation (1-2 Appointments, No Healing Time)
This is the blueprint phase. You cannot build a house without a solid plan, and you cannot start an implant journey without a thorough evaluation. This phase typically involves one or two appointments spread over a week or two.
Comprehensive Oral Examination
Your implant dentist begins with a thorough visual inspection of your mouth. They will check the health of your gums, the condition of any remaining teeth, and your bite alignment. They look for signs of active gum disease, which must be treated before implant surgery. Healthy gums are essential for a successful long-term result.
Advanced 3D Imaging (Cone Beam CT Scan)
This step is non-negotiable in modern implant dentistry. A traditional two-dimensional X-ray is insufficient. You will need a Cone Beam Computed Tomography (CBCT) scan. This advanced machine rotates around your head, capturing hundreds of images. It compiles them into a detailed 3D model of your jaw, nerves, sinuses, and bone structure.
This scan provides a treasure map of your anatomy. The dentist can measure the exact height, width, and density of your bone. They can pinpoint the precise location of the inferior alveolar nerve, which provides sensation to your lower lip and chin. Avoiding this nerve is a top priority. In the upper jaw, they will map the location of the maxillary sinus. With this 3D model, the dentist can virtually place the implant on a computer screen before a single incision is made. This practice, called guided surgery, dramatically reduces risk and ensures the implant goes exactly where it provides the most strength and support.
Medical History Review and Customized Treatment Plan
Your dentist will carefully review your full medical history. Certain conditions and medications profoundly affect healing. They will ask about uncontrolled diabetes, autoimmune disorders, and a history of radiation to the jaw. They will pay special attention to medications known as bisphosphonates, often used for osteoporosis. They will also ask if you are a current or former smoker. This is not a judgmental conversation. It is a safety conversation. Honestly sharing this information helps your dentist create a plan that minimizes your risk of complications.
At the end of this phase, you will receive a detailed, written treatment plan. This plan will outline every step, the realistic timeline, and a breakdown of all costs. You will have the chance to ask every question on your mind. A good dentist will not pressure you. They will educate you, empowering you to make the best decision for your health.
Phase 2: Preparatory Procedures (Timeline Varies Greatly)
This is where your personal timeline can stretch significantly. Many people cannot move directly to implant placement. They need a healthy, solid foundation first. If your dentist tells you that you need a bone graft or a sinus lift, do not be discouraged. These are extremely common and are the key to a predictable outcome.
Tooth Extraction and Site Preservation (10-15 Minutes for the Extraction, 3-6 Months of Healing)
If the tooth needing replacement is still present but damaged, the first step is removal. A simple extraction of a loose tooth might take just a few minutes. A surgical extraction of a broken tooth or one with curved roots can take longer. The dentist performs the extraction as gently as possible to preserve the surrounding bone.
After the tooth is out, your dentist will often perform a procedure called ridge preservation. This is a type of bone graft placed directly into the empty socket. The purpose is to prevent the natural and inevitable bone shrinkage that occurs after an extraction. Without a tooth root to stimulate the bone, the body begins to resorb that area, leading to a loss of both width and height. Socket preservation uses particulate bone grafting material to fill the hole. This maintains the shape of the ridge for a future implant. The healing time after an extraction and socket preservation is typically three to six months. You must wait for the soft tissue to close and the graft material to integrate with your natural bone.
Major Bone Grafting (Surgery: 1-2 Hours, Healing: 4-12 Months)
If a tooth has been missing for many years, the jawbone in that area has significantly deteriorated. A simple socket graft is no longer enough. You need a larger block bone graft to rebuild the lost volume. The surgeon sources bone grafting material from several places. The most common is processed cadaver bone from a tissue bank, which is completely safe and acts as a scaffold for your body’s own cells. The surgeon can also use synthetic materials or take a small block of bone from another site in your own body, usually your chin or the back of your lower jaw.
The surgeon makes an incision in the gum to expose the bone defect. They then carefully pack the grafting material onto the deficient area and cover it with a special collagen membrane. This membrane acts like a bandage, preventing fast-growing gum cells from filling the space reserved for slower-growing bone cells. The surgeon then sutures the gum closed.
The waiting period after a major bone graft is the longest part of the entire implant journey. The graft material must be slowly replaced by your own living bone through a process called creeping substitution. A minor to moderate graft requires about four to six months of healing. A very large, extensive graft can require nine to twelve months before the site is strong enough to receive an implant.
| Graft Type | Procedure Goal | Typical Healing Time Before Implant |
|---|---|---|
| Socket Preservation | Fill an empty tooth socket to prevent bone loss. | 3 – 4 Months |
| Minor Block Graft | Rebuild a small localized defect in jawbone width. | 4 – 6 Months |
| Major Block Graft | Rebuild significant lost bone height and width. | 6 – 12 Months |
| Sinus Lift (Below) | Add bone height in the upper jaw beneath the sinus. | 4 – 9 Months |
Sinus Lift Procedure (Surgery: 90 Minutes, Healing: 4-9 Months)
This special type of graft is for the upper back jaw. After upper molars are lost, the maxillary sinus, an air-filled cavity above your teeth, often expands downward into the vacant space. This leaves a paper-thin floor of bone that is too thin to hold an implant. A sinus lift, or sinus augmentation, solves this problem.
The surgeon creates a small window on the side of the upper jaw, gently lifts the sinus membrane, and packs bone graft material into the newly created space. This adds vertical bone height. The procedure has an excellent success rate, but the bone needs a solid four to nine months to mature before an implant can be placed. Sometimes, if at least 4-5mm of bone exists, the surgeon can place the implant and perform the sinus lift simultaneously, saving about four months of healing. Your anatomy on the CBCT scan determines which approach is possible.
Periodontal Treatment for Gum Disease (Weeks to Months)
Healthy gums and bone are the fortress around your future implant. Active gum disease, or periodontitis, is a chronic bacterial infection that destroys the bone and soft tissue supporting teeth. Placing an implant into an infected environment is a recipe for failure. A similar infection can occur around an implant, a condition called peri-implantitis.
If your evaluation reveals gum disease, it becomes the top priority. Treatment involves a deep cleaning procedure called scaling and root planing to remove tartar and bacteria from below the gumline. This may require several appointments. In more advanced cases, you may need gum surgery to reduce pockets and regenerate lost bone. This phase of controlling the infection and achieving pristine gum health can add several weeks to a few months to your overall timeline. It is an absolutely non-negotiable investment in your long-term health.
Phase 3: The Implant Placement Surgery (60-90 Minutes for One Implant)
You have a healthy foundation. The day of the implant surgery has arrived. This is a significant step, but for many, it is less disruptive than a tooth extraction. Your dentist will make you profoundly numb with a long-lasting local anesthetic. Most practices offer sedation options, ranging from oral medication (a pill you take an hour before) to nitrous oxide (laughing gas) to IV sedation, where you are in a comfortable, dream-like twilight state but still able to respond to commands.
Once you are completely comfortable, the surgeon follows the precise digital guide or their meticulous freehand technique. They make a small incision in the gum to expose the bone. Using a precisely regulated, slow-speed drill with copious sterile saline irrigation to prevent overheating, they create a carefully sized channel in the bone. The titanium implant is then placed into this prepared site. The surgeon checks for a perfect fit, called primary stability. The implant should feel like a screw tightly anchored in oak wood. The surgeon then places a small cover screw onto the implant and stitches the gum closed over it, burying it completely under the tissue, or they may place a healing abutment that protrudes through the gum. The choice depends on the surgeon’s assessment of the implant’s stability and the bone quality.
A single implant surgery often takes between sixty and ninety minutes. Multiple implants will take longer. The surgery itself is painless due to the anesthetic.
Phase 4: The Critical Healing Period – Osseointegration (3-6 Months)
This is the most important phase and the one that most directly answers the question: how long does it take to get dental implants? Osseointegration is the biological process where your living jawbone cells grow directly onto the microscopically roughened surface of the titanium implant. There is no fibrous tissue or ligament in between. It is a direct, structural, and functional connection. This discovery by a Swedish orthopedic surgeon is the miracle that makes modern implant dentistry possible.
This process takes time. Bone is a dynamic, living tissue, but it rebuilds and remodels slowly. The initial stability of the implant, the quality of your bone, and your overall health all influence this timeline.
- Lower Jaw (Mandible): The bone here is typically very dense and compact. Blood supply is good. Osseointegration often occurs more reliably and slightly faster. A waiting period of 3 to 4 months is standard.
- Upper Jaw (Maxilla): The bone in the upper jaw is less dense, more spongy, and has a thinner outer cortex. Healing is still very predictable, but it takes longer. A waiting period of 4 to 6 months is standard. The proximity to the sinuses also warrants this extra caution.
During this period, you will not have a visible tooth on the implant. You will wear a temporary removable tooth, often called a flipper, or have no tooth at all in a non-visible area. You must protect the healing implant. Your dentist will instruct you to eat a soft food diet and avoid chewing in that area entirely. The goal is to prevent any micromovement of the implant. Even minor, invisible forces can disrupt the delicate bone cells trying to fuse to the titanium, leading to a fibrous encapsulation and implant failure. This is a period of masterful inactivity. You wait. You heal.
Critical Warning: Do not pressure your dentist to speed this phase up. Loading the implant with a tooth before osseointegration is complete is the most common cause of early implant failure. The implant may become loose and need to be removed. This restarts your entire timeline from the beginning. Three months of patience is far better than another year of redoing the process.
Phase 5: The Abutment and Crown Phase (2-4 Appointments Over a Month)
Congratulations! The implant has successfully fused to the bone. You are now ready to complete the visible part of the restoration. This phase involves uncovering the implant, placing the abutment, and fabricating the final crown.
Uncovering the Implant and Placing the Healing Abutment
If the implant was buried under the gum, the surgeon makes a tiny incision to expose the top of the fixture. The cover screw is removed. A small metal cylinder called a healing abutment is screwed into the implant. The top of this healing abutment protrudes through the gum tissue. The gum is then allowed to heal around it for about two weeks. This shapes the gum tissue into a perfect, natural collar, creating a clean, biological seal and an aesthetic emergence profile for the future crown. This is a minor procedure, often performed with just local anesthetic. For an implant that already had a healing abutment, this step is skipped.
Final Impressions
Once your gums have healed and look perfect around the healing abutment, your restorative dentist takes a final impression. This is no longer the gooey, messy material you may remember. Most modern practices use a digital intraoral scanner. The dentist runs a small wand over your teeth and the implant. On the screen, a precise 3D digital model appears instantly. This scan captures the exact position of the implant, the contour of the gum tissue, and the relationship to the opposing and neighboring teeth. The digital file is sent electronically to a specialized dental laboratory.
Fabricating the Final Crown (2-3 Weeks)
The dental lab technician is an artisan. They will custom-design your abutment and crown from the digital prescription. The abutment can be a custom-milled titanium or zirconia piece that fits the implant and your gum contour perfectly. The crown itself is typically made of strong, beautiful porcelain that is layered by hand to match the color, translucency, and texture of your natural teeth.
This lab work is meticulous and not a quick process. You will typically wait two to three weeks. During this time, you will wear your temporary tooth.
The Delivery Appointment (Under an Hour)
At the final appointment, your dentist removes the healing abutment. They place the final abutment and torque it to a precise specification. They then try in the crown, checking for several critical parameters. The contacts with adjacent teeth must be perfect—firm enough to floss with a satisfying snap, but not too tight. The bite against the opposing tooth must be slightly lighter than your natural teeth. Natural teeth have a ligament that allows for a tiny bit of give. An implant is fused to bone and has no give. A high bite creates a repetitive, traumatic force that can lead to implant failure, screw loosening, or porcelain fracture. Your dentist will check and re-check the bite with colored articulating paper and adjust it meticulously. Once everything is perfect, the crown is either cemented onto the abutment or secured with a tiny screw through a hidden channel, which is then sealed with a tooth-colored filling.
Phase 6: Final Follow-Up and Maintenance (Ongoing)
Your new tooth is in place, and it looks sensational. The active treatment timeline is complete. But your journey of care is lifelong. Your dentist will schedule a follow-up appointment in a few weeks to check on the soft tissue health and confirm all is well. An annual X-ray of the implant is standard to monitor the bone level around it. You must treat your implant like a natural tooth—or even better. You will brush it, floss it daily (using specialized floss or a water flosser to get under the crown), and keep your regular hygiene appointments. A well-maintained dental implant can last a lifetime.
A Summative Timeline: Visualizing the Path from Start to Finish
It is helpful to see the entire journey laid out in a clear, visual format. The following table presents a few realistic patient scenarios. This will help you understand where you might fit on the spectrum of time.
| Patient Scenario | Step 1: Prep | Step 2: Major Graft | Step 3: Implant | Step 4: O-I | Step 5: Crown | Total Time (Approx) |
|---|---|---|---|---|---|---|
| The Ideal Case | Exam & Extraction with Socket Graft | Not Needed | Placement at 4 Months | 4 Months | 1 Month | 9 Months |
| The Standard Case | Tooth already missing for years. Minor bone loss. | Minor Block Graft | Placement at 5 Months | 4 Months | 1 Month | 10 Months |
| The Complex Case | Multiple missing teeth in upper jaw. Significant bone loss. | Sinus Lift and Major Block Graft | Placement at 9 Months | 6 Months | 2 Months | 17 Months |
| Same-Day Teeth | Exam & Extraction of all teeth in arch | Not Applicable | 4-6 Implants placed same day | None for final set | Immediate fixed temporary bridge. Final bridge at 4-6 Months. | 4-6 Months to Final |
Factors That Influence Your Personal Timeline: The Accelerators and the Delays
No two patients are alike. Your body’s unique biology and your daily habits play a commanding role in how long your journey takes. Understanding these factors puts you in the driver’s seat for the ones you can control.
Factors That Can Accelerate the Timeline
Some fortunate anatomical and procedural advantages can shorten your wait.
- Immediate Implant Placement: If you need a tooth extracted and the surrounding bone is intact and infection-free, your surgeon can remove the tooth and place the implant into the socket in the same surgical visit. This saves you 3-4 months of healing after an extraction. The implant can still osseointegrate while the socket heals.
- Combined Sinus Lift and Implant Placement: As mentioned, if you have a minimum of 4-5mm of native bone height in the upper jaw, the surgeon can often perform a sinus lift and place the implant at the same time. This merges two separate 6+ month healing periods into one, saving immense time.
- Excellent Bone Quality: Patients with dense, highly vascular bone (Type I or II bone) provide an ideal bed for an implant. Healing is robust and predictable, often allowing a dentist to proceed to the crown phase at the shorter end of the healing window (around 3 months).
Factors That Can Delay the Timeline
Several systemic and behavioral factors can slow healing and demand a more cautious approach.
Smoking and Tobacco Use
This is, without question, the most significant modifiable risk factor. Nicotine is a powerful vasoconstrictor. It constricts the small blood vessels that deliver the oxygen and nutrients essential for healing to the surgical site. Smokers have a dramatically higher risk of implant failure. Their osseointegration process is significantly impaired. A protocol your surgeon may strongly recommend is to cease all smoking for at least one week before and two weeks after surgery. If you cannot or will not quit, you must understand that your healing timeline is often doubled, and your risk of failure is much higher. Many surgeons will decline to place implants in heavy smokers due to the low probability of long-term success.
Uncontrolled Systemic Conditions
- Diabetes: Uncontrolled diabetes, with an HbA1c consistently above 7.0%, severely compromises healing and the immune response. A diabetic patient with poor sugar control has a much higher risk of post-operative infection and failed osseointegration. Achieving good diabetic control before starting the process is mandatory for safety and success.
- Autoimmune Diseases: Conditions like rheumatoid arthritis, lupus, and others directly impact the body’s inflammatory response and healing capacity. Medications to manage these conditions often include immunosuppressants, which also slow healing. A careful conversation and collaboration with your physician are necessary.
- Medication-Related Osteonecrosis of the Jaw (MRONJ): Patients who have been on or are currently taking certain medications for osteoporosis or cancer treatment (oral or IV bisphosphonates like Fosamax, Boniva, Actonel, and Reclast, or the monoclonal antibody Denosumab) face a small but serious risk. Jaw surgery can trigger a condition where the bone fails to heal and dies. This is an absolute red flag. You must inform your surgeon. Often, dental implant surgery is contraindicated while on these medications.
Poor Oral Hygiene
Entering the implant process with a history of poor oral hygiene and a lack of commitment to daily care is like building a palace on a swamp. Peri-implantitis, the destructive infection that can take hold around an implant, is even more aggressive than gum disease around natural teeth. A patient who cannot commit to the daily ritual of perfect cleaning will face a long-term failure. The timeline can be delayed from the start if the dentist needs to treat active gum disease.
Special Protocols: Immediate Load and Same-Day Teeth
A very common and understandable desire is to have the teeth on the same day as the surgery. This concept, often called “Teeth in a Day” or “All-on-4,” is a powerful marketing term and a genuine revolutionary protocol. You must understand exactly what it means.
In this protocol, typically used for a full arch of missing teeth, the surgeon places four to six strategically angled implants. A full-arch, fixed temporary bridge made of high-strength acrylic is screwed onto these implants on the same day. You walk out with a full set of fixed teeth. It is life-changing.
Key Distinction: You do not walk out with your final, long-term porcelain teeth. The immediate bridge is a temporary set. It acts as a rigid splint, which is crucial for the success of this technique. It locks the implants together and protects them from micromovement during the critical healing months. After a strict soft-food diet and a 4-6 month osseointegration period, you return to have a brand new, custom-crafted, final zirconia or porcelain bridge fabricated. The benefit is that you never wear a removable denture. The total time to final teeth is still 4-6 months, but your quality of life during that time is immeasurably better.
Navigating Your Life During the Healing Months
The waiting periods between steps can feel long. Knowing what to expect and how to manage this time makes the journey far smoother. Here is what a typical recovery looks like after each main surgical phase.
Post-Extraction and Grafting Recovery
The first 24 to 48 hours are the most delicate. You must allow a stable blood clot to form and organize. A strict soft diet and avoidance of drinking through a straw or spitting forcefully are paramount. Dislodging the clot leads to a painful dry socket. Swelling peaks around day two or three and then begins to subside. An ice pack on the face (twenty minutes on, twenty minutes off) during the first day helps significantly. You will manage any discomfort with prescribed or over-the-counter pain relief, but many patients are surprised that a single extraction with a graft requires little more than ibuprofen. A sensation of small granular particles in your mouth a few days after a graft is normal; these are stray particles, not a sign that the entire graft is failing.
Post-Implant Surgery Recovery
The implant surgery itself is often less painful than an extraction. There is no open ligament in the bone to ache. Discomfort is typically well-controlled for one to three days. The primary instruction during the entire 3-6 month integration phase is behavioral: protect the implant. Do not chew on it. Do not poke it with your tongue constantly. Let it be. A soft-to-medium food diet is your lifestyle. Think scrambled eggs, pasta, well-cooked vegetables, and smoothies. You must absolutely avoid hard, crunchy foods like nuts, hard bread, and raw carrots in that area. A single accidental bite on a hidden olive pit can generate enough force to cause a failure in a healing implant.
Important Note: A small titanium implant has no sensation. You will not feel a “warning” ache like you might with a natural tooth. The only sign of a problem is a physical loosening. This is why the discipline of not chewing on it is so crucial. You will do no damage without realizing it.
Cost vs. Time: Understanding the Investment of Patience
A dental implant is a long-term investment, and understanding the financial component helps contextualize the time commitment. The cost is tied directly to the time, skill, and technology involved at each stage. The following is a representative range in US dollars, and actual fees vary greatly by location and specialist.
| Treatment Component | Why It Costs | Estimated Range (USD) |
|---|---|---|
| Consultation & 3D CBCT Scan | Diagnostic expertise, surgical planning software, radiation technology. | $250 – $700 |
| Single Tooth Extraction | Surgical skill, local anesthetic, time. | $200 – $600 |
| Bone Grafting (Socket) | Expensive graft material, membrane, surgical skill, time. | $400 – $1,200 |
| Major Block Graft / Sinus Lift | Complex surgery, significant material, specialized membrane, longer surgical time. | $1,500 – $4,000+ |
| Single Implant Placement | The implant fixture cost, surgical kit, guided surgery stent, surgeon’s training and skill. | $1,500 – $3,000 |
| Abutment and Crown | Custom-milled abutment (titanium/zirconia), master lab technician’s artistry, high-grade porcelain. | $1,500 – $3,000 |
| Full Arch “All-on-4” / “Teeth in a Day” | Multiple implants, complex surgery, sedition, immediate temporary bridge, then final high-end bridge. | $20,000 – $35,000 per arch |
While a single implant might cost between $4,000 and $7,000 from start to finish, it is a permanent replacement for a missing tooth. A three-unit dental bridge costs roughly the same yet requires cutting down healthy adjacent teeth and has a lifespan of 10-15 years. The implant preserves the jawbone and leaves other teeth untouched. The financial cost, spread over the time it takes to complete, is an investment in a one-time solution.
The Unseen Value: Why the Long Wait is Undeniably Worth It
When you are in the middle of the process, waiting for a tooth, you can lose sight of the destination. It is essential to re-focus on the profound, life-long benefits that this careful timeline delivers. The reward is not just a cosmetic fix. It is a functional and biological restoration.
- The Preservation of Your Jaw and Face: This is the single greatest benefit that a bridge or denture cannot provide. A dental implant is the only tooth-replacement method that halts bone resorption. The implant post transmits chewing forces into the jawbone, exactly like a natural tooth root. This stimulates the bone cells to maintain their density and volume. When you choose an implant, you preserve the structural integrity of your face. You prevent the sunken, prematurely aged appearance that comes with long-term tooth loss and denture wear.
- The Restoration of Complete Chewing Power: An osseointegrated implant achieves a bite force nearly identical to a natural tooth. You can eat a full, healthy diet without fear, without pain, and without embarrassment. You can order a steak, a crunchy salad, or a crisp apple. This freedom has a direct impact on your nutrition and overall physical health.
- The Psychological Lift of a Secure Smile: The psychological toll of a missing tooth, or a loose, clicking denture, is immense. It erodes your confidence. You learn to smile with your mouth closed. You cover your laugh. A dental implant removes that invisible burden. It feels, functions, and appears as your own. You forget it is there. This is the gift of a natural smile, given back to you.
“The question I hear most isn’t about the surgery. It’s ‘How long until I can smile without thinking about it?’ With a properly healed dental implant, the beautiful answer is: ‘For the rest of your life.'”
Your Role in a Swift and Successful Outcome
The timeline is a collaboration between your biology and your surgeon’s skill. You are not a passive passenger. You are an active participant with immense power to ensure a smooth and timely recovery. Here is your personal checklist for success.
- Become a Meticulous But Gentle Cleaner. Your dentist will give you post-surgical instructions. Follow them exactly. After the first few days, for an uncovered healing abutment, you will begin to gently clean around it with a soft toothbrush and often a chlorhexidine mouthwash prescribed by your surgeon. A build-up of plaque on a healing abutment will inflame the gum and delay the final tissue shaping.
- Enforce a Nutrition-Rich, Soft Diet. Healing is physiologically demanding. Your body needs premium fuel. Focus on high-protein smoothies, bone broths, yogurt, eggs, and pureed soups. Supplement with a high-quality multivitamin, and particularly ensure you get enough Vitamin D and Calcium, the essential building blocks for bone metabolism.
- Honor Your Body’s Need for Rest. For the first several days after any surgery, physical exertion is the enemy. It increases your blood pressure, which increases swelling and can cause throbbing and bleeding. Get your sleep. The deepest, most productive healing happens when you are at rest.
- Become a Teetotaler and a Non-Smoker. This is temporary, but critical. Alcohol in the first week inhibits clotting and interacts poorly with pain medications. Smoking, at any point, suffocates the healing bone. View this period as your opportunity to quit for good.
- Keep Every Single Appointment. The follow-up appointments are not optional. They are the surgeon’s checkpoints to ensure healing is progressing on schedule. Skipping them introduces risk and can cause a delay if a small, easily correctable problem is missed.
A Brighter Horizon: The Moment of Completion
It is easy to get bogged down in the months of waiting. So, let’s look clearly at the finish line. The day you receive your final crown is a day of quiet triumph. Your dentist hands you a mirror. You open your mouth. The tooth is there, emerging from healthy, pink gum tissue. The porcelain catches the light just like your natural teeth. There is no line, no metal, no sign of the journey it took to get there.
You will find yourself running your tongue over it, and the sensation is of a smooth, solid tooth. You take a drink of cool water, and there is no sharp sensation. You take that first tentative bite, and there is only silent, stable strength. The long timeline finally makes sense. It wasn’t an inconvenience. It was the meticulous, biologically-respectful process of gifting you a part of your body back. The day you get your crown is the day you stop thinking about the timeline and start living your life with your full, confident, unencumbered smile.
Conclusion
The realistic timeline to get a dental implant spans from a single day of surgery to a year of patient healing, largely dictated by your unique bone health. The core of the process is the 3-6 month osseointegration period, a quiet biological miracle that creates a permanent, rock-solid foundation no other tooth replacement can match. While preparatory grafts and final tooth creation add weeks or months, this entire journey is an investment in a lifetime of restored function, preserved jawbone, and the unshakeable confidence of a natural smile.
Frequently Asked Questions (FAQ)
Can dental implants ever be done in one day?
Yes and no. In a procedure like “Teeth in a Day,” you can have failing teeth removed, implants placed, and a fixed, full-arch temporary bridge attached in a single surgical appointment. You leave with functional teeth. However, these are not your final permanent teeth. The implants still need 4-6 months to fuse to the bone before a new, long-lasting final bridge is made.
How painful is the dental implant process?
The surgical placement of an implant is typically less painful and traumatic than a tooth extraction. With modern local anesthetics and sedation options, the procedure itself is painless. Post-operative discomfort is usually mild to moderate, peaks within the first 48 hours, and is well-controlled with over-the-counter pain relievers like ibuprofen and ice packs.
I’ve been told I need a bone graft. Does this mean I’m not a candidate?
Absolutely not. It means you are a responsible candidate. A recommendation for a bone graft shows your dentist is taking the necessary steps to ensure long-term success. Once the graft has healed and created a solid foundation, your implant prognosis is excellent.
What if I don’t want a hole in my smile for all those months?
You will never have to face the world with an empty space unless you choose to. Your dentist will provide a temporary cosmetic solution. This could be a removable flipper tooth with an acrylic tooth, or a fixed temporary bridge bonded to adjacent teeth. It is designed purely for looks and eating soft foods, not for chewing. It will fill the space beautifully until your final crown is delivered.
How soon can I return to work after having an implant placed?
Most patients with a desk job return to work the very next day. For a single, straightforward implant, you will likely feel fine. If your work involves physical labor, or if you underwent extensive grafting or multiple implants, you may want to take two to three days to rest. The main goal is to avoid physical exertion that increases blood pressure to the surgical site.
How long does the entire “All-on-4” process take from start to the final bridge?
For a full arch of failing teeth, the initial process of removal, implant placement, and delivery of the immediate fixed temporary bridge occurs in one long surgical day. The implants then require a strict soft-food diet and a 4-6 month healing period. After this, you return to have your final, high-strength zirconia or porcelain bridge fabricated and fitted. The entire journey to the final, durable set of teeth is typically 4-6 months.
Additional Resource:
For a deeper scientific explanation of osseointegration and the materials used in modern implant dentistry, visit the American Academy of Implant Dentistry’s patient resources page. You can find it by searching for “AAID What are dental implants” online.
Disclaimer:
The information in this article is for educational and informational purposes only and is not a substitute for professional dental advice. Timelines and treatments vary for each individual. Always consult with a licensed and qualified dental professional for a diagnosis and a customized treatment plan.