dental implants healing process
Undergoing dental implant surgery represents a significant investment in your health, appearance, and confidence. You likely chose this path to reclaim the full function of your smile and to prevent the long-term bone loss that accompanies missing teeth. Yet, once the sedation wears off and you return home, a pressing question often takes center stage: “What happens now?”
The journey from surgery to a fully functional, natural-feeling tooth involves a complex biological marvel called osseointegration. This is not simply a matter of waiting for a wound to close. Your body must actively fuse living bone to a titanium post, creating a foundation strong enough to withstand the powerful forces of chewing. Understanding this timeline transforms a potentially anxious waiting period into a manageable, predictable process.
This guide provides a realistic, week-by-week breakdown of the dental implants healing process. We will demystify the biological stages, detail exactly what to eat, explain how to manage discomfort, and identify the subtle warning signs that require professional attention. By removing the guesswork, this resource aims to be your trusted companion, ensuring you feel informed, prepared, and empowered from the first day of surgery to the moment you admire your final crown.
The Unseen Marvel: Understanding Osseointegration as the True Healing Goal
Before mapping out the daily timeline, you must understand the central biological event that defines success. The placement of the implant is a surgical procedure. The creation of the crown is a restorative one. However, the true healing process is neither surgical nor restorative; it is biological. It carries a specific name: osseointegration.
In 1952, a Swedish orthopedic surgeon named Per-Ingvar Brånemark discovered that bone would fuse directly to titanium without any soft tissue interface. He called this phenomenon osseointegration. This discovery transformed dentistry. Before this, replacing a single tooth often required compromising healthy adjacent teeth to create a bridge. With osseointegration, a synthetic root could become a permanent, independent anchor.
Think of the titanium implant not as a screw holding a tooth, but as a biological scaffold. Your jawbone cells, called osteoblasts, do not reject the titanium. They treat it as a compatible, inert material and begin to lay down new bone matrix directly onto its microscopically roughened surface. This is not a mechanical interlock. It is a living, cellular bond. The timeline of this process dictates everything about your recovery.
The strength of this bond depends on several factors: the quality and density of your bone, your overall health, and crucially, the stability you provide during the early healing window. Any micromovement of the implant during the first critical weeks can disrupt the delicate cellular activity. Instead of bone cells forming a direct bond, fibroblasts might rush in to create a layer of scar tissue. This failure, known as fibrous encapsulation, means the implant has failed to integrate. The post becomes loose and must be removed.
Your daily actions during the dental implants healing process directly influence which cellular path your body takes. This is why the instructions to eat soft foods and avoid disturbing the surgical site are not arbitrary suggestions. They are the strategy to protect a microscopic construction project happening deep within your jawbone.
The First 24 Hours: Immediate Post-Operative Care and Crucial Blood Clot Formation
The moment you leave the surgical chair, the initial phase of the dental implants healing process begins. The anesthetic will linger for a few hours, creating a false sense of normalcy. Your focus during this first day must center on protecting a fragile, life-sustaining structure that forms in the wound: the blood clot.
Do not underestimate the blood clot. It is not a messy byproduct. It serves as nature’s protective dressing and the foundational scaffold for all future healing. The clot seals the wound, preventing bacteria from entering the surgical site. It also contains a rich concentration of growth factors and signaling molecules that recruit healing cells to the area. Losing this clot prematurely leads to a painful condition known as dry socket in extraction cases, but in implant sites, it exposes the sensitive underlying bone and disrupts the initial healing cascade.
Bleeding Management
You will notice blood-tinged saliva for several hours. This does not mean you are actively bleeding. A small amount of blood mixed with a large amount of saliva looks dramatic. Bite down with firm, continuous pressure on the sterile gauze pads placed by your surgeon. The pressure is the key. Replace the gauze every 30 to 45 minutes until the pad shows only light pink staining. Do not keep changing the gauze every few minutes, as this disrupts the forming clot.
If you have had multiple implants placed, your surgeon may have provided a tea bag. The tannic acid in black tea has a natural astringent property that promotes clotting. If directed, bite gently on a moistened tea bag for 30 minutes.
Pain Perception and Medication
As the local anesthetic metabolizes, typically three to four hours after the procedure, the discomfort will begin to announce itself. Do not wait for severe pain to take your first dose of medication. Take the recommended pain reliever at the first whisper of discomfort. Staying ahead of the pain curve is far more effective than chasing it. Many clinicians recommend alternating ibuprofen with acetaminophen, provided you have no medical contraindications. This multimodal approach often provides better pain control with fewer narcotic side effects, should narcotics be prescribed.
Swelling Initiation
Swelling is a normal and expected inflammatory response. Your body rushes fluid and immune cells to the area to begin repair. The swelling will not reach its peak today. It will build gradually. Applying an ice pack to the cheek over the surgical area is the single most effective way to limit this swelling. Use the pack for 15 minutes on, then 15 minutes off. This intermittent cooling constricts blood vessels, reducing fluid accumulation without causing tissue damage from prolonged cold exposure.
The Non-Negotiable Rules
During these first 24 hours, a strict protocol protects the blood clot. Do not spit vigorously. Let saliva dribble out of your mouth if you must. Do not use a straw. The suction pressure is the perfect mechanism to dislodge a fragile clot. Do not smoke. The chemical agents in cigarette smoke impair blood flow, and the physical suction is equally destructive. Do not probe the area with your tongue or finger. Avoid hot liquids, which can dissolve the clot. Stick to cool or lukewarm fluids. Do not engage in any strenuous physical activity, which can elevate blood pressure and restart bleeding. Rest with your head elevated on pillows, even while sleeping.
Week One: The Inflammatory Stage and Managing Expectations
The first week represents the most intensive phase of active management. The dental implants healing process now moves from the immediate threat of bleeding to the broader challenges of inflammation, dietary adjustment, and meticulous oral hygiene.
Day 2-3: The Peak of Discomfort
You will wake up on the second post-operative day and likely discover that your face looks more swollen than the day before. This is not a sign of infection. This is the normal peak of the inflammatory response. The swelling may be at its maximum around 48 to 72 hours after surgery. You might also notice some bruising beginning to appear. The skin around your jaw, chin, or even under your eye may turn shades of yellow, purple, or green. This blood pigment, breaking down and migrating through tissue planes, is a normal part of the process and will resolve spontaneously over a week.
Jaw stiffness is also common. The muscles responsible for chewing may have been stretched during the procedure, or the local anesthetic injection sites may be inflamed. You might find it difficult to open your mouth wide. This condition, called trismus, will gradually loosen as the muscle inflammation subsides. Do not force your mouth open; this is a passive waiting game.
Pain during these days should be manageable with the prescribed or recommended over-the-counter medications. The sensation is typically a dull ache and pressure, rather than sharp, localized pain. If you experience a sharp, shooting pain that is not controlled by medication, this warrants a call to your surgeon, as it could indicate an issue with the nearby nerve or excessive pressure on the implant.
Addressing Your Mouth’s State
Your breath will not be fresh. A slightly unpleasant taste or odor is normal during the first week. Blood degrading in the mouth, limited ability to brush the surgical area, and the healing tissues themselves contribute to this. Gentle salt water rinses will help maintain a clean environment. Mix half a teaspoon of salt in a cup of warm water and hold it in your mouth, letting it passively bathe the surgical site. Do not swish vigorously. Let the water fall out of your mouth into the sink without spitting.
The Dietary Protocol for the Soft Food Phase
Nutrition directly affects your body’s capacity to heal. You cannot consume a normal diet. Your goal is to maintain caloric and nutrient intake while exerting zero pressure on the implant site. This means a diet of completely smooth, non-particulate foods that require no chewing.
Acceptable Week-One Foods
| Category | Recommended Items | Specific Instructions |
|---|---|---|
| Protein Base | Protein shakes, smooth nut butters diluted into liquids, pureed silken tofu, Greek yogurt (plain, no fruit chunks), scrambled eggs (cooled) | Add unflavored protein powder or collagen peptides to other liquids. Protein provides amino acids essential for tissue repair. |
| Fruits & Vegetables | Smoothies made with peeled, well-blended fruits (banana, mango, berries), vegetable purees (butternut squash soup, carrot puree), avocado | Avoid any fruit with small seeds (raspberries, kiwi) that can lodge in the wound. Pass all purees through a fine-mesh strainer. |
| Grains & Carbohydrates | Thin oatmeal, cream of wheat, congee (rice porridge), well-cooked and pureed pasta (as a base for pureed sauces) | These provide easily digestible energy. Ensure all grains are cooked until completely mushy and thinned with milk or broth. |
| Hydration | Water, milk, non-acidic fruit juices (apple), meal replacement shakes, cool herbal tea | Avoid acidic juices like orange or tomato, which will sting the surgical site. |
| Temperature | All foods must be lukewarm or cool. | Heat increases blood flow and can dissolve the protective clot. Cold is soothing but avoid extremely icy foods if they cause sensitivity. |
Important Note: What to Strictly Avoid
Avoid any food that requires chewing, including soft breads. Avoid small, granular foods like rice, quinoa, or poppy seed muffins; these grains can easily become trapped in the surgical site. Avoid spicy foods and carbonated beverages, which can irritate the tissue. The less the site is disturbed, the faster the initial layer of healing tissue, called the epithelium, can begin to close the wound.
Oral Hygiene: The Delicate Balance
On the day of surgery, you will not brush the surgical area at all. Starting the day after surgery, you can begin gentle oral hygiene for the rest of your mouth. Use a soft-bristled toothbrush and brush your normal teeth carefully. Do not let the brush bump the implant site. If you were provided a prescription mouth rinse, typically chlorhexidine, use it as directed. It usually involves holding the rinse passively over the surgical area twice a day. Chlorhexidine is a powerful antiseptic that significantly reduces the bacterial load during the healing phase when mechanical cleaning is impossible. Be aware it can cause temporary staining of the teeth, which your dentist can remove later.
Week Two: Transitioning and the Deceptive Soft Tissue Closure
As you enter the second week, the acute symptoms begin to fade. This is a period of transition that can be deceptive. The dental implants healing process is far from complete, but you may start feeling that the worst is behind you.
The Receding Swelling and Sutures
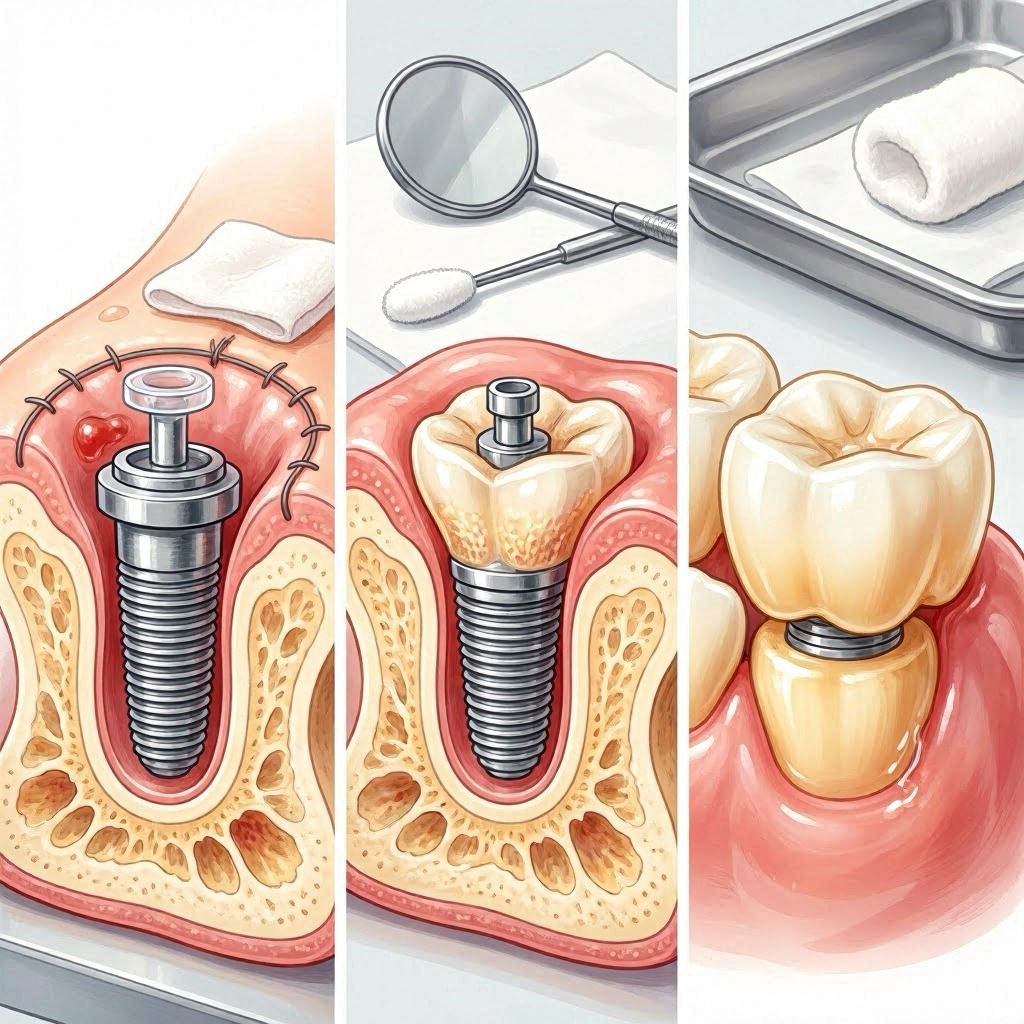
The noticeable facial swelling will largely resolve within 7 to 10 days. Any bruising will continue to change color and fade. The stitches in your mouth will start to feel strange. They may become loose as the tissue begins to close and the suture material starts to dissolve or work its way out. Do not pull on a loose stitch. Allow it to dissolve and fall out on its own. Your surgeon will tell you if your sutures are the dissolving type or if they require a removal appointment. Typically, non-dissolving sutures come out at a brief visit around day 10 to 14.
The surface wound may now look like a small, pinkish dimple where the implant is, or a healing cap might be slightly visible. This visual closure of the gum tissue is a significant milestone, but it is crucial to understand its limits. The soft tissue seal is not strong. It provides a fragile barrier against oral bacteria but offers zero structural support for the implant. The real work continues unseen in the bone.
Dietary Advancement with Extreme Caution
You can now introduce slightly more substantial foods, but you must continue to protect the implant from any loading force. The key principle is that the food must be soft enough to mash against the roof of your mouth with your tongue, not chewed over the implant.
Transitional Food List
- Mashed potatoes with sour cream and melted cheese
- Flaky, poached fish (tilapia, cod) that separates easily
- Very soft pasta shapes (pastina, orzo) in a smooth cream sauce, not tomato-based
- Scrambled eggs or soft-boiled eggs
- Cottage cheese
- Smooth hummus
- Well-cooked and mashed legumes like lentils
- Soft, seedless muffins soaked in milk
You must continue to avoid chewing directly on the implant site. If you have a temporary tooth, it is for cosmetic purposes only and cannot bear any functional load. Do not test it with your tongue or teeth.
Resuming Gentle Rinsing
After the first week, you can begin rinsing a bit more actively, but still avoid a vigorous swishing action. A warm salt water rinse after any meal helps flush away food debris. The healing gum tissue is still delicate, and the healing cap or cover screw over the implant can trap food. A soft, baby-sized toothbrush can be used to very gently clean the adjacent teeth, slowly working closer to the site without directly scrubbing the healing cap. Maintaining impeccable hygiene around the adjacent teeth prevents plaque from building up and inflaming the healing gums.
Weeks 3-6: The Proliferative Phase and The Danger of Feeling “Normal”
This is the most psychologically tricky phase of the dental implants healing process. You feel completely back to normal. There is no pain. You can eat a wider variety of soft foods. The danger arises from the fact that the implant is at its weakest structural point, yet your body is telling you everything is fine.
What is Happening to the Bone?
During the first two weeks, the body cleaned the surgical site and formed a primitive matrix. Now, the bone-building cells, the osteoblasts, are working at full capacity. They are depositing a soft, unmineralized bone matrix called osteoid onto the implant surface. Think of this osteoid as the wooden framework of a building. The frame is assembled, but it cannot withstand a hurricane. Over the subsequent weeks and months, this osteoid framework will undergo mineralization, where calcium phosphate crystals are deposited, hardening into mature, load-bearing bone.
If you stress the implant now by chewing on it, you will fracture this delicate osteoid scaffold. The damage occurs at the microscopic interface before you would ever feel a wiggle. If fibroblasts fill that microscopic gap instead of osteoblasts, the implant fails biologically. You will not know it is failing until weeks later when your dentist performs a test. The motto for this phase is: “Healing is not a feeling.”
The Food Trap and Maintenance
The healing abutment, which protrudes through the gum, creates a perfect environment for trapping food. An interdental brush or a Waterpik on the absolute lowest setting can be carefully introduced, but the water stream should never be directed forcefully into the gumline around the implant. Angle the water flow across the adjacent teeth. Your goal is to keep the mouth immaculate without disturbing the fragile soft tissue seal that is forming around the healing cap. This seal is your defense against peri-implantitis, the destructive infection that can doom an implant.
The Stages of Full Osseointegration: Upper vs. Lower Jaw Timelines
The waiting game now extends over several months. The dental implants healing process timeline diverges significantly based on which jaw received the implant.
Lower Jaw (Mandible) Healing: 3 to 4 Months
The bone in the lower jaw is typically denser. It has a thick outer layer of cortical bone with a relatively small inner core of spongy, cancellous bone. This dense, compact bone is ideal for achieving primary stability—the initial mechanical grip of the implant in the bone—at the time of surgery. Because of this good blood supply and dense structure, the healing time in the mandible averages three to four months. The bone remodels and integrates relatively quickly.
Upper Jaw (Maxilla) Healing: 4 to 6 Months
The bone in the upper jaw is significantly less dense. It has a thin layer of cortical bone and a larger proportion of softer, cancellous bone. This softer bone may not provide the same “grip” at the time of surgery. The blood supply is also less robust than the mandible. Consequently, the healing time is longer, typically four to six months, to allow the slower mineralization process to create a sufficiently strong bond. Furthermore, the maxilla is located close to the sinus cavities. In many cases where the back upper teeth are missing, the sinus floor is very low, and a sinus lift procedure is required simultaneously. This grafting procedure extends the total healing time, often to six to nine months.
Comparative Healing Timeline
| Jaw Location | Bone Quality | Typical Integration Time | With Bone Grafting |
|---|---|---|---|
| Anterior Mandible (Lower Front) | Very Dense, thick cortical bone | 3-4 months | Rarely needed; if placed, 4-6 months |
| Posterior Mandible (Lower Back) | Dense cortical bone | 3-4 months | 4-6 months |
| Anterior Maxilla (Upper Front) | Thin cortical, moderate cancellous | 4-5 months | 6-8 months |
| Posterior Maxilla (Upper Back) | Very thin cortical, poor density | 5-6 months | 6-9 months (Sinus lift) |
The Abutment Uncovering Stage (For Two-Stage Implants)
If you received a two-stage implant where the implant was buried completely under the gum, you will have a minor procedure once osseointegration is confirmed. This is far simpler than the original surgery. Your surgeon makes a tiny incision to expose the top of the implant and places a healing abutment, a small metal cylinder that protrudes through the gum. This shapes the gum tissue into a natural, healthy cuff for the future crown. This minor procedure heals in just a few weeks, and then you are ready for the restorative phase.
Potential Complications: Recognizing Warning Signs in the Healing Process
A realistic guide must prepare you for the possibility that the dental implants healing process can encounter challenges. Most heal uneventfully. Recognizing the early signs of a problem empowers you to seek intervention quickly, which can save the implant.
Infection (Peri-Implant Mucositis and Peri-Implantitis)
A surface infection of the soft tissue around the implant is called peri-implant mucositis. It mirrors gingivitis around natural teeth. Signs include redness, swelling, and bleeding when gently touched. At this stage, the infection is reversible with improved hygiene and a professional cleaning of the healing abutment. If the infection progresses deeper into the bone, it becomes peri-implantitis. This condition destroys the very bone you need to integrate. Symptoms include persistent bad taste, pus, a deep pocket around the implant, and eventually, radiographic bone loss visible on an X-ray. Pain is often absent until the condition is advanced, which is why attending follow-up appointments is vital.
Early Implant Failure
Early failure occurs before the crown is placed. The implant may fail to integrate for several reasons: inadequate bone quality, surgical overheating of the bone, micromovement, contamination, or systemic factors like uncontrolled diabetes or heavy smoking. The first sign is often mobility. A successfully integrating implant should feel as solid as an ankylosed tooth. Any perceptible wiggle is a definitive sign of failure. The implant must be removed, and after a bone graft heals the site for several months, a new implant can often be placed.
Persistent Numbness or Tingling (Paresthesia)
The inferior alveolar nerve runs within the lower jaw and supplies sensation to your lower lip and chin. If an implant is placed too close to or impinges on this nerve, you can experience paresthesia—a numbness, tingling, or “pins and needles” sensation in the lip and chin. Some temporary paresthesia can occur due to surgical inflammation and resolves as the swelling subsides. However, a persistent sensation that does not improve over weeks is a serious concern. Promptly inform your surgeon. The implant may need to be removed or backed out to relieve pressure on the nerve before the damage becomes permanent.
Critical Warning Signs: When to Call Your Surgeon Immediately
- Uncontrolled Pain: Severe, throbbing pain not relieved by the prescribed pain medication.
- Mobility: Feeling the implant move with your tongue or seeing it wobble.
- Prolonged Numbness: Numbness in the lip, chin, or tongue that persists past 24 hours without improvement.
- Infection Signs: Pus, fistula (pimple on the gum), or a bad taste that does not resolve.
- Allergic Reaction: Rash, itching, or difficulty breathing, though this is extremely rare with titanium.
- Reopening of the Wound: The wound edges separate entirely, exposing the bone.
Systemic Factors: How Your Health Shapes the Healing Journey
You cannot divorce the dental implants healing process from your overall health. The mouth is not an isolated environment. Your body’s systemic condition dictates the speed and quality of bone healing.
Smoking and Vaping
Nicotine is a potent vasoconstrictor. It shrinks the peripheral blood vessels, drastically reducing the oxygen and nutrient supply to the surgical site. This has a direct and devastating impact on osseointegration. Smokers face a significantly higher implant failure rate. Carbon monoxide from smoke also binds to hemoglobin, displacing oxygen. If you smoke, you must commit to a cessation program before surgery and throughout the healing period. Vaping, while often perceived as less harmful, also delivers nicotine and heat, impairing the vascular supply.
Diabetes Control
Uncontrolled diabetes, indicated by a high hemoglobin A1c level, impairs wound healing, collagen synthesis, and the body’s ability to fight infection. The inflammatory response is prolonged and dysfunctional. A patient with well-controlled diabetes, however, heals predictably. If you have diabetes, work with your physician to optimize your blood sugar control before the surgical phase. This may mean delaying the implant until your A1c is within an acceptable target range determined by your surgeon.
Medications and Bone Metabolism
A crucial class of drugs to discuss is bisphosphonates, often prescribed for osteoporosis. These medications alter the bone turnover cycle. In the context of oral surgery, they carry a risk of Medication-Related Osteonecrosis of the Jaw (MRONJ), a condition where the jaw bone fails to heal and becomes necrotic. You must fully disclose all medications to your surgeon. Another class, selective serotonin reuptake inhibitors (SSRIs), may be associated with a slightly increased implant failure rate due to their influence on bone metabolism. This does not mean you must stop your medication, but your surgeon should be aware to create a risk-adjusted treatment plan.
The Restorative Phase: Uncovering and Your First Weeks with a New Crown
After the months of silent integration, you return for the final phase. The implant has passed the test. A radiograph confirms a healthy bone-implant interface with no radiolucency. The implant feels solid to percussion. Your new tooth is ready to be fabricated.
The Impression
For a single implant, the restorative dentist either takes a digital 3D scan of the healing abutment and surrounding teeth or uses a physical impression material. This captures the exact spatial position of the implant platform. The dental laboratory will use this to create your custom abutment and crown. The color and shape are matched meticulously to your adjacent teeth.
The Delivery Appointment
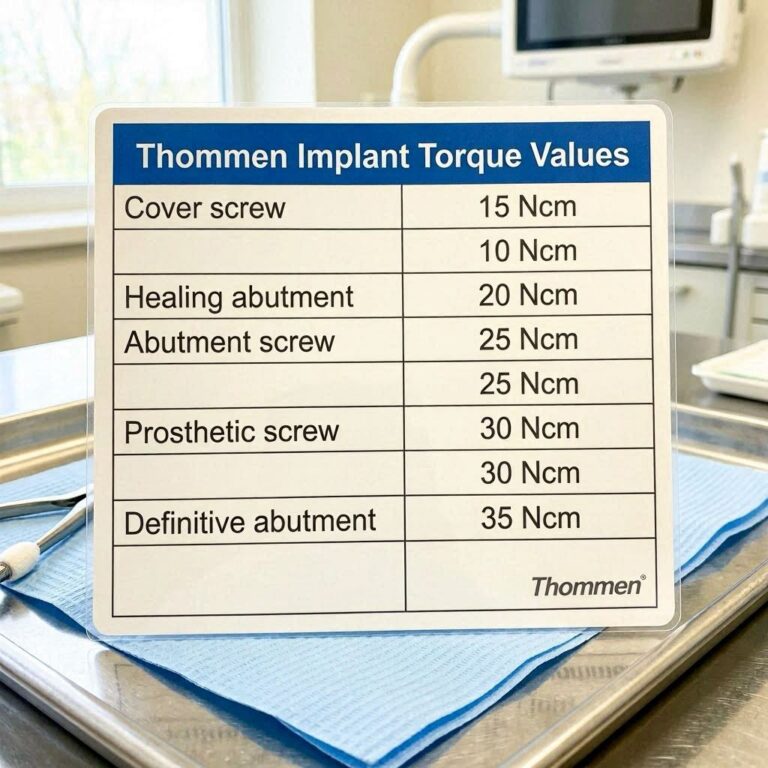
The final appointment involves removing the healing abutment and attaching the final abutment, which is torqued to a specific Newton-centimeter value. The crown is then cemented or screwed into place. A screw-retained crown is often preferred in the posterior region because it is retrievable without damaging the crown if it ever needs maintenance.
The “Feel” of a New Tooth
Your implant will feel different from a natural tooth. It will lack the periodontal ligament—the microscopic shock absorber that gives natural teeth a tiny degree of movement and proprioceptive feedback. An implant is rigidly fused. You will not “feel” the same feedback when biting. It feels solid, like a part of your own body, but the sensory experience when chewing is subtly different. Most patients adapt to this new sensation within a few weeks. You will be advised to gradually introduce harder foods and to avoid using the implant to open packages, crack nuts, or chew ice. The porcelain of the crown can fracture, but the implant itself, if properly integrated, is extraordinarily strong.
Long-Term Success: Protecting Your Investment
The dental implants healing process culminates in a restoration that can last a lifetime, but this longevity is not guaranteed. It rests on the daily maintenance you provide.
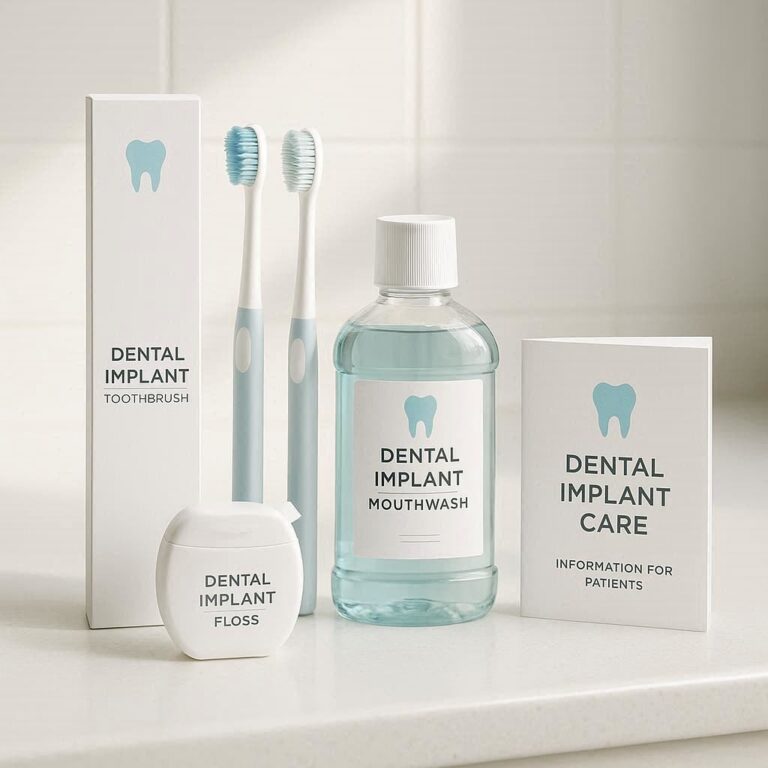
An implant requires the same meticulous hygiene as a natural tooth, but with specific tools. The curved surfaces of an implant crown, where it meets the gum, are the prime areas for plaque accumulation. Use a nylon-coated interdental brush to clean the area where the crown meets the gum. Floss using implant-specific floss, which is thicker and shred-resistant. A Waterpik with a non-metal tip on a low setting can be an excellent tool for flushing out the sulcus around the implant. The goal is to disturb the biofilm daily.
Annual professional maintenance is non-negotiable. During these visits, the hygienist will not clean your implant with standard metal instruments, which can scratch the abutment surface. Scratches create microscopic niches for bacteria. Instead, they use titanium, plastic, or ultrasonic instruments with specialized tips. The dentist will periodically take a small X-ray, a periapical radiograph, to check the marginal bone level around the implant neck. Stable bone levels signify a healthy, integrated implant. Progressive bone loss, even without symptoms, signals peri-implantitis and demands immediate intervention.
Implant Healing and Age: Considerations for Different Life Stages
The dental implants healing process is effective across a wide age range, but specific considerations apply at different stages of life. Understanding these nuances helps set realistic expectations.
Young Adults and Implant Timing
Placing an implant in a patient who is too young can lead to restorative disaster. The jawbone must have completed its growth. If an implant is placed in an adolescent whose jaws are still developing, the implant will remain static while the surrounding natural teeth continue to erupt and move. The result is an implant that appears to “sink” into the gum, creating an uneven smile line and a severe aesthetic problem. For this reason, clinicians often use a temporary removable partial denture (a “flipper”) or a bonded bridge until growth completion is confirmed, typically through serial lateral cephalometric radiographs. For males, growth may not be complete until the early 20s.
Healing in Older Adults
Age itself is not a contraindication to implant therapy. Chronological age is less important than biological health. A healthy 80-year-old can heal predictably and enjoy the benefits of dental implants. However, medical management becomes more critical. Polypharmacy, the use of multiple medications, can create a complex interplay of effects. Anticoagulants must be managed carefully in consultation with the physician. Osteoporosis medications, as mentioned, require a thorough assessment. The healing process in older adults may be slightly slower, but the outcome is equally successful when systemic conditions are well-controlled.
The Psychological Landscape of the Waiting Period
The dental implants healing process is as much a psychological journey as a physical one. The months of waiting can test your patience. You might find yourself obsessing over every minor sensation, worrying that the implant is failing because you feel a slight pressure or a vague ache. This hypervigilance is understandable. You have invested significant finances and hopes into this tiny post.
The emotional trajectory often follows a pattern. The first two weeks are active, focused on visible recovery and symptom management. Weeks three to eight can feel like a “no-man’s-land.” The visible signs of healing are gone, but the final tooth is months away. This is when patients become most frustrated with their temporary or soft-food diet. Remind yourself that the silence in your jaw is not emptiness; it is the sound of construction. The bone is hard at work 24 hours a day, without a day off, building a permanent foundation.
A practical way to navigate this waiting period is to mark the milestones on a calendar. Instead of counting down the days to the final crown, which seems interminably far, count down to the three-month mark for a lower implant, where your surgeon might perform a preliminary stability check. Celebrate the small victories: the day the swelling is entirely gone; the day you no longer need any pain relief; the first day you eat a soft sandwich without thinking about the implant.
A Surgeon’s Reassurance
“The most common question I receive during the healing phase is, ‘Is it normal to feel this?’ The body’s healing response creates a symphony of minor sensations—tingling, pressure, a dull ache. These are nearly always benign. The patient’s role is to maintain a sterile, calm environment and trust the biology.”
— Dr. P. Markham, DDS, MS, Board-Certified Periodontist
Conclusion
The dental implants healing process is a profound biological journey that transforms a titanium post into a living part of your body through osseointegration. It demands a phased approach: strict protection of the blood clot in week one, cautious dietary progression in weeks two to six, and patient trust during the months of silent bone mineralization. Recognizing the danger of feeling normal too early, avoiding micromovement, and maintaining meticulous hygiene are your central responsibilities. Ultimately, this measured timeline of four to six months yields a functional, life-like restoration that can last a lifetime with dedicated daily care and professional oversight.
Frequently Asked Questions
Can I wear my denture or temporary tooth during the healing phase?
If you have a removable temporary denture (a “flipper”), your surgeon likely delivered it immediately after surgery. You can wear it for aesthetic and social occasions but must remove it at night and whenever possible to relieve any pressure on the underlying implant. It must be relined regularly with a soft material to prevent loading. A fixed temporary tooth, if provided, is for cosmetic purposes only and can absolutely not be used for chewing.
When can I return to strenuous exercise or heavy lifting?
Light walking can usually be resumed within a few days. However, heavy weightlifting, running, and high-intensity interval training should be postponed for at least one to two weeks. The Valsalva maneuver—holding one’s breath while straining—can spike blood pressure and induce bleeding or increase swelling. Listen to your body and clear any specific athletic activities with your surgeon.
Is a dry socket possible with a dental implant?
A classic dry socket, or alveolar osteitis, involves the loss of the blood clot from a tooth extraction socket, exposing the bony walls. While the implant itself is placed into a prepared osteotomy, the procedure often occurs at the same time as a tooth extraction. In an immediate implant placement, the risk of a dry socket is effectively eliminated because the implant fills the socket. However, the pain from a disturbed clot around an implant can be severe and requires evaluation.
Why do I have a metal taste in my mouth?
A temporary metallic taste is common, particularly if you have a healing abutment made of a different alloy or if there is slight bleeding releasing iron-containing blood components into your saliva. A persistent, foul metallic taste can also signal a buildup of bacteria around the healing abutment. This is a sign to improve your gentle cleaning around the post with the prescribed rinse or salt water.
How do I know if my implant is failing during the healing process?
The most definitive early sign is mobility. The implant should never feel loose. Other signs include pain that appears after weeks of being pain-free, persistent swelling or redness of the gum, and a purulent discharge (pus) from the gum margin. A failing implant often does not cause pain until the later stages. Any feeling of movement warrants an immediate visit to your surgeon for a simple torque test or X-ray.
Additional Resource:
For a peer-reviewed overview of peri-implant diseases and maintenance protocols, visit the American Academy of Periodontology:
https://www.perio.org/for-patients/periodontal-treatments-and-procedures/dental-implant-procedures/
Disclaimer: This article is for informational purposes only and does not constitute medical advice. The dental implants healing process varies significantly between individuals. Always follow the specific post-operative instructions provided by your dental surgeon. If you experience severe pain, uncontrolled bleeding, or signs of infection, seek immediate professional attention.