When to Start Brushing After Dental Implant Surgery
Dental implant surgery is a significant investment in your health and smile. The hours and days immediately following the procedure are critical. One of the most common and anxious questions patients ask is: “When can I brush my teeth again?” The answer is not a single date on a calendar. It is a phased, gentle progression from no brushing at all to your normal, thorough routine. Brushing incorrectly or too soon can disrupt the delicate blood clot and healing process, putting the entire implant at risk. Brushing too late or ineffectively allows harmful bacteria to build up, causing infection. This article provides a detailed, day-by-day and week-by-week guide. You will learn exactly how to care for your mouth after implant surgery, protecting your new implant while maintaining oral hygiene.
The Biology of the Surgical Wound
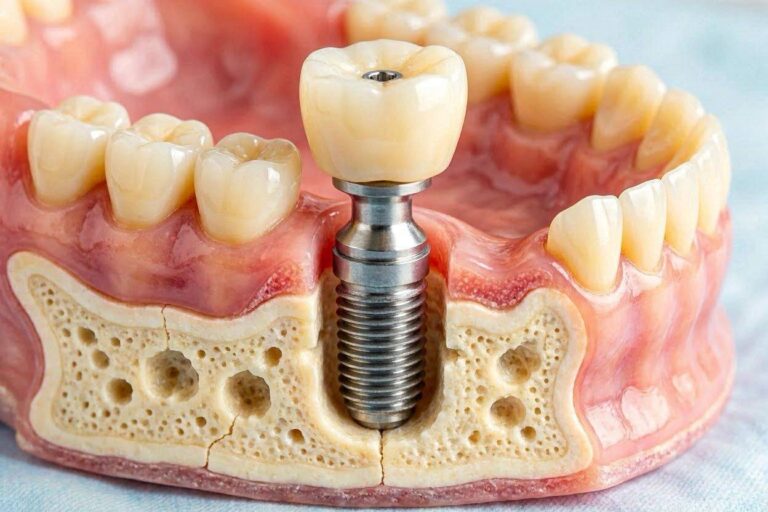
To understand the “when,” you must first appreciate the “why.” An implant site is a controlled surgical wound. A hole has been precisely drilled into your jawbone, and a titanium or ceramic post has been inserted. The gum tissue over it has been sutured closed or a healing cap has been placed. The immediate goal is the formation and stabilization of a blood clot. This clot is not a scab to be picked off. It is a living scaffold packed with cells and growth factors that orchestrate the entire healing cascade. The clot is fragile. Within the first 24-72 hours, it is only loosely adherent. Any disturbance—suction from spitting, a direct hit from a toothbrush bristle, or vigorous rinsing—can dislodge it. This condition is similar to a dry socket in an extraction site. Losing the clot exposes the underlying bone and implant, leading to severe pain, delayed healing, and potential implant failure.
The Phases of Soft Tissue Healing
The gum tissue heals in overlapping phases. For the first 2-3 days, inflammation is dominant. The area is red, slightly swollen, and tender. This is the body bringing healing cells to the site. From day 3 to week 3, new tissue forms. Fibroblasts lay down collagen, and new blood vessels grow. The gum edges begin to seal together. By week 3, the gum is typically closed, although still fragile. The concept of “brushing” is entirely dependent on these phases. You do not mechanically brush a fresh wound any more than you would scrub a fresh cut on your skin. You must navigate the biology correctly.
The Definitive Post-Operative Brushing Timeline
Here is a clear, stage-by-stage timeline. Your specific dentist’s instructions take precedence, as they know the details of your surgery, such as whether it was a flapless or flapped procedure and the stability of the implant.
Day 1: The Day of Surgery
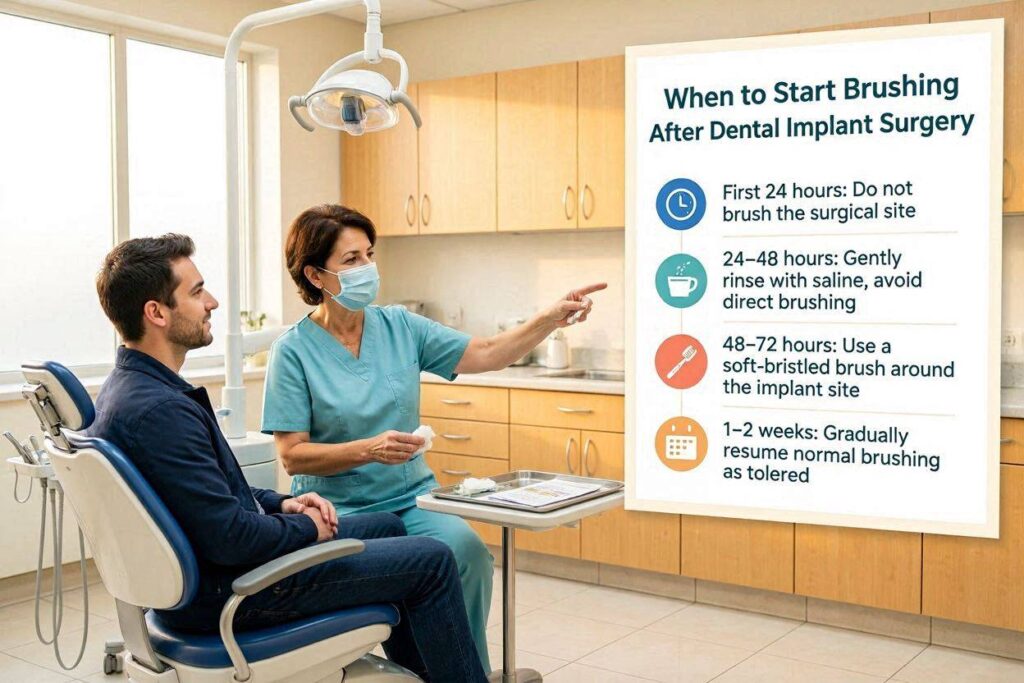
Do not brush the surgical area at all. Focus on controlling bleeding and protecting the clot. Bite gently on the gauze packs placed by your surgeon, changing them as directed. You can and should gently brush your other, non-surgical teeth. Use a soft-bristled toothbrush and be very careful. Avoid any toothpaste spitting foam onto the surgical wound. Lean over the sink and let the saliva and toothpaste dribble out of your mouth. Do not purse your lips and spit forcefully. Do not rinse your mouth with water or mouthwash unless specifically instructed. The clot is at its most vulnerable stage. Rest with your head elevated. Apply an ice pack to your face to minimize swelling.
Days 2-3: The Gentlest of Beginnings
Continue to avoid direct brushing of the implant site. The gum tissue is now acutely inflamed. You can begin very gentle oral hygiene measures around the area. Many surgeons will prescribe an antimicrobial mouth rinse, typically chlorhexidine gluconate 0.12%. The instruction is not to swish. Swishing creates turbulence that can dislodge the clot. Instead, you pour a small amount into the cap, hold it over the surgical area, and gently tilt your head side to side to bathe the wound. Let the liquid fall passively out of your mouth. Do not spit. You can also use a cotton swab (Q-tip) dipped in the mouthwash to very gently wipe the adjacent teeth, staying millimeters away from the actual suture line. Continue brushing your other teeth carefully. The goal is to keep the overall bacterial load in your mouth low without touching the wound.
Days 4-7: Introducing Ultra-Soft Mechanical Cleaning
The tissue is now beginning the proliferative phase. The risk of complete clot dislodgement is decreasing but still present. You can now transition to a very gentle, direct cleaning of the implant site with a specialized brush. Your dentist should have provided, or recommended, an ultra-soft surgical toothbrush. These have very fine, soft bristles, often only a few tufts. The technique is critical.
- Do not use a back-and-forth scrubbing motion.
- Moisten the brush with the prescribed mouthwash or warm salt water.
- Place the bristles right at the junction of the gum and the healing cap or sutures.
- Use extremely light pressure and gentle, circular, vibratory motions. You are polishing the area, not scrubbing.
- Brush the biting surface of the healing cap, if exposed, with the same gentle touch.
You can now also begin warm salt water rinses (one teaspoon of salt in a cup of warm water) 2-3 times a day, particularly after eating. The motion should be a gentle “holding and tilting,” still not a vigorous swish.
Week 2: Normalizing Hygiene with Caution
By the second week, the gum tissue has usually achieved a good degree of sealing. Sutures, if they were not dissolvable, are often removed around day 7-14. Once the sutures are out and the surgeon confirms the wound is closed, you can begin a more normal, but still gentle, brushing routine. You can now use your regular extra-soft toothbrush. Apply a small amount of non-abrasive toothpaste. Brush the implant site using small, circular strokes. You can start using a sulcular brushing technique, angling the bristles 45 degrees against the gum line. Electric toothbrushes should remain off the implant site for now. Continue to avoid any harsh, back-and-forth scrubbing. The new tissue is like a newly healed skin scar—it can be abraded by vigorous brushing.
Weeks 3-4: Transitioning to Full Routine
Most patients can now resume their normal, effective oral hygiene routine around the implant. If you use an electric toothbrush, a gentle mode with a soft brush head can be introduced, but start cautiously. The healing cap or the implant itself is designed to be cleaned. You can now brush it like a natural tooth, but with an awareness of using non-abrasive toothpaste and gentle force. The emphasis shifts from “not touching it” to “keeping it immaculately clean.” Plaque left on the healing cap or around the gum margin is the main cause of post-operative peri-implant mucositis. A single-tufted brush or an interdental brush can be introduced to clean the hard-to-reach areas around the back of the healing cap. Flossing around a healing implant is generally not recommended during the first month. Instead, use a proxy brush or a rubber tip stimulator.
The Correct Toothbrush and Tools for Each Phase
Using the wrong tool is a common mistake. A medium or hard-bristled brush can traumatize the fragile peri-implant tissue, causing recession and ulceration. The table below outlines the proper tool for each stage.
| Healing Phase | Recommended Tool | Technique | Toothpaste |
|---|---|---|---|
| Day 1-3 | Cotton swab (Q-tip) | Passive wiping of adjacent teeth | None |
| Day 4-14 | Ultra-soft surgical toothbrush | Gentle circular motion, no pressure | None or prescribed gel |
| Week 2-4 | Soft regular toothbrush | Sulcular, 45-degree angle | Non-abrasive toothpaste |
| Month 1+ | Soft brush, single-tufted, proxy brush | Thorough, all-surface cleaning | Non-abrasive, fluoride toothpaste |
Why No Electric Toothbrush Initially?
An electric or sonic toothbrush generates high-frequency oscillations. On a stable, osseointegrated implant, this is fine and even beneficial. On a healing, recently sutured wound, these vibrations can disrupt the delicate fibrin clot and the young granulation tissue. The mechanical energy is simply too high. The direct trauma can cause the wound edges to separate (dehiscence). Wait until your surgeon specifically clears you to use it. This is usually at the 3-4 week mark, after the tissue is strong and intact.
The Crucial Role of Chlorhexidine and Saline
During the first two weeks, mechanical brushing is limited, so chemical plaque control is essential. Chlorhexidine gluconate 0.12% is the gold standard antimicrobial mouth rinse. It binds to oral tissues and is slowly released over 8-12 hours, killing bacteria on contact. It dramatically reduces the bacterial load. Use it as prescribed, typically twice daily. The downsides are that it can cause brown staining of teeth with long-term use and alter taste sensation, but for a 10-14 day period, the benefits far outweigh the risks. If you are not prescribed chlorhexidine, or as an adjunct, warm saline rinses are soothing, help debride the area, and create a bacteriostatic environment due to the elevated salt concentration. Use saline rinses 3-4 times a day, especially after meals.
What About Flossing and Water Flossers?
Flossing is a mechanical action of passing a thread through a tight contact point. During the first month, you do not want to be pulling floss down into the healing sulcus around an implant. You risk cutting the fragile epithelial attachment or pushing debris into the wound. A water flosser, even on its lowest setting, uses a pulsating jet of water. This jet can disrupt the clot and force bacteria into the surgical site. It is absolutely contraindicated in the early healing phase. After the implant is fully integrated and the final crown is placed (typically 3-6 months post-surgery), a water flosser on a low setting becomes an excellent tool. But during the first month, stick to the brush and rinse method.
Managing the Adjacent Teeth
A common mistake is to neglect the teeth adjacent to the implant site out of fear. You must keep these teeth clinically clean. Plaque accumulation on the side of a neighboring tooth is a direct source of bacteria that can migrate into the fresh implant wound. The technique for these teeth is careful, controlled brushing with a manual toothbrush, brushing away from the wound. For example, if the implant is on a lower right tooth, you brush the adjacent tooth with a pulling motion that goes toward the adjacent tooth and away from the implant site.
Signs You Are Brushing Too Early or Too Hard
Your mouth will tell you if you are overdoing it. Watch for these warning signs.
- Renewed Bleeding: A small amount of oozing for the first day is normal. Bright red bleeding that starts again on day 3 or later when you brush is a sign of tissue trauma.
- Increased Pain: A sharp, stinging pain during or after brushing is the direct sensation of wound disruption.
- Tissue Ulceration: A white or yellowish patch on the gum that wasn’t there before. This is a traumatic ulcer from the toothbrush.
- Visible Clot Loss: The site looks like a dark, empty hole where you could previously see a red-purple plug.
If you experience any of these, stop brushing the area immediately and revert to the day-1 protocol of saline or chlorhexidine soaks. Call your dentist for guidance.
Important Note: Your surgeon’s specific post-operative instructions always take priority over any general timeline. If you had a complex surgery, like a sinus lift, block bone graft, or multiple implants, the healing protocol is more conservative. You may be instructed to avoid direct brushing for a longer period. Always follow your personalized written instructions.
Building a Lifetime Implant Hygiene Habit
The careful, gentle technique you learn in the first month should actually influence how you clean your implant for life. Even a mature, osseointegrated implant requires a less traumatic cleaning approach than a natural tooth. The soft tissue seal around an implant is not as robust as the periodontal ligament around a tooth. Aggressive brushing with a hard brush can cause gingival recession around an implant, exposing the dark titanium abutment and causing an aesthetic and functional problem. The lesson of the early healing phase—gentle, circular, 45-degree angulation with a soft brush—is the correct lifelong technique for implant maintenance.
Conclusion
Brushing after dental implant surgery follows a careful progression: no direct contact for the first few days, gentle introduction of an ultra-soft brush around day four, and a gradual return to a normal but gentle routine by weeks three to four. The goal is to protect the healing blood clot and wound while preventing bacterial buildup with prescribed rinses. Following this phased protocol ensures the site heals cleanly, paving the way for a successful, infection-free osseointegration.
FAQ
1. When can I use an interdental brush around my implant healing cap?
You can gently introduce a small interdental brush around week 3-4, once the gum has sealed and is no longer tender. Use a brush with a plastic-coated wire to avoid scratching the metal healing cap and be extremely gentle as you maneuver it around the back of the cap.
2. Can I use toothpaste with whitening or baking soda on my implant?
Avoid whitening toothpastes and those with harsh abrasives like baking soda or charcoal on the implant and its crown for the long term. They can scratch the smooth surface of the abutment and crown, creating micro-roughness that attracts plaque and leads to gum irritation.
3. Is it normal for the gum to bleed a little when I start brushing again at week 2?
Mild bleeding at week 2 is common and often a sign of resolving plaque-induced gingivitis from the period of reduced brushing. It should diminish daily as you clean. Persistent heavy bleeding or bleeding accompanied by pus is a sign of infection and needs a dental evaluation.
Additional Resource
For further post-operative care guidance, visit the American Association of Oral and Maxillofacial Surgeons: https://www.aaoms.org/