How The Bone Dental Implant Looks?
You stare at the X-ray on the screen. Your dentist points to a shape in the image, a ghostly form embedded in what used to be empty space. That is your dental implant, seen from an angle you have never considered. It looks different from what you imagined. Not like a tooth at all. More like a small machine part, a precisely engineered component now integrated into your living skeleton.
Understanding how a dental implant looks within the bone provides insight into how it works, why it is stable, and what your dentist evaluates when monitoring its health. This guide explores the visual appearance of dental implants in bone from every perspective: radiographic, clinical, and anatomical.
The Implant in Bone: A Visual Introduction
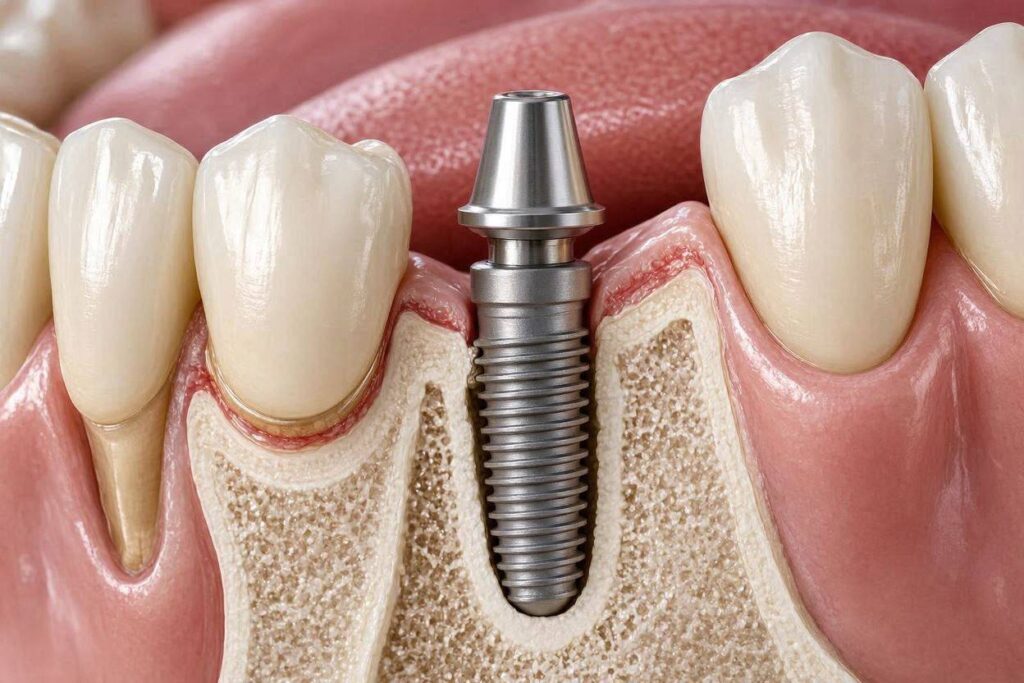
A dental implant in bone does not look like a natural tooth root, though it serves the same function. On an X-ray or CBCT scan, it appears as a precisely shaped, radiopaque (white) structure with distinct geometric features: threads, a defined apex, and an internal connection visible at the top.
The implant is surrounded by bone that, in health, should appear in direct contact with the implant surface with no dark gap or radiolucency between the bone and the implant. This direct bone-to-implant contact is the radiographic hallmark of successful osseointegration.
Radiographic Appearance: The Implant on X-Ray
For most patients, their only view of the implant in bone comes through radiographic imaging.
What the Patient Sees on X-Ray
A dental implant appears on X-ray as:
| Feature | Appearance |
|---|---|
| Overall shape | A tapered or cylindrical white (radiopaque) structure |
| Threads | Distinct, regularly spaced ridges along the implant body |
| Apex | Rounded or slightly pointed end deep in the bone |
| Internal connection | A darker area at the top where the abutment screw enters |
| Platform | A flat or slightly flared top at the bone crest level |
| Abutment (if present) | May be visible extending upward from the implant platform |
Bone Appearance Around a Healthy Implant
| Zone | Healthy Appearance |
|---|---|
| Implant-bone interface | Bone appears in direct contact with the implant surface; no dark gap |
| Crestal bone | Bone level at or slightly below the implant platform; stable over time |
| Surrounding bone | Normal trabecular pattern; no areas of increased or decreased density |
| Apical area | Normal bone; no radiolucency at the implant apex |
Bone Appearance Around a Failing Implant
| Zone | Concerning Appearance |
|---|---|
| Implant-bone interface | Dark radiolucent line surrounding the implant (failed osseointegration) |
| Crestal bone | Progressive bone loss over time; crater-shaped defect |
| Surrounding bone | Radiolucency indicating infection or bone destruction |
| Apical area | Dark area at the apex suggesting infection |
Three-Dimensional Appearance: CBCT Imaging
Cone beam computed tomography provides a three-dimensional view that reveals details not visible on two-dimensional X-rays.
What CBCT Shows
| Feature | Visible on CBCT |
|---|---|
| Buccal (cheek-side) bone thickness | Yes; not visible on standard X-rays |
| Lingual (tongue-side) bone thickness | Yes |
| Exact implant position in three dimensions | Yes |
| Relationship to adjacent teeth roots | Yes; clearly visible |
| Relationship to nerves and sinuses | Yes; precisely measurable |
| Bone density around the implant | Yes; can be assessed |
| Fenestrations or dehiscences | Yes; areas where bone is missing over the implant surface |
Cross-Sectional View
A cross-sectional CBCT slice shows the implant in relationship to the buccal and lingual bone plates. In health:
- The implant should be centered within the bone or slightly toward the lingual
- At least 1–2 millimeters of bone should be present on both the buccal and lingual sides
- The bone should extend to the implant platform level on all sides
Clinical Appearance During Surgery
The appearance of an implant being placed provides another perspective.
What the Surgeon Sees
During implant placement, the surgeon visualizes the bone directly:
| Stage | Visual Appearance |
|---|---|
| After osteotomy preparation | A precisely drilled hole in the bone; bleeding indicates healthy vascular supply |
| During implant insertion | The threaded implant being seated into the prepared site |
| After placement | The implant platform at or slightly below the bone crest |
| With cover screw | A smooth metal surface flush with or slightly below the bone |
| With healing abutment | The abutment extending through the gum |
Bone Quality Visual Assessment
Surgeons assess bone quality during surgery based on tactile feedback and visual appearance:
| Bone Type | Appearance and Tactile Feel |
|---|---|
| Type I (dense cortical) | Hard, ivory-like; minimal bleeding; dense white appearance |
| Type II (thick cortical, dense cancellous) | Firm cortical shell with good internal bone density |
| Type III (thin cortical, dense cancellous) | Softer cortical plate; adequate internal density |
| Type IV (thin cortical, sparse cancellous) | Soft bone; minimal resistance to drilling; sparse internal structure |
The Bone-Implant Interface at the Microscopic Level
While not visible to the naked eye, the microscopic appearance of the bone-implant interface explains how implants work.
Osseointegration at the Cellular Level
Under a microscope, the bone-implant interface shows:
- Direct bone contact: Bone cells and bone matrix in direct apposition to the titanium oxide surface
- No intervening soft tissue: In successful osseointegration, there is no layer of fibrous tissue between bone and implant
- Bone ingrowth into surface irregularities: Bone grows into the microscopic roughness created by surface treatments
- Ongoing remodeling: Evidence of bone turnover with osteoblasts and osteoclasts active at the interface
The Titanium Oxide Layer
The implant surface is not bare titanium. A layer of titanium dioxide forms naturally and is enhanced through manufacturing processes. This oxide layer:
- Is approximately 5–10 nanometers thick
- Is what bone cells actually attach to
- Provides corrosion resistance
- Contributes to biocompatibility
Healing Stages: How the Bone-Implant Appearance Changes
The appearance of the bone around an implant evolves during healing.
Immediately After Placement
| Feature | Appearance |
|---|---|
| Space between implant threads | Filled with blood clot |
| Bone edges | Sharp from drilling |
| Radiographic appearance | Implant clearly visible; bone margins distinct |
Early Healing (Weeks 1–4)
| Feature | Appearance |
|---|---|
| Blood clot | Replaced by granulation tissue, then woven bone |
| Bone edges | Begin to remodel; sharp edges smooth |
| Radiographic appearance | Implant remains clearly visible; slight loss of sharp bone margins |
Established Osseointegration (Months 3–6)
| Feature | Appearance |
|---|---|
| Implant-bone interface | Bone in direct contact with implant surface |
| Crestal bone | Stabilized at or near the implant platform |
| Radiographic appearance | No radiolucent gap; bone appears adapted to implant contours |
Long-Term Stable Implant (Years)
| Feature | Appearance |
|---|---|
| Crestal bone | Stable or with minimal remodeling (less than 0.2 mm per year after the first year) |
| Bone density | May increase around the implant due to functional loading |
| Trabecular pattern | May show orientation of bone trabeculae along lines of stress |
Variations by Implant Design
Different implant designs present different appearances in bone.
Tapered vs. Cylindrical Implants
| Design | Appearance in Bone |
|---|---|
| Tapered | Wider at the platform, narrowing toward the apex; mimics natural root form |
| Cylindrical | Relatively uniform width; parallel walls |
Thread Design Variations
| Thread Feature | Visual Appearance |
|---|---|
| Standard V-thread | Sharp, distinct thread pattern |
| Buttress thread | Threads angled to favor compressive loading; asymmetric appearance |
| Square thread | Broad, flat threads maximizing surface area |
| Microthreads | Fine threads near the implant neck; designed to preserve crestal bone |
| Self-tapping threads | Cutting flutes or notches visible at the apical portion |
Implant-Abutment Connection Designs
| Connection Type | Radiographic Appearance |
|---|---|
| External hex | Hexagon visible at the implant platform |
| Internal hex | Darker internal area with hexagonal shape |
| Conical (Morse taper) | Smooth internal taper; tight fit; minimal gap |
Bone Grafting and Implant Appearance
When bone grafting is performed, the radiographic appearance changes.
Grafted Bone Around Implants
| Graft Material | Radiographic Appearance |
|---|---|
| Autograft (patient’s own bone) | Similar density to native bone; may be indistinguishable once integrated |
| Allograft (donor bone) | Initially more radiolucent; gradually approaches native bone density |
| Xenograft (animal-derived) | Often remains slightly more radiopaque; particulate appearance |
| Alloplast (synthetic) | Variable; may remain distinctly visible indefinitely |
Sinus Lift Appearance
After a sinus lift with implant placement:
- The sinus floor appears elevated
- Graft material is visible between the sinus floor and the implants
- Implants extend through the graft into native bone or are entirely within the graft
- Over time, the graft matures and becomes more bone-like in appearance
Common Radiographic Observations and Their Meanings
Radiolucency Around the Implant Apex
A dark area at the tip of the implant may indicate:
- Incomplete osteotomy fill (benign, often resolves)
- Apical infection
- Failed osseointegration at the apex
- Normal healing if seen shortly after placement
Crestal Bone Loss
Some bone loss around the implant neck is expected in the first year (typically 0.5–1.5 mm). Progressive bone loss beyond this suggests:
- Peri-implantitis
- Overload
- Poorly fitting prosthesis
- Cement retention
Thread Exposure
If implant threads become visible radiographically due to bone loss, this indicates:
- Past or ongoing peri-implant disease
- Possibly a stable but compromised situation if bone loss has halted
- Need for evaluation and possible treatment
Patient Understanding: What to Ask About Your X-Ray
When your dentist shows you an X-ray of your implant, you can ask:
- Are the bone levels stable compared to previous images?
- Is there any radiolucency around the implant?
- How much crestal bone has been lost?
- Is the bone in contact with the implant surface?
- Are there any signs of peri-implantitis?
- How does my implant compare to a healthy implant on X-ray?
Conclusion
A dental implant in bone appears on X-ray as a radiopaque, precisely shaped structure with distinct threads, direct bone contact in health, and no intervening radiolucent gap. In three dimensions, it should be surrounded by adequate bone on all sides. At the microscopic level, successful osseointegration means living bone cells and bone matrix are in direct contact with the titanium oxide surface. The appearance evolves over time, from the immediate post-placement period with blood clot filling the thread spaces to mature osseointegration with stable crestal bone levels. Understanding what a healthy implant looks like in bone empowers patients to participate meaningfully in monitoring their implant health over the years.
Frequently Asked Questions
What does a healthy dental implant look like on X-ray?
A healthy implant appears as a white, threaded structure with bone in direct contact with its surface. There is no dark gap between the bone and the implant. The bone level at the neck of the implant is stable over time.
What does a failing implant look like on X-ray?
A failing implant shows a dark radiolucent line surrounding it, indicating the bone is not in contact with the implant surface. Progressive bone loss, crater-shaped defects around the implant neck, or dark areas at the apex suggest failure.
Can you see an implant on a regular dental X-ray?
Yes. Titanium and zirconia implants are radiopaque and appear clearly on periapical and panoramic X-rays. They are among the most visible structures on dental radiographs.
How does bone look around an implant compared to natural tooth?
Around a natural tooth, a thin dark line representing the periodontal ligament space is visible between the root and the surrounding bone. Around a healthy implant, no such space exists. Bone appears in direct contact with the implant surface.
Why does my implant have threads visible on X-ray?
The threads are a normal design feature of most dental implants. They increase surface area for bone contact and provide mechanical stability. Thread visibility on X-ray is normal and expected.
Additional Resources
- Academy of Osseointegration: www.osseo.org
- American Academy of Oral and Maxillofacial Radiology: www.aaomr.org
- International Team for Implantology: www.iti.org