Dental Implant Preparation
Deciding to get dental implants is a big step. You are not just fixing a tooth; you are investing in something that can last a lifetime. But before you sit in the dentist’s chair, a lot of work happens behind the scenes.
Preparation is everything.
Most people worry about the surgery itself. But the real secret to a successful implant does not start in the operating room. It starts with you, your health, and your plan. This guide walks you through every single thing you need to know. No confusing medical terms. No unrealistic promises. Just honest, practical advice to help you feel ready and confident.
What Does Dental Implant Preparation Really Mean?
Let’s clear something up right away. Dental implant preparation is not just “showing up on time.” It is a process. It usually takes several weeks or even months. That is normal. That is good.
Preparation means getting your body and your mouth ready to accept a tiny titanium post. Your bone needs to be strong enough. Your gums need to be healthy. Your overall health needs to be stable. Your dentist cannot skip these steps. And neither should you.
Think of it like building a house. You would never pour concrete on soft, wet soil. You would prepare the ground first. The same rule applies here.
“Implant preparation is about creating the right biological environment. Rushing this phase is the leading cause of long-term failure.” — Dr. Elena Marchese, prosthodontist.
Why Proper Preparation Is Non‑Negotiable
You might feel eager to get your new tooth as fast as possible. That is understandable. But skipping preparation leads to real problems.
Here is what can happen if you rush:
- Implant failure: The bone rejects the post.
- Infection: Bacteria find a home around a healing implant.
- Nerve damage: Poor planning leads to numbness in your lip or chin.
- Sinus issues: Upper implants can push into your sinus cavity.
- Wasted money: You pay twice for the same tooth.
Proper preparation flips those risks. It helps ensure:
- A stable, long-lasting implant.
- Faster healing after surgery.
- Lower chance of infection.
- Better cosmetic results.
- Less pain overall.
In short: slow is smooth, and smooth is fast.
The Step‑by‑Step Preparation Timeline
No two patients are exactly the same. But most people follow a similar path. Below is a realistic timeline from your first phone call to the day of surgery.
| Step | What Happens | Typical Duration |
|---|---|---|
| 1. Initial consultation | Exam, X-rays, discussion of goals | 1 hour |
| 2. Health evaluation | Blood tests, medical history review | 1–2 weeks |
| 3. Imaging & planning | CBCT scan, digital mapping | 1 hour |
| 4. Preparatory work (if needed) | Bone graft, sinus lift, extractions | 3–12 months |
| 5. Final surgery date set | Review consent, payment, schedule | 1 week before |
| 6. Day‑before checklist | Medications, food, transport | 24 hours |
Notice the gap in step four. That is where most of the waiting happens. And that is okay. Your body needs that time to heal before you place an implant.
Step 1: The Initial Consultation – What to Expect
Your first visit is mostly conversation and scanning. The dentist wants to know three things:
- Is this right for you?
- What is the current state of your bone and gums?
- Are there any red flags?
Bring the following with you:
- A list of all medications (including over‑the‑counter drugs and supplements).
- Any recent blood work or hospital discharge papers.
- Your insurance card (if applicable).
- A notebook and pen. You will get a lot of information.
During this visit, the dentist will:
- Look inside your mouth.
- Take small X-rays (panoramic or periapical).
- Ask about your smoking, alcohol, and coffee habits.
- Discuss costs and payment plans.
Do not be shy. Ask your own questions. Here are some good ones:
- “How many implants of this type have you placed?”
- “What happens if the implant fails?”
- “Will I need a bone graft?”
- “How much pain should I expect?”
A good dentist will answer clearly. If you feel rushed, consider a second opinion.
Step 2: Medical and Dental Health Evaluation
Before any surgery, you need a green light from your body.
General Health Factors
Some conditions require special attention. You can still have implants. But your preparation will look different.
| Condition | Impact on Implants | Extra Preparation Needed |
|---|---|---|
| Diabetes (uncontrolled) | Slower healing, higher infection risk | Stabilize blood sugar first |
| Osteoporosis | Weak bone; medication may interfere | Consult your rheumatologist |
| High blood pressure | Bleeding risk | Medication adjustment |
| Autoimmune disease | Rejection risk | Pre‑op antibiotics |
| Smoker (1+ pack/day) | Reduced blood flow to gums | Quit 2 weeks before and after |
Note: Do not stop any prescribed medication without your doctor’s approval. Some drugs (like blood thinners) need careful management, not sudden stops.
Oral Health Checklist
Your mouth must be free of active infection. This means:
- No untreated cavities.
- No gum disease (gingivitis or periodontitis).
- No abscesses.
- No loose teeth next to the implant site.
If you have gum disease, you will need a deep cleaning (scaling and root planing). That adds 4–6 weeks to your timeline. Do not skip it. Placing an implant into infected gums is like planting a tree in mud. It will fall.
Step 3: Advanced Imaging and Digital Planning
Basic X-rays are not enough for modern implants. Your dentist will likely order a CBCT scan (Cone Beam Computed Tomography). Do not worry. It sounds scary, but it is simple.
You sit still for about 60 seconds while a machine rotates around your head. The radiation is low. The result is a 3D model of your jaw, nerves, sinuses, and teeth.
Why is this so important?
- It shows exactly how much bone you have (height, width, density).
- It locates the inferior alveolar nerve (damage this, and you lose feeling in your lip).
- It reveals your sinus floor position.
- It helps the dentist choose the right implant size.
Some clinics use special software to create a surgical guide. This is a 3D‑printed plastic tool that fits over your teeth. It tells the dentist exactly where to drill. No guessing. No freehand errors.
If your dentist offers a surgical guide, say yes. It costs extra (usually $200–500), but it dramatically improves accuracy.
Step 4: Common Preparatory Procedures (The Waiting Period)
Here is where many patients feel impatient. You come in for an implant, but the dentist says: “You need a bone graft first.”
Do not panic. This is extremely common. About 50% of implant patients need some form of grafting.
Bone Grafting
When you lose a tooth, the bone that once held it shrinks (atrophies). You lose width first, then height. If too much bone is gone, there is nothing to hold the implant.
A bone graft rebuilds that foundation. The dentist places grafting material (from a donor, cow, synthetic source, or your own body) into the empty socket or defect. Then you wait. Usually 4 to 9 months. During that time, your body replaces the graft with living bone.
What it feels like: Similar to a tooth extraction. Some swelling. Minor discomfort for a few days.
Success rate: Over 90% for small to medium defects.
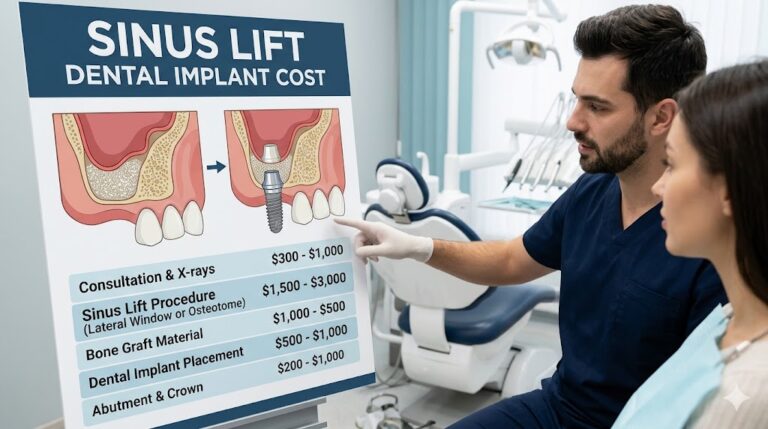
Sinus Lift (for upper back teeth)
Your upper molars sit just below your maxillary sinuses (air‑filled spaces in your cheekbones). When those teeth are lost, the sinus can expand downward, leaving almost no bone.
A sinus lift adds bone between your sinus membrane and your jaw. The surgeon lifts the membrane and places graft material underneath. Again, you wait several months for healing.
Important: Do not blow your nose for at least two weeks after a sinus lift. The pressure can push the graft material out.
Extractions
If your damaged tooth is still in place, it must come out. Some dentists will extract and place the implant on the same day (immediate implant). This is convenient, but not always ideal.
Same‑day implants work best when:
- No active infection is present.
- The bone socket is intact.
- You do not grind your teeth.
If any of those are false, a delayed approach (extract, wait 3–6 months, then implant) is safer.
Periodontal Treatment
Active gum disease is a deal‑breaker. You need healthy gums first. Treatment may include:
- Deep cleaning (scaling and root planing).
- Antibiotic gels or pills.
- Laser gum therapy.
- In severe cases, gum surgery.
Tip: Ask your dentist to measure your “pocket depths” (the space between tooth and gum). Healthy pockets are 1–3 mm. If you have 5 mm or more, you are not ready for an implant yet.
Step 5: Financial and Insurance Preparation
Let’s be real. Dental implants cost real money. A single implant (including the crown) ranges from 3,000to3,000to6,000 in the United States. Full‑mouth implants can reach 30,000–50,000.
Here is what you can do ahead of time to avoid surprises.
Before Your Surgery
- Call your insurance. Ask: “Do I have a missing tooth clause?” Some plans do not cover teeth that were missing before the policy started.
- Get a written treatment plan. It should list every procedure: consultation, CBCT, extraction, graft, implant placement, abutment, crown. And every cost.
- Ask about payment plans. Many clinics work with CareCredit, LendingClub, or in‑house financing.
- Check for dental schools. They offer implants at 40–60% less. A licensed faculty supervises every step.
Hidden Costs to Budget For
- Temporary tooth (flipper or Essix retainer): $200–500.
- Pain medication (prescription): $10–50.
- Antibiotics: $10–30.
- Post‑op check‑ups: usually included, but confirm.
- CT scan: $200–400 (sometimes separate from implant fee).
Note: Never choose an implant based only on price. The cheapest option is not the best. You want a dentist who takes their time and uses quality parts.
Step 6: Preparing Your Home for Recovery
Most people focus on the surgery day. But the days after matter just as much. A little home preparation goes a long way.
One Week Before Surgery
- Stock your fridge with soft foods: Yogurt, apple sauce, pudding, smoothie ingredients, protein shakes, mashed potatoes, soup (not too hot).
- Buy an extra pillow: You will sleep with your head elevated for the first 3–4 nights (reduces swelling).
- Prepare ice packs: Two gel packs are better than one, so you can rotate them.
- Fill prescriptions early: Do not wait until after surgery when you are in pain.
Two Days Before Surgery
- Clean your house. You will not feel like vacuuming or doing laundry for a couple of days.
- Arrange a ride. If you receive IV sedation (common for implants), you cannot drive for 24 hours.
- Wash your bedsheets. Fresh sheets feel surprisingly good when you are recovering.
- Download movies or podcasts. You will want to rest quietly.
The Night Before
- Eat a normal dinner. Do not fast unless your dentist told you to.
- Brush and floss carefully. A clean mouth lowers infection risk.
- Lay out your clothes for the next day. Loose, comfortable, with a front‑zipping jacket (nothing that goes over your head).
- Set two alarms. You do not want to rush.
Step 7: Medications and Supplements – What to Adjust
This section is critical. Some common pills are bad news for implant surgery.
Stop (with doctor’s approval)
| Medication Type | Examples | Stop Before Surgery |
|---|---|---|
| Blood thinners | Aspirin, Warfarin, Plavix, Eliquis | 5–7 days |
| NSAIDs | Ibuprofen (Advil), Naproxen (Aleve) | 48 hours |
| Certain supplements | Vitamin E, Fish oil, Ginkgo, Garlic | 7 days |
| Herbal teas (some) | Green tea, chamomile (thins blood) | 48 hours |
Do not stop prescription blood thinners without your cardiologist saying it is safe. Sometimes your dentist will work around them.
Keep Taking (or Start)
- Tylenol (acetaminophen): Safe for pain before surgery.
- Probiotics: May reduce post‑op infection risk.
- Vitamin C: Supports gum healing (but stop high doses 3 days before).
- Prescribed antibiotics: If your dentist gives you a pre‑op dose, take it exactly on time.
“The single biggest mistake I see is patients not telling me about their supplements. Just because it’s natural does not mean it’s safe before surgery. Garlic and fish oil both increase bleeding.” — Dr. James Liu, oral surgeon.
Write down everything you take. Hand the list to your dentist at the final pre‑op visit.
Step 8: What to Eat and Drink Before Surgery
You want to go into surgery strong. Not hungry. Not dehydrated.
24 Hours Before
- Eat normal, balanced meals. Include protein (eggs, chicken, beans). Protein helps your body heal.
- Drink plenty of water. Being hydrated makes your veins easier to find for the IV.
- Avoid alcohol completely. It thins your blood and dehydrates you.
- Avoid caffeine after noon if you are nervous. It can raise your heart rate.
The Morning of Surgery (if no sedation)
If you are having only local anesthetic (numbing shots, no IV), you can eat a light breakfast 2 hours before.
Good options:
- A banana.
- One piece of toast.
- A small yogurt.
- Half a protein shake.
Bad options:
- Anything greasy or spicy.
- A large meal.
- Smoothies with seeds (strawberry, raspberry) – seeds can get stuck in the surgical site.
If You Are Having IV Sedation
Your dentist will tell you: Nothing to eat or drink after midnight (or at least 6 hours before). This includes water, gum, and mints. An empty stomach prevents vomiting while you are sedated. Vomiting with anesthesia is dangerous.
Note: If you accidentally eat or drink, be honest. They will reschedule. It is not worth the risk.
Step 9: Mental and Emotional Preparation
Let’s talk about fear. It is normal to feel nervous before implant surgery. Your mouth is personal. The sounds of drilling can be unsettling. And you have probably heard horror stories from a friend of a friend.
Here is the truth: Modern implant surgery, with proper preparation, is very predictable. The pain is usually less than a tooth extraction. Most patients say: “That was it?”
Tips to Calm Your Nerves
- Ask for headphones. Bring your own playlist or audiobook. Many clinics allow you to listen during local anesthetic cases.
- Discuss sedation options. Nitrous oxide (laughing gas) helps you relax but wears off fast. Oral sedatives (like Halcion) make you drowsy. IV sedation means you remember almost nothing.
- Bring a support person. Someone in the waiting room can be reassuring.
- Practice deep breathing. In for 4 seconds, hold for 4, out for 6. It physically lowers your heart rate.
- Remind yourself why you started. You are doing this to eat normally, smile confidently, and protect your jawbone.
If you have dental phobia (extreme anxiety), look for a dentist who offers “sleep dentistry” or “anxiety‑free sedation.” They are trained to work with fearful patients.
Step 10: What Your Dentist Does to Prepare
You are doing your part. Your dentist is busy too. A responsible implant provider will complete this checklist before you arrive:
- Review your CBCT scan and mark vital structures (nerve, sinus).
- Design the surgical guide (if used).
- Sterilize all implant instruments.
- Confirm the implant brand and size are in stock.
- Prepare a backup implant (different size) in case the bone is different than expected.
- Test the surgical handpiece and drill speeds.
- Review your medical history one last time.
- Confirm your ride is waiting.
Do not hesitate to ask: “Is everything ready on your end?” A confident team will say yes and explain what they have done.
The Day Before Your Surgery – Final Checklist
This is your go‑to list. Print it out or save it on your phone.
Medical
- Stop ibuprofen (Advil, Motrin) – last dose was 48 hours ago.
- Stop supplements (vitamin E, fish oil, garlic, ginkgo).
- Take any pre‑op antibiotics as prescribed.
- Confirm your ride for tomorrow.
Home
- Ice packs are in the freezer.
- Soft foods are ready.
- Pillow for head elevation is set up.
- Prescriptions are filled and at home.
- Phone charger is next to your bed.
Personal
- Shower and wash your hair (you will not feel like it tomorrow).
- Brush and floss thoroughly.
- Wear loose, short‑sleeved clothing (easy for BP cuff and IV).
- Remove nail polish from two fingers (for oxygen monitor).
- Leave jewelry and contact lenses at home.
Logistics
- Clinic address and phone number saved.
- Parking or drop‑off plan ready.
- Emergency contact written down.
What to Bring on Surgery Day
Pack a small bag the night before. Do not trust your sleepy morning brain.
- Your ID and insurance card.
- A form of payment for any remaining balance.
- Your glasses (if you wear contacts – leave contacts at home).
- Lip balm – your lips will get dry.
- Headphones and your phone.
- A small towel (some patients drool after sedation – it is normal).
- A list of emergency contacts.
- A button‑up shirt or jacket. Nothing that pulls over your head.
Do not bring:
- Valuables or large amounts of cash.
- Your own music speaker (use headphones).
- Perfume or cologne (others may have allergies).
- Children (unless someone else watches them in the waiting room).
A Realistic Look at the Risks (Even With Good Prep)
No surgery is risk‑free. You deserve honesty.
Even with perfect preparation, these complications can happen:
- Bleeding: Some oozing is normal. Heavy bleeding is rare (1–2%).
- Infection: About 1–2% of implants get infected early on. Antibiotics usually fix it.
- Nerve injury: Temporary numbness occurs in less than 1% of lower jaw implants. Permanent numbness is extremely rare (0.1%) with CBCT planning.
- Implant failure to integrate: The bone never grabs the implant. This happens in about 3–5% of healthy patients. It is higher for smokers (up to 15%).
- Sinus perforation: For upper implants, about 4%. Usually heals on its own or with a small patch.
If an implant fails, do not panic. You usually can try again after the bone heals (another 3–6 months). Many failed second attempts succeed.
Special Situations – Extra Preparation Needed
If You Are a Smoker
I will not lecture you. But you need the facts. Smoking restricts blood vessels. Your gums get less oxygen, so healing is slower and weaker.
Your modified preparation:
- Stop smoking 2 weeks before surgery (ideally longer).
- Do not smoke for 2 weeks after (critical for bone healing).
- Consider nicotine patches if withdrawal is too hard.
- Expect a longer healing time (add 2–3 months before the crown).
If You Have Diabetes
Stable blood sugar is your goal.
- Get your A1c tested. Below 7.0 is good. Below 6.5 is ideal.
- Eat a normal meal before surgery (do not skip unless told).
- Bring your glucose meter and a fast‑acting sugar source (juice box) to the clinic.
- Tell the dentist immediately if you feel shaky or dizzy.
If You Take Bisphosphonates (Bone Drugs)
Drugs like Fosamax, Actonel, or Boniva for osteoporosis or cancer increase the risk of osteonecrosis (jawbone death). This is serious.
- Your dentist will likely ask you to see the prescribing doctor.
- For osteoporosis (low risk) – you may still get implants after a drug holiday (stopping for 3–6 months).
- For cancer‑dose bisphosphonates (high risk) – implants are usually avoided.
Do not hide this. It could save your jaw.
Frequently Asked Questions (FAQ)
1. How painful is dental implant surgery?
Most patients rate it 2–4 out of 10 during the procedure (you are numb). After the numbing wears off, you feel soreness similar to a tooth extraction. Over‑the‑counter Tylenol usually handles it.
2. Can I get implants if I have gum disease?
Not directly. You must treat the gum disease first. Then you wait for your gums to heal and become stable (usually 4–8 weeks). After that, you can proceed with implants.
3. How long does the whole process take from start to finish?
Simple cases (no graft, good bone): 4–6 months from consultation to final crown. Complex cases (bone graft, sinus lift): 9–12 months. Full mouth implants: sometimes over a year.
4. Do I need to take time off work?
Plan for 1–3 days off after surgery (more if your job is physically demanding or requires a lot of talking). You can return to desk work sooner. Wait one week before heavy lifting or intense exercise.
5. Will I have a missing tooth during the healing phase?
Not necessarily. Your dentist can give you a temporary solution: a flipper (removable fake tooth), a bridge, or a temporary crown screwed into the implant after it heals. Ask about this during preparation.
6. What happens if I sneeze or cough during surgery?
You will be numb, so you will not feel pain. If you feel a sneeze coming, tell the dentist. They will stop drilling and let you turn your head. No harm done.
7. Can I eat normally the day before surgery?
Yes. Eat a normal dinner. Hydrate. Avoid alcohol. If you are having IV sedation, follow the fasting rules (usually nothing after midnight).
8. What is the success rate of dental implants?
Over 95% for single implants in healthy non‑smokers. Lower jaw has slightly higher success than upper jaw. Proper preparation pushes you toward the top of that range.
Additional Resource – Where to Learn More
For verified, dentist‑reviewed information about implant types, long‑term maintenance, and finding a specialist in your area, visit the American Academy of Implant Dentistry (AAID) public education page.
👉 Link: https://www.aaid.com/Public/index.html (opens in new window)
This resource includes a “Find a Dentist” tool that lets you search specifically for AAID‑credentialed implant providers. Credentialing means extra training beyond dental school.
A Final Note Before You Go
This guide focuses on preparation. But remember: you and your dentist are partners. Speak up if something feels off. Ask for clarification. Bring a friend to appointments if that helps you remember information.
No question is silly. No concern is too small.
And if you are still nervous? That is okay. Nerves show that you care about the outcome. Use that energy to prepare thoroughly. Follow the checklists. Be honest about your health. Take it one step at a time.
You have done harder things. You can do this.
Conclusion
Preparing for a dental implant involves more than just showing up for surgery. You need to optimize your health, plan your home recovery, understand your finances, and communicate openly with your dental team. Proper preparation takes time, but it directly lowers your risk of infection, nerve injury, and implant failure. Follow this realistic guide, and you will walk into your surgery with confidence and walk out with a foundation that can last a lifetime.
Disclaimer:
This article is for general informational purposes only and does not constitute medical or dental advice. Every patient is different. Always consult with a licensed dentist or oral surgeon for a complete evaluation and treatment plan tailored to your specific health needs. Do not ignore or delay seeking professional advice based on what you read here. The author and publisher are not responsible for any outcomes resulting from the use of this information.