How Long After Implant Post Placement Can the Tooth Be Applied?
You have successfully navigated the surgery. The dental implant post is in your jawbone. The stitches have dissolved or been removed. Your mouth feels like it is healing well. Now comes the hardest part for many patients: the wait. The question echoes in your mind at every meal and every glance in the mirror: “When do I finally get my tooth?” The timeline from implant post placement to the delivery of your final, functional crown is not arbitrary. It is dictated by the biology of osseointegration—the direct fusion of bone to the implant surface—and the mechanical requirements of a long-lasting restoration. This article provides a definitive guide to the waiting period, the different loading protocols your dentist may use, and the critical factors that determine whether you get your tooth in a day, a few months, or somewhere in between.
The Central Principle: Loading the Implant
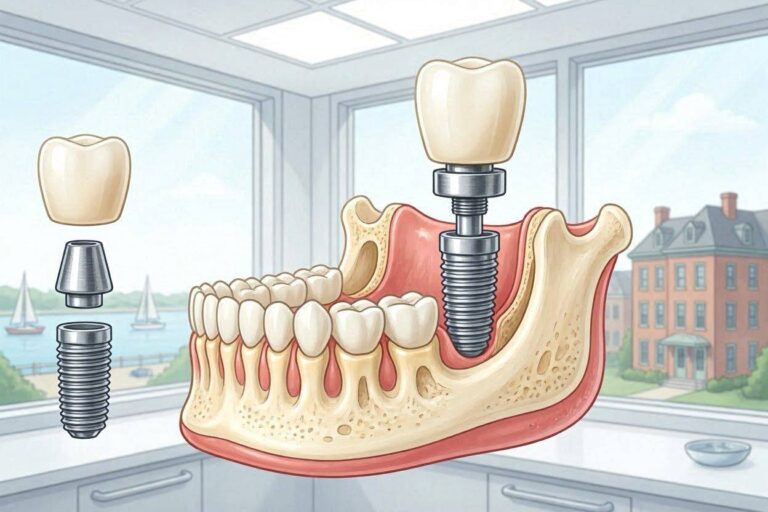
In dental terminology, applying the tooth to the implant post is called “loading.” When you chew, significant forces—measured in hundreds of pounds per square inch—are transmitted through the crown, down the abutment and implant post, and into the surrounding jawbone. The bone must be ready to receive these forces. If the bone-implant interface is immature and woven, loading it prematurely causes micro-movements. These micro-movements, as small as 50-150 microns, can disrupt the delicate osteoblasts. The body then interprets this as an unstable structure and, in a biological decision, encapsulates the implant in fibrous scar tissue instead of fusing bone to it. This is a failure. The timing of tooth application, therefore, is a strategic decision to avoid this outcome while meeting the patient’s functional and aesthetic needs.
What the Research Shows
Decades of clinical studies and systematic reviews have established clear parameters. For conventional loading in standard bone, allowing an undisturbed healing period of 3 to 6 months produces a very high survival rate, consistently over 95%. The precise timing has been shortened significantly with advances in implant surface technology, but the underlying principle remains: the final tooth is only applied after the dentist has objective confirmation of osseointegration—zero mobility, a clear ringing sound on percussion, and a radiograph showing bone intimately contacting the implant surface with no radiolucent line.
The Three Loading Protocols Explained
Modern implant dentistry categorizes the time to tooth application into three distinct protocols. Your dentist selects the appropriate one based on your bone quality, the primary stability of the implant, your systemic health, and the aesthetic demands of the case.
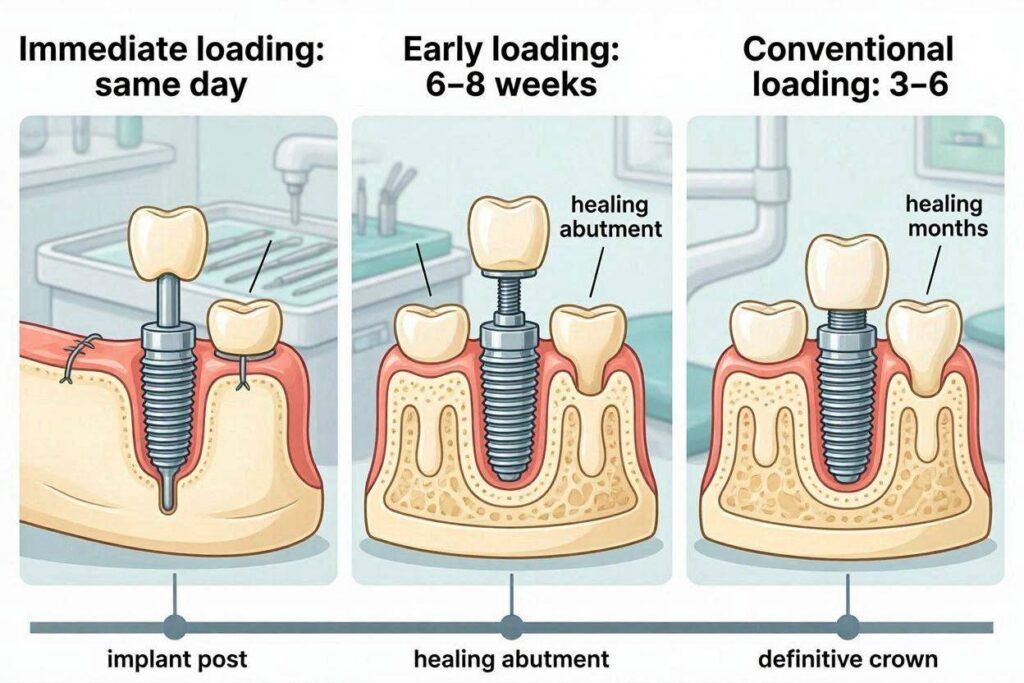
1. Conventional or Delayed Loading (3 to 6 Months)
This is the traditional, most predictable protocol and remains the gold standard, especially for complex or compromised cases. The implant post is placed and buried under the gum tissue (two-stage approach) or left with a healing cap (one-stage approach). It is then left completely undisturbed, with no tooth attached, for a defined healing period. For the lower jaw (mandible), this is typically 3 to 4 months. For the upper jaw (maxilla), it is 4 to 6 months. The reason for the difference is bone density. The posterior maxilla often has thin, spongy, type IV bone, which heals slower and requires a longer period to develop the secondary stability from osseointegration while the initial mechanical stability wanes. After this healing period, the dentist uncovers the implant (if submerged), confirms integration, takes an impression, and the lab fabricates the final crown. This adds about 2 to 4 weeks. So from surgery day to final tooth, a patient on a conventional loading protocol waits approximately 4 to 7 months.
2. Early Loading (6 to 8 Weeks)
Early loading is a middle ground. The implant is placed, and a healing period of 6 to 8 weeks is allowed before the tooth is attached. This protocol became more predictable with the advent of moderately rough, hydrophilic implant surfaces that accelerate the bone healing cascade. It is typically reserved for cases with good primary stability, dense bone, and a low occlusal load. The implant is not loaded immediately, but the waiting time is roughly halved. At the 6-8 week mark, the dentist measures the implant stability, often using Resonance Frequency Analysis (RFA) to obtain an ISQ value. If the ISQ is above 68-70 and other clinical signs are positive, the implant is considered ready for early loading. This protocol is a compromise that offers a faster total treatment time without the higher risk profile of immediate loading.
3. Immediate Loading (Within 1 Week, Often Same Day)
Immediate loading is the “teeth in a day” concept. A temporary or, less commonly, a final crown is attached to the implant post within one week of surgery, often on the same day. This is an advanced protocol with strict prerequisites. It is not suitable for all cases. The most famous application is the All-on-4 treatment, where four implants are placed in a fully edentulous jaw, and a full-arch fixed bridge is screwed onto them on the same day. For a single tooth, immediate loading requires the implant to achieve a very high insertion torque, typically greater than 35-45 Ncm, indicating excellent primary stability. The bone must be dense and healthy. The temporary tooth must be meticulously designed to be completely out of functional occlusion—meaning it should not touch the opposing teeth in any jaw position during chewing. It is for aesthetics and soft tissue shaping, not for function. The patient must commit to a very soft diet and must not bite into the temporary. This protocol provides instant aesthetic gratification and shapes the gum beautifully, but it carries a slightly elevated risk of failure if the strict protocols are not followed.
Comparative Table of Loading Protocols
| Protocol | Time to Tooth | Best For | Prerequisites | Risk Level |
|---|---|---|---|---|
| Conventional (Delayed) | 3-6 months | Most cases, especially compromised bone, posterior maxilla | Standard healing | Lowest risk |
| Early Loading | 6-8 weeks | Dense bone, single anterior implants with good stability | ISQ > 68, good primary stability | Low risk |
| Immediate Loading | Same day to 1 week | Full-arch All-on-4, highly aesthetic single front teeth, fully guided surgery | Insertion torque >35 Ncm, cross-arch stabilization, strict non-functional occlusion | Elevated risk |
The Bone Graft Factor: Extending the Timeline
A significant number of implant cases require bone grafting. This fundamentally resets the timeline. A graft is a scaffold of bone particles, either from the patient, a donor, or a synthetic source. It must be revascularized and replaced by the patient’s own living bone before an implant can be placed. The waiting period after a major bone graft, such as a ridge augmentation or a sinus lift, is 4 to 9 months before the implant surgery can even be scheduled. Then, the post-placement osseointegration period of 3-6 months applies. In a severely resorbed jaw requiring a large block graft and then implant placement, the total time from initial surgery to final tooth could be over a year. This is the reality of biological timelines. A graft cannot be rushed. A dentist who places an implant simultaneously with a graft—which is possible in minor defects—still needs to wait for both the graft and the implant to integrate, which often necessitates the longer end of the healing spectrum.
Soft Tissue Grafting Timeline
If a soft tissue graft is performed to thicken the gum or increase the band of keratinized tissue, this also needs healing time. A connective tissue graft typically needs 8 to 12 weeks to mature and stabilize before the final impression is taken. If soft tissue grafting is done after implant placement, at the uncovering stage, it adds about 2-3 months to the prosthetic phase.
The Prosthetic Phase: After Integration Is Confirmed
The waiting period is not over the moment the bone fuses. Once osseointegration is confirmed via the methods described in a previous article (clinical percussion, mobility test, radiograph, and often an RFA reading), the prosthetic phase begins. This series of appointments typically spans 3 to 6 weeks and is independent of the biologic healing time.
Step-by-Step Prosthetic Workflow
- Appointment 1: Impression Taking (1-2 hours). The healing cap is removed. An impression coping is attached to the implant. A digital intraoral scan or a traditional physical impression using polyvinyl siloxane material is taken. A shade is chosen for the crown. The healing cap is replaced. This appointment yields a master cast from which the lab will work.
- Laboratory Phase (2-3 weeks). The dental laboratory technician fabricates the custom abutment and the final crown. For a screw-retained crown, the abutment and crown are often fused or designed to be cemented extra-orally. For a stock abutment, the lab selects a pre-made titanium or zirconia abutment and customizes it.
- Appointment 2: Try-In and Delivery (30-60 minutes). The final abutment is torqued down to the manufacturer’s specification, usually 30-35 Ncm. The crown is tried in. The contacts with the adjacent teeth are checked with floss. The occlusion is meticulously adjusted using articulating paper, ensuring that in maximum intercuspation and all excursive movements, the implant crown does not carry heavy or premature contact. The crown is then cemented (if a cement-retained design) or the screw access hole is sealed with PTFE tape and composite (if screw-retained).
Thus, even after the bone is ready, the dental team needs close to a month to fabricate and deliver a precision, custom restoration.
Immediate Provisionalization: The Aesthetic Bridge
For a front tooth, waiting 3-6 months with a visible gap is not acceptable for most patients. This is where an immediate fixed provisional restoration comes in. This is not immediate loading, but immediate temporization. At the time of surgery, a custom-fabricated temporary crown is attached to the implant or, more commonly, to the adjacent teeth with a small bonding point. This is a “Maryland bridge-style” temporary, or a suck-down Essix retainer with a denture tooth. If attached to the implant, it must be completely non-functional. This temporary fills the space beautifully. It shapes and holds the gum papillae. It provides a psychological bridge for the patient while the bone heals silently below. At the uncover appointment, the temporary is removed, and the final crown workflow begins.
What Happens If You Rush the Process?
The consequences of loading an implant too early are mechanical and biological. Mechanically, the immature woven bone interface fractures. Biologically, this micro-motion triggers a fibroblastic response. The implant becomes encased in a soft tissue capsule. The clinical sign is a mobile, often painful or tender implant. The X-ray reveals a continuous radiolucent line around the entire implant. There is no rescue for a mobile, fibrous-encapsulated implant. It must be surgically removed. After site healing and analysis of the failure, a new implant can be attempted, restarting the entire timeline. The cost, time, and emotional toll of a failed implant far outweigh the inconvenience of waiting the prescribed time.
The Exception of Primary Stability Loss
Sometimes, an implant loses primary stability not due to early loading but because the bone overheated during drilling, causing necrosis. In this scenario, the implant is never stable, even at surgery. This is a failed primary stability case, and the implant should have been recognized as such and not placed, or placed with a different protocol. A low insertion torque implant (below 20 Ncm) is often recommended for a longer, submerged healing period, as the risk of failure is higher if loaded early.
Technological Aids in Shortening the Timeline
Technology has made early loading safer and more predictable. The key tool is Resonance Frequency Analysis, providing an objective ISQ value. A clinician can track an implant’s stability trajectory. If an implant starts with an ISQ of 60 at placement, drops to 55 at week 3, and then climbs back to 72 at week 6, the trend is a reliable indicator of progressing osseointegration and readiness for loading. This “ISQ trend” is more powerful than a single reading. Another technology is the use of recombinant human platelet-derived growth factor (rhPDGF) or bone morphogenetic proteins to accelerate bone formation, though these are primarily used in grafting, not routine implant sites. Advanced digital planning with a surgical guide also allows for prosthetically-driven implant placement with ideal primary stability, enabling a shift toward shorter protocols.
Important Note: Be very wary of any clinic that promises “definitive same-day teeth” for every case without rigorous diagnostic workup. Same-day protocols are a marketing tool, but they are a medical procedure with specific, narrow indications. A responsible clinician will evaluate your unique anatomy and, if immediate loading is too risky, will recommend a delayed protocol to protect your long-term outcome. A short-term cosmetic gain is never worth the loss of an implant.
Conclusion
The timeline from dental implant post placement to final tooth application ranges from same-day immediate loading in highly selected cases, to the conventional standard of 3 to 6 months of healing followed by a few weeks of prosthetic fabrication. Bone grafting can extend the total treatment time to over a year. The chosen protocol balances the biological requirement for solid osseointegration, confirmed by diagnostic tests, against the patient’s aesthetic and functional desires to achieve a durable, lifelong restoration.
FAQ
1. Can I have a temporary denture (flipper) during the healing months?
Yes, a removable temporary partial denture, often called a flipper, can be made. It replaces the missing tooth and rests on the gums. It must be designed with extreme care so that it applies absolutely no pressure on the healing implant site underneath. You must remove it at night.
2. What if I need to chew on that side before the tooth is placed?
You must not chew directly on the healing implant or healing cap. The forces will transmit directly to the implant-bone interface and can cause failure. You must modify your diet and chew exclusively on the opposite side until the final restoration is delivered and cleared for normal function.
3. Does the final crown placement hurt?
No, placing the final abutment and crown does not require any local anesthetic. The implant has no nerve supply in the pulp like a natural tooth, and the soft tissue around a healed, healthy implant is not cut or sutured. It is a completely painless, non-invasive appointment.
Additional Resource
For more details on the science of implant loading protocols, visit the Academy of Osseointegration: https://osseo.org/