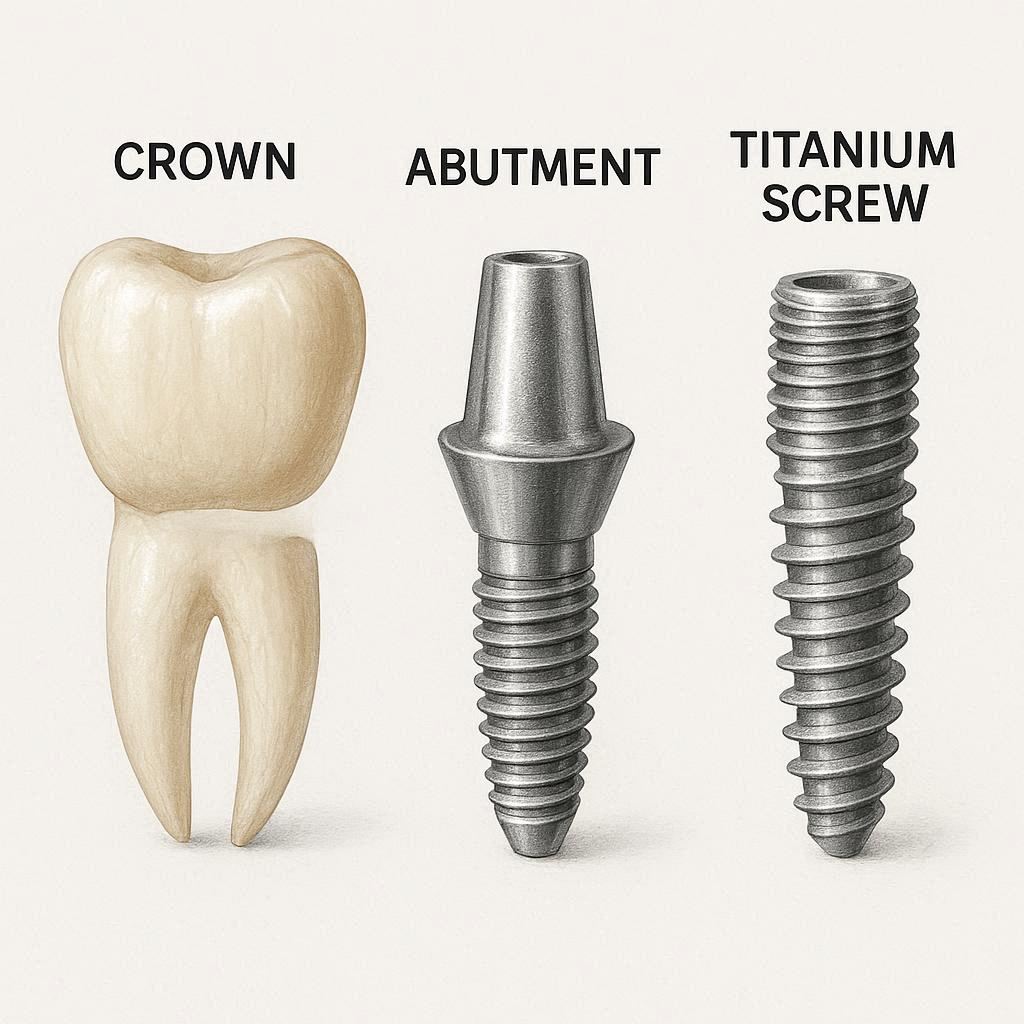
Parts of a Dental Implant: A Complete Guide to Each Component
If you are missing a tooth, you have probably heard about dental implants. They are the gold standard for tooth replacement. But when you start researching, you hear words like “abutment,” “fixture,” and “crown.” It can feel a little confusing at first.
Here is the good news: a dental implant is actually a simple device made of only a few key pieces. Once you understand the basic parts, the whole process makes much more sense.
In this guide, we will walk through every single part of a dental implant. We will explain what each piece does, what materials it is made from, and why it matters for your smile. No fluff. No confusing jargon. Just clear, honest information you can trust.
What Is a Dental Implant? A Simple Overview
A dental implant is a man-made replacement for a natural tooth root. Surgeons place it into your jawbone. Over time, the bone grows around it. This creates a rock-solid foundation.
But the implant itself is not the visible tooth. It is the part under the gumline. To get a full, working tooth, you need all the components working together.
Think of it like building a house. You need a foundation (the implant), the connector walls (the abutment), and the roof (the crown). Each part has its own job. Together, they create something strong and natural-looking.
Reader Note: A full dental implant is actually three main pieces. Some sources count the connecting screw as a fourth part. We will cover both views here so you get the complete picture.
The 5 Main Parts of a Dental Implant
Most dental implants consist of five distinct components. Some of these are always present. Others depend on your specific case.
Let us list them first, then dive deep into each one.
- The Implant Fixture (The Root)
- The Abutment (The Connector)
- The Prosthetic Crown (The Visible Tooth)
- The Abutment Screw (The Tiny but Mighty Fastener)
- The Healing Cap or Healing Abutment (The Protector)
Below, we break down each part in detail. We will also look at optional components like the cover screw and transfer coping.
1. The Implant Fixture (The Root)
This is the part everyone means when they say “dental implant.” The fixture is a small, screw-shaped post made almost always of medical-grade titanium or zirconia.
A surgeon places this post directly into your jawbone. It replaces the natural root of your missing tooth.
What Does the Fixture Do?
The fixture has one main job: hold tight. It must fuse with your bone. This process is called osseointegration.
Osseointegration sounds complex, but it is a beautiful natural process. Your bone cells grow right onto the surface of the titanium post. They do not see it as a foreign object. Instead, they accept it like a natural part of your body.
A successful fixture can last for decades. In many cases, for life.
Material Choices: Titanium vs. Zirconia
| Feature | Titanium Implant | Zirconia Implant |
|---|---|---|
| Appearance | Dark metal (may show through thin gums) | White/Tooth-colored |
| Strength | Extremely high | High (but more brittle) |
| Track record | 50+ years of research | Newer, good results so far |
| Allergy risk | Very low (but possible) | Virtually zero |
| One-piece design | Usually two-piece | Often one-piece (fixture + abutment together) |
Most dentists recommend titanium because it is proven and predictable. Zirconia is a great option for patients with metal sensitivities or very thin gum tissue.
Surface Matters
Not all fixtures are smooth. Modern implants have a rough, porous surface. This texture helps bone cells grip and grow faster. Think of it like velcro for your bone.
What Size Fixture Do You Need?
Fixtures come in different lengths and widths. Your dentist chooses based on:
- The amount of bone you have
- Which tooth is missing (front teeth need narrower implants)
- Your bite force (back molars need wider, stronger implants)
Example sizes:
- Narrow: 3.0mm to 3.5mm (for lower front teeth)
- Standard: 3.75mm to 4.2mm (most common)
- Wide: 5.0mm to 6.0mm (for molars)
2. The Abutment (The Connector)
The abutment is the middle piece. It connects the hidden fixture (in the bone) to the visible crown (in your mouth).
Imagine a table leg (the fixture). You cannot attach the tabletop (the crown) directly to the leg without a connector piece. The abutment is that connector.
Types of Abutments
There are several types. Your dentist will choose based on your case.
Stock Abutments
These are pre-fabricated, off-the-shelf parts. They work well for many simple cases. They are also cheaper. However, they may not fit perfectly with your gum contour.
Custom Abutments
A dental lab makes these just for you. They use a scan of your mouth to design an abutment that matches your natural gumline. Custom abutments look better and feel more comfortable. They cost more, but many patients find them worth the extra expense.
Temporary Abutments
These are plastic or low-cost metal pieces used during healing. They hold a temporary crown while your implant integrates with the bone. Your dentist replaces them with a permanent abutment later.
Angled Abutments
Sometimes, the implant fixture sits at a slightly wrong angle. An angled abutment corrects this. It allows the crown to line up properly with your other teeth.
Healing Abutment vs. Regular Abutment
Do not confuse these two.
- Healing abutment: A temporary cap placed right after implant surgery. It shapes your gum tissue during healing. It sticks up through the gumline.
- Regular abutment: The permanent connector piece placed after healing is complete. This one stays under the final crown.
Reader Note: Some systems call the healing abutment a “healing collar” or “gingival former.” Same part, different names.
3. The Prosthetic Crown (The Visible Tooth)
The crown is the only part you see. It looks just like a natural tooth. It is also the part that does the work of chewing, biting, and smiling.
A dental crown for an implant is not the same as a crown for a natural tooth. But they look and feel identical.
What Is the Crown Made Of?
There are three main materials for implant crowns.
Porcelain Fused to Metal (PFM)
A metal shell covered with tooth-colored porcelain. Very strong. But the metal can sometimes show as a dark line near the gum. Less common today.
Full Ceramic or Zirconia
The most popular choice. Beautiful, natural light properties. No dark lines. Zirconia crowns are extremely strong. They do not chip easily.
Full Gold or Metal Alloy
Rare today for front teeth. Some dentists still recommend gold for back molars because it is gentle on opposing teeth. Gold wears down at the same rate as natural enamel.
Screw-Retained vs. Cement-Retained Crowns
There are two ways to attach the crown to the abutment.
| Feature | Screw-Retained | Cement-Retained |
|---|---|---|
| Attachment | A small screw goes through the crown into the abutment | Dental cement glues the crown onto the abutment |
| Repairability | Easy to unscrew and fix | Must cut off the crown to access the abutment |
| Appearance | A tiny screw hole (filled with tooth-colored material) | No visible screw hole |
| Risk of complications | Very low | Cement can leak into gums, causing inflammation |
| Cost | Slightly higher | Slightly lower |
Most modern dentists prefer screw-retained crowns. They are cleaner and easier to repair. However, cement-retained crowns sometimes look a bit more natural in the front of the mouth.
How Long Does an Implant Crown Last?
With good care, an implant crown lasts 10 to 15 years. After that, it may wear down or chip. Replacing just the crown is a simple procedure. You do not need to replace the implant fixture itself.
4. The Abutment Screw (The Tiny Mighty Fastener)
This part is small. Very small. But forget it, and nothing works.
The abutment screw holds the abutment to the implant fixture. In two-piece implant systems, this screw is critical. It passes through the abutment and threads into the internal cavity of the fixture.
Why Is This Screw Special?
Standard screws from the hardware store will not work. The abutment screw is:
- Made of a special titanium alloy
- Designed to handle millions of chewing cycles
- Manufactured to exacting tolerances (often 0.1mm precision)
- Torqued to a specific value (usually 20 to 35 Ncm)
Dentists use a torque wrench to tighten this screw. Too loose, and the abutment wobbles. Too tight, and the screw breaks.
What Happens If the Abutment Screw Loosens?
Over time, an abutment screw can come slightly loose. You might notice:
- A clicking sound when chewing
- The crown feels slightly mobile
- Food traps around the crown
Do not panic. This is a common complication. Your dentist can tighten the screw in five minutes. In most cases, they do not even need to numb you.
Important note: Do not try to tighten it yourself. You do not have the correct torque wrench. You could damage the internal threads of the implant fixture.
5. The Healing Cap or Healing Abutment (The Protector)
Immediately after surgery, your dentist covers the top of the implant fixture with a small, smooth cap. This is the cover screw.
The cover screw protects the internal threads of the implant from bone or soft tissue growing inside. You cannot see it. It sits completely under your gumline.
Then Comes the Healing Abutment
About two to four weeks after surgery, your dentist makes a small cut and removes the cover screw. They replace it with a taller piece: the healing abutment.
The healing abutment sticks up through your gumline. It looks like a small metal button. Its job is to train your gums. It pushes the soft tissue aside, creating a nice “collar” shape. This collar will eventually surround the permanent crown.
You will wear the healing abutment for several months while the implant fuses with your bone. It is not painful. You just feel a smooth metal surface with your tongue.
Do You Always Need a Separate Healing Abutment?
Not always. Some implant systems use a “one-stage” approach. The implant fixture itself is long enough to stick through the gumline. No separate healing abutment needed. However, most modern systems use a two-stage approach with a healing abutment.
Optional and Specialized Components
Beyond the five main parts, some cases require extra components. Here is a quick list.
The Transfer Coping (Impression Coping)
When your implant is ready for the final crown, the dentist must take an impression. They screw a special plastic part (the transfer coping) onto the implant. This coping captures the exact position and rotation of the implant fixture. The dental lab uses it to fabricate your custom abutment and crown.
The Laboratory Analog
This is a replica of the implant fixture. The lab uses it to build your crown without touching your real implant. The analog fits into a stone model of your mouth.
The Platform Switch
Some implants use a platform-switching design. That means the abutment is slightly smaller in diameter than the top of the implant fixture. This small gap seems to reduce bone loss around the implant neck. Many modern systems use this design.
The Internal Hex vs. External Hex
Look at the top of an implant fixture. You will see a hexagonal (six-sided) hole or protrusion. This is the “hex.”
- Internal hex: The hole is inside the fixture. The abutment or healing cap has a matching male hex. More common today.
- External hex: The fixture has a raised hex. The abutment fits over it. Older design, still used in some systems.
The hex prevents the abutment from rotating. Without it, your crown could spin around.
How All the Parts Work Together (Step by Step)
Let us follow the entire process from surgery to final smile. This will help you see how every part plays its role.
Step 1: Surgery Day
The surgeon:
- Makes a small cut in your gum
- Drills a precise hole in your bone
- Inserts the implant fixture
- Places a cover screw into the fixture
- Stitches the gum closed over the screw
You cannot see any parts. Everything is hidden.
Step 2: Healing Phase (3 to 6 Months)
Your bone grows around the fixture. This is osseointegration. During this time, you have a healing abutment (placed after 2-4 weeks). The healing abutment sticks through your gum.
Step 3: Uncovering the Implant
After osseointegration completes, the dentist:
- Removes the healing abutment (or cover screw if still in place)
- Screws in the healing abutment if not already present
- Lets your gums heal for another 2 to 4 weeks to form the collar shape
Step 4: Impressions
The dentist removes the healing abutment. They screw a transfer coping onto the implant fixture. They take a dental impression. The lab uses the coping and a laboratory analog to make your custom abutment and crown.
Step 5: Abutment Placement
Your dentist places the permanent abutment. They secure it with the abutment screw torqued to the correct value. Some dentists place the abutment and crown together in the same visit.
Step 6: Crown Delivery
Your dentist tries in the crown. They check the fit, bite, and color. For a screw-retained crown, they place a small screw through the crown into the abutment. They fill the screw hole with composite resin. For a cement-retained crown, they glue the crown onto the abutment.
Step 7: Final Adjustments
Your dentist polishes the crown. They check your bite one last time. You walk out with a new, fully functional tooth.
Parts of a Dental Implant: Quick Reference Table
| Part | What It Does | Material | Visible? |
|---|---|---|---|
| Implant Fixture | Fuses with jawbone; acts as artificial root | Titanium or Zirconia | No |
| Abutment | Connects fixture to crown | Titanium, Gold, or Zirconia | Partially (under crown) |
| Abutment Screw | Locks abutment to fixture | Titanium alloy | No |
| Crown | Looks and functions like a natural tooth | Ceramic, Zirconia, PFM, or Gold | Yes |
| Healing Abutment | Shapes gum tissue during healing | Titanium or plastic | Yes (temporary) |
| Cover Screw | Protects internal threads after surgery | Titanium | No |
| Transfer Coping | Transfers implant position to dental lab | Plastic or metal | No (used for impressions) |
Common Questions About Dental Implant Parts
Can I See the Abutment?
In most cases, no. The crown covers it completely. But if your gums are very thin or recede, you might see a dark metal line at the gum edge. A zirconia abutment (tooth-colored) solves this problem.
Do All Implant Brands Use the Same Parts?
No. This is critical to understand.
Implant parts are not interchangeable between brands. A Nobel Biocare abutment will not fit a Straumann implant. Even within the same brand, different models may use different connections.
Always get spare parts from your original implant provider. If your dentist uses a lesser-known brand, ask if parts will be available in 10 or 20 years.
How Much Do the Different Parts Cost?
Prices vary widely by location and dentist. Here are rough estimates for the United States.
| Part | Estimated Cost (USD) |
|---|---|
| Implant fixture (single) | 500−1,500 |
| Abutment (stock) | 200−500 |
| Abutment (custom) | 500−800 |
| Abutment screw | 50−150 |
| Crown (PFM) | 500−1,000 |
| Crown (full ceramic/zirconia) | 800−2,000 |
| Healing abutment | 50−150 |
| Cover screw | 20−50 |
These are just component costs. The total procedure (surgery + parts + crown) is typically 3,000to6,000 per implant in the US.
Can I Buy Just One Part?
Generally, no. Implant components are medical devices. Most manufacturers sell only to licensed dentists. You cannot walk into a store and buy an abutment screw. This is for your safety. Incorrect parts can ruin the implant fixture.
What Happens If the Crown Breaks?
You do not need to replace the entire implant. The dentist unscrews the broken crown (or cuts it off if cemented). They take a new impression and make a new crown. The fixture and abutment stay in place.
Do Implants Have Any Moving Parts?
No. Every part is fixed in place. There are no hinges, springs, or sliding pieces. This makes them very reliable.
Materials Deep Dive: Why Titanium Rules
You will hear “titanium” over and over when discussing parts of a dental implant. There is a good reason for that.
Titanium has four superpowers:
- Biocompatibility: The human body accepts titanium. It does not trigger an immune attack. In fact, bone cells actively grow toward it.
- Strength: Titanium is as strong as steel but half the weight. It handles chewing forces up to 200 pounds per square inch.
- Corrosion resistance: Saliva is slightly acidic. Titanium does not rust, tarnish, or dissolve. It stays perfect for decades.
- Osseointegration: As mentioned earlier, bone fuses directly to titanium. No other material does this as reliably.
What About Zirconia?
Zirconia is a white ceramic. It is also biocompatible. Some patients prefer it for aesthetic reasons (no dark metal) or due to suspected metal allergies.
However, zirconia implants have downsides:
- They cannot be welded or modified easily
- They are more brittle (higher risk of fracture under extreme force)
- Most are one-piece (fixture + abutment together), which complicates angled corrections
For most people, titanium remains the better choice. Zirconia is a niche option, not the standard.
The Implant-Abutment Connection: A Critical Junction
Engineers call this the “implant-abutment interface.” It is the microscopic gap where the abutment meets the fixture.
Why Does This Gap Matter?
Bacteria love tiny gaps. If the connection is not perfect, bacteria can grow inside the implant. This leads to inflammation (mucositis) and eventually bone loss (peri-implantitis).
Modern implants use one of three connection types to minimize this gap.
External Hex Connection
- Oldest design (1970s)
- Hexagon on top of the fixture
- Abutment sits over it
- Higher risk of screw loosening
- Rarely used today
Internal Hex Connection
- Hexagon-shaped hole inside the fixture
- Abutment inserts into the hole
- Better stability
- Very common
Internal Tapered (Morse Taper) Connection
- Cone-shaped internal cavity
- Abutment is a matching cone
- Creates a cold weld (essentially no gap)
- Best seal against bacteria
- Gold standard today
If you are choosing a dentist, ask which connection their implant system uses. Internal tapered connections are the most reliable.
Hygiene and Maintenance: Keeping All Parts Clean
An implant cannot get a cavity. But the parts around it can still get sick.
Peri-implantitis is the #1 cause of late implant failure. It is an infection around the implant that destroys bone. It starts when plaque and bacteria accumulate at the abutment-crown junction.
How to Clean Your Implant Parts
- Soft toothbrush: Brush the crown like a natural tooth. Pay special attention to the gumline.
- Interdental brushes: Small conical brushes clean the space under the crown. Use them daily.
- Water flosser: Excellent for flushing out debris around the abutment.
- Regular dental visits: Your dentist will check the abutment screw torque and probe for bone loss.
- No metal tools: Never let a hygienist use a metal scaler on your crown. It can scratch the ceramic. Plastic or titanium instruments only.
What to Avoid
- Sticky foods: Caramel, toffee, and gum can pull on the crown.
- Chewing ice or pens: This can crack the ceramic crown.
- Smoking: It reduces blood flow and increases infection risk around implant parts.
- Skipping cleanings: Implants need professional maintenance every 6-12 months.
Reader Note: You do not need special toothpaste for implants. Regular fluoride toothpaste is fine. Avoid abrasive whitening toothpastes. They can scratch the crown surface.
When Parts Fail: Common Complications
No medical device is perfect. Let us be honest about what can go wrong.
Loose Abutment Screw
Symptoms: Clicking sound, slight movement.
Solution: Retighten with torque wrench. Sometimes replace the screw.
Prevention: Proper torque at placement. Annual check-ups.
Fractured Abutment Screw
Symptoms: Crown feels very loose or falls off.
Solution: Remove the broken screw fragment (special tools required). Replace with new screw.
Prevention: Avoid over-torquing. Use genuine manufacturer screws.
Broken Crown
Symptoms: Visible crack or chip. Rough surface.
Solution: Replace crown only.
Prevention: Avoid biting hard objects (nutshells, bones, pens).
Peri-Implantitis (Bone Loss)
Symptoms: Bleeding gums, pus, bad taste, mobility.
Solution: Deep cleaning (surface decontamination). Sometimes surgery to clean the implant threads. Late-stage: remove the entire fixture.
Prevention: Excellent oral hygiene. No smoking. Regular maintenance visits.
Failed Osseointegration
Symptoms: Implant never tightens. It stays mobile in the bone.
Solution: Remove the fixture. Graft bone. Try again in 6-12 months.
Prevention: Choose an experienced surgeon. Do not smoke. Control diabetes.
The good news: most of these complications are manageable. Total implant failure (losing the fixture) happens in only 2-5% of cases.
Choosing the Right Implant System: What to Ask Your Dentist
Not all implant parts are created equal. Here are five questions to ask before you commit.
1. What brand of implant do you use?
Look for established brands with long track records: Nobel Biocare, Straumann, Dentsply, Zimmer, BioHorizons. Avoid “white label” or generic implants from unknown manufacturers.
2. Do you stock replacement parts?
Your dentist should have extra abutment screws, healing abutments, and transfer copings in their office. If they order everything “just in time,” a broken screw could leave you toothless for weeks.
3. Is the connection internal tapered?
Yes is the best answer. It seals out bacteria better than external hex connections.
4. Can you provide a copy of the implant card?
Most brands give a small ID card with the implant’s lot number, size, and date of placement. Keep this card forever. If you move or your dentist retires, the next dentist needs this information to order compatible parts.
5. What is your protocol for a loose screw?
A good dentist will say, “We tighten it. If it loosens again, we replace the screw and inspect the internal threads.” A bad dentist might say, “That never happens.” (It does happen.)
The Future of Dental Implant Parts
Technology is moving fast. Here are three innovations you may see in the coming years.
Smart Implants with Sensors
Researchers are developing implants with tiny sensors inside. These sensors measure bite force, temperature, and even detect bacterial biofilms. The data transmits to your smartphone. You would know exactly when the abutment screw needs tightening.
3D-Printed Custom Implants
Instead of choosing from a catalog of sizes, your dentist could scan your bone and print a perfectly matched titanium implant. This would eliminate the need for bone grafting in many cases. Early versions exist today. Costs remain high.
Antibacterial Surfaces
Scientists are coating implant surfaces with silver nanoparticles or antimicrobial peptides. These surfaces kill bacteria on contact. If successful, they would virtually eliminate peri-implantitis.
For now, the standard titanium implant with internal tapered connection remains the proven workhorse. Do not let shiny new tech distract you from what works.
Summary Table: Key Takeaways for Patients
| Question | Answer |
|---|---|
| How many parts in a basic implant? | Three: fixture, abutment, crown. |
| Which part lasts the longest? | Implant fixture (often 30+ years). |
| Which part breaks most often? | Crown (10-15 years) or abutment screw. |
| Can I replace just the crown? | Yes. |
| Can I switch abutment types later? | Yes, as long as it fits your implant brand. |
| Do implants need special cleaning? | Yes. Focus on the gum-crown junction. |
| Are implant parts universal? | No. Never mix brands. |
| What is the most common failure point? | Abutment screw loosening. |
| How do I know my parts are quality? | Use major brands with ≥10 years of track record. |
Additional Resource
For a visual breakdown of implant parts and step-by-step surgical animations, visit the American Academy of Implant Dentistry (AAID) patient education library:
https://www.aaid.com/patients/index.html
This resource offers free, dentist-reviewed guides, videos, and a search tool to find accredited implant dentists in your area.
Conclusion
A dental implant is a simple, elegant device made of just a few key parts: the implant fixture (artificial root), the abutment (connector), and the prosthetic crown (visible tooth). Supporting components like the abutment screw and healing cap play critical roles in long-term success. Understanding these parts helps you ask the right questions, maintain your implant properly, and enjoy a functional, natural-looking smile for decades.
Frequently Asked Questions (FAQ)
1. Are dental implant parts all the same size?
No. Implants come in various diameters and lengths. The abutment and crown are custom-made for your mouth.
2. Can my body reject the implant fixture?
True rejection (an immune attack on titanium) is extremely rare. More common is failure of osseointegration, where bone simply does not grow onto the fixture. This happens in about 2-5% of cases.
3. How long does the abutment screw last?
With proper torque, an abutment screw can last 10-20 years. However, screws can fatigue over time. Some dentists recommend replacing the screw when they replace the crown.
4. Do I feel the abutment with my tongue?
Not after the crown is placed. The crown covers the abutment completely. During the healing phase (with a healing abutment), you will feel a smooth metal button.
5. Can I use my implant parts for an MRI?
Yes. Titanium is non-ferromagnetic. It is safe for MRI. However, inform the MRI technician that you have a dental implant.
6. What happens if I lose my abutment screw?
Do not try to find a replacement on the internet. Call your dentist immediately. They will order the correct screw from the implant manufacturer.
7. Is it possible to have a one-piece implant?
Yes. Some systems combine the fixture and abutment into a single piece. These are used in specific cases, such as narrow front teeth. Most implants, however, are two-piece designs for better versatility.
8. Do cheap implants use the same quality parts as expensive ones?
Not always. Budget implants may use less pure titanium, inferior surface treatments, or poorly machined connections. You generally get what you pay for with implant parts. Stick to established brands.
9. Can I have an allergic reaction to the abutment screw?
Extremely rare. Abutment screws are titanium alloy (containing small amounts of aluminum and vanadium). True metal allergy affects less than 0.6% of people. For those patients, zirconia implants are an alternative.
10. How do I know if my healing abutment is loose?
You might see the metal button rotate when you touch it with your tongue. It may also feel slightly higher than before. Contact your dentist. A loose healing abutment can allow tissue to grow over the implant.
Disclaimer: This article is for informational purposes only. It does not constitute medical or dental advice. Always consult a licensed dentist or oral surgeon for diagnoses, treatment decisions, and specific questions about your case. Individual results vary. Do not attempt to place, adjust, or replace any dental implant part yourself.