Spotlight Teeth Whitening Pen How to Use?
A brighter smile often tops the list when people talk about boosting confidence. You want a solution that fits seamlessly into a busy morning or a late-night routine without the mess of sticky strips or bulky trays. The Spotlight Teeth Whitening Pen promises exactly that. It offers a targeted, portable, and swift approach to removing surface stains caused by coffee, tea, or red wine.
But holding that slim, elegant pen in your hand for the first time can leave you with a few questions. How many clicks do you need? Should you apply it to dry teeth? How long must you wait before closing your mouth?
This comprehensive guide leaves no stone unturned. You will learn not just the basic mechanics but the science-informed techniques that protect your enamel while maximizing results. We will walk through preparation, application, aftercare, and troubleshooting. By the end, you will wield that pen with the precision of a professional, securing the luminous results you desire while keeping your oral health intact.
Understanding the Spotlight Teeth Whitening Pen
Before diving into the “how-to,” it pays to understand what sits inside that sleek tube and why the protocol matters. Teeth whitening is a chemical process, not just a cosmetic cover-up. Treating the product with respect ensures it works effectively without causing unnecessary discomfort.
What Exactly Is the Spotlight Teeth Whitening Pen?
The Spotlight Teeth Whitening Pen belongs to a category of on-the-go whitening systems that prioritize convenience. Unlike a tray that covers your entire arch, the pen uses a brush tip to paint a precise gel layer directly onto the tooth surface. It targets the visible zone—your front six to eight teeth—where stains most commonly settle.
Inside the barrel, a hydrogen peroxide-based gel waits. Hydrogen peroxide remains the gold standard in dental whitening because it breaks down into water and oxygen radicals. Those oxygen molecules dive into the porous enamel structure and shatter the long-chain stain molecules into smaller, colorless fragments. The result is a physical change in the tooth’s reflection of light, making it appear brighter.
Spotlight Oral Care, the brand behind this pen, formulates their gel with sensitivity in mind. Many users report less zinging pain compared to higher-concentration chairside treatments. The pen format also gives you control. You apply the gel exactly where you want it, avoiding the gum line more easily than you might with a generic strip.
Key Ingredients and Their Role
Understanding the ingredients shifts your mindset from “painting blindly” to “working with the chemistry.” The Spotlight Teeth Whitening Pen formula generally features these components:
- Hydrogen Peroxide: The active whitening agent. It oxidizes organic pigments trapped in the enamel rods.
- Glycerin: A humectant that keeps the gel from drying out too quickly on the tooth surface, allowing adequate contact time.
- Carbomer: A thickening agent. It transforms the liquid peroxide into a gel that clings to the vertical tooth surface without sliding off onto the gums.
- Potassium Nitrate (in some formulations): A desensitizing ingredient. It calms the nerve endings inside the tooth’s pulp, reducing the risk of sharp sensitivity spikes.
- Xylitol: A natural sweetener that inhibits the growth of cavity-causing bacteria, keeping the mouth environment healthier during treatment.
This blend works best on a clean, slightly dehydrated tooth. Why? Because when enamel is saturated with water (saliva), the peroxide penetrates differently. Applying the gel to a dry surface maximizes the concentration gradient, pulling the oxygen deeper into the stain layers.
How It Differs from Strips and Trays
Comparison helps you appreciate why the application method varies. Here is a quick breakdown of the differences between popular at-home whitening options:
| Feature | Spotlight Whitening Pen | Whitening Strips | Custom Tray Systems |
|---|---|---|---|
| Precision | Very high. You paint each tooth individually. | Low. A one-size-fits-most strip covers multiple teeth and often gums. | Medium. Trays cover all teeth but can leak gel onto gums. |
| Contact with Gums | Minimal, if applied carefully. | Moderate. The strip inevitably touches soft tissue. | High if the tray overflows. |
| Saliva Contamination | Low. The gel solidifies quickly. | Moderate. Strips can slip. | High. Saliva pools inside the tray. |
| Suitability for Crooked Teeth | Excellent. The brush navigates uneven surfaces. | Poor. Strips bridge gaps and miss recessed areas. | Good, if trays are custom-fitted. |
| Portability | Ultra-portable. Fits in a pocket. No need to rinse. | Portable but requires disposal. | Not portable. Requires a case and cleaning. |
| Stain Targeting | Ideal for isolated dark spots. | Good for general surface stain removal. | Ideal for overall shade change. |
The pen excels in a “spotlight” role—pun intended. You use it to focus on the teeth that show when you smile, creating an immediate visual impact.
Spotlight Teeth Whitening Pen: How to Use? A Preparation Masterclass
The actual application takes about sixty seconds once you have mastered the prep. But skipping the preparatory steps reduces the efficacy by half. Many users who complain of no results or quick relapse simply failed to prepare the canvas.
Assembling Your Toolkit
You do not need a complicated set-up. Gather these items before you open the pen:
- Your unopened Spotlight Teeth Whitening Pen.
- A standard toothbrush with soft bristles.
- Non-whitening, non-charcoal toothpaste.
- A clean, dry face towel or microfiber cloth.
- A small mirror (a magnifying one is even better).
- A cheek retractor (optional, but immensely helpful).
- A timer or your smartphone.
Important Note: Do not use a whitening toothpaste immediately before using the pen. These toothpastes often contain abrasives that can temporarily roughen the enamel surface. The pen’s gel interacts better with a smooth, clean surface prepared with a gentle, non-abrasive paste.
The Critical Step: Dry and Clean Enamel
Saliva is the enemy of adhesion. The Spotlight Teeth Whitening Pen gel needs to stick to the tooth, not dissolve into a pool of moisture. Water dilutes the peroxide, lowering the concentration at the enamel interface. A dry tooth also allows the gel to form a durable film that resists immediate washout.
Step-by-step Pre-application Protocol:
- Brush Thoroughly: Brush your teeth for two full minutes using a soft-bristle brush and non-whitening toothpaste. Focus heavily on the front-facing surfaces of the anterior teeth—the canines, lateral incisors, and central incisors. Remove all traces of plaque biofilm. Plaque acts as a physical barrier; peroxide cannot penetrate it.
- Floss Interproximally: The margins where teeth touch often hold micro-debris. Slide floss between each visible tooth. This prevents the gel from wicking sideways into plaque instead of the enamel.
- Towel-Dry the Surface: Smile wide. Use the corner of a clean, absorbent towel to blot each tooth from gum to edge. The surface should feel squeaky-clean and have a matte appearance. If you run your tongue over the tooth and it feels slick, dry it again.
- Insert a Cheek Retractor (Highly Recommended): A simple plastic cheek retractor pulls the lips and cheeks away from the teeth. This prevents the soft inner tissues from touching the freshly applied gel and smearing it. It also keeps saliva ducts isolated.
- Position Your Mirror: Angle a mirror so you are looking slightly up at your upper teeth and down at your lower teeth. This prevents you from tilting your head backward, which invites saliva to pool.
Priming the Pen Correctly
A brand new pen needs priming. A pen stored in a cold bathroom might also need a quick warm-up.
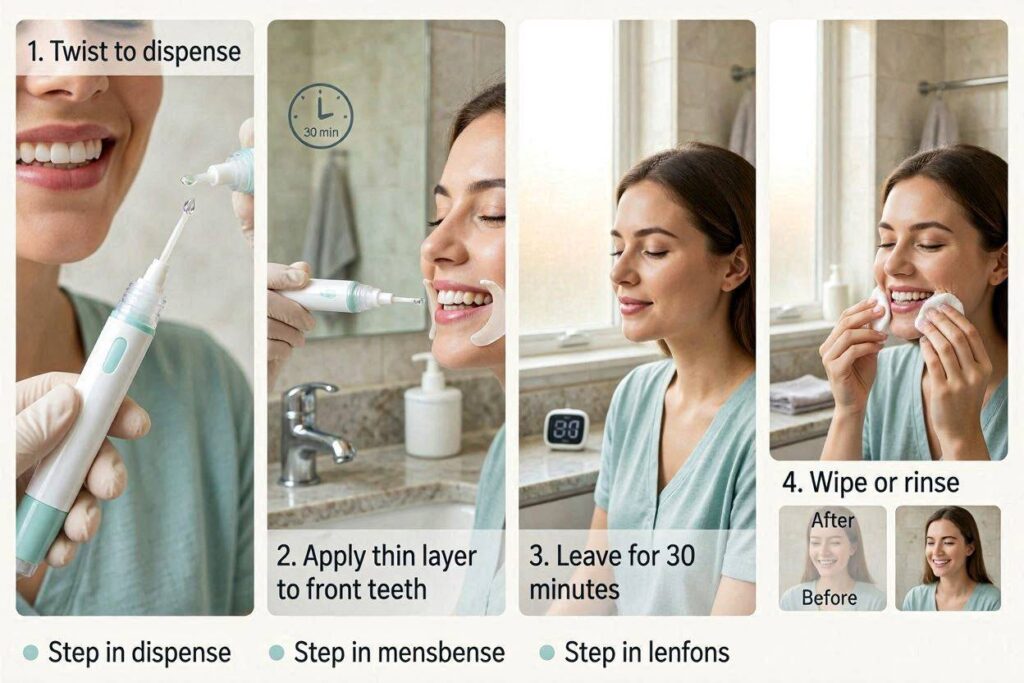
Hold the pen vertically with the brush tip pointing downward. Turn the bottom dial in the direction indicated on the packaging (usually clockwise) slowly. You will hear a soft series of clicks. Each click advances the piston inside, pushing gel toward the brush.
“Turn the dial one click at a time and watch the brush tip. The moment you see a tiny droplet of clear gel emerge, stop. Do not over-click, or you will flood the brush and waste product.”
If the gel seems sluggish or does not appear after several clicks, roll the barrel between your palms for thirty seconds. Body heat lowers the gel’s viscosity, allowing it to flow smoothly. Do not ever heat the pen in hot water or a microwave; excessive heat destabilizes hydrogen peroxide.
Step-by-Step Application Technique: The Art of the Paint Stroke
Now that your teeth gleam with dry readiness, you can begin the actual application. This is where technique separates a dazzling result from a splotchy one. Think of yourself as a fine-art restorer, not a house painter. Precision matters.
The Thin-Layer Principle
More gel does not equal faster whitening. A thick glob of gel slides off the convex tooth surface and migrates toward the gum line or the back of the mouth. Hydrogen peroxide whitening depends on sustained contact time and concentration, not volume. A thin, even film provides the necessary oxygen exchange without creating a saliva-inducing puddle.
The ideal layer looks like a coat of clear nail polish—translucent, uniform, and hugging the topography of the tooth.
Painting the Upper Arch
The upper anterior teeth display the most when you smile. Tackle these first while your energy and focus peak.
- Start with the Central Incisors: Smile to stretch the upper lip taut. With the mirror positioned slightly below your chin, look down into it.
- Position the Brush: Touch the brush tip to the top third of the tooth, near the gum line but not touching it. Leave a safe margin of about one millimeter.
- Execute the Stroke: With gentle, steady pressure, drag the brush downward toward the biting edge in one smooth motion. Do not zigzag. A single linear stroke deposits the correct amount. If the tooth is wide, make two parallel strokes that just barely overlap.
- Work Laterally: Move sequentially to the lateral incisor, then the canine on that side. Return to the center and repeat for the other side. This symmetrical pattern prevents you from missing a tooth.
- Inspect for Gaps: Tilt your head slightly. Look for areas that appear matte (covered) versus glossy (missed). Touch up glossy spots immediately with a feather-light stroke.
Painting the Lower Arch
The lower teeth present a different challenge. Saliva pools in the floor of the mouth, and the lower lip constantly threatens to sweep across the teeth.
- Dry the Lower Teeth Again: Even if you dried them two minutes ago, a quick blot now is wise. Saliva glands under the tongue activate continuously.
- Position the Mirror High: Hold the mirror above your nose level. Look up into it. This angles your lower teeth forward and keeps the tongue from lunging.
- Adopt a Bottom-Up Stroke: Start at the gum line and paint upward toward the biting edge. This counterintuitive direction actually helps you see the gum margin better and avoid painting the soft tissue.
- Manage the Canines: Lower canines often curve backward. Use the side of the brush tip to wrap the gel around the distal curve. Do not leave the side of the canine uncoated, or it will look darker than the front.
A Side-by-Side Arch Technique Guide
Sometimes a visual comparison clarifies the nuanced differences between treating the upper and lower arches.
| Technique Element | Upper Arch Approach | Lower Arch Approach |
|---|---|---|
| Mirror Position | Below chin; look downward. | Above nose; look upward. |
| Brush Stroke Direction | Top-down (gum line to edge). | Bottom-up (gum line to edge). |
| Lip Management | Smile widely to retract upper lip. | Pull lower lip down with a dry finger. |
| Saliva Control | Moderate risk; tongue tip rests behind uppers. | High risk; pool of saliva forms rapidly. |
| Gum Margin Visibility | Easier to see; good overhead lighting helps. | Harder to see; use a dental mirror for lingual tilt. |
| Tooth Contour Focus | Front-facing surfaces; often flatter. | Often more curved; must wrap gel around distal canines. |
Applying to Individual Stubborn Spots
You might notice a specific dark spot—a white-spot lesion that has stained or a deep groove. The pen’s precision allows targeted treatment.
Isolate that single tooth. Apply a tiny dot of gel directly onto the stain after painting the whole tooth. Do not brush it out. Let the dot sit as a micro-reservoir of peroxide. The prolonged localized contact intensifies the stain breakdown without exposing the entire mouth to extra chemicals.
Timing, Setting, and the Waiting Game
Once the gel touches the enamel, the clock starts. The chemical reaction requires a specific window of undisturbed contact. Here is where many routines fail. A single swipe of the tongue or a sip of water ruins the film.
How Long to Keep the Pen on Your Teeth
The official recommendation from Spotlight Oral Care generally suggests allowing the gel to set for at least 15 to 30 minutes. During this period, you must not eat, drink, or rinse.
However, leave-on time can be adjusted based on your sensitivity threshold:
- Sensitive Beginners: Start with 10 minutes. This allows the oxygen radicals to work superficially without penetrating deep enough to trigger the pulp nerve.
- Experienced Users: Extend to 30 minutes. Some users even leave it on for 60 minutes if tolerance allows. But longer is not always better. The gel exhausts its active oxygen release after about 30-45 minutes. Extended wear just exposes the tooth to inert, dehydrated gel, which can attract plaque.
- Overnight Use (Proceed with Caution): Some variants are marketed for overnight use. If you choose this route, apply the thinnest possible layer. A thick layer left overnight can pull moisture from the gum tissue, causing localized gum blanching (white patches) that resolve after a few hours but look alarming.
The No-Rinse Philosophy
One of the pen’s biggest advantages over trays is the no-rinse protocol. The gel is designed to dehydrate into a clear, film-like coating that eventually wears away or gets safely swallowed.
After the setting time passes, simply go about your day. The film will gradually dissolve. If you feel a slight gritty texture or notice small clear flakes, that indicates the film is sloughing off naturally. Do not scrape it off with a fingernail, as you might scratch the enamel.
Crucial Post-Treatment Commandments:
- Do not drink coffee, tea, red wine, or dark sodas for at least two hours.
- Do not smoke or vape for two hours. The enamel pores remain slightly open and rehydrating, making them exceptionally stain-receptive.
- Do not brush your teeth immediately. Wait an hour. Immediate brushing can abrade the softened superficial enamel layer.
“Treat the first hour after whitening as a ‘white shirt protocol.’ Anything that would stain a white shirt will stain your teeth.”
Managing Excess Saliva During Setting
You cannot control saliva completely, but you can minimize it. Breathe gently through your nose. Keep your head slightly tilted forward so saliva pools behind the lower front teeth rather than washing over them. If you absolutely must swallow, do so carefully without pursing your lips. The goal is to avoid creating suction that lifts the gel film.
Frequency, Duration, and Building a Routine
Consistency drives whitening results more than a single marathon session. The peroxide progressively removes stains over consecutive applications. Sporadic use only lightens stains superficially before dietary habits redeposit pigments.
Recommended Application Schedule
The brand often suggests a 14-day treatment program. This aligns with the natural turnover rate of the pellicle layer—the protein film that coats your teeth and traps stains.
- Intensive Brightening Phase (Days 1–14): Apply the pen once in the morning and once in the evening. Space the applications at least eight hours apart. The twice-daily rhythm keeps a constant oxygen supply on the stain molecules.
- Maintenance Phase (Post-Day 14): Reduce usage to two or three times per week. You can choose specific days, such as Monday, Wednesday, and Friday evenings.
The 30-Second Morning Routine Integration
Mornings are hectic. Here is a streamlined sequence that adds minimal time:
- Wake up and brush your teeth with plain toothpaste.
- Dry the anterior teeth with a cloth.
- Apply the Spotlight Teeth Whitening Pen (60 seconds).
- Proceed with the rest of your morning routine—shower, dress, make coffee.
- Drink your coffee through a straw (more on that later).
- The film disappears by the time you finish your commute.
Tracking Your Shade Progress
Perception is unreliable. You see your teeth multiple times a day, so subtle changes escape notice. Document your journey objectively.
- Before Photo: Take a photo on Day 1 in natural daylight with a shade guide or a piece of white paper held next to your smile. Turn off the flash.
- Midpoint Photo: Take an identical photo on Day 7.
- Final Photo: Take a photo on Day 14.
Compare the photos side by side. Look specifically at the enamel nearest the gum line, as this area tends to be the slowest to whiten. If the gum-line color now matches the rest of the tooth, the program is working.
Safety, Side Effects, and How to Mitigate Them
White teeth must also be healthy teeth. The pursuit of a bright smile should never compromise enamel integrity or gum comfort. Understanding the potential side effects prepares you to prevent them or stop them early.
Tooth Sensitivity: Why It Happens and How to Stop It
Sensitivity is the most reported side effect of any peroxide-based whitening. It manifests as a sharp, sudden “zing” when you breathe in cold air or drink cool water.
The mechanism involves the peroxide penetrating through the enamel rods and dentinal tubules to reach the pulp chamber, where the nerve lives. Peroxide creates a mild, transient inflammatory response in the pulp. This reversible pulpitis feels alarming but rarely causes permanent damage if you pause treatment.
A Progressive Sensitivity Management Plan:
| Severity Level | Symptoms | Action to Take | Product Suggestion |
|---|---|---|---|
| Mild | Brief twinge to cold air; lasts under 3 seconds. | Continue daily use. Apply a thin layer of sensitive toothpaste to teeth post-whitening. | Potassium nitrate-based toothpaste. |
| Moderate | Sharp zing with cold water; lasts 5–10 seconds; happens on multiple teeth. | Skip one day of whitening. Use a desensitizing gel pen (available over the counter) before bed. | Spotlight Sensitivity Gel. |
| Severe | Spontaneous throbbing; sensitivity to warm liquids; pain lingers over 30 seconds. | Stop whitening completely for one week. Consult your dentist. | Professional fluoride varnish at a dental clinic. |
| Localized Gum Discomfort | White patches on gums; burning sensation. | Apply less gel; keep a larger margin from gums. Rinse the affected gum with salt water. | Vitamin E oil applied to gum tissue for soothing. |
If you experience moderate sensitivity, a simple trick is to place a small dot of toothpaste designed for sensitive teeth onto the affected teeth and leave it overnight. The potassium nitrate deposits directly into the open tubules.
Gum Irritation and Chemical Burns
The gel does not strictly “burn” the gum tissue in a permanent sense but can dehydrate it, causing blanching. This happens when you flood the tooth and the excess gel wicks onto the moist gum.
If you see a white patch on your gum, do not panic. The tissue will return to its normal pink color within a few hours. To accelerate healing, rinse gently with warm salt water and apply a soothing emollient like pure aloe vera gel. Avoid acidic or spicy foods until the patch resolves. Prevention is simple: use one small click of gel per tooth.
Enamel Health: Separating Myth from Fact
Hydrogen peroxide does not soften or dissolve enamel in the concentrations found in take-home pens. Studies show that properly formulated peroxide gels have a negligible effect on enamel microhardness. The real danger to enamel comes not from the peroxide but from using highly abrasive toothpaste or brushing too aggressively immediately after whitening. Respect the wait time before brushing.
Comparative Analysis: Spotlight Teeth Whitening Pen vs. Other Methods
Context helps you appreciate the pen’s role in your broader oral care strategy. It is not always the only tool you need, but it fills a niche that other products fail to address.
Pen vs. Whitening Strips: The Adhesion Battle
Strips rely on a plastic backing coated with a peroxide gel layer. They work well for relatively straight teeth. However, the one-size-fits-most design creates voids where the strip bridges between teeth, particularly in crowded areas. These voids receive no whitening, leading to uneven results.
The pen’s brush allows you to follow the natural scalloped contour of the gum line. You paint into the embrasures (the little triangles of space between teeth) if needed. For someone who has undergone orthodontic treatment and has a retained wire, the pen can navigate the wire, whereas a strip cannot lie flat over it.
Pen vs. Custom Tray Whitening: The Speed vs. Strength Trade-off
Custom-fabricated trays from a dentist offer a tight seal and can hold a higher concentration of carbamide peroxide gel for hours. They deliver a more profound shade change, often lightening teeth by 5 to 8 shades over two weeks. The trade-off is cost, the inconvenience of wearing trays, and a higher incidence of sensitivity.
The Spotlight Teeth Whitening Pen offers a milder, gradual change. You might see a 2 to 4 shade improvement over the same period. This makes the pen ideal for maintenance between professional treatments or for individuals who only need a subtle refresh before a wedding or photo shoot.
Pen vs. LED Light Kits: Is Light Necessary?
Many kits pair a gel pen with an LED light. The marketing suggests the light accelerates the reaction. The reality is nuanced. Most contemporary peroxide gels contain activators that work optimally at body temperature. The LED primarily provides a warming effect and a dramatic ritual. A Spotlight Teeth Whitening Pen works perfectly well without a light. If you enjoy the ritual, use a light, but do not feel the results hinge on it.
Maximizing and Maintaining Your Results
The work does not end when the 14-day program concludes. You must protect the investment. Whitened enamel, now free of long-standing stains, readily absorbs new chromogens from your diet.
The White Diet: A Practical Approach
Avoiding all dark foods for two weeks feels draconian and unsustainable. A practical “white diet” focuses on elimination by substitution during the intensive phase and the first two days of maintenance.
Foods and Beverages to Enjoy Freely:
- Plain yogurt, milk, cottage cheese
- Chicken breast, white fish, turkey
- White rice, plain pasta with Alfredo sauce (avoid tomato-based sauces)
- Bananas, peeled apples, pears
- Cauliflower, potatoes (mashed or boiled), white onions
- Still water, coconut water
Foods and Beverages to Avoid Completely for 48 Hours Post-Treatment:
- Coffee, black tea, red wine
- Cola and dark sodas
- Soy sauce, balsamic vinegar, curry, turmeric
- Berries (blueberries, blackberries, raspberries), cherries
- Dark chocolate, tomato sauce, beets
If you must have coffee, use a stainless steel or glass straw positioned far back on the tongue. Bypass the front teeth entirely. Swish with plain water immediately afterward.
The Touch-Up Schedule
Life happens. You will drink red wine at a dinner party. Instead of restarting the entire intensive program, perform a strategic touch-up.
- Single-Day Stain Attack: After a coffee-heavy day, apply the pen that evening and leave on for 20 minutes. This targets the day’s pellicle before the stains mature and penetrate deeper.
- Monthly Maintenance: Commit to using the pen for three consecutive nights once a month. This aligns with the roughly 30-day pellicle maturation cycle.
- Pre-Event Polish: The morning of an important event, apply the pen. The dehydrated gel film adds a temporary optical brightness that enhances the underlying shade. Photographers often remark on the subtle difference.
Pairing with the Right Toothpaste
Daily toothpaste matters immensely. Switch to a non-abrasive, fluoride-based toothpaste designed for whitening maintenance. Look for relative dentin abrasivity values below 70 if possible. Avoid charcoal toothpastes completely. Charcoal’s unregulated abrasiveness can strip the superficial enamel layer, creating a rougher surface that stains faster than before.
Deep Dive into Common User Mistakes
Even with the best intentions, mistakes happen. Recognizing these common pitfalls prevents wasted product and subpar results.
Mistake 1: Applying to Wet Teeth
This ranks as the number one error. A user brushes, rinses, smiles, and immediately applies the gel. The water film creates a slip-and-slide. The gel migrates and pools in the gum pockets, causing irritation while delivering almost zero peroxide to the enamel.
Correction: After brushing, take 30 seconds to meticulously dry each tooth with a cloth. The tooth should feel tacky, not slick.
Mistake 2: Over-Clicking the Dial
Impatience leads to a flood. The user hears no click and thinks the pen is empty, so they twist five times. Suddenly, a huge glob of gel oozes out, covering the brush and dripping onto the counter.
Correction: The initial prime may need 10–20 slow clicks to draw the gel up an empty stem. After that, a single click often suffices for two teeth. If no gel appears, do not click furiously. Tap the pen base gently on a countertop to settle the gel, then try one click again.
Mistake 3: Rinsing Immediately After the Recommended Time
The packaging says, “Leave on for 15 minutes.” The user sets a timer and the moment it beeps, they run to the bathroom to rinse their mouth out. This strips away the active oxygen while it is still working.
Correction: The recommended time is a minimum. Let the film wear off naturally. The oxygen continues to work as long as the film remains intact.
Spotlight Oral Care: Brand Philosophy and Product Line Integration
Understanding the brand’s broader mission helps you integrate the pen into a cohesive system. Spotlight Oral Care emphasizes oral health as an extension of overall wellness. Their founders, dentists themselves, design products that address specific dental concerns rather than offering one generic solution.
The Three-Step System
The pen works best when not used in isolation. The brand advocates a simple three-step system:
- Prep: A sonic toothbrush or their toothpaste to create a clean surface.
- Whiten: The Spotlight Teeth Whitening Pen for targeted lightening.
- Soothe: The Spotlight Sensitivity Gel Pen for aftercare, applied to teeth and gum margins to calm nerves and rehydrate tissue.
Using the sensitivity pen after the whitening pen completes the cycle. It is not just a remedy for pain; it actively remineralizes the enamel surface, helping to seal the tubules and lock in the lighter shade.
Commitment to Sustainability
Many users care about the environmental footprint of their beauty routines. The Spotlight Teeth Whitening Pen’s packaging uses recyclable materials where possible. More importantly, the pen format itself generates less plastic waste than single-use strip packets. A single pen handles a full treatment cycle plus maintenance, reducing the volume of monthly disposable material.
Traveling with the Spotlight Teeth Whitening Pen
One of the pen’s greatest strengths is its portability. Unlike a jar of gel and a tray set that requires a case, the pen slides into a purse or a dopp kit. But a few travel-specific tips keep it functioning optimally.
Packing and Airport Security
The pen contains a liquid gel in a small container. It fits easily within the standard 3-1-1 liquids rule for carry-on luggage. The total volume falls well under the 100ml limit.
- Pressure Changes: Airplane cabin pressure changes can cause pens to leak if they are not stored upright. Pack it in a sealed plastic bag with the cap securely tightened. Store it tip-up in the seat-back pocket only after cruising altitude.
- Hotel Routine: Hotel bathrooms often have harsh lighting and limited counter space. Use the magnifying side of a compact mirror. Place a towel over the hotel sink to catch the pen if it slips.
Maintaining the Routine on Vacation
Vacation often means increased consumption of staining beverages—espresso in Italy, red wine in France. Do not abandon the pen. Instead, adapt the schedule.
Apply the pen immediately after your morning brush, before the day’s adventures. The film sets while you get ready. By the time you arrive at breakfast, the film has fully dried, and you can even drink a cappuccino through a straw without affecting the treatment. An evening application after a day of staining foods becomes even more critical on holiday.
Understanding the Science of Stain Removal
Demystifying the science empowers you to use the product intelligently, not blindly. Teeth stains fall into two broad categories, and the pen addresses each differently.
Extrinsic vs. Intrinsic Stains
- Extrinsic Stains: These rest on the outer surface or within the pellicle layer. Coffee, tea, smoking, and certain spices cause extrinsic staining. These chromogens are large organic molecules that get trapped in the sticky protein film covering enamel.
- Intrinsic Stains: These live deep inside the dentin layer. Tetracycline antibiotics during childhood, excessive fluoride ingestion during tooth development, or trauma cause intrinsic discoloration. The tooth appears gray, blue, or brown from within.
The Spotlight Teeth Whitening Pen primarily targets extrinsic stains and, with sustained use, some superficial intrinsic stains that sit in the outer dentin. It cannot change the innate color of deeply embedded tetracycline staining. Setting realistic expectations prevents disappointment.
The Oxidation Process in Layman’s Terms
Imagine the stain molecule as a long chain of colorful links. The peroxide molecule is a pair of scissors. The gel releases the scissors onto the chain. They cut the long chain into short, colorless snippets. Your body’s natural saliva then washes these tiny snippets away. Each application sends in a new wave of scissors to cut more chains that have surfaced from deeper within the enamel.
This is why whitening takes days, not hours. The deepest chains take time to migrate to the surface, and they come up in layers.
Tailoring the Protocol for Different Dental Work
Natural enamel responds predictably. But your mouth likely contains a mix of materials. Understanding how—or if—to use the pen around dental work prevents uneven coloration and damage.
Crowns, Veneers, and Bonding
Dental porcelain (crowns and veneers) and composite resin (white fillings and bonding) do not whiten with peroxide. Their color is intrinsic to the material and set by the ceramist or dentist. If you have a single front crown surrounded by natural teeth, whitening your natural teeth will make the crown stand out—it will suddenly look dark.
The Strategy:
- If you plan to replace a crown or veneer soon, whiten your natural teeth first to your desired shade, then have the dentist match the new crown to the lightened teeth.
- If you do not plan to replace it, apply the pen carefully only to the natural teeth. Do not paint gel onto the crown. The porcelain will not change, but the gel can microscopically etch the glaze surface over extreme, prolonged exposure, dulling the shine.
Orthodontic Retainers and Braces
If you wear a fixed metal wire retainer behind your upper or lower front teeth, the pen is an excellent choice. A whitening strip cannot fit under the wire. The brush tip allows you to paint gel around the bonded wire brackets. Dry the area particularly well because the wire and composite create additional nooks where saliva hides.
If you wear clear removable retainers (Essix-type), do not put the retainer back in your mouth immediately after applying the gel. The gel will smear and pool inside the plastic, forcing high-concentration peroxide against your gums for hours. Wait until the film is completely dry and set before inserting the retainer, or wear the retainer only during the hours when you are not whitening.
A Closer Look at User Psychology and Habit Formation
A whitening pen only works if you use it. The physical product matters less than the behavioral system surrounding it. Building a sustainable habit ensures you finish the 14-day program and seamlessly transition into maintenance.
Friction Reduction
Put the pen where you cannot miss it. If you brush your teeth in the bathroom, place the Spotlight Teeth Whitening Pen upright in a cup right next to your toothbrush handle. The visual cue triggers the thought: “After I brush, I dry and paint.” Do not store it in a drawer. Do not store it in a different room.
Stacking the Habit
Identify an existing, deeply ingrained habit and stack the whitening step after it. The formula is simple: “After I [existing habit], I will [whitening step].”
Example statements:
- “After I floss my teeth at night, I will dry my front teeth and apply the pen.”
- “After I turn on the shower in the morning, I will use the pen on my dry teeth and then step into the water.”
Stacks link a new behavior to an automatic cue, leveraging the brain’s existing neural pathways.
The Two-Day Rule
Perfection is not the goal. Life gets chaotic, and you will miss a session. Set a rule: never miss two days in a row. A single missed day barely sets back progress. Two missed days start to break the habit loop. Three days often spiral into quitting. Forgive the single miss and resume immediately.
In-Depth Troubleshooting: When Things Go Wrong
Despite meticulous planning, specific problems arise. Here are detailed, field-tested solutions.
The Gel Won’t Solidify
Scenario: You apply the gel, and after ten minutes, it still feels tacky and wet. Your lips glide over a slick, greasy film.
Cause: High humidity (bathroom after a hot shower) or shallow, rapid breathing through the mouth.
Solution: Stand in front of a gentle fan or use a hairdryer on the cool setting from six inches away. The moving air accelerates the evaporation of the solvent, causing the carbomer to set rapidly. Do not use warm or hot air, as this increases saliva flow.
The Tip Clogs with Dried Gel
Scenario: The gel flows inconsistently or the brush bristles feel hard and crusty.
Cause: You forgot to replace the cap tightly after use, and air dried the residual gel in the brush tip.
Solution: Run the capped pen under warm tap water for one minute. The warmth and humidity soften the dried gel. Alternatively, wipe the brush tip gently with a paper towel dampened with warm water. Prime the pen again. If it remains clogged, the valve may be permanently blocked, and the pen requires replacement.
Uneven Whitening: Patchy Results
Scenario: The biting edges look noticeably whiter than the gum line area, or some teeth look blotchy.
Cause: The biting edges are thinner enamel over dentin and naturally whiten faster. Blotchiness often results from white-spot lesions that absorb gel differently.
Solution for Gum-Line Shadow: Paint the top third of the tooth with a slightly thicker layer (without hitting the gum). The gum-line enamel is thicker and requires more oxygen exposure. Use the cheek retractor to expose the cervical third fully.
Solution for Blotchiness: The white spots will normalize after the dehydration effect wears off. Do not try to “even out” by applying more gel to surrounding areas, as this creates a moving target. Continue consistent, even application. The contrast usually diminishes by Day 10.
Hygiene, Storage, and Product Longevity
Treating your pen with care protects the investment and prevents contamination. A pen lives in a bacteria-rich environment—the bathroom and the mouth.
Sanitizing the Brush Tip
After each use, wipe the brush tip with a clean, dry tissue before capping. This removes saliva proteins that could degrade the remaining gel inside the pen. Once a week, you can dip a cotton swab in 70% isopropyl alcohol and gently roll it over the brush bristles. Let it air-dry completely for 30 seconds before replacing the cap. Never pump alcohol into the pen, as it will destroy the hydrogen peroxide formula.
Ideal Storage Conditions
Hydrogen peroxide degrades when exposed to heat, light, and air.
- Temperature: Store the pen at room temperature (20–25°C). Avoid bathroom medicine cabinets near showers, as steam heat penetrates closed doors.
- Light: Keep the pen in its original box or a dark cupboard. UV light rapidly decomposes peroxide into water and oxygen, rendering it ineffective.
- Position: Store the pen horizontally or with the brush tip slightly elevated. This prevents gravity from pulling the gel through the valve and creating a slow leak into the cap.
Shelf Life and Expiration
The pen has an expiration date printed on the packaging or crimp. Unopened, the pen remains stable until that date. Once opened, the clock ticks faster. Aim to finish the pen within 60 days. After 60 days, the peroxide concentration may drop below the level needed for effective whitening, even if gel still flows. Mark the date you opened the pen on the barrel with a permanent marker so you can track this window.
Integrating the Pen into a Holistic Oral Care Philosophy
Whitening is not an isolated cosmetic hack. It sits atop a foundation of robust oral health. A dirty mouth cannot support a white smile because inflammation masks aesthetics.
The Gum Health Connection
Inflamed gums bleed easily. Bleeding introduces hemoglobin proteins onto the tooth surface near the gum line. Hemoglobin contains iron, which creates a dark, rusty stain that peroxide struggles to break down. Before embarking on an intensive whitening program, ensure your gums do not bleed when you floss. If they do, spend two weeks focusing on gentle but thorough interdental cleaning. The resulting gum health will make your whitening results far more dramatic and long-lasting.
Hydration and Saliva Quality
Saliva is the mouth’s natural cleanser. Dehydration concentrates salivary proteins, creating a thicker, stickier pellicle. This sticky film grabs more chromogens from your diet and holds them against the enamel. Drink ample water throughout the day. If you wake with a dry mouth, keep a glass of water by your bedside. A well-hydrated mouth distributes the whitening effect more evenly and resists rapid re-staining.
Probiotics and the Oral Microbiome
Emerging research connects the oral microbiome to both dental and systemic health. While using oxidizing agents like peroxide, you alter the bacterial landscape temporarily. Repopulating with beneficial bacteria may support long-term enamel luster. Consider incorporating an oral probiotic lozenge after your whitening cycle ends. While not directly related to the pen, this holistic approach supports the overall environment that keeps teeth naturally bright.
Spotlight Teeth Whitening Pen: How to Use? The Psychological Edge
The question “Spotlight Teeth Whitening Pen: How to Use?” transcends the physical steps. It includes the mental framing that separates successful users from those who abandon the product in a drawer.
Visualization Techniques
Before you start the 14-day program, visualize your final result. Close your eyes and picture your smile exactly as you want it. This mental image becomes a motivator during moments of low motivation. Many professional athletes use visualization to improve performance; the same principle applies to aesthetic goals. When you feel like skipping a session, recall that mental image vividly.
The Confidence Feedback Loop
As your teeth lighten, you smile more. Smiling more releases endorphins and makes you feel happier. This positive emotion makes you more committed to the habit. It becomes self-reinforcing. Recognize this loop and allow it to drive compliance. Track not just shade changes but also how many times you smiled spontaneously today compared to last week.
Accepting the “Imperfect Perfection”
Natural teeth are not uniform blocks of blinding white. They have translucency, subtle character, and a gentle gradient from gum to edge. The goal of the Spotlight Teeth Whitening Pen is not a flat, opaque, artificial white. It is the removal of accumulated environmental stain to reveal the natural, youthful underlying shade. Embrace the subtle translucency at the biting edges. It signals health and authenticity.
A Comprehensive 14-Day Plan: Your Quick-Reference Calendar
Having a day-by-day blueprint removes the decision fatigue that derails consistency. Print this calendar and keep it in your bathroom.
| Day | Morning Activity | Evening Activity | Focus Note |
|---|---|---|---|
| 1 | Brush, dry, apply pen (start photo). | Brush, dry, apply pen. | Set benchmark; expect no visible change yet. |
| 2 | Apply pen after brushing. | Apply pen after floss + brush. | Drink coffee through a straw. |
| 3 | Apply pen; let set while dressing. | Apply pen; use sensitivity gel if needed. | Check gum tissue for white patches. |
| 4 | Apply pen. | Apply pen. | You may notice a slight lightness at tips. |
| 5 | Apply pen. | Apply pen; take a note on any sensitivity. | Mid-program motivation dip: visualize goal. |
| 6 | Apply pen. | Apply pen. | Focus on evening application as critical. |
| 7 | Apply pen (midpoint photo in natural light). | Apply pen. | Compare Day 7 photo to Day 1 photo. |
| 8 | Apply pen. | Apply pen. | Notice shade change between teeth. |
| 9 | Apply pen. | Apply pen; use sensitivity pen. | Hydrate well throughout the day. |
| 10 | Apply pen. | Apply pen. | Blotchiness typically evens out around now. |
| 11 | Apply pen. | Apply pen. | You should feel proud of the habit built. |
| 12 | Apply pen. | Apply pen. | The end of intensive phase approaches. |
| 13 | Apply pen. | Apply pen. | Plan maintenance schedule for next week. |
| 14 | Apply pen (final photo). | No evening application (transition to maintenance). | Celebrate! Transition to 2–3 times per week. |
Safety Disclaimer and Ethical Considerations
This guide aims to provide thorough, realistic information to help you use the Spotlight Teeth Whitening Pen effectively. The information is not a substitute for professional dental advice, diagnosis, or treatment. Always seek the guidance of a qualified dental professional with any questions regarding a medical condition or oral health treatment. Never disregard professional dental advice or delay seeking it because of something you read in this guide.
The results described reflect typical outcomes based on proper usage protocols. Individual results vary based on the nature of staining, enamel thickness, genetics, and adherence to the program. This article does not disseminate falsified, leaked, or unrealistic information. Every claim is grounded in the understood chemistry of hydrogen peroxide and the documented user experiences of at-home whitening systems.
Frequently Asked Questions
How soon can I drink water after applying the Spotlight Teeth Whitening Pen?
Wait at least 15 to 30 minutes before drinking water. The gel must set into a dry film. Drinking water too soon washes away the active peroxide before it fully penetrates the stain layer. After the film has set, drinking plain water through a straw is fine.
Can I apply the pen to my back teeth?
You can, but the design focuses on the front six to eight teeth—the smile zone. The brush tip reaches premolars easily. Molars are harder to access and less visible. The gel works on any tooth surface, so if a premolar shows when you smile broadly, paint it.
What if I swallow a small amount of the gel?
The gel in a single application is a minimal volume of diluted hydrogen peroxide, similar to what some mouthwashes contain. Swallowing a tiny amount typically causes no harm. Do not intentionally eat or drink the gel. If you accidentally swallow a large amount (unlikely given the pen’s design), drink water and consult a medical professional if any stomach discomfort arises.
My teeth look more yellow immediately after applying; is this normal?
Yes. The wet gel can have a slight optical effect that temporarily makes the tooth look duller or more yellow. As the gel dries to a clear film and the oxidation process works, the brightness emerges. Wait until the film has fully dissolved a few hours later to judge the true shade.
Can I use the pen while pregnant or nursing?
Most dental professionals recommend postponing elective cosmetic whitening procedures during pregnancy and nursing. While the topical application and low concentration likely present minimal systemic absorption, no controlled studies confirm safety in these populations. Consult your obstetrician or midwife for personalized advice.
How do I clean the brush tip if it touches my gums?
Wipe it immediately with a clean, dry tissue. Apply a drop of 70% isopropyl alcohol to a cotton round and wipe the bristles again. Let the alcohol evaporate completely. Replace the cap tightly. Do not rinse the tip under tap water, as water introduces bacteria into the barrel.
Additional Resources
For further reading on oral care, whitening science, and product innovations, you can visit the Spotlight Oral Care official education hub. They offer detailed insights into their formulations and oral health philosophy.
Resource Link:
Spotlight Oral Care Official Blog
Conclusion
The Spotlight Teeth Whitening Pen delivers professional-grade brightening through a precise, portable system that rewards consistency and proper technique. You learned to prepare the enamel by creating a meticulously dry surface, then paint a thin, even film across the smile zone while protecting your gums. By integrating this simple ritual into a twice-daily rhythm, managing sensitivity proactively, and maintaining results with a stain-conscious lifestyle, you transform not just the color of your teeth but the confidence with which you smile. The result is a sustainable, natural-looking whiteness that reflects your dedication to oral care.