How To Clean All On Four Dental Implants
If you have recently received All On Four dental implants—or you are considering the procedure—you have already made a life-changing investment. These implants give you a full arch of fixed teeth. They look natural. They feel strong. But they are not the same as natural teeth.
Natural teeth have a ligament that acts like a shock absorber. Your new implants do not have that. They are anchored directly into the jawbone. This difference changes everything about how you clean them.
If you clean them incorrectly, you risk a condition called peri-implantitis. That is a fancy word for bone loss around your implants. And bone loss can lead to implant failure.
The good news is that learning how to clean All On Four dental implants is simple once you understand the rules. You do not need expensive gadgets. You do not need to visit the dentist every week. You just need a clear system and the right daily habits.
This guide will walk you through every tool, every technique, and every routine mistake to avoid. Let us get started.
Understanding Why All On Four Implants Need Special Cleaning
Before we talk about the how, we need to talk about the why. Most people assume that brushing harder or more often is the answer. That is not true.
The Hidden Danger Under the Bridge
An All On Four prosthesis is a fixed bridge. You cannot pop it out like dentures. It stays in your mouth 24/7. This is wonderful for confidence and eating. But it creates a small gap between the prosthesis and your gums.
Food particles and bacteria love this gap. They will accumulate there every single day. If you ignore that hidden space, bacteria will multiply and travel down the implant posts. Your immune system will react. Your gums will swell and bleed. Over time, the bone that holds your implants will dissolve.
Important Note: This process is painless in the early stages. Most patients do not feel a problem until significant damage has already occurred. That is why prevention is not optional. It is mandatory.
Natural Teeth vs. Implants: A Cleaning Comparison
To understand the difference, look at this simple table:
| Feature | Natural Teeth | All On Four Implants |
|---|---|---|
| Surface under gums | Smooth root | Roughened titanium (attracts bacteria) |
| Blood supply | Excellent natural defense | Reduced defense nearby |
| Pain sensation | Sharp pain from cavities | No pain until bone loss is severe |
| Cleaning access | Floss can go between teeth | Requires special floss and tools to reach under the bridge |
| Risk of neglect | Cavity (repairable) | Bone loss (potentially irreversible) |
As you can see, waiting for pain or discomfort is a losing strategy. You must clean proactively.
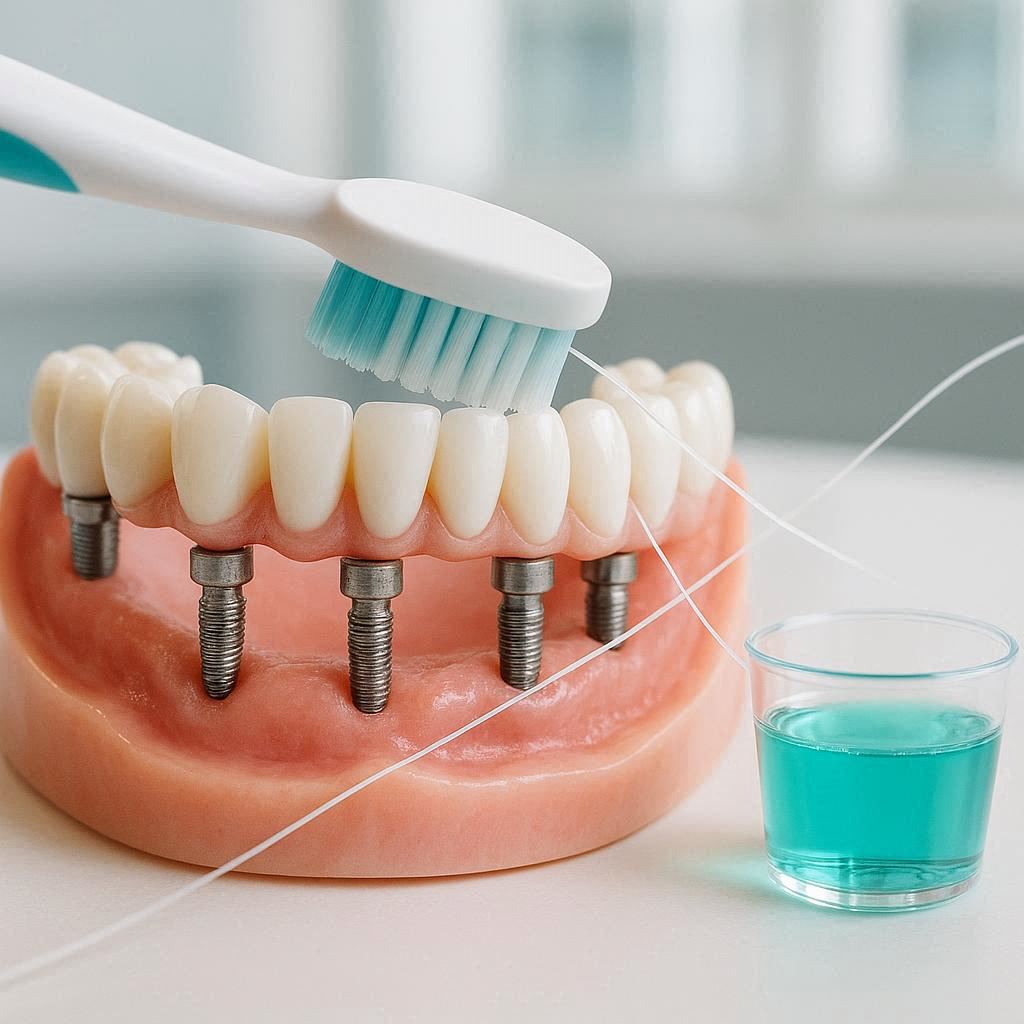
The Essential Tool Kit for Cleaning All On Four Implants
You cannot clean these implants with a regular toothbrush and standard floss. Standard floss will shred and get stuck. A soft toothbrush cannot reach under the bridge.
Here is the tool kit you need. Invest in quality items once, and they will last for months.
1. Super Floss or Implant-Specific Floss
Regular floss is too thin. It will not remove the sticky biofilm that forms under your prosthesis. You need a floss with a stiffened end and a spongy middle section.
Recommended options:
- Oral-B Super Floss (easy to find in most pharmacies)
- TePe Interspace Floss
- Superfloss from any major dental brand
The stiffened end allows you to thread the floss under the bridge. The spongy section expands to wipe the underside clean.
2. A Water Flosser (Irrigator)
This is not a luxury. For All On Four implants, a water flosser is close to a medical necessity. The pulsating water jet reaches areas that no floss or brush can touch.
What to look for:
- A reservoir of at least 600 ml (so you do not have to refill mid-cleaning)
- Multiple pressure settings (start low and increase slowly)
- A special orthodontic or perio tip (the standard tip is too direct)
The Waterpik brand is the most researched and recommended by dental professionals. But generic brands with good reviews also work.
3. A Small Interdental Brush
These look like tiny bottle brushes. They are essential for cleaning the vertical sides of the implant posts and the underside of the bridge.
Sizes matter: Every prosthesis has different gaps. You may need a 0.7 mm brush for tight spaces and a 1.5 mm brush for wider gaps. Buy an assortment pack first. Test which size fits snugly but does not get stuck.
4. A Soft-Bristled Manual or Electric Toothbrush
Yes, you still need a normal toothbrush. You will use this to clean the top surfaces of the prosthetic teeth and your natural gum tissue.
Crucial rule: Do not use a medium or hard bristle brush. It will scratch the acrylic surface of your prosthesis. Scratches become hiding places for bacteria. Soft bristles only.
5. A Non-Alcoholic, Antibacterial Mouthwash
Alcohol dries out your gum tissue. Dry gums are more susceptible to infection. Look for a mouthwash with chlorhexidine (short-term use only) or cetylpyridinium chloride (safe for daily use).
Note from a hygienist: “I tell my patients to use a plain saline rinse (warm water and salt) three times a week. It is cheap, natural, and very effective at reducing inflammation. You do not need expensive chemical rinses for daily maintenance.” — Sarah J., RDH
Quick Reference Shopping List
- Super floss (stiffened end + spongy section)
- Water flosser with perio tip
- Interdental brush assortment pack
- Soft-bristled toothbrush (electric or manual)
- Non-alcoholic mouthwash or plain salt
Step-by-Step: How To Clean All On Four Dental Implants (Evening Routine)
This is your non-negotiable daily routine. Perform it every evening before bed. Morning cleaning is optional but recommended. The evening routine is what prevents overnight bacterial growth.
Set aside 8 to 10 minutes. Do not rush.
Step 1: Rinse With Warm Water
Start by rinsing your mouth vigorously with warm water for 30 seconds. This loosens large food particles trapped under the bridge. It also softens any dried biofilm.
Spit the water out. Look at what came out. If you see food debris, you are already benefiting from this step.
Step 2: Use the Water Flosser (The Most Important Step)
Fill the reservoir with warm water (never cold—cold water can cause sensitivity in the gums around implants). Set the pressure to low or medium. High pressure can force bacteria deeper into the gum pocket.
Technique:
- Lean over the sink.
- Place the perio tip at a 45-degree angle to the gum line.
- Aim the water jet directly into the gap between the prosthesis and your gums.
- Work methodically from left to right. Do not jump around.
- Spend 3 to 5 seconds per tooth area.
- Pause after each pass. Spit out the water. Look for debris.
You will know you are doing it correctly when you see small food particles and white biofilm coming out from under the bridge. That biofilm is the target. It is invisible to the naked eye until you dislodge it.
Common mistake: Moving the water flosser too quickly. Slow down. Let the water do its work.
Step 3: Thread Super Floss Under the Bridge
This step feels awkward at first. After one week, it becomes second nature.
How to thread properly:
- Cut a 10-inch piece of super floss.
- Use the stiffened end as a needle.
- Gently push the stiffened end between two prosthetic teeth until it emerges from the underside of the bridge.
- Pull until the spongy section of the floss is under the bridge.
- Wrap the ends of the floss around your index fingers.
- Move the spongy section back and forth in a “shoe shine” motion. Do not saw aggressively. Gentle back-and-forth is enough.
- Repeat for every gap between every prosthetic tooth.
Important: Do not force the floss. If it gets stuck, do not yank it. Gently pull it back out and try a thinner floss or a smaller interdental brush instead.
Step 4: Clean the Implant Posts With Interdental Brushes
This is the step that most online guides forget. Your All On Four prosthesis has four (or sometimes six) implant abutments underneath. These are the titanium posts that connect the bridge to the implants. They are magnets for plaque.
How to do it:
- Choose an interdental brush that fits snugly around each post.
- Insert the brush from the underside of the bridge.
- Rotate the brush 3 to 4 times.
- Withdraw it slowly.
- Rinse the brush under water.
- Repeat for each implant post.
If you see bleeding during this step, do not panic. Bleeding indicates inflammation. It means you are cleaning a site that needs attention. The bleeding will stop after 5 to 7 days of consistent cleaning.
Step 5: Brush the Prosthetic Teeth and Gums
Now take your soft-bristled toothbrush. Brush the top surfaces of your prosthetic teeth exactly as you would brush natural teeth. Use a fluoride toothpaste.
Add this special move: After brushing the teeth, tilt the brush at a 45-degree angle and gently brush the gum line where the prosthesis meets the gums. Use small circular motions. This massages the gum tissue and removes bacteria at the margin.
Step 6: Final Rinse
Rinse your mouth with non-alcoholic mouthwash or warm salt water (one teaspoon of salt in a cup of warm water). Swish for 60 seconds. Spit. Do not rinse with plain water afterward. You want the active ingredients to stay in contact with your gums.
Morning Routine: The Quick Version
Your morning cleaning routine should take 3 minutes. It is less intensive than evening cleaning. The goal is to remove anything that accumulated overnight.
- Rinse with warm water (30 seconds).
- Water flosser (1 to 2 minutes, low pressure).
- Brush prosthetic teeth and gums with soft brush (1 minute).
- Swish with mouthwash (30 seconds).
That is it. Do not skip morning cleaning entirely. Overnight, bacteria multiply rapidly in a warm, moist mouth. Morning cleaning resets the bacterial load for the day.
The Weekly Deep Clean (Once Every 7 Days)
Once per week, add one extra step to your evening routine. This is a deep clean that targets stubborn biofilm that builds up over several days.
Soak the Underside With Antibacterial Solution
Fill your water flosser reservoir with a diluted antibacterial solution instead of plain water.
Safe recipe:
- 2 ounces of non-alcoholic mouthwash
- 14 ounces of warm water
Run the water flosser through all the spaces under your bridge. The antibacterial properties will reach places your physical tools cannot touch.
Do not use: Hydrogen peroxide full strength, bleach, vinegar, lemon juice, or baking soda slurry. These can damage the acrylic of your prosthesis and irritate your gums.
Inspect With a Mirror and Flashlight
After your weekly deep clean, use a small dental mirror and a bright flashlight. Look under the bridge. You should see clean, pink gum tissue. You should not see white buildup, red spots, or swelling.
If you see white material that looks like cottage cheese, that is a fungal overgrowth (often from a dry mouth or frequent sugar consumption). Call your dentist. They may prescribe an antifungal rinse.
Common Cleaning Mistakes (And How to Fix Them)
Even well-intentioned patients make mistakes. Here are the most common errors and their solutions.
Mistake #1: Using a “Pick” or Toothpick Under the Bridge
Why it is bad: Toothpicks and plastic picks are too rigid. They can scratch the titanium abutments. Scratches give bacteria more surface area to grip. They can also damage the acrylic bridge.
The fix: Throw away all toothpicks. Use super floss or a water flosser only.
Mistake #2: Skipping the Water Flosser Because It Splashes
Why it is bad: Many people try a water flosser once, get water on the mirror and their shirt, and give up. That is a costly mistake.
The fix: Practice using the water flosser with the bathroom mirror closed. Lean way over the sink. Open your mouth slightly so water can fall out naturally. After three practice sessions, you will master the angle.
Mistake #3: Using Mouthwash With Alcohol Every Day
Why it is bad: Alcohol disrupts the natural oral microbiome. It kills good bacteria along with bad bacteria. Over time, this leads to chronic dry mouth. Dry mouth accelerates gum disease around implants.
The fix: Read the label. If “alcohol” or “ethanol” is in the first five ingredients, use it only once per week. Buy an alcohol-free version for daily use.
Mistake #4: Brushing Too Aggressively
Why it is bad: Hard brushing wears down the acrylic surface of your bridge. A rough surface collects 300% more bacteria than a smooth surface.
The fix: Hold your toothbrush like a pen, not like a tennis racket. Use very light pressure. Your goal is to polish, not scrub.
Mistake #5: Flossing Only the Front Teeth
Why it is bad: The back of the bridge (the posterior region) is harder to reach. Patients unconsciously focus on the front where they can see. The back accumulates more debris because gravity pulls food downward.
The fix: Start your cleaning routine at the back teeth. Work forward. This ensures the back gets attention first, when you have the most energy and focus.
What to Eat (and Avoid) to Keep Implants Cleaner Longer
Your diet directly affects how difficult your cleaning routine will be. Some foods leave almost no residue. Other foods stick under bridges for hours.
Foods That Are Implant-Friendly
These foods rinse away easily and rarely get trapped.
- Cooked vegetables: Zucchini, spinach, steamed carrots
- Lean proteins: Chicken breast, turkey, fish, eggs
- Soft fruits: Banana, peeled peaches, melon
- Dairy: Yogurt, soft cheese, cottage cheese
- Grains: Oatmeal, rice, quinoa
Foods That Require Extra Cleaning
You can eat these foods. Just know that they demand a thorough cleaning afterward.
- Bread and rolls: The doughy texture compresses under the bridge. Rinse immediately after eating.
- Leafy greens: Spinach and kale leaves are thin and cling to abutments.
- Berries with small seeds: Raspberry and blackberry seeds can lodge between the prosthesis and gums.
- Sticky candies: Caramel, toffee, and gummy candies are risky. If you eat them, clean within 30 minutes.
- Popcorn: The hulls are notorious for getting stuck under All On Four bridges. Use your water flosser immediately.
The One Food to Never Eat
Hard nuts (whole almonds, walnuts, pecans). Patients fracture their prosthetic teeth on hard nuts every month. Your bridge is strong, but it is not as strong as natural enamel. A fractured bridge costs thousands of dollars to repair or replace.
If you want nuts, buy nut butter (peanut butter, almond butter) instead.
How Often Should You See Your Dentist for Professional Cleaning?
Even with perfect home care, you cannot clean beneath the gum line where the implant meets the bone. That area is invisible to you. Only a dentist or hygienist with specialized instruments can access it.
The Standard Schedule
| Time Since Implant Placement | Recommended Cleaning Frequency |
|---|---|
| First 6 months | Every 2 to 3 months (healing monitoring) |
| 6 months to 2 years | Every 4 months |
| 2 years and beyond | Every 4 to 6 months (depending on home care quality) |
Do not wait for a full year between professional cleanings. That works for natural teeth in low-risk patients. It does not work for All On Four implants. The stakes are too high.
What Happens During a Professional Implant Cleaning?
Your dentist or hygienist will:
- Remove the prosthesis (if it is a screw-retained type) to access the abutments directly.
- Use plastic or titanium curettes to scrape off calcified deposits. (Metal instruments are safe as long as they are softer than the titanium implant.)
- Irrigate each implant pocket with an antibacterial solution.
- Check the tightness of the retaining screws.
- Take X-rays once per year to measure bone levels.
Quote from a prosthodontist: “I have seen patients with perfect oral hygiene for five years. They never missed a day. And still, they needed a deep cleaning every six months because calcified deposits form regardless. Do not view professional cleanings as a punishment. View them as a warranty on your investment.”
Signs That Your Cleaning Routine Is Not Working
Your body will tell you when something is wrong. Do not ignore these warning signs. They indicate that your cleaning technique needs adjustment or that an infection is starting.
Early Warning Signs (Act within 2 weeks)
- Bleeding when you floss or use interdental brushes
- Red or purplish gums around the implants
- Swelling that comes and goes
- Bad breath that returns an hour after brushing
- A metallic taste in your mouth
If you notice any of these, double your cleaning time for one week. Be more thorough with the water flosser. If symptoms do not improve in 10 days, call your dentist.
Late Warning Signs (Act within 48 hours)
- Mobility: the bridge feels slightly loose when you push it with your finger
- Pus coming from the gum line (you may see a white or yellow liquid when you press on the gum)
- Pain when biting down
- A screw that feels loose (clicking sensation when you chew)
- Receding gums that expose more of the metal abutment
These signs indicate peri-implantitis or hardware failure. Do not wait. See your dentist immediately. Early treatment can save the implant. Delayed treatment often means removing the implant.
Adapting Your Cleaning Routine for Special Situations
Life changes. Your cleaning routine should adapt. Here is how to handle common scenarios.
When You Travel
Travel disrupts routines. Plan ahead.
Packing checklist for travel:
- A travel-sized water flosser (cordless, battery-operated)
- Pre-cut floss picks (not ideal, but better than nothing)
- A small interdental brush
- A soft toothbrush and travel toothpaste
If you forget your water flosser: Do not panic. Rinse vigorously after every meal. Use super floss thoroughly. Rinse with water mixed with a pinch of salt. This temporary routine will hold you for one week.
After Oral Surgery (Unrelated to Implants)
If you need a tooth extraction, bone graft, or gum surgery elsewhere in your mouth, tell your dentist about your implants. Some antibiotics and painkillers affect gum health. The stress of surgery can also trigger an inflammatory response around your implants.
Temporary adjustment: For three days after surgery, use only a water flosser on the lowest pressure setting. Do not use super floss or interdental brushes near the surgical site. Resume full cleaning after your dentist approves.
When You Have Arthritis or Limited Hand Dexterity
Cleaning implants requires fine motor skills. Arthritis, Parkinson’s disease, or stroke recovery can make this difficult. You have options.
Adaptive tools:
- A countertop water flosser with a large, easy-grip handle
- Floss holders (plastic Y-shaped tools that hold floss taut)
- Electric toothbrushes with a built-in pressure sensor
- A three-sided toothbrush (brushes top, front, and back simultaneously)
Do not feel ashamed to ask for help. A caregiver can learn to use the water flosser and interdental brushes for you.
Comparing Cleaning Methods: Which One Removes the Most Plaque?
Dental researchers have studied how well different methods clean implant bridges. Here are the findings from clinical studies.
| Cleaning Method | Plaque Removal Effectiveness | Ease of Learning | Time Required |
|---|---|---|---|
| Soft toothbrush only | 15% (ineffective) | Very easy | 2 minutes |
| Super floss only | 45% | Moderate | 5 minutes |
| Water flosser only | 65% | Easy | 3 minutes |
| Water flosser + interdental brushes | 85% | Moderate | 6 minutes |
| Water flosser + super floss + interdental brushes | 95% | Difficult (first week) | 10 minutes |
The best method is the one you will do consistently. If you cannot commit to 10 minutes every night, drop the super floss and rely on a thorough water flosser + interdental brush routine. That still removes 85% of plaque, which is clinically acceptable.
Consistency beats perfection. A 6-minute routine done every single day is better than a 10-minute routine done four days per week.
Frequently Asked Questions (FAQ)
Can I use a regular electric toothbrush on All On Four implants?
Yes, absolutely. Use a soft brush head only. The oscillating-rotating type (like Oral-B) works very well. Sonic toothbrushes (like Philips Sonicare) are also safe and effective. Avoid charcoal bristles or any “whitening” brush heads with abrasive particles.
How do I know if I am flossing too hard?
You should never feel pain during flossing. You should never see fresh, bright red blood (dark red or brownish blood is old blood and less concerning). If you push the floss against the gum and it makes a “snap,” you are using too much force. The floss should slide gently.
Is it normal to have a smell under my implant bridge?
A mild, neutral odor is normal because the space under the bridge is moist. A strong, foul, or rotten odor indicates bacterial overgrowth. Increase your cleaning frequency to twice daily for one week. If the odor persists, see your dentist. You may have a trapped piece of food that has begun to decay.
Can I use baking soda to clean my implants?
No. Baking soda is abrasive. It will scratch the acrylic teeth and the titanium abutments. Scratches on titanium are permanent and create bacterial reservoirs. Use a standard fluoride toothpaste or a gel designed for implant care.
What happens if I never clean under the bridge?
If you never clean under the bridge, a biofilm forms within 24 hours. Within 2 weeks, that biofilm calcifies into hard calculus. Calculus cannot be removed with a toothbrush or floss. It requires a professional scraping. Over 6 months, the calculus pushes the gum tissue away from the implant. Pockets form. Bacteria travel down the implant. Bone loss begins. By 18 months, significant bone loss has occurred. Implants become loose. By 3 years, the implant may fail completely and require removal.
How much does an implant replacement cost?
Replacing a failed All On Four implant is expensive. One failed implant in a four-implant bridge often means replacing the entire bridge. Costs vary by country and provider. In the United States, a single implant replacement ranges from $3,000 to $6,000. A full new bridge can cost $15,000 to $30,000. Cleaning supplies cost $50 per year. The math is clear: cleaning is cheap. Replacement is not.
Can I use whitening strips on my implant bridge?
Do not use whitening strips. They contain hydrogen peroxide or carbamide peroxide. These chemicals can penetrate the acrylic and weaken the bond between the teeth and the underlying framework. They can also irritate the gum tissue around the implants. If your prosthetic teeth are stained, ask your dentist about professional polishing (quick and affordable).
Additional Resource
For a visual demonstration of the techniques described in this article, the American Academy of Implant Dentistry provides a free library of patient education videos. Visit their official website and search for “All On Four home care.” You will find step-by-step video guides showing exactly how to thread super floss and angle your water flosser.
Link format for your website: [American Academy of Implant Dentistry - Patient Resources](https://www.aaid.com/patient-resources)
Important Final Notes for Readers
Note 1: Do not share cleaning tools with another person. Implant patients have different oral bacteria profiles. Cross-contamination can transfer aggressive bacteria from one person to another.
Note 2: If you smoke or use any tobacco products, your cleaning routine must be twice as thorough. Tobacco use reduces blood flow to the gums by 50% or more. Reduced blood flow means reduced immune response. Bacteria grow faster. Healing is slower.
Note 3: Never use a metal dental scaler or a “pick” purchased from a drugstore on your implants. Home scalers often have microscopic burrs that scratch titanium. Those scratches are impossible to polish out.
Note 4: If you grind or clench your teeth at night (bruxism), ask your dentist for a night guard. Grinding puts excessive force on the implant screws. Over time, this can loosen them or fracture the acrylic bridge. A custom night guard costs $300 to $700 and protects a $30,000 investment.
Note 5: Keep a copy of your implant records. Know the brand of your implants (Nobel Biocare, Straumann, Zimmer, etc.) and the torque specifications for the retaining screws. If you move to a new city or see a new dentist, this information is invaluable.
Conclusion
Learning how to clean All On Four dental implants is not complicated, but it is different from cleaning natural teeth. You need a water flosser, super floss, and interdental brushes. You need to clean under the bridge every single night for 8 to 10 minutes. And you need to see your dentist every 4 to 6 months for professional maintenance. Follow these guidelines consistently, and your implants can last 20 years or more. Ignore them, and you risk bone loss, infection, and expensive failure.
Disclaimer: This article is for informational purposes only and does not constitute medical or dental advice. Every patient is different. Cleaning recommendations may vary based on your specific implant system, bone health, and medical history. Always consult with your licensed dentist or prosthodontist before making changes to your oral hygiene routine. The author and publisher are not responsible for any adverse effects or consequences resulting from the use of any information contained in this article.