Dental Implant Cleaning Tools
So, you’ve invested in dental implants. Congratulations. That was a significant decision for your health, your confidence, and your ability to enjoy a crisp apple without worry.
But here is the honest truth that many people don’t realize until after their surgery.
Dental implants cannot get cavities. That is fantastic news. However, they are not invincible. They can still fail if you ignore a different enemy: peri-implantitis.
Think of peri-implantitis as a more aggressive cousin of gum disease. It attacks the soft tissue and bone around your implant. The only way to stop it? Proper cleaning. And proper cleaning requires the right dental implant cleaning tools.
You cannot clean an implant the same way you clean a natural tooth. Natural teeth have a ligament that acts as a shock absorber and a barrier against bacteria. Implants do not have this ligament. They screw directly into the bone. If bacteria sneak in, there is no natural defense.
This guide will walk you through every tool you need, every tool you should avoid, and a simple daily routine that takes less than five minutes. Let us protect that investment together.
Why Regular Toothbrushes Are Not Enough for Implants
You might be thinking, “I brush twice a day. Isn’t that enough?”
For natural teeth, yes, that is a great start. For implants, it is only half the story.
A standard manual or electric toothbrush is excellent for cleaning the flat surfaces of your implant crown—the part you see when you smile. But the real danger zone is hiding just below the gum line, where the implant meets the crown, and around the abutment (the connector piece).
Bacteria love to form a sticky biofilm in these tiny crevices. A regular toothbrush bristle is too thick to reach down into the sulcus (the gum pocket around the implant). You need specialized tools designed to be gentle on titanium but tough on plaque.
“The difference between a successful implant after ten years and a failed one often comes down to what happens in the first two millimeters below the gum line.” — Dr. Elena Vasquez, Prosthodontist.
Let us break down exactly what you need in your bathroom cabinet.
The Essential Toolkit: 7 Types of Dental Implant Cleaning Tools
You do not need to buy fifteen different gadgets. Most people only need four or five core tools. Below is a master list of everything available, ranked from “absolutely essential” to “nice to have.”
The Core Cleaning Tools (Your Daily Starters)
| Tool Name | Primary Use | Frequency | Risk of Damage |
|---|---|---|---|
| Implant-Specific Brush | Cleaning the abutment & crown base | Daily | Very Low |
| Interdental Brushes | Cleaning between implants & teeth | Daily | Low (if sized correctly) |
| Water Flosser | Flushing out food & biofilm | Daily | Zero |
| Nylon-Coated Scalers | Removing stubborn plaque | Weekly check | Medium (if used wrong) |
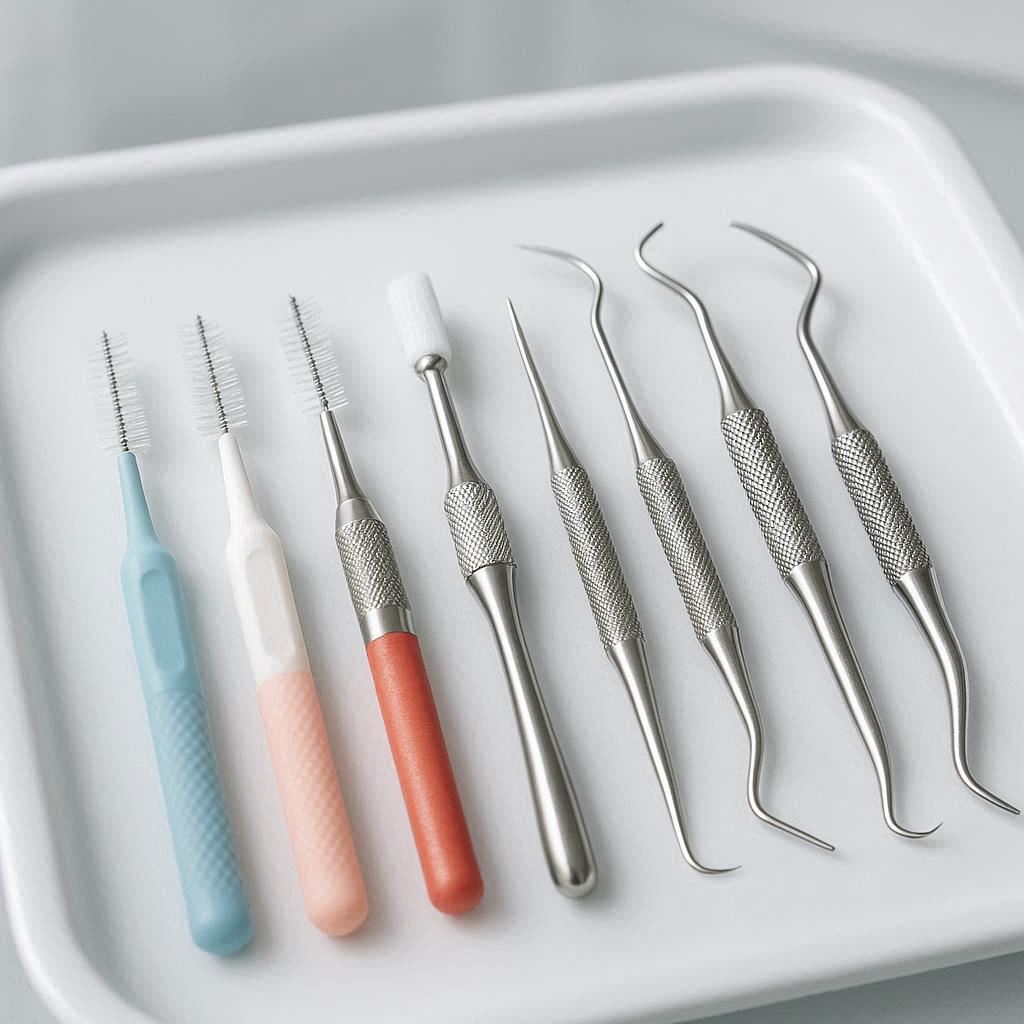
1. The Single-Tuft Brush (The Precision Tool)
Imagine a toothbrush, but miniature. A single-tuft brush has a small, pointed head with a cluster of bristles. This is arguably the most important tool for implant owners.
Why it works: The small head allows you to clean the concave areas around the abutment. You can angle it 90 degrees to scrub the gum line margin where the crown meets the root.
How to use it: Dry your implant area first (plaque is easier to see on dry surfaces). Place the tuft at a 45-degree angle toward the gum. Make tiny circular motions for five seconds on each side of the implant.
2. Interdental Brushes (The Gap Cleaners)
If you have multiple implants or implants next to natural teeth, you need these. They look like tiny bottle brushes.
The critical rule: Never force a brush. If it feels tight, go down a size.
You want the brush to pass through the gap with gentle resistance. The bristles should lightly tickle the gum tissue, not push it away. Using a brush that is too large can actually scratch the implant surface, creating rough spots where more bacteria stick.
Recommended sizes for implants: ISO sizes 0 to 2 (very small to small).
3. Water Flossers (The Deep Flusher)
A water flosser is not a luxury. For many implant patients, it is a medical necessity. Why? Because you cannot use traditional string floss around a single implant crown the same way you do on natural teeth.
A water flosser uses a pressurized stream to blast away debris and reduce bacteria up to 6mm below the gum line.
Tips for implant patients:
- Use the lowest pressure setting that still removes food. High pressure can traumatize the thin gum tissue around an implant.
- Aim the tip at a 45-degree angle directly into the gum pocket.
- Use warm water. Cold water can cause sensitivity in exposed implant threads.
4. Titanium or Plastic Scalers (For Plaque Removal)
Sometimes, despite your best efforts, calculus (hardened plaque) forms. You cannot brush this off. You need to scrape it.
Never use metal dental tools from the drugstore. They are usually made of stainless steel, which is harder than your implant’s titanium surface. Steel will scratch titanium. Those scratches become highways for bacteria.
Instead, look for:
- Plastic scalers: Disposable and safe, but they bend easily.
- Titanium scalers: Same hardness as your implant. Safe, but expensive.
- Nylon-coated curettes: The best balance of safety and effectiveness.
Tools You Should Never Use on Dental Implants
This section is just as important as the first. Using the wrong tool for one week can undo years of successful healing.
List of prohibited tools for implant cleaning:
- Metal tooth scrapers (any steel): Will scratch the surface.
- Baking soda or charcoal toothpaste: These are abrasives. They will erode the glaze on your implant crown.
- Hard-bristled toothbrushes: Only use “soft” or “extra-soft” labels.
- Standard string floss without a threader: You can saw through the gum attachment if you pull down incorrectly.
- Whitening toothpaste containing hydrogen peroxide: Can weaken the bond between the crown and the abutment over time.
- Toothpicks: They splinter and can lacerate the gum collar.
Important Note: If a product says “whitening,” “deep scrub,” or “tartar control,” read the label carefully. These often contain harsh granules. When in doubt, look for toothpaste specifically labeled for “implants,” “bridges,” or “dental hygiene.”
Step-by-Step Daily Cleaning Routine for Implants
Consistency wins the game. You do not need a complex ritual. You need a five-minute routine that hits every surface.
Here is a simple, realistic sequence you can do every night before bed.
Step 1: The Pre-Rinse (30 seconds)
Use an alcohol-free, antimicrobial mouthwash. Swish gently for 30 seconds. This loosens large food particles. Do not use high-alcohol rinses; they dry out your gum tissue, making it more prone to inflammation.
Step 2: The Water Flosser First (1 minute)
Many people floss after brushing. For implants, do the opposite.
- Fill your water flosser with lukewarm water.
- Lean over the sink.
- Start with the back teeth. Trace along the gum line of every implant.
- Pause for 2 seconds between each tooth.
- Look in the mirror. You should see debris flushing out.
Step 3: The Single-Tuft Brushing (2 minutes)
- Dry the implant area with a clean tissue (dry bristles grip plaque better).
- Apply a pea-sized amount of non-abrasive gel toothpaste.
- Angle the brush at 45 degrees toward the gum.
- Spend 10 seconds per side of the implant (front, back, left, right).
- Do not scrub hard. Use short, gentle vibrations.
Step 4: Interdental Brushing (1 minute)
- Select the correct size brush.
- Insert from the cheek side.
- Move back and forth 3-4 times.
- Rinse the brush under water after each tooth.
Step 5: The Final Rinse (30 seconds)
Use a fluoride rinse or plain saline solution (salt water). Salt water naturally reduces inflammation and kills bacteria without chemicals.
Product Comparison: Top Implant-Safe Brands
The market is flooded with “implant tools,” but not all are created equal. Here is a comparison of reliable, clinically tested brands available in most pharmacies or online.
| Brand | Tool Type | Best For | Price Range | Implant-Safe |
|---|---|---|---|---|
| TePe | Interdental Brushes | Wide gaps & tight spaces | $ | Yes (Color-coded) |
| Curaprox | Single-Tuft (CS 5460) | Abutment cleaning | $$ | Yes (Ultra-soft) |
| Waterpik | Water Flosser (WP-660) | Deep pocket flushing | $$$ | Yes (with orthodontic tip) |
| Dr. Brite | Toothpaste | Daily brushing | $$ | Yes (No peroxide) |
| Tigr | Titanium Scalers | Professional home care | $$$ | Yes (Same hardness) |
Pro tip: You do not need the most expensive electric toothbrush. A 5manualsingle−tuftbrushisoftenmoreeffectiveforimplanthygienethana150 sonic brush. Save your money for good water flossers and professional cleanings.
Professional Tools vs. Home Tools
Let us be realistic about what you can do at home versus what your hygienist should do.
What you should do at home (Daily/Weekly)
- Biofilm disruption (brushing)
- Food debris removal (flossing/water flossing)
- Visual inspection (looking for redness or swelling)
What your hygienist should do (Every 6 months)
- Probe the pocket depth: Measuring the gum attachment around the implant.
- Ultrasonic scaling with plastic tips: Using vibration to break up heavy calculus.
- Checking for mobility: Making sure the implant is still rigid.
- Polishing with rubber cups: Smoothing the crown surface.
Honest warning: Do not try to “deep clean” your implants at home. If you feel a rough deposit of tartar, do not attack it with a sharp tool. Call your dentist. One slip of a hand scaler can gouge the titanium, and that damage is permanent.
Signs You Are Using the Wrong Cleaning Tools
Your body will tell you if your cleaning method is too harsh or too weak. Listen to these signals.
Red flags to watch for:
- Bleeding when you brush. A healthy implant does not bleed during gentle cleaning. Bleeding means inflammation.
- Bad taste or odor. This indicates bacteria are hiding somewhere your tools cannot reach.
- Receding gums. If the metal of the implant becomes visible above the gum line, your brushing is too aggressive.
- The brush wears out in one week. If you destroy a soft brush in seven days, you are scrubbing with gorilla force. Dial it back.
- Pus when you press on the gum. This is an infection. Stop home cleaning and see a dentist immediately.
If you see any of these signs, stop using your current tools and schedule a check-up. It is not a failure. It is simply feedback that your technique or tool needs adjustment.
The Role of Toothpaste in Implant Care
You might be surprised to learn that the toothpaste you have used for twenty years might be damaging your implant.
Natural teeth have enamel. Implant crowns are made of ceramic (zirconia or porcelain) or acrylic. Ceramic is hard, but it has a smooth glaze. Abrasive toothpastes act like sandpaper on this glaze.
Look for toothpaste with:
- Low Relative Dentin Abrasivity (RDA) score below 70.
- Non-fluoridated options (optional, but some patients prefer).
- Ingredients like Xylitol or Ozone gel (natural antibacterials).
- Gel-based, not paste-based.
Avoid:
- Any toothpaste that says “Tartar control” (too abrasive).
- Charcoal powder (extremely abrasive).
- Baking soda crystals.
Simple recommendation: Buy children’s toothpaste. It is gentle, non-abrasive, and gets the job done safely.
Frequently Asked Questions (FAQ)
Q1: Can I use a normal electric toothbrush on my dental implants?
Yes, you can. Use a brush head labeled “soft” or “sensitive.” However, a regular electric brush only cleans the top of the crown. You still need single-tuft brushes and water flossers for the gum line area.
Q2: How often should I replace my implant cleaning brushes?
Replace interdental brushes when the wire bends or the bristles look squashed (usually every 1-2 weeks). Replace a single-tuft brush every 3 months, just like a regular toothbrush.
Q3: Is a water flosser better than string floss for implants?
Yes, for most people. String floss can be difficult to manipulate around an abutment without damaging the gum attachment. A water flosser is gentler and reaches deeper pockets. However, if you have multiple implants with bridges, use “super floss” (the thick, spongy kind).
Q4: What is the single best tool for a new implant (first 3 months)?
The single-tuft ultra-soft brush and a low-pressure water flosser. Avoid interdental brushes until the gum tissue has fully matured and tightened around the implant (around 3-6 months post-restoration).
Q5: Can I clean my implant with a paperclip or pin?
Absolutely not. Never put metal objects in your mouth to clean an implant. This will cause microscopic scratches that lead to peri-implantitis. Please, throw that idea away.
Q6: My gums bleed when I use my new brush. Should I stop?
No, but change your technique. Use less pressure. Bleeding usually means you are finally reaching bacteria that were there before. Continue gentle cleaning for 5-7 days. If bleeding persists beyond one week, see your dentist.
Additional Resource & Where to Learn More
You have taken the first step by reading this guide. But dental technology evolves.
For the most current research and video tutorials on implant cleaning techniques, visit the American Academy of Implant Dentistry (AAID) patient education section.
Recommended Resource Link:
AAID Patient Education – Implant Hygiene (Note: Always check official .org or .edu domains for medical advice).
You can also ask your dental hygienist for a hands-on demonstration. Bring your tools to your next appointment. Ask them: “Show me how to angle this single-tuft brush on my actual implant.” A two-minute live demo is worth ten articles.
A Realistic Conclusion
Protecting your dental implants is not complicated, but it does require the correct tools. A combination of a single-tuft brush, soft interdental brushes, and a gentle water flosser will remove 95% of harmful bacteria when used daily. Avoid metal tools, abrasive toothpaste, and aggressive scrubbing, and your implants can easily last thirty years or a lifetime.
Disclaimer: This article is for informational purposes only and does not constitute medical advice. Dental implant care varies based on your specific anatomy, the type of implant system used, and your overall health history. Always consult with your licensed dentist or periodontist before changing your oral hygiene routine. The author and publisher are not responsible for any adverse effects resulting from the use of information in this guide.