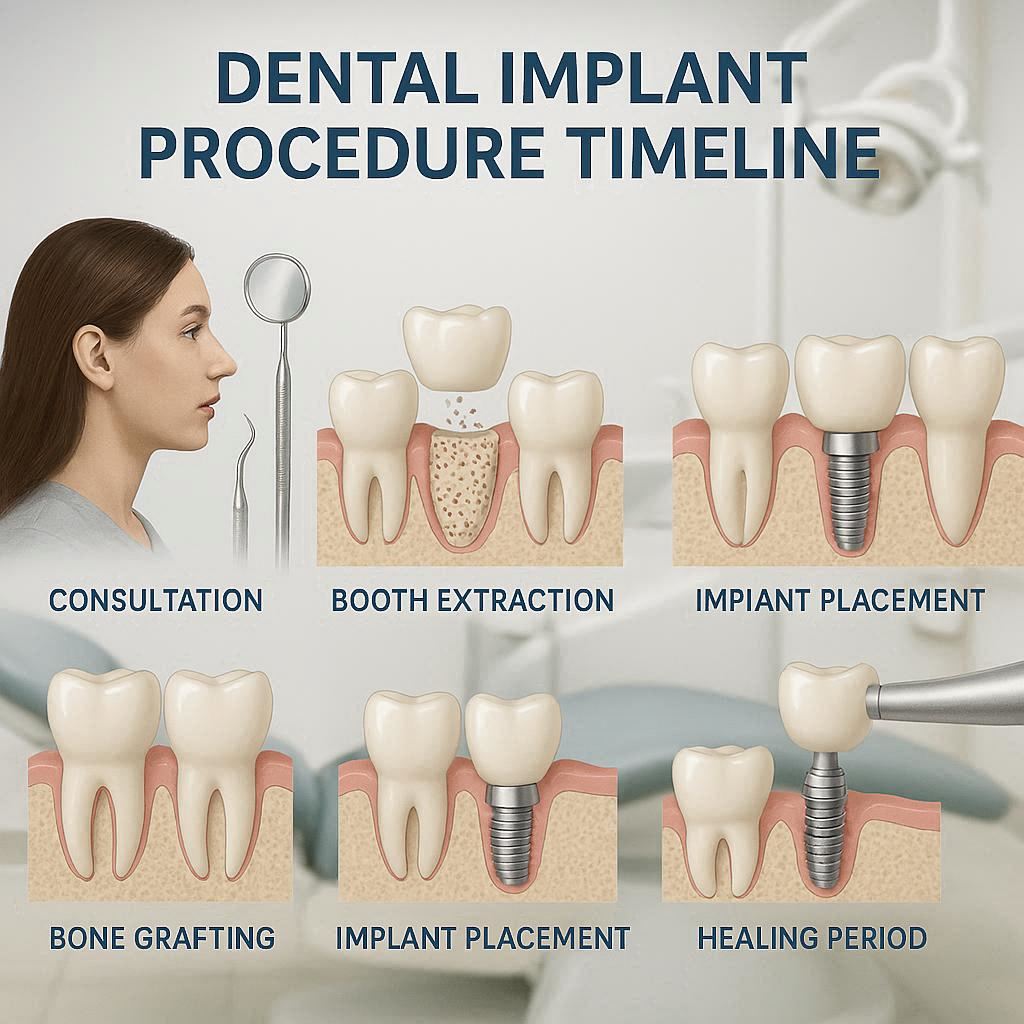
Dental Implant Procedure Timeline
Deciding to get a dental implant is a big step. You are probably asking yourself many questions. How long will it take? Does it hurt? Will I have a missing tooth for months?
The truth is that the dental implant procedure timeline varies for each person. However, a standard process follows a predictable rhythm. From the first consultation to the final crown, you are looking at a journey of several months.
This guide is your friendly companion. We will walk through every single phase. We will use simple words and realistic expectations. No confusing medical terms. Just honest, helpful information.
Understanding the Basics of Dental Implants
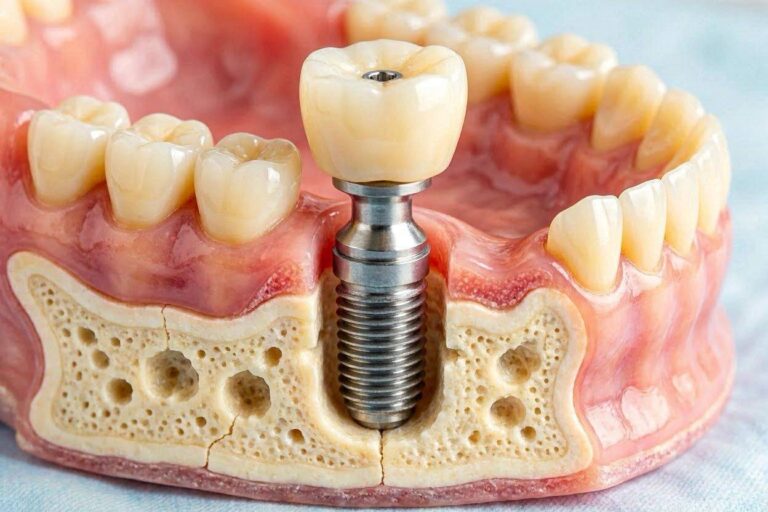
Before we look at the calendar, let us understand what a dental implant actually is. Think of it as an artificial tooth root. It is a small screw, usually made of titanium. A surgeon places this screw into your jawbone.
Why titanium? Because your body loves it. Bone cells grow tightly around titanium. This process is called osseointegration. It is the secret to a strong, permanent tooth replacement.
An implant has three main parts:
- The Implant Post: The screw inside the bone.
- The Abutment: A small connector piece on top of the post.
- The Crown: The visible, white tooth on top.
The timeline depends on how fast your bone heals and grows around that screw.
The Complete Dental Implant Procedure Timeline (At a Glance)
To give you a bird’s eye view, here is a typical timeline for a single tooth implant without complications. Remember, every mouth is unique.
| Phase | Procedure | Typical Duration |
|---|---|---|
| Phase 1 | Initial Consultation & Planning | 1 day (plus 1-2 weeks for custom guides) |
| Phase 2 | Tooth Extraction (if needed) | 1 day |
| Phase 3 | Bone Grafting (if needed) | 1 day (healing: 4-9 months) |
| Phase 4 | Implant Placement Surgery | 60-90 minutes |
| Phase 5 | Osseointegration (Healing) | 3 to 6 months |
| Phase 6 | Abutment Placement | 30 minutes |
| Phase 7 | Gum Healing | 2 to 6 weeks |
| Phase 8 | Final Crown Placement | 1 hour |
| Total Average | From extraction to final tooth | 6 to 12 months |
Important Note: If you already have a healthy extraction site and do not need bone grafting, you might finish closer to 5 months. Complex cases with severe bone loss can take over a year.
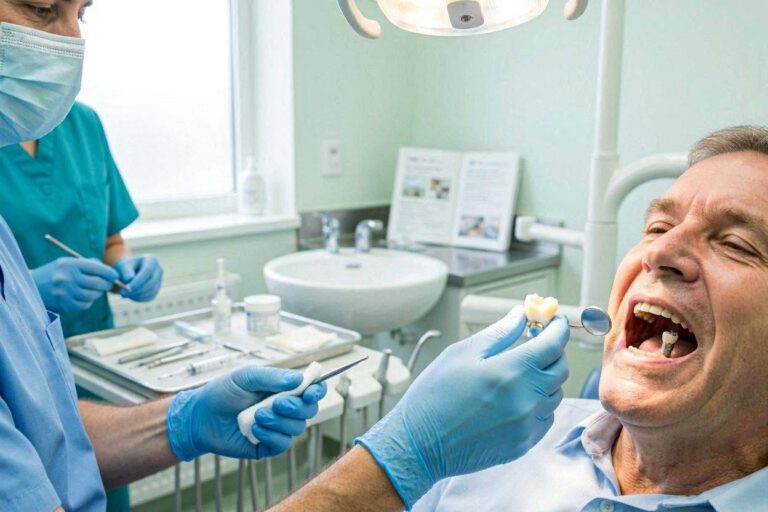
Phase 1: The Initial Consultation (Day 1)
Your journey starts with a conversation. You meet your dentist or an oral surgeon. This is not just a quick look. It is a full investigation.
What happens during this visit?
- Medical History Review: The doctor asks about your health. Do you smoke? Do you have diabetes or heart conditions? These factors affect healing.
- Oral Exam: The dentist checks the missing tooth space and the surrounding teeth.
- Imaging: You will get X-rays. Most likely, you will also get a CBCT scan (3D image of your jaw). This is crucial. It shows bone height, width, and density. It also shows nerve locations.
The Treatment Plan
The surgeon uses the 3D scan to plan the surgery on a computer. This is called guided implant surgery. It is like GPS for your tooth. It ensures precise placement.
How long does this take?
The appointment itself is 1-2 hours. Then, the lab needs 1-2 weeks to create the surgical guide. You will schedule the surgery for a later date.
Phase 2: Tooth Extraction (If Necessary)
Do you still have the damaged tooth? It must come out first.
Simple Extraction vs. Surgical Extraction
- Simple: The tooth is fully visible. The dentist loosens it with tools and pulls it out. Very fast.
- Surgical: The tooth is broken or impacted. The surgeon makes a small cut in the gum to remove it. More complex.
Immediate Implant vs. Delayed Implant
Sometimes, the surgeon places the implant immediately after pulling the tooth. This saves time. However, it is only possible if:
- No active infection is present.
- The bone socket is intact.
- There is enough healthy bone.
In most cases, the surgeon prefers to wait. They will remove the tooth and let the socket heal for 4-6 weeks before placing the implant. This reduces the risk of implant failure.
Timeline for this phase: 1 day for extraction. Add 4-6 weeks of healing before Phase 4.
Phase 3: Bone Grafting (Building a Strong Foundation)
This is a very common step. In fact, over 50% of implant patients need some form of bone graft.
Why? When you lose a tooth, your jawbone starts to shrink. It resorbs because it no longer feels the pressure from chewing. If you waited months or years to replace the tooth, you likely lost bone volume.
What is a bone graft?
The surgeon adds bone material to your jaw to increase its height or width. This material can come from:
- Your own body (from your chin or shin).
- A cow or human donor (safely processed).
- Synthetic bone material.
The Healing Period
After the graft, you must wait for your body to turn this material into living bone. This takes time.
- Minor graft (socket preservation): 4-5 months.
- Major graft (sinus lift or block graft): 6-9 months.
Realistic expectation: Bone grafting is the single biggest reason the timeline extends to 12+ months. Be patient. A strong foundation guarantees a long-lasting implant.
Timeline for this phase: 1 day for surgery. Then 4 to 9 months of waiting.
Phase 4: Implant Placement Surgery (The Big Day)
Finally, the day arrives. Do not worry. This surgery is routine. Most patients describe it as easier than a tooth extraction.
Before the surgery
You will receive local anesthesia. The area becomes completely numb. You will feel pressure but no pain. For anxious patients, sedation dentistry (laughing gas or oral pills) is available.
The surgical steps (30-90 minutes):
- Incision: The surgeon makes a small cut in your gum to expose the bone.
- Drilling: Using the surgical guide, the doctor drills a precise hole into the bone. They use a series of drills, each slightly larger than the last.
- Placement: The titanium implant screw is twisted into the hole.
- Covering: A healing cap or a cover screw is placed on top. Then, the surgeon stitches the gum tissue over or around the implant.
After the surgery
You will feel some soreness for 2-3 days. Ice packs and over-the-counter pain relievers (ibuprofen) usually manage this well. Most people return to work the next day.
Phase 5: Osseointegration (The Silent Healing)
This is the most critical phase in the entire dental implant procedure timeline. The word sounds complex, but the concept is beautiful.
Osseo = bone. Integration = to join.
Your bone cells grow into the microscopic pores of the titanium screw. Over time, the implant becomes fused with your jawbone. It becomes a part of you.
What happens during this time?
- You do nothing. Literally. You just let your body work.
- You eat soft foods on the opposite side of your mouth.
- You maintain excellent oral hygiene to prevent infection.
How long does osseointegration take?
- Lower jaw (mandible): 3 to 4 months. The lower jaw is denser and has better blood flow.
- Upper jaw (maxilla): 5 to 6 months. The upper bone is softer and takes longer to heal.
Your surgeon will take X-rays during this time. They check if the bone is attaching correctly. If the implant feels loose or painful, tell your doctor immediately. Failure during this phase is rare (2-5% of cases), especially for non-smokers.
Phase 6: Abutment Placement (Connecting the Parts)
After osseointegration is complete, you need the abutment. This is the small metal cap that connects the implant (inside the bone) to the crown (outside the bone).
This is a minor procedure.
- The surgeon numbs the area.
- They make a tiny hole in the gum to expose the top of the implant.
- They remove the healing cap.
- They screw the abutment into the implant.
- They suture (stitch) the gum tissue around the abutment, not over it.
Timeline: 30 minutes. You drive yourself home. Mild discomfort for 24 hours.
Phase 7: Gum Healing (Forming the Collar)
Now the gum needs to heal around the abutment. This forms a natural “collar” or seal. This seal is important. It prevents food and bacteria from getting down to the bone.
What to expect:
Your gums might look a little red or swollen for a few days. You will see a small metal cap sticking out of your gum. Do not panic. This is normal. It is the abutment.
The dentist may give you a temporary crown or a small healing cuff. This shapes the gum nicely for the final tooth.
Duration: 2 to 6 weeks. The gum tissue heals much faster than bone.
Phase 8: Final Crown Placement (The Reveal)
This is the exciting moment. Your implant is now healed. Your gum looks healthy. It is time for the new tooth.
Step 1: Impressions
The dentist takes a digital scan or a physical mold of your mouth. They send this to a dental laboratory.
Step 2: Fabrication
A skilled technician builds your custom crown. They match the color, shape, and size to your natural teeth. This takes 2-3 weeks.
Step 3: Fitting
You return to the office. The dentist:
- Removes the temporary healing cuff.
- Tests the crown to check the bite (how teeth touch).
- Cements or screws the final crown onto the abutment.
Result: You look in the mirror. You see a beautiful, natural tooth. It feels like your own. You cannot tell which tooth is the implant.
The Shortened Timeline: Same-Day Implants (Teeth-in-a-Day)
You may have heard of “Teeth in a Day” or “All-on-4.” This is a different procedure for people missing all teeth in an arch (upper or lower).
How it works:
The surgeon places 4 to 6 implants in the jaw. On the same day, they attach a fixed, temporary bridge of teeth. You leave the clinic with a full smile.
Important Reality Check:
- The temporary bridge is for soft foods only. You cannot chew hard foods for 6 months.
- The final, permanent bridge is placed after 6 months of healing.
- This is not for single tooth replacement. It is for full arch reconstruction.
For a single tooth, “same-day” usually means placing the implant and a temporary crown on the same day. But you still cannot chew on it for months.
Factors That Extend or Shorten Your Timeline
Everyone heals differently. Here is what influences your speed.
| Speeds Up Healing | Slows Down Healing |
|---|---|
| Non-smoker | Heavy smoker (nicotine reduces blood flow) |
| Excellent oral hygiene | Gum disease (periodontitis) |
| Healthy diet (calcium & vitamin D) | Uncontrolled diabetes |
| Good bone density | Severe bone loss needing large graft |
| Single tooth replacement | Multiple adjacent implants |
Quote from an oral surgeon: *”The most common reason for a long timeline is not biology. It is the patient rushing. Do not ask to put the crown on early. The 4 to 6 months of waiting is what makes the implant last 20+ years.”*
What Does the Pain Look Like?
Let us be honest. Nobody likes pain. Here is the realistic breakdown:
- Extraction pain (Day 1-2): Moderate. Like a bad bruise.
- Bone graft pain (Day 2-4): Pressure sensation. Swelling is common.
- Implant surgery (Day 1-3): Mild to moderate. Most patients say 2/10 on pain scale.
- Abutment (Day 1): Very mild. 1/10.
Pain management tips:
- Use ice packs immediately after surgery (20 minutes on, 20 off).
- Take ibuprofen before the anesthesia wears off.
- Sleep with your head elevated for the first two nights.
- Avoid crunchy, hot, or spicy foods for one week.
Costs Associated with the Timeline
Let us talk money. It is important to be realistic. Prices vary by location, but here is a general US estimate for a single tooth implant.
| Procedure | Average Cost (USD) |
|---|---|
| Consultation & CBCT scan | 150−500 |
| Tooth extraction | 200−600 |
| Bone graft (if needed) | 300−800 per site |
| Implant placement surgery | 1,500−2,500 |
| Abutment | 300−600 |
| Final crown | 1,000−2,000 |
| Total without graft | 3,150−3,150−5,600 |
| Total with graft | 3,450−3,450−6,400 |
Insurance note: Medical insurance sometimes covers the extraction and bone graft if it is medically necessary. Dental insurance often covers part of the crown.
Daily Life During the Healing Phases
What can you actually eat and do during the 6-12 month timeline?
Phase 1-3 (Extraction & Graft healing):
- Eat: Smoothies, yogurt, mashed potatoes, soup, scrambled eggs.
- Avoid: Nuts, seeds, popcorn, rice (small particles get in wounds).
- Activities: Normal, but avoid heavy gym lifting for 48 hours.
Phase 4-5 (Osseointegration):
- Eat: You have a metal screw in your mouth. You can eat almost anything, but avoid chewing gum or sticky candy on that side.
- Hygiene: You must brush gently around the healing cap. Use a water flosser on low setting.
- Activities: Normal. You can play sports.
Phase 6-7 (Abutment healing):
- Eat: Soft foods for 3-5 days. The gum is tender.
- Hygiene: Special small brushes (proxabrushes) to clean around the abutment.
Phase 8 (Final crown):
- Eat: Everything! Treat it like a real tooth. But do not chew ice or open bottles with it. It is strong, not indestructible.
Common Questions About the Timeline (FAQ)
Q1: Can I get a temporary tooth during the healing period?
Yes. Many dentists offer a flipper (removable partial denture) or a cantilever bridge (temporary tooth glued to adjacent teeth). These are cosmetic only. They cannot support chewing pressure.
Q2: What happens if the implant fails during osseointegration?
Failure means the bone rejected the screw. The implant becomes loose. The surgeon will remove it (small procedure). You let the bone heal for 2 months. Then you try again, often with a larger diameter implant. Success rates for second attempts are still high (90%+).
Q3: Does age affect the timeline?
Age does not matter. An 80-year-old with healthy bone heals as well as a 30-year-old. What matters is health, not age.
Q4: Can I smoke during the timeline?
You should not. Smoking is the #1 cause of implant failure. Nicotine constricts blood vessels. The bone cannot heal properly. If you must smoke, stop for 2 weeks before surgery and 2 months after.
Q5: Why does the upper jaw take longer to heal?
The upper jawbone (maxilla) is less dense and more porous. It contains the sinus cavity. Blood supply is slightly lower. Therefore, osseointegration takes 5-6 months instead of 3-4.
Tips for a Smooth and Fast Timeline
You are not a passive passenger. You can actively help your body heal faster.
Do these things:
- Take Vitamin D3 and Calcium: Ask your doctor. These build strong bones.
- Stop smoking completely. Even one cigarette a day doubles failure risk.
- Control your blood sugar. If you are diabetic, keep your HbA1c below 7.
- Use an antimicrobial mouthwash (Chlorhexidine) as prescribed for the first week.
- Attend all follow-up appointments. Do not skip the 3-month X-ray.
Avoid these things:
- Drinking through a straw for 2 weeks (risk of dry socket).
- Spitting forcefully.
- Touching the implant site with your tongue or finger.
- Eating hard foods like nuts or chips for the first month.
Long-Term Success After the Timeline
You waited 6 to 12 months. You invested money and time. Now, how do you make your implant last 30 years or more?
Maintenance is easy:
- Brush twice daily with a soft toothbrush.
- Floss daily. Use implant-specific floss or super floss.
- Use a water flosser on medium pressure to clean the gum line.
- See your hygienist every 6 months. They have special plastic tools that do not scratch the titanium.
- Wear a nightguard if you grind your teeth (bruxism). Grinding can break the crown or the screw.
Success rates:
- 5 years: 95-98% survival.
- 10 years: 93-95% survival.
- 20 years: 90-92% survival.
Dental implants are the most successful long-term tooth replacement in modern medicine.
Conclusion
The dental implant procedure timeline typically spans 6 to 12 months from start to finish. This journey includes consultation, possible extraction and bone grafting, implant surgery, a 3-6 month healing period for osseointegration, and finally placing the abutment and crown. While the wait may feel long, every single phase is essential for creating a stable, natural-looking, and permanent tooth that can last a lifetime.
Additional Resources
For more detailed information on bone grafting and sinus lifts, we recommend visiting the American Academy of Implant Dentistry (AAID) patient education center.
👉 Link: aaid.com/patients (Note: Replace with your preferred resource link or keep as external reference).
Disclaimer
This article is for informational purposes only. It does not constitute medical advice. Every surgical procedure carries risks, including infection, nerve injury, and implant failure. The dental implant procedure timeline varies significantly based on individual health, bone quality, and the surgeon’s technique. Always consult with a licensed dental professional or oral surgeon to evaluate your specific case. Do not use this article to self-diagnose or delay seeking professional care.