All About Dental Implants Drilling Process Explained
The dental implant drilling process is the central, most technically sensitive phase of implant surgery. It is the act of creating a precise, sterile, heat-controlled channel in the living bone of the jaw into which the titanium implant will be placed. The word “drilling” can evoke a visceral, uncomfortable reaction, but the reality is a far cry from the crude, high-speed drilling associated with construction or even with a conventional dental filling. The implant osteotomy, the surgical term for the prepared bone channel, is created with a sequence of exquisitely sharp, highly specialized, computer-calibrated drills, turning at low speeds under a constant, cooling flood of sterile saline. The goal is not simply to make a hole. It is to prepare a site with such geometric accuracy and minimal biological trauma that the bone cells, the osteocytes, survive the process and are primed to heal and fuse to the implant surface. This guide provides a complete, step-by-step technical explanation of the implant drilling process. It details the surgical drill sequence, the physics of heat generation and the life-saving role of irrigation, the difference between guided and freehand drilling, and the intra-operative measurements that guarantee a safe, stable, and lasting result.
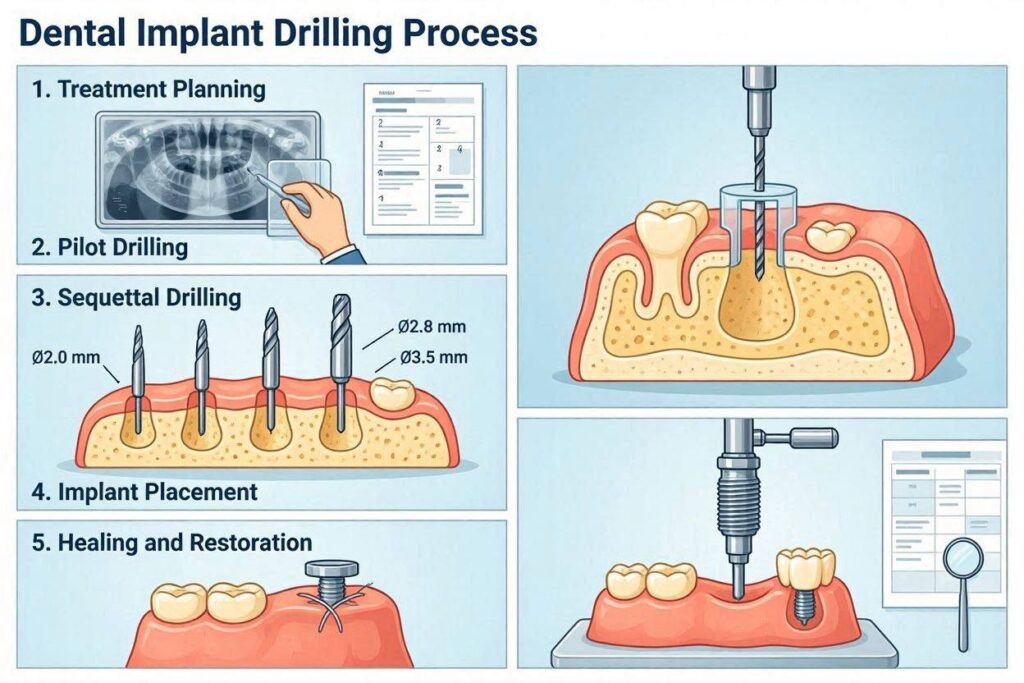
The Fundamental Principle: An Atraumatic, Heat-Controlled Osteotomy
Living bone is a delicate, highly vascularized tissue. The osteocytes, the mature bone cells, reside in tiny lacunae and are connected by a network of canaliculi. They are exquisitely sensitive to heat. The critical threshold is 47 degrees Celsius (116.6 degrees Fahrenheit). If the bone temperature exceeds this threshold for more than one minute, the bone cells die. This is called thermal necrosis. An implant placed into a socket of necrotic, dead bone will not osseointegrate. The body will slowly resorb the dead bone, and the implant will lose its support and fail.
The entire drilling protocol is designed around preventing thermal necrosis. The drills are sharp, single-use or strictly limited-use, and are replaced before they become dull. A dull drill generates friction, not cutting. The drill speed is slow, typically 800 to 1500 revolutions per minute, compared to a filling drill which runs at over 300,000 RPM. The slow speed reduces frictional heat. The most critical defense is the constant, copious, chilled saline irrigation, delivered directly to the drill tip by the implant motor’s pump system. The saline acts as a coolant and a lubricant, flushing away bone chips and debris. The surgeon uses a light, controlled, pumping motion, drilling down a few millimeters and then lifting the drill up to allow the saline to flush the depths of the osteotomy. This is a dance of precision and patience.
The Surgical Drill Sequence: A Graduated, Step-by-Step Protocol
The implant is not placed by simply picking up a drill the size of the implant. The osteotomy is widened in a meticulous, sequential progression. The implant surgical kit contains a tray of drills, each labeled with its diameter and often color-coded. The sequence follows a strict protocol.
Step 1: The Round Bur or Pilot Drill (Marking the Entry Point)
The first instrument is a small, round diamond or carbide bur. After the gum flap is reflected and the bone is exposed, the surgeon uses this bur to create a small, shallow indentation, a dimple, at the precise, pre-planned entry point on the crest of the ridge. This is the cortical punch. The dense, outer layer of bone, the cortical plate, is hard. The round bur breaks through this hard shell and creates a starting guide, preventing the subsequent, finer twist drills from skating or wandering across the smooth bone surface.
Step 2: The Initial Twist Drill (Creating the Pilot Channel)
The first twist drill is narrow, typically 2.0 millimeters in diameter. The surgeon positions the drill tip in the cortical punch dimple, aligns it with the pre-determined angle, and begins the osteotomy. The drill advances to the full planned depth, which is the length of the implant. The depth is controlled by depth markings, laser-etched rings on the drill at specific millimeter increments, and often by a physical stop on the surgical guide. A paralleling pin, a smooth metal pin, is then inserted into this pilot channel. The surgeon checks the angle and the depth.
Step 3: The Sequential Widening Drills
The pilot channel is now widened using a sequence of intermediate twist drills. The sequence is determined by the bone density and the final implant diameter. In dense, type D1 bone, the surgeon will use every drill in the sequence, gradually enlarging the channel by 0.5 to 0.8mm increments. In soft, type D4 bone, the surgeon may under-prepare the site, using fewer drills to leave the bone more compressed for the implant threads to grip. Each drill is used with the same pumping motion, under copious irrigation. A paralleling pin is inserted after each drill to confirm the trajectory has not deviated.
Step 4: The Final Drill and Countersink
The final drill in the sequence matches the diameter of the implant body, but it is slightly narrower, typically 0.5 to 1.0mm smaller, to allow the implant threads to engage and compress the bone. For a bone-level implant, a countersink drill, also called a profile drill, is used to create a widening at the very crest of the ridge, a precise shelf that accommodates the slightly wider implant collar or platform. This allows the implant to sit flush with the bone crest.
Guided vs. Freehand Drilling: The Precision Differential
The drilling sequence can be performed freehand, relying on the surgeon’s skill, spatial judgment, and the paralleling pins for guidance. An experienced surgeon can achieve excellent results freehand. However, the modern gold standard for precision, safety, and restorative predictability is guided surgery.
A guided surgery uses a 3D-printed surgical stent, fabricated from the pre-operative CBCT and digital implant plan. The stent fits securely over the patient’s adjacent teeth or the edentulous ridge. It contains metal sleeves, hollow cylinders of a precise internal diameter. Each drill in the guided surgery kit has a metal guide handle that perfectly fits into these sleeves. The drill is passed through the sleeve. The sleeve physically directs the drill’s angle, its buccal-lingual position, its mesial-distal position, and its depth. The drill cannot deviate. The surgeon’s skill is still required to manage the tissue and the irrigation, but the geometric decision-making is transferred from the hand to the stent. Guided surgery reduces the risk of nerve injury, sinus perforation, and fenestration of the buccal bone plate. It is the standard of care for complex cases and immediate-load protocols.
The Physics of Irrigation: The Coolant of Life
The clear, sterile saline solution streaming from the implant handpiece is not an optional accessory. It is the lifeblood of the procedure. The irrigation serves three vital functions. First, it cools the bone. The frictional heat generated by the drill bit cutting through the dense mineral matrix is instantly absorbed and dissipated by the flowing water. Second, it lubricates the drill flutes, reducing torque and friction. Third, it flushes the osteotomy, removing the bone chips and debris that would otherwise pack the drill flutes, increase pressure, and block the cooling flow. The saline is chilled and delivered through an internal or external irrigation channel at a controlled flow rate. A surgeon who drills without adequate irrigation is committing a catastrophic, bone-killing error. The sound of the slow-speed handpiece and the constant stream of water is the sound of a safe, healthy osteotomy.
The Depth Control and Nerve Safety Mechanisms
The drilling process is governed by absolute depth control. The CBCT scan has measured the exact distance from the bone crest to the roof of the mandibular canal (for a lower implant) or the floor of the maxillary sinus (for an upper implant). A safety margin of 1.5 to 2.0 millimeters is subtracted. This number is the maximum drilling depth.
The drills are marked with depth-indicating grooves. The surgical guide has a physical sleeve that stops the drill at the planned depth. The implant motor has an electronic depth stop. The surgeon is constantly cross-referencing the depth. The proximity to the nerve is not a guess. It is a precisely measured, mechanically controlled parameter. If the patient feels a sharp, electric sensation during lower jaw drilling, this is the drill tip touching the neurovascular bundle. The surgeon stops immediately and reassesses. This is rare with modern planning.
What the Patient Feels During the Drilling
Under profound local anesthesia, the patient feels no sharp pain. The sensation is one of intense pressure and vibration. The patient hears the low whir of the implant motor and the suction removing the saline. The vibration can feel deep and resonant in the skull. This is entirely normal. The surgeon or dental assistant will often provide a physical counter-pressure, stabilizing the patient’s jaw with a firm hand to make the vibration feel less alarming. The entire drilling sequence for a single implant is surprisingly brief, often lasting only 5 to 10 minutes of active drilling time.
Conclusion
The dental implant drilling process is a meticulously graduated, heat-controlled sequence of specialized surgical drills that progressively widen a precise channel in the jawbone, starting with a cortical punch and ending with a countersink, all performed under a constant flood of chilled sterile saline to prevent the thermal necrosis of bone cells. The use of a 3D-printed surgical guide, with its metal-directing sleeves, locks the drill into the pre-planned, prosthetically ideal trajectory, eliminating the risk of nerve or sinus violation. The patient experiences intense vibration and pressure, but no pain, during a brief, biologically atraumatic osteotomy that is the essential foundation for successful osseointegration.
Frequently Asked Questions
Can the drill hit a nerve during implant surgery?
With a pre-operative 3D CBCT scan and depth-controlled, guided drilling, the risk of hitting the inferior alveolar nerve is extremely low. The scan provides an exact map of the nerve’s position. The surgical guide and the drill depth markings physically prevent the drill from exceeding the safe depth. Nerve injury is a serious but preventable complication.
Why do they use so much water during the drilling?
The constant stream of sterile saline is a coolant and lubricant. It prevents the frictional heat of the drill from rising above the critical threshold of 47 degrees Celsius, which would cause the bone cells to die. Without irrigation, the implant would be placed into dead bone and would fail to integrate.
Is the drilling done by a robot?
No. The drilling is performed by the surgeon’s hand, holding the surgical handpiece. In guided surgery, the physical path of the drill is constrained by the metal sleeve in the 3D-printed stent, but the surgeon controls the motor, the speed, the pressure, and the irrigation. Surgical robots for implantology exist but are not yet standard.
Can old, worn-out drills be used for my surgery?
This is a dangerous and unacceptable cost-cutting practice. Implant drills have a limited number of uses, after which the cutting flutes become dull. A dull drill generates excessive friction and heat, pulverizes the bone instead of cutting it cleanly, and causes thermal necrosis. A reputable surgeon uses drills that are within their specified usage cycle.
Additional Resource:
For detailed technical videos of the implant surgical sequence, visit the Academy of Osseointegration’s educational library at www.osseo.org.
Disclaimer: This article provides a detailed educational description of the implant drilling process. Individual surgical techniques, drill sequences, and the decision to use guided versus freehand surgery are determined by the operating surgeon based on your specific anatomy and clinical needs. This is not a substitute for a personal surgical consultation.