Dental Office Window Graphics: A Complete Guide to Design and Marketing
Your dental office windows are valuable marketing space. They face the street, the parking lot, or a busy hallway. They catch the eye of potential patients walking by. They can communicate your services, your brand, and your personality before anyone steps inside.
But many practices neglect their windows. They leave them bare, cover them with dusty blinds, or slap on cheap decals that peel and fade. This wastes a powerful opportunity. Well-designed window graphics transform your windows into silent salespeople. They attract new patients, reinforce your brand, and create a welcoming atmosphere.
This guide covers everything you need to know about dental office window graphics. You will learn about design ideas, materials, regulations, installation, and maintenance. By the end, you will have a clear plan to turn your windows into effective marketing tools.
Why Window Graphics Matter
Window graphics are more than decoration. They are a strategic marketing investment. Here is why they deserve your attention.
- They Attract New Patients: Eye-catching graphics grab attention and communicate what you do. Passersby learn about your practice without stepping inside.
- They Build Brand Awareness: Your logo, colors, and messaging on windows reinforce your brand identity. Consistency builds recognition.
- They Communicate Services: Graphics can highlight your specialties, new technologies, or special offers. This educates potential patients.
- They Create Privacy: Frosted or perforated graphics provide privacy for patients inside while allowing light in.
- They Add Personality: Window graphics can be warm, professional, or playful. They reflect your practice’s character.
- They Are Cost-Effective: Compared to other advertising, window graphics are affordable and long-lasting. They work for you 24 hours a day.
“Your windows are prime real estate. They are the billboard you already own. Use them wisely, and they will bring patients to your door.” — Lisa Morgan, Dental Marketing Strategist
Types of Window Graphics
There are many types of window graphics. Each serves a different purpose. Choose the type that best fits your goals.
1. Vinyl Lettering and Decals
These are cut vinyl letters and shapes applied directly to the glass. They are affordable, versatile, and easy to update. Use them for your practice name, hours, phone number, and simple messages.
- Best For: Storefront windows, entry doors
- Cost: Low to medium
- Durability: 3-5 years
2. Full Window Wraps
These cover the entire window with a printed graphic. They are bold, eye-catching, and highly effective for branding. Use them for large windows facing busy streets.
- Best For: Large storefront windows
- Cost: Medium to high
- Durability: 5-7 years
3. Perforated Window Film
This film has tiny holes that allow you to see out while displaying a graphic to the outside. It provides privacy and marketing at the same time. Use it for patient rooms facing hallways or streets.
- Best For: Operatory windows, privacy windows
- Cost: Medium
- Durability: 3-5 years
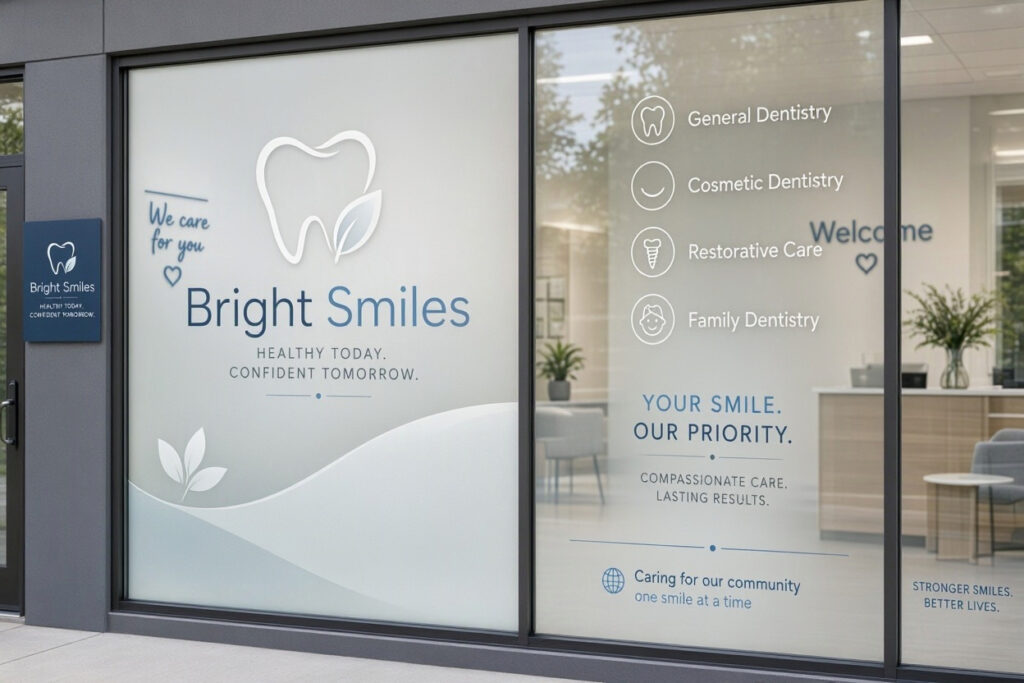
4. Frosted or Etched Glass Film
This film mimics the look of etched glass. It provides privacy while looking elegant and professional. Use it for entry doors, partitions, and windows where privacy is needed.
- Best For: Entry doors, reception windows
- Cost: Medium
- Durability: 5-7 years
5. Window Clings
These are removable, static-cling graphics. They are easy to apply and remove. Use them for seasonal promotions, temporary offers, and holiday decorations.
- Best For: Temporary promotions, seasonal decor
- Cost: Low
- Durability: 1-2 years
6. Illuminated and Neon Signs
These are electric signs that light up. They are highly visible at night and add a modern touch. Use them for your logo or a key message.
- Best For: Street-facing windows, night visibility
- Cost: High
- Durability: 5-10 years
| Type | Best For | Cost | Durability |
|---|---|---|---|
| Vinyl Lettering | Storefronts, doors | Low-Medium | 3-5 years |
| Full Wraps | Large windows | Medium-High | 5-7 years |
| Perforated Film | Privacy windows | Medium | 3-5 years |
| Frosted Film | Doors, partitions | Medium | 5-7 years |
| Window Clings | Temporary promos | Low | 1-2 years |
| Illuminated Signs | Night visibility | High | 5-10 years |
Note for Readers: Check local signage regulations before installing window graphics. Some areas have restrictions on size, brightness, and content. Always get approval if required.
Design Principles for Effective Window Graphics
Good design makes the difference between a graphic that attracts and one that repels. Follow these principles.
1. Keep It Simple
Less is more. A cluttered window confuses the eye. Choose one key message and make it bold. Avoid too much text, too many colors, or too many images.
2. Use High-Contrast Colors
Your graphics must be readable from a distance. Use high-contrast colors that stand out against the background. Dark text on a light background or light text on a dark background works best.
3. Choose Readable Fonts
Use clean, sans-serif fonts. Avoid decorative fonts that are hard to read from afar. Ensure the text is large enough to be seen from the street.
4. Include Your Branding
Your logo, practice name, and brand colors should be prominent. This reinforces your identity and builds recognition.
5. Focus on Benefits
Communicate what patients gain from choosing your practice. “Gentle Care for Anxious Patients” or “Same-Day Emergency Appointments” are more effective than generic messages.
6. Include a Call to Action
Tell people what to do next. “Call Today,” “Book Online,” or “Walk-Ins Welcome” guide potential patients to take action.
7. Consider the View from Inside
Window graphics affect the view from inside. Ensure they do not block natural light or obscure the view for patients and staff.
| Principle | Action | Benefit |
|---|---|---|
| Simplicity | One key message | Easy to read |
| Contrast | High-contrast colors | Visible from distance |
| Readable Fonts | Clean, sans-serif | Legible from afar |
| Branding | Logo, colors, name | Recognition |
| Benefits | Focus on patient gains | Persuasive |
| Call to Action | Tell people what to do | Drives action |
| Inside View | Don’t block light | Comfort for patients |
Pro Tip: Test your design from across the street. Can you read it clearly? Does it look professional? Ask others for their honest opinion before you commit.
Window Graphics Ideas for Dental Offices
Here are some proven ideas for dental office window graphics.
1. The Welcome Window
A warm welcome message with your practice name and logo. Include your hours and phone number. This is simple, professional, and effective.
2. The Services Window
List your key services: general dentistry, cosmetic dentistry, orthodontics, etc. Use icons or simple graphics to make it visually appealing.
3. The “New Patients Welcome” Window
A clear message that you are accepting new patients. Include a call to action like “Call Today” or “Book Online.”
4. The Privacy Window
Use frosted or perforated film on operatory windows. Add your logo for branding. This provides privacy while keeping the space bright.
5. The Seasonal Window
Change your graphics for holidays and seasons. A festive window graphic shows your practice is active and engaged with the community.
6. The Pediatric Window
Bright, playful graphics featuring friendly characters, animals, or tooth mascots. This appeals to children and reassures parents.
7. The Emergency Window
A clear message that you offer emergency dental services. Include your phone number in large, bold text. This is especially effective for street-facing windows.
8. The Community Window
Highlight your involvement in the community. “Proud Sponsor of [Local Team]” or “Supporting [Local Charity].” This builds goodwill and local recognition.
| Idea | Best For | Key Elements |
|---|---|---|
| Welcome Window | All practices | Name, logo, hours, phone |
| Services Window | All practices | Service list, icons |
| New Patients | Growing practices | Clear message, CTA |
| Privacy Window | Operatories | Frosted film, logo |
| Seasonal | All practices | Holiday graphics |
| Pediatric | Pediatric offices | Characters, bright colors |
| Emergency | All practices | Large phone number, CTA |
| Community | All practices | Sponsorship message |
Important Note: Avoid making false or exaggerated claims in your window graphics. Honesty builds trust. Stick to factual, verifiable statements about your services.
Materials and Durability
The material you choose affects the look, durability, and cost of your window graphics. Here is a comparison.
1. Cast Vinyl
- Pros: Durable, conforms to curved surfaces, long-lasting
- Cons: More expensive than calendared vinyl
- Best For: Long-term graphics, curved windows
2. Calendared Vinyl
- Pros: Affordable, good for flat surfaces
- Cons: Less durable, not suitable for curves
- Best For: Short-term graphics, flat windows
3. Perforated Film
- Pros: Provides privacy, allows visibility from inside
- Cons: Can reduce light transmission slightly
- Best For: Operatory windows, privacy windows
4. Frosted Film
- Pros: Elegant, provides privacy, durable
- Cons: Can be difficult to remove
- Best For: Entry doors, partitions
5. Static Cling
- Pros: Removable, reusable, affordable
- Cons: Less durable, not suitable for long-term use
- Best For: Temporary promotions, seasonal decor
| Material | Durability | Cost | Best Use |
|---|---|---|---|
| Cast Vinyl | 5-7 years | High | Long-term, curved |
| Calendared Vinyl | 3-5 years | Low | Short-term, flat |
| Perforated Film | 3-5 years | Medium | Privacy windows |
| Frosted Film | 5-7 years | Medium | Doors, partitions |
| Static Cling | 1-2 years | Low | Temporary promos |
Note for Readers: Choose materials that are suitable for your climate. Extreme heat or cold can affect the durability of window graphics. Consult a professional installer for recommendations.
Regulations and Permits
Window graphics are subject to local regulations. Here is what to check.
1. Signage Permits
Many cities require permits for window signs, especially if they cover a certain percentage of the window. Check with your local planning or building department.
2. Size Restrictions
Some areas limit the size of window graphics. Ensure your design complies with local rules.
3. Content Restrictions
Some regulations restrict certain types of content, such as flashing lights or offensive images. Ensure your graphics are appropriate and compliant.
4. Landlord Approval
If you rent your office space, check your lease agreement. You may need landlord approval before installing window graphics.
5. Historical District Rules
If your office is in a historical district, there may be additional restrictions on signage and design. Check with your local historical commission.
| Regulation | What to Check | Why It Matters |
|---|---|---|
| Signage Permits | Local planning department | Legal compliance |
| Size Restrictions | Local codes | Avoid fines |
| Content Rules | Local regulations | Compliance |
| Landlord Approval | Lease agreement | Avoid disputes |
| Historical Rules | Historical commission | Preserve character |
Important Note: Always get written approval before installing window graphics. This protects you from fines and forced removal. Consult a local signage professional for guidance.
Installation and Maintenance
Proper installation and maintenance keep your window graphics looking great.
Installation Tips
- Clean the Glass: Thoroughly clean the window before installation. Any dust or dirt will cause bubbles and peeling.
- Use Professional Installers: Window graphics require skill and precision. Hire a professional for the best results.
- Apply in Moderate Weather: Extreme heat or cold can affect adhesion. Install in mild weather for best results.
- Follow Manufacturer Instructions: Each material has specific installation requirements. Follow them carefully.
Maintenance Tips
- Clean Gently: Use a soft cloth and mild soap to clean graphics. Avoid abrasive cleaners that can damage the material.
- Inspect Regularly: Check for peeling, bubbling, or fading. Repair or replace graphics as needed.
- Avoid Pressure Washing: High-pressure water can damage window graphics. Clean by hand.
- Remove Carefully: When it is time to remove graphics, use a professional service. Improper removal can damage the glass.
| Task | Frequency | Notes |
|---|---|---|
| Cleaning | Weekly | Mild soap, soft cloth |
| Inspection | Monthly | Check for damage |
| Repair | As needed | Fix peeling edges |
| Replacement | Every 3-5 years | Depends on material |
Pro Tip: Keep a maintenance log for your window graphics. Record cleaning, repairs, and replacements. This helps you stay on top of maintenance and extend the life of your graphics.
Budgeting for Window Graphics
Window graphics are a cost-effective marketing investment. Here is a simple budgeting framework.
| Graphic Type | Cost Range | Notes |
|---|---|---|
| Vinyl Lettering | $100 – $500 | Simple, affordable |
| Full Window Wrap | $500 – $2,000 | Large, impactful |
| Perforated Film | $300 – $1,000 | Privacy plus branding |
| Frosted Film | $200 – $800 | Elegant, private |
| Window Clings | $50 – $200 | Temporary, seasonal |
| Illuminated Sign | $1,000 – $5,000+ | High visibility, night |
Pro Tip: Start with simple vinyl lettering for your practice name and hours. This is affordable and effective. Add more elaborate graphics as your budget allows.
Common Mistakes to Avoid
Even well-intentioned window graphics can go wrong. Here are the most common mistakes.
- Overcrowding: Too much text or too many images make the window look cluttered. Fix it by simplifying.
- Poor Readability: Small fonts or low contrast make graphics hard to read. Fix it with large, bold text.
- Ignoring Regulations: Failing to check permits can result in fines. Fix it by checking local rules first.
- Using Cheap Materials: Flimsy materials peel and fade quickly. Fix it by investing in quality.
- Neglecting Maintenance: Dirty or damaged graphics look unprofessional. Fix it with regular cleaning and repairs.
- Blocking Natural Light: Dark or full-coverage graphics can make the inside feel gloomy. Fix it with perforated or partial-coverage designs.
- Forgetting the Inside View: Graphics that look great from outside may look bad from inside. Fix it by checking both views.
“The most common mistake I see is trying to say too much on one window. Patients do not read paragraphs as they walk by. They scan. Keep it short, clear, and focused on one key message.” — Mark Reynolds, Healthcare Signage Designer
Frequently Asked Questions
How much do dental office window graphics cost?
Costs vary widely. Simple vinyl lettering starts around $100. Full window wraps can cost $500 to $2,000. Illuminated signs can cost $1,000 or more. Get quotes from local installers.
Do I need a permit for window graphics?
It depends on your location. Many cities require permits for window signs, especially if they cover a large portion of the window. Check with your local planning department.
How long do window graphics last?
High-quality vinyl graphics last 3-7 years, depending on the material and climate. Frosted film lasts 5-7 years. Temporary clings last 1-2 years.
Can window graphics provide privacy?
Yes. Frosted film and perforated film provide privacy while allowing light in. Perforated film lets you see out while displaying a graphic to the outside.
Will window graphics damage my glass?
No, when installed and removed properly. High-quality materials are designed to adhere to glass without leaving residue. Professional removal is recommended.
What should I put on my dental office window?
Start with your practice name, logo, hours, and phone number. Add a welcome message and a call to action. Highlight key services or new patient offers. Keep it simple and readable.
Conclusion
Dental office window graphics are a powerful, cost-effective marketing tool. By choosing the right design, materials, and installation, you can turn your windows into 24-hour ambassadors that attract patients and build your brand.
Additional Resource
For more guidance on signage regulations and design best practices, explore the resources from the International Sign Association. https://www.signs.org/