Dental Office Layout Floor Plans: A Complete Guide to Designing Your Practice
The layout of your dental office determines everything. It affects how smoothly your team works, how comfortable patients feel, and how efficiently your practice operates. A well-designed floor plan reduces stress, saves time, and maximizes your investment. A poorly designed one creates bottlenecks, frustration, and costly renovations later.
Many practice owners underestimate the importance of floor plan design. They focus on equipment and decor, treating the layout as an afterthought. But the layout is the foundation of your entire practice. It dictates traffic flow, infection control, privacy, and workflow efficiency.
This guide covers everything you need to know about dental office layout and floor plans. You will learn about key design principles, room-by-room planning, space requirements, and common mistakes. By the end, you will have a clear understanding of how to design a floor plan that works for your practice.
Why Floor Plan Design Matters
A floor plan is more than a drawing. It is a strategic document that shapes every aspect of your practice. Here is why it deserves careful thought.
- It Drives Workflow Efficiency: A well-planned layout reduces wasted movement. Your team moves smoothly between rooms, saving time and energy.
- It Improves Patient Experience: A logical, easy-to-navigate layout reduces anxiety. Patients feel guided and cared for.
- It Supports Infection Control: Clear separation between clean and dirty zones prevents cross-contamination. This is critical in a dental setting.
- It Maximizes Space Utilization: Good design uses every square foot effectively. You avoid wasted space and unnecessary expansion costs.
- It Accommodates Future Growth: A flexible layout allows you to add operatories or technology without major renovations.
- It Ensures Compliance: Floor plans must meet building codes, accessibility standards, and safety regulations. Proper design ensures compliance.
“The floor plan is the DNA of your practice. Get it right, and everything else falls into place. Get it wrong, and you will fight the space every day.” — Dr. Amanda Reid, Dental Office Design Specialist
Key Principles of Dental Office Layout
Before you design your floor plan, understand these core principles.
1. Patient Flow
Patients should move through your office in a logical, intuitive way. The journey from entry to treatment to exit should be smooth and stress-free.
2. Staff Flow
Your team needs efficient pathways between operatories, sterilization, the lab, and the front office. Minimize steps and avoid crossing paths with patients where possible.
3. Clean and Dirty Separation
Infection control is non-negotiable. Design clear zones for clean supplies, contaminated instruments, and sterilization. Ensure one-way flow from dirty to clean.
4. Privacy
Patients deserve privacy during treatment and conversations. Design operatories and consultation areas to protect confidentiality.
5. Accessibility
Your office must be accessible to all patients. Wide doorways, wheelchair-friendly counters, and clear pathways are essential.
6. Flexibility
Design with future growth in mind. Modular furniture, flexible walls, and adaptable spaces allow you to expand or reconfigure as needed.
| Principle | Goal | Key Design Elements |
|---|---|---|
| Patient Flow | Smooth, intuitive journey | Clear entry, logical room sequence |
| Staff Flow | Efficient movement | Central sterilization, minimized steps |
| Clean/Dirty Separation | Infection control | One-way flow, color-coded zones |
| Privacy | Confidentiality | Solid doors, acoustic panels |
| Accessibility | Inclusive access | Wide doorways, ADA compliance |
| Flexibility | Future growth | Modular design, adaptable spaces |
Note for Readers: Always consult with an architect or dental office designer who has experience with healthcare facilities. They can help you meet codes and optimize your layout.
Space Requirements by Room
Different rooms need different amounts of space. Here is a general guide to help you plan.
Reception and Waiting Area
- Size: 150 – 400 square feet
- Why: Needs space for seating, reception desk, and patient flow. Larger practices may need more.
- Key Elements: Reception desk, seating, restroom access, children’s area
Operatories
- Size: 100 – 150 square feet each (10 x 12 feet minimum)
- Why: Needs space for dental chair, equipment, cabinets, and movement around the patient.
- Key Elements: Dental chair, delivery system, light, sink, cabinets, waste disposal
Sterilization Area
- Size: 80 – 150 square feet
- Why: Needs space for sterilizers, ultrasonic cleaner, instrument storage, and workflow.
- Key Elements: Sterilizers, ultrasonic cleaner, counter space, sink, storage
Dental Lab
- Size: 60 – 120 square feet
- Why: Needs space for model work, casting, and storage. Small practices may use a shared lab.
- Key Elements: Workbench, storage, ventilation, sink
Front Office/Business Area
- Size: 100 – 200 square feet
- Why: Needs space for staff desks, computers, filing, and private conversations.
- Key Elements: Desks, computers, filing, phones, privacy partitions
Consultation Room
- Size: 80 – 120 square feet
- Why: Needs space for private discussions, treatment planning, and financial conversations.
- Key Elements: Desk, chairs, computer, privacy
Staff Break Room
- Size: 80 – 150 square feet
- Why: Needs space for staff to rest, eat, and recharge.
- Key Elements: Table, chairs, refrigerator, microwave, storage
Restrooms
- Size: 50 – 80 square feet each
- Why: Needs space for toilet, sink, and accessibility. At least one ADA-compliant restroom is required.
- Key Elements: Toilet, sink, mirror, accessible fixtures
| Room | Recommended Size | Key Elements |
|---|---|---|
| Reception | 150 – 400 sq ft | Desk, seating, flow |
| Operatories | 100 – 150 sq ft each | Chair, equipment, cabinets |
| Sterilization | 80 – 150 sq ft | Sterilizers, counters, sink |
| Dental Lab | 60 – 120 sq ft | Workbench, storage, ventilation |
| Front Office | 100 – 200 sq ft | Desks, computers, privacy |
| Consultation | 80 – 120 sq ft | Desk, chairs, privacy |
| Break Room | 80 – 150 sq ft | Table, appliances, storage |
| Restrooms | 50 – 80 sq ft each | Toilet, sink, ADA access |
Important Note: These are general guidelines. Actual requirements vary based on your practice size, services offered, and local regulations. Consult a professional designer for precise measurements.
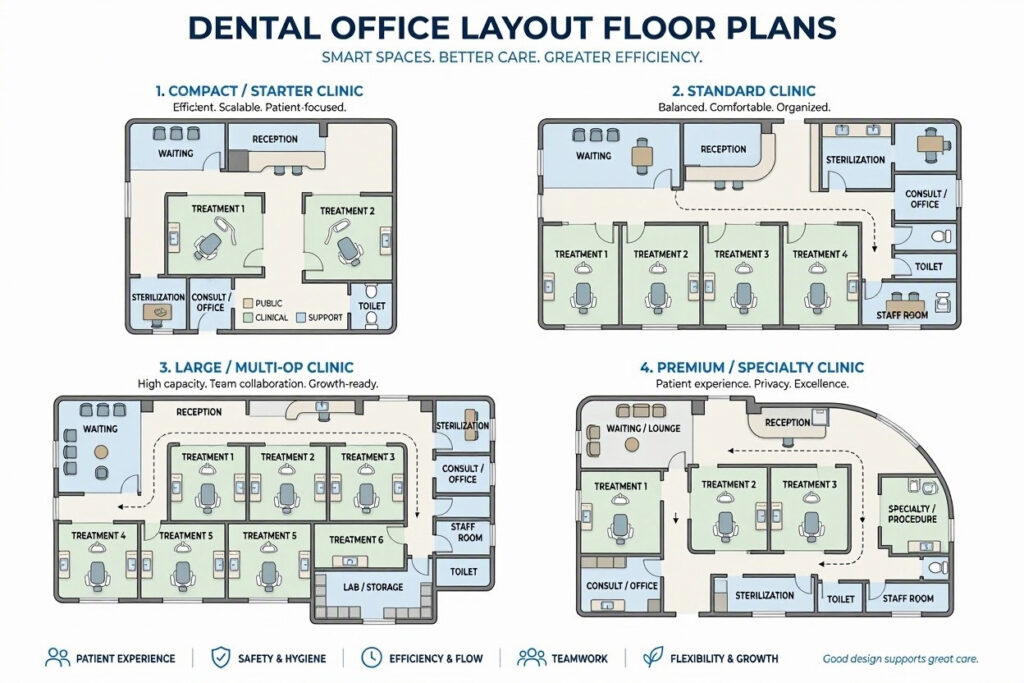
Types of Dental Office Floor Plans
There are several common floor plan layouts. Each has its own strengths and weaknesses.
1. The Linear Layout
Rooms are arranged in a straight line along a central hallway. This is simple, efficient, and easy to navigate.
- Pros: Clear flow, easy wayfinding, efficient use of space
- Cons: Can feel institutional, long hallways can be tiring
- Best For: Small to medium practices
2. The U-Shaped Layout
Rooms are arranged around a central core (often sterilization or the lab). This creates a compact, efficient workspace.
- Pros: Short travel distances, efficient workflow, good for teamwork
- Cons: Can feel enclosed, requires careful planning
- Best For: Medium to large practices
3. The Pod Layout
Operatories are grouped in clusters (pods) with shared support spaces. This is common in larger practices.
- Pros: Flexible, efficient, good for team dentistry
- Cons: Requires more space, can be complex to design
- Best For: Large practices, group practices
4. The Open Concept Layout
Operatories are open or semi-open, with partial walls or dividers. This is a modern trend.
- Pros: Feels spacious, encourages collaboration, efficient
- Cons: Less privacy, can be noisy, not suitable for all patients
- Best For: Modern practices, pediatric offices
5. The Hybrid Layout
Combines elements of different layouts to suit your specific needs. This is the most flexible option.
- Pros: Customized to your practice, flexible, efficient
- Cons: Requires careful planning, may be more complex
- Best For: Any practice willing to invest in custom design
| Layout Type | Best For | Pros | Cons |
|---|---|---|---|
| Linear | Small-medium | Clear flow, efficient | Can feel institutional |
| U-Shaped | Medium-large | Compact, efficient | Can feel enclosed |
| Pod | Large, group | Flexible, team-friendly | Complex, space-intensive |
| Open Concept | Modern, pediatric | Spacious, collaborative | Less privacy, noisy |
| Hybrid | Any | Customized, flexible | Complex planning |
Pro Tip: Visit other dental offices to see different layouts in action. Ask colleagues about what works and what they would change. This firsthand experience is invaluable.
Room-by-Room Planning Guide
Here is a detailed guide to planning each key area of your dental office.
Reception and Waiting Area
This is the first impression. It should be welcoming, comfortable, and efficient.
- Location: Near the entrance, visible from the street.
- Flow: Patients enter, check in at the desk, and wait in the seating area.
- Key Elements: Reception desk, comfortable seating, restroom access, reading materials, children’s area.
- Tips: Keep the desk at a comfortable height. Provide clear signage. Ensure adequate seating.
Operatories
These are the clinical heart of your practice. They must be efficient and comfortable.
- Location: Central, accessible from sterilization and the front office.
- Flow: Patients move from the waiting area to the operatory. Staff move between operatories and sterilization.
- Key Elements: Dental chair, delivery system, light, sink, cabinets, waste disposal.
- Tips: Standardize operatory layouts for efficiency. Ensure adequate space for movement. Position equipment for ergonomic access.
Sterilization Area
This is the infection control hub. It must be designed for one-way flow.
- Location: Central, accessible from all operatories.
- Flow: Dirty instruments come in, are cleaned, sterilized, and stored. Clean instruments go out.
- Key Elements: Sterilizers, ultrasonic cleaner, counter space, sink, storage.
- Tips: Separate dirty and clean zones. Use color-coded bins. Ensure adequate ventilation.
Dental Lab
This is where custom restorations and models are made. It needs space and ventilation.
- Location: Near operatories, but separate from patient areas.
- Flow: Staff move between the lab and operatories.
- Key Elements: Workbench, storage, ventilation, sink.
- Tips: Ensure good lighting and ventilation. Keep the lab organized and clutter-free.
Front Office
This is the business hub. It needs to be organized and efficient.
- Location: Near the entrance, visible to patients.
- Flow: Staff manage phones, scheduling, billing, and patient communication.
- Key Elements: Desks, computers, filing, phones, privacy partitions.
- Tips: Ensure ergonomic seating. Provide adequate storage. Create a quiet space for phone calls.
Consultation Room
This is where private discussions happen. It needs to be comfortable and confidential.
- Location: Near the front office, away from patient traffic.
- Flow: Patients move from the operatory or waiting area to the consultation room.
- Key Elements: Desk, chairs, computer, privacy.
- Tips: Soundproof the room. Use comfortable furniture. Display educational materials.
| Room | Location | Key Flow | Tips |
|---|---|---|---|
| Reception | Near entrance | Entry to waiting | Welcoming, clear signage |
| Operatories | Central | Patient to treatment | Standardize layouts |
| Sterilization | Central | Dirty to clean | One-way flow, color coding |
| Lab | Near operatories | Staff movement | Ventilation, organization |
| Front Office | Near entrance | Staff operations | Ergonomic, organized |
| Consultation | Near front office | Private discussions | Soundproof, comfortable |
Important Note: Plan for adequate storage throughout your office. Lack of storage leads to clutter, which affects efficiency and infection control.
Workflow and Traffic Patterns
Understanding how people move through your office is key to a good floor plan. Here are the main traffic patterns to consider.
1. Patient Traffic
Patients enter, check in, wait, move to treatment, and exit. This path should be direct and intuitive. Avoid making patients walk through staff areas or past dirty utility rooms.
2. Staff Traffic
Staff move between the front office, operatories, sterilization, and the lab. This path should be efficient and separate from patient traffic where possible.
3. Supply Traffic
Supplies arrive, are stored, and are distributed to operatories and sterilization. This path should be efficient and not interfere with patient or staff flow.
4. Waste Traffic
Waste and contaminated items move from operatories to sterilization and disposal. This path should be separate from clean supply routes.
| Traffic Type | Path | Key Consideration |
|---|---|---|
| Patient | Entry to treatment to exit | Direct, intuitive, comfortable |
| Staff | Front office to operatories to sterilization | Efficient, separate from patients |
| Supply | Storage to operatories | Efficient, clean |
| Waste | Operatories to disposal | Separate from clean routes |
Pro Tip: Draw your floor plan with traffic flow in mind. Use arrows to map patient, staff, supply, and waste routes. Identify any conflicts or bottlenecks and adjust the layout accordingly.
Common Floor Plan Mistakes to Avoid
Even well-intentioned floor plans can have flaws. Here are the most common mistakes.
- Undersized Operatories: Too-small rooms make movement difficult and increase stress. Fix it by planning for adequate space from the start.
- Poor Sterilization Placement: A sterilization area that is far from operatories wastes time and energy. Fix it by placing it centrally.
- No Clean/Dirty Separation: Mixing clean and dirty zones undermines infection control. Fix it with clear separation and one-way flow.
- Ignoring Patient Privacy: Operatories that are too open or close to waiting areas compromise privacy. Fix it with solid doors and soundproofing.
- Inadequate Storage: Lack of storage leads to clutter and inefficiency. Fix it by planning ample storage throughout.
- Forgetting Accessibility: Narrow doorways and high counters exclude patients with disabilities. Fix it by following ADA guidelines.
- Not Planning for Growth: A rigid layout limits future expansion. Fix it with modular design and flexible spaces.
“The most common mistake I see is underestimating space requirements. A cramped operatory is a daily frustration. Plan for more space than you think you need.” — Mark Reynolds, Dental Office Designer
Budgeting for Floor Plan Design
Floor plan design is an investment. Here is a simple budgeting framework.
| Item | Budget Range | Notes |
|---|---|---|
| Architect/Designer | $5,000 – $30,000+ | Depends on scope and complexity |
| Permits and Fees | $1,000 – $10,000 | Varies by location |
| Construction/Renovation | $50 – $200 per sq ft | Varies widely |
| Equipment | $50,000 – $200,000+ | Depends on practice size |
| Furniture | $10,000 – $50,000 | Reception, office, break room |
| Technology | $10,000 – $50,000 | Computers, software, imaging |
| Signage | $1,000 – $10,000 | Interior and exterior |
Pro Tip: Get multiple quotes from architects and contractors. Compare their experience with dental offices specifically. A designer who understands dentistry is worth the investment.
Frequently Asked Questions
What is the ideal size for a dental office?
It depends on the number of operatories and services offered. A small practice with 2-3 operatories needs about 1,200-1,800 square feet. A larger practice with 6-8 operatories needs 2,500-4,000 square feet. Plan for future growth.
How many operatories should I have?
A good rule of thumb is one operatory per dentist, plus one for hygiene. If you have one dentist and one hygienist, plan for at least two operatories, preferably three.
Where should the sterilization area be located?
Centrally, with easy access from all operatories. It should have a clear one-way flow from dirty to clean. Avoid placing it near the waiting area or front office.
What is the best layout for a dental office?
There is no single best layout. Linear, U-shaped, pod, and hybrid layouts all have advantages. The best layout depends on your practice size, services, and goals. Consult a designer to find the right fit.
How do I plan for future growth?
Design with flexibility in mind. Use modular furniture and non-load-bearing walls that can be easily reconfigured. Plan for additional plumbing and electrical capacity. Leave space for future operatories.
What are the ADA requirements for a dental office?
ADA requirements include accessible parking, entrances, doorways (at least 36 inches wide), restrooms, and counters. Ensure all patient areas are accessible to people with disabilities. Consult local codes for specific requirements.
Conclusion
A well-designed dental office floor plan is the foundation of a successful practice. By focusing on workflow, infection control, privacy, and accessibility, you can create a space that supports your team and comforts your patients.
Additional Resource
For more guidance on dental office design and construction, explore the resources from the American Dental Association. https://www.ada.org/resources/practice/practice-management