Dental Office Cleaning Checklist: A Complete Guide to a Spotless, Compliant Practice
A clean dental office is not just about appearances. It is about patient safety, regulatory compliance, and professional reputation. Patients notice dust on shelves and smudges on counters, even if they do not mention it. Inspectors notice much more. A structured cleaning checklist keeps your practice spotless, your team accountable, and your compliance records in order. This guide provides a practical, room-by-room checklist you can adapt to your practice today.
Why a Cleaning Checklist Matters
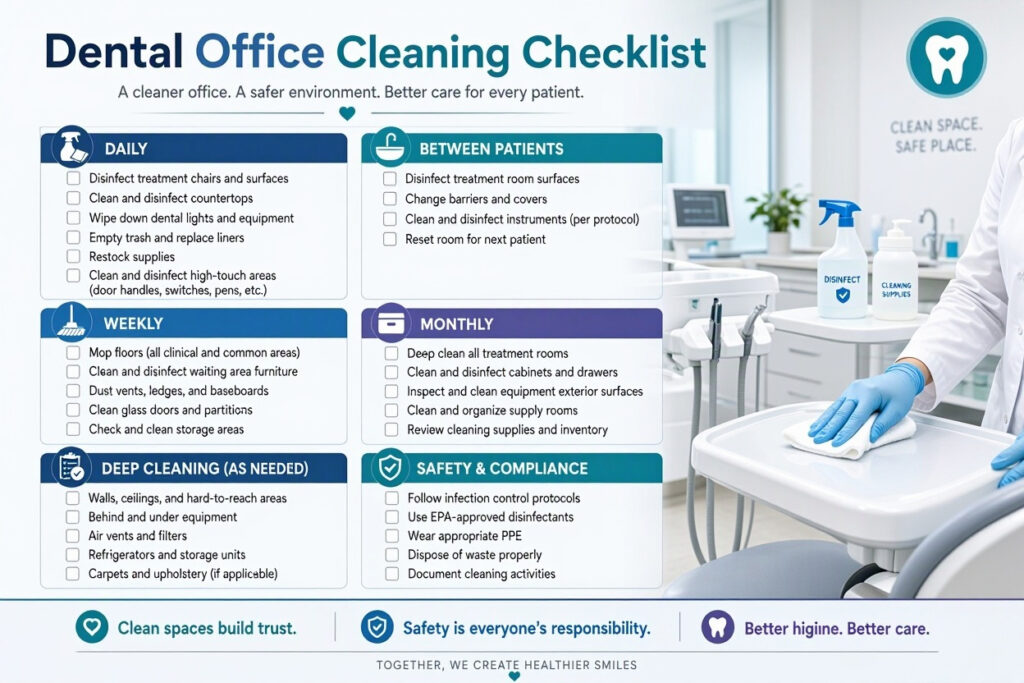
Cleaning in a dental office is not a single task. It is a layered system. Some tasks happen between every patient. Others happen daily, weekly, or monthly. Without a checklist, things get missed. With one, nothing falls through the cracks.
A checklist also protects your practice. If an inspector asks how you maintain infection control, a documented cleaning schedule is your proof. It shows that your team follows consistent, verifiable procedures.
“In a dental office, cleaning is not housekeeping. It is infection control. Treat every checklist item like a patient safety requirement.” — Infection Control Consultant
Key Benefits of a Written Cleaning Checklist
- Consistency: Every team member follows the same steps.
- Accountability: Tasks are assigned and signed off.
- Compliance: Creates a record for OSHA and health inspections.
- Efficiency: Reduces confusion about who cleans what and when.
- Patient trust: A visibly clean office reassures patients.
Understanding Cleaning Levels
Not all cleaning is the same. Dental offices require three distinct levels, each with its own purpose and frequency.
| Level | Purpose | Frequency | Examples |
|---|---|---|---|
| Cleaning | Remove visible dirt and debris | Daily or as needed | Wiping counters, sweeping floors |
| Disinfection | Kill most pathogens on surfaces | Between patients, daily | Wiping chairs, handles, trays |
| Sterilization | Destroy all microorganisms | After every use | Autoclaving instruments |
Important Note: Disinfection and sterilization are not interchangeable. Follow your practice’s infection control policy and manufacturer instructions for every product you use.
Between-Patient Cleaning Checklist
These tasks happen after every patient, without exception. Speed matters, but thoroughness matters more.
- Treatment chair: Wipe all touchable surfaces with an approved disinfectant.
- Delivery system: Disinfect handpieces, hoses, and control panels.
- Light handles: Wipe with disinfectant.
- Suction and saliva ejector: Replace disposable tips; wipe connections.
- Countertops: Clear and disinfect all work surfaces.
- Computer keyboard and mouse: Use a disinfectant wipe or cover.
- Drawer handles and cabinet pulls: Wipe with disinfectant.
- Sharps container: Check fill level; replace if needed.
- Barriers: Replace disposable barriers on high-touch items.
- Floor around chair: Spot clean any spills or debris.
Tip: Keep a disinfectant caddy stocked and within reach. A missing wipe adds minutes to every turnover.
Daily Cleaning Checklist
Daily tasks keep the office healthy from opening to closing. Assign them to specific roles so nothing is assumed.
Morning Opening Tasks
- Check sterilization logs: Confirm the autoclave passed its cycle.
- Run water lines: Flush lines per your water quality protocol.
- Wipe reception counters: Disinfect high-touch surfaces.
- Check restrooms: Restock supplies and wipe surfaces.
- Empty trash: All bins, including biohazard containers if needed.
- Sanitize waiting room: Wipe chairs, door handles, and shared surfaces.
Throughout the Day
- Clean treatment rooms between patients.
- Wipe door handles in high-traffic areas.
- Empty trash when bins are three-quarters full.
- Clean spills immediately.
- Restock supplies as they run low.
End-of-Day Closing Tasks
- Disinfect all treatment rooms: Full wipe-down of chairs, counters, and equipment.
- Run sterilization cycle: Process all instruments and log results.
- Clean sinks and faucets: Use an approved cleaner.
- Sweep and mop floors: All clinical and public areas.
- Empty all trash: Including biohazard and sharps containers.
- Wipe reception desk: Phones, keyboards, card readers, and counters.
- Clean waiting room: Chairs, tables, magazines, and kids’ area.
- Check restrooms: Final clean and restock.
- Secure the office: Turn off equipment, lock cabinets, set alarms.
Weekly Cleaning Checklist
Weekly tasks go deeper than daily cleaning. Assign them to specific days to spread the workload.
- Deep clean treatment chairs: Upholstery, crevices, and base.
- Clean cabinet interiors: Wipe shelves and drawers.
- Clean windows and glass doors: Both sides.
- Dust vents and light fixtures.
- Clean the break room: Refrigerator, microwave, and counters.
- Wash fabric items: Curtains, chair covers, and uniforms.
- Clean play areas: Disinfect all toys and surfaces.
- Mop behind equipment: Chairs, cabinets, and counters.
- Clean trash cans: Inside and out.
Monthly Cleaning Checklist
Monthly tasks address areas that accumulate grime slowly.
- Clean ceiling vents and air returns.
- Dust high shelves and ledges.
- Deep clean upholstery on waiting room chairs.
- Clean baseboards and door frames.
- Wipe walls in high-traffic areas.
- Clean light diffusers and replace bulbs as needed.
- Inspect and clean sterilization area: Autoclave exterior, storage bins, and shelves.
- Clean computer equipment: Keyboards, monitors, and cables.
- Check and clean fire extinguishers and emergency equipment.
Room-by-Room Checklist
Different rooms need different attention. Use this room guide to assign tasks clearly.
| Room | Daily Tasks | Weekly Tasks |
|---|---|---|
| Treatment rooms | Disinfect chair, counters, handles | Deep clean chair, mop behind equipment |
| Reception | Wipe desk, phones, card readers | Clean glass, dust shelves |
| Waiting room | Wipe chairs, empty trash | Deep clean upholstery, clean toys |
| Restrooms | Restock, wipe surfaces, mop | Deep clean grout, wash walls |
| Sterilization | Wipe counters, log cycles | Clean autoclave exterior, shelves |
| Break room | Wipe counters, empty trash | Clean fridge, microwave, floors |
Important Note: Post a printed checklist in each room. Team members initial tasks as they complete them. Keep completed checklists for at least a year for compliance records.
Products and Supplies
Using the right products makes cleaning faster and safer.
Essential Supplies
- EPA-registered disinfectant: For clinical surfaces.
- Sterilization pouches and indicators: For instruments.
- Disposable barriers: For high-touch equipment.
- Microfiber cloths: Color-coded by area to prevent cross-contamination.
- Mops and buckets: Separate for clinical and public areas.
- Trash bags: Regular, biohazard, and sharps containers.
- Hand sanitizer and soap: Stocked in every room.
Comparison Table: Cleaning Product Types
| Product | Use | Notes |
|---|---|---|
| EPA-registered disinfectant | Clinical surfaces | Follow contact time exactly |
| Cavicide or similar | Chairs, equipment | Check material compatibility |
| Alcohol wipes | Keyboards, electronics | Avoid excess moisture |
| Mild soap and water | General cleaning | Good for non-clinical surfaces |
| Bleach solution | Restrooms, floors | Use per OSHA guidelines |
Tip: Color-code your microfiber cloths. For example, blue for treatment rooms, yellow for restrooms, and green for reception. This prevents cross-contamination between areas.
Staff Roles and Accountability
A checklist only works if someone owns each task. Assign responsibilities clearly.
Sample Role Assignments
- Dental assistants: Between-patient disinfection, sterilization, treatment room setup.
- Hygienists: Treatment room cleaning after each patient.
- Front office: Reception, waiting room, and restroom checks.
- Office manager: Compliance records, supply ordering, and spot checks.
- Cleaning service: Deep cleaning of floors, windows, and common areas.
Accountability Tips
- Post checklists visibly in each room.
- Use initials and dates to track completion.
- Review checklists weekly to spot patterns.
- Rotate responsibilities to prevent burnout.
- Recognize good performance publicly.
Compliance and Documentation
Cleaning records are part of your compliance file. Keep them organized and accessible.
What to Document
- Sterilization logs: Date, cycle, operator, and result.
- Disinfection schedules: Initialed daily and weekly checklists.
- Water line maintenance: Flushing and testing records.
- Equipment maintenance: Autoclave service, suction checks.
- Staff training: Infection control training dates and signatures.
Important Note: Check your state and local regulations for specific documentation requirements. Most jurisdictions require records to be kept for a set period, often one to three years.
Common Cleaning Mistakes to Avoid
- Skipping contact time: Disinfectants need time to work. Read the label.
- Reusing cloths across areas: Causes cross-contamination.
- Forgetting high-touch items: Door handles, light switches, and phones.
- Cleaning around clutter: Surfaces cannot be disinfected if covered.
- No documentation: If it is not recorded, it did not happen.
- Inconsistent training: New staff need clear onboarding on cleaning protocols.
Frequently Asked Questions
How often should a dental office be cleaned?
Clinical surfaces are disinfected between every patient. Full office cleaning happens daily, with deeper tasks weekly and monthly.
What should be on a daily dental office cleaning checklist?
Treatment room disinfection, restroom cleaning, trash removal, reception wiping, floor sweeping, and sterilization logging.
Who is responsible for cleaning a dental office?
Dental assistants and hygienists handle clinical cleaning. Front office staff handle reception and waiting areas. A professional cleaning service often handles deep cleaning.
How do I document cleaning for compliance?
Post checklists in each room, have staff initial completed tasks, and keep records for at least one year. Include sterilization logs and training records.
What disinfectant should a dental office use?
Use an EPA-registered hospital disinfectant with a tuberculocidal claim. Always follow the manufacturer’s contact time and material compatibility guidelines.
Additional Resource
For infection control guidelines and cleaning protocols, visit the CDC Dental Infection Control page for current recommendations and checklists.
Conclusion
A dental office cleaning checklist turns a big job into small, manageable steps. Create daily, weekly, and monthly lists for every room. Assign clear roles and document completion. Use the right products and follow contact times. With a consistent system, your office stays clean, compliant, and trustworthy.