Dental Office Floor Plan: A Complete Guide to Layout and Workflow
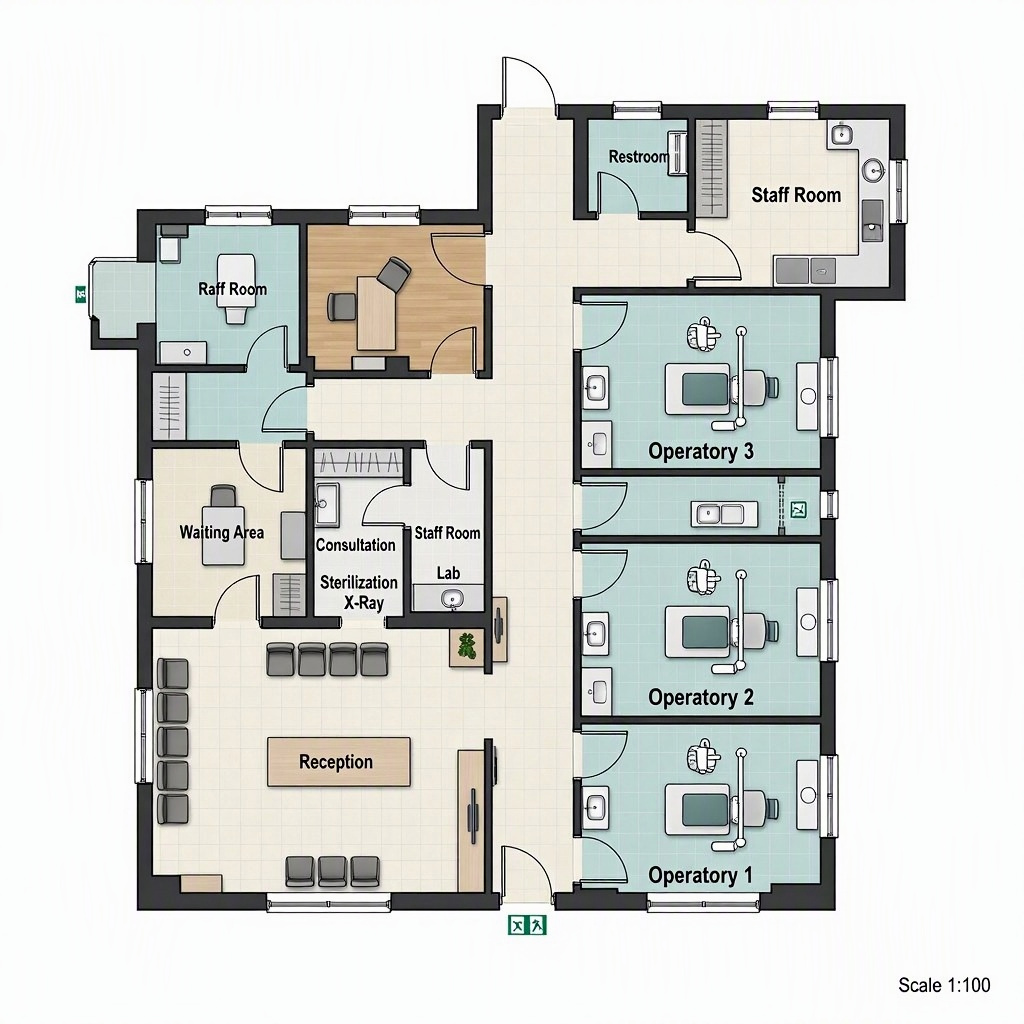
A floor plan is the skeleton of your dental office. It determines how patients move, how staff work, and how your practice functions every single day. A good floor plan feels natural. Patients flow from reception to treatment without confusion. Staff move efficiently between rooms. Equipment is where it needs to be.
A bad floor plan creates problems. Patients wait in crowded hallways. Staff waste time walking back and forth. Sterilization gets backed up. These issues compound over time. They frustrate everyone and reduce your practice’s efficiency.
This guide will walk you through the essential elements of a dental office floor plan. We will cover space allocation, workflow design, and common mistakes to avoid.
Why Your Floor Plan Matters
Your floor plan affects everything. It affects patient experience. It affects staff productivity. It affects your bottom line. A well-planned office can see more patients with less stress. A poorly planned office creates bottlenecks that limit your growth.
“We spent six months planning our floor plan before construction. It was worth every minute. Our staff can treat 30% more patients than our old office because the flow is so much better.” — Dr. Michael Torres, General Dentist
Key Principles of Dental Office Floor Planning
Before you draw any lines, understand these core principles.
Principle 1: Patient and Staff Separation
Patients and staff should have separate paths. Patients should not walk through the sterilization area. Staff should not squeeze past patients in narrow hallways. Design separate corridors where possible.
Principle 2: Central Sterilization
The sterilization room should be central to all treatment rooms. Staff should not walk long distances to retrieve or return instruments. A central location reduces steps and improves turnaround time.
Principle 3: Clear Sightlines
The front desk should have clear sightlines to the waiting room and the entrance. This improves security and customer service. Staff can greet patients immediately and monitor the waiting area.
Principle 4: Flexible Spaces
Design for the future. A treatment room today might become a hygiene room tomorrow. Use modular furniture and standard room sizes. Avoid over-customizing spaces that may need to change.
Principle 5: Accessibility
Every area must be accessible to all patients. Wide doorways, ramps, and accessible restrooms are essential. Follow ADA guidelines strictly.
Space Allocation: How Much Room Do You Need?
Space allocation depends on your practice size and services. Here are general guidelines.
| Area | Recommended Size | Notes |
|---|---|---|
| Reception/Waiting | 200–400 sq ft | Larger for pediatric or high-volume practices |
| Front Desk | 100–150 sq ft | Include workspace, filing, and patient checkout |
| Treatment Rooms | 100–120 sq ft each | Minimum for a dental chair and equipment |
| Hygiene Rooms | 80–100 sq ft each | Slightly smaller than treatment rooms |
| Sterilization | 100–150 sq ft | Central location, two-door entry recommended |
| Supply Storage | 80–120 sq ft | Organized shelving, easy access |
| Break Room | 100–150 sq ft | Away from patient areas |
| Office/Administration | 100–150 sq ft | Private space for manager, billing |
| Restrooms | 50–80 sq ft each | At least one accessible restroom |
| X-Ray/CBCT Room | 80–100 sq ft | Lead-lined walls required |
Total Space Estimates
- Solo practice: 1,500–2,000 sq ft
- Two-provider practice: 2,500–3,500 sq ft
- Multi-provider practice: 4,000–6,000+ sq ft
The Patient Journey: A Step-by-Step Flow
Walk through your floor plan as if you are a patient. This helps identify problems before construction.
Step 1: Arrival and Parking
Patients arrive. They need clear signage. They need accessible parking near the entrance. A covered drop-off area is helpful for elderly or disabled patients.
Step 2: Entrance and Reception
Patients enter. They see the front desk immediately. The receptionist greets them warmly. The waiting area is visible but not exposed. Patients should not feel like they are on display.
Step 3: The Waiting Room
Patients wait. The waiting room should have comfortable seating, distractions, and clear access to restrooms. The front desk should be visible from all seats.
Step 4: Treatment Room
A staff member escorts the patient to the treatment room. The path should be direct. Patients should not walk through clinical areas or see other patients in treatment. Privacy matters.
Step 5: Checkout
After treatment, patients go to checkout. This should be separate from reception to avoid congestion. The checkout area should have seating and privacy for discussing finances.
The Staff Workflow: Efficiency in Motion
Staff efficiency depends on the floor plan. Minimize steps. Maximize visibility.
Sterilization Workflow
The sterilization area should follow a one-way flow: dirty instruments in, clean instruments out. Use two doors if possible. One door for dirty instruments. One door for clean instruments. This prevents cross-contamination.
Supply Access
Supplies should be stored near treatment rooms. Staff should not walk to a distant storage room for gloves or masks. Use cabinets in each operatory for daily supplies. Keep bulk storage nearby.
Communication
Staff should be able to see and hear each other easily. An open corridor design helps. Avoid isolating treatment rooms in separate wings. A central corridor keeps everyone connected.
Comparative Table: Floor Plan Styles
| Style | Description | Pros | Cons | Best For |
|---|---|---|---|---|
| Linear Corridor | Rooms on both sides of a central hallway | Simple, efficient | Can feel institutional | Small to medium practices |
| Open Bay | Multiple chairs in one large room | High visibility, efficient | Less privacy, more noise | High-volume, pediatric |
| Pod Design | Small clusters of rooms around a central station | Team collaboration, flexible | Requires more space | Large multi-provider practices |
| Split Wing | Separate areas for different services | Privacy, specialization | Can feel fragmented | Practices with multiple specialties |
Common Floor Plan Mistakes to Avoid
Learn from others’ mistakes. These are the most common issues we see.
Mistake 1: Too Small Waiting Room
Practices underestimate patient volume. A small waiting room feels crowded during peak hours. Patients get annoyed. They leave bad reviews. Plan for your busiest day, not your average day.
Mistake 2: Poor Sterilization Location
Placing sterilization at the back of the office forces staff to walk long distances. This wastes time and energy. Keep it central.
Mistake 3: Narrow Hallways
Narrow hallways create bottlenecks. Staff and patients collide. Equipment gets stuck. Hallways should be at least 5 feet wide.
Mistake 4: Ignoring Future Growth
You may add providers or services later. Design for flexibility. Leave space for extra treatment rooms or additional equipment.
Mistake 5: Insufficient Electrical and Plumbing
Dental equipment requires dedicated circuits and plumbing lines. Underestimating these needs leads to expensive retrofits. Work with an engineer early.
Important Notes for Readers
Note on Zoning and Permits: Check local zoning laws before finalizing your floor plan. Some areas require specific parking ratios or building setbacks for medical facilities.
Note on Infection Control: Design surfaces that are easy to clean. Include handwashing sinks in every treatment room. Use non-porous materials.
Note on Acoustics: Use soundproofing between treatment rooms. Dental equipment is noisy. Patients appreciate privacy.
Note on Natural Light: Place treatment rooms along exterior walls with windows. Natural light improves mood for patients and staff.
Note on Emergency Exits: Ensure every area has clear access to emergency exits. Follow fire codes strictly.
Conclusion
A dental office floor plan is a strategic document. It shapes patient experience, staff efficiency, and practice growth. Focus on separation of patient and staff paths. Centralize sterilization. Plan for flexibility. Avoid common mistakes. When your floor plan works, everything else becomes easier.
Frequently Asked Questions (FAQ)
Q: How many treatment rooms should I include in my floor plan?
A: A solo dentist needs 2–3 treatment rooms plus one hygiene room. Add one room per additional provider.
Q: What is the minimum hallway width for a dental office?
A: Hallways should be at least 5 feet wide to allow staff and patients to pass comfortably. Wider is better.
Q: Should I include a separate consultation room?
A: Yes, if possible. A small private room for treatment discussions improves patient communication and privacy.
Q: How do I plan for future expansion?
A: Leave unused space or design rooms that can be easily converted. Use modular furniture and standard room sizes.
Q: What is the ideal location for the sterilization area?
A: Central to all treatment rooms. It should have a one-way flow: dirty instruments in, clean instruments out.
Additional Resource:
For more guidance on dental facility planning, visit the American Dental Association Center for Professional Success website.