Dental Office Sterilization Room: Design, Workflow, and Compliance Basics
The sterilization room is the most regulated square footage in any dental practice. It’s also the room most often squeezed into leftover space during a renovation. That’s a costly trade-off. A poorly planned sterilization area slows instrument turnaround, increases cross-contamination risk, and creates daily frustration for the team members who work there.
This guide covers the practical design decisions: workflow direction, zoning, equipment placement, surfaces, ventilation, and space planning. It’s written for practice owners and managers planning a new build or renovation, with the understanding that specific requirements vary by jurisdiction and must be confirmed locally.
Why the Sterilization Room Deserves Careful Planning
Instrument processing happens dozens of times a day. Every inefficiency multiplies.
Turnaround Time Affects the Whole Schedule
If instruments aren’t ready, appointments get delayed. A well-designed room processes instruments faster and with less backtracking, which protects the day’s schedule.
Contamination Control Is a Design Problem
Cross-contamination is prevented partly by procedure and partly by layout. If dirty and clean instruments share a counter, errors become more likely. Design can make the correct behavior the easy behavior.
Staff Work Here All Day
Sterilization technicians and assistants spend hours in this room. Poor lighting, cramped counters, and bad ventilation cause fatigue and errors.
“We had our sterilizer on the same counter as the dirty instruments. It worked, but it was stressful and slow. Rebuilding the room with a proper one-way flow cut our turnaround time noticeably and made the job far less stressful.” — Denise Okafor, Lead Dental Assistant
The One-Way Workflow Principle
This is the foundational concept of sterilization room design. Instruments should move in a single direction, from dirty to clean, with no crossing back.
The Four Stages
| Stage | Activity | Zone |
|---|---|---|
| 1. Receiving and containment | Dirty instruments arrive from operatories in closed containers. | Dirty zone |
| 2. Cleaning | Manual scrubbing, ultrasonic cleaning, or washer-disinfector. | Dirty zone |
| 3. Preparation and packaging | Drying, inspection, pouching, and labeling. | Clean zone |
| 4. Sterilization and storage | Autoclave cycle, cooling, and storage of sterile packs. | Clean zone |
Why the Flow Matters
If a clean instrument is set down in the dirty zone, it must be reprocessed. If staff must walk back and forth across the room, contamination risk rises. A linear or L-shaped flow from dirty to clean eliminates both problems.
Practical Layout Note
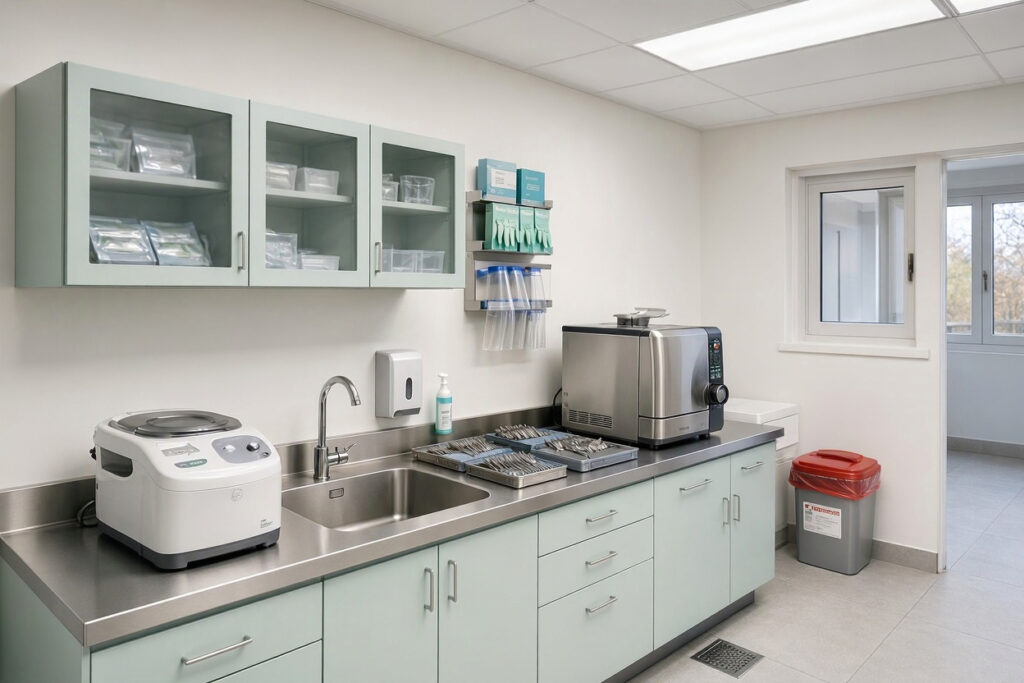
Place the dirty receiving counter at one end of the room and the sterile storage at the other. The autoclave sits in the clean zone, ideally with clearance on all sides for loading and maintenance access.
Space Requirements and Room Sizing
There’s no universal standard, but practical guidance helps.
| Practice Size | Approximate Room Size | Notes |
|---|---|---|
| Single operatory | 60 – 80 sq ft | Compact but workable with vertical storage. |
| Two to four operatories | 80 – 120 sq ft | Comfortable for one technician. |
| Five or more operatories | 120 – 180 sq ft | Allows separate zones and storage. |
Beyond floor area, plan for:
- Counter depth: At least 24 inches for sorting trays; 30 inches is more comfortable.
- Clear walkway: At least 36 inches between counters.
- Autoclave clearance: Follow manufacturer specifications, typically several inches on all sides plus door swing.
- Sink placement: Near the dirty zone entrance for handwashing and instrument soaking.
Equipment Placement
Equipment drives the layout, so plan placement before finalizing casework.
Core Equipment
- Ultrasonic cleaner: In the dirty zone, close to receiving.
- Washer-disinfector (if used): Dirty zone, with proper plumbing and drainage.
- Autoclave or statim: Clean zone, with ventilation and clearance.
- Sealer: Clean zone, near packaging.
- Drying area: Between cleaning and packaging.
- Handwash sink: Accessible from the dirty zone entrance.
- Storage: Closed cabinets in the clean zone for sterile packs.
What Not to Do
Don’t place the autoclave next to the dirty sink. Don’t put sterile storage near the receiving counter. Don’t block autoclave vents with shelving. These small errors undermine the entire flow.
Surfaces, Casework, and Finishes
Everything in this room gets wet and gets disinfected repeatedly. Material choice is not aesthetic—it’s functional.
| Surface | Recommendation | Reasoning |
|---|---|---|
| Countertops | Stainless steel or solid surface | Non-porous, heat resistant, easy to disinfect |
| Cabinetry | Stainless steel or sealed thermofoil | Moisture resistant, wipeable |
| Shelving | Closed cabinets, not open wire | Protects sterile packs from dust and splashes |
| Flooring | Seamless vinyl or sealed tile with coved base | Easy to mop, no crevices |
| Walls | Scrubbable paint or wall panels | Withstands frequent cleaning |
| Sink | Deep stainless or solid surface with gooseneck faucet | Accommodates trays and large items |
Avoid particleboard-based cabinetry, open shelving in the clean zone, and porous wall finishes. For a broader comparison, see our article on dental office cabinets.
Ventilation, Lighting, and Comfort
These three elements are frequently undervalued.
Ventilation
Autoclaves release heat, steam, and odor. Proper exhaust ventilation removes moisture that would otherwise condense on surfaces and damage casework. Confirm ventilation requirements with your equipment supplier and local code.
Lighting
Task lighting over every work surface is essential. Under-cabinet lighting reduces shadows when inspecting instruments. General lighting should be bright and even—this is a task room, not a calming patient space.
Comfort
Anti-fatigue mats at standing workstations, ergonomic stool options, and comfortable room temperature all reduce fatigue. A small radio or speaker can make repetitive work more pleasant, provided it doesn’t interfere with communication.
Compliance and Documentation Basics
Regulations vary significantly by country and region. What follows are general principles, not legal advice.
Areas Usually Covered by Regulation
- Instrument processing protocols and validation of sterilization cycles.
- Documentation of autoclave testing and maintenance.
- Hand hygiene facilities and personal protective equipment.
- Surface disinfection schedules and products.
- Waste segregation and sharps handling.
- Water quality for dental unit waterlines (separate but related).
Practical Compliance Habits
- Keep a written policy manual accessible in the room.
- Log every autoclave cycle and spore test in a consistent format.
- Post step-by-step protocols at each workstation.
- Store safety data sheets for all chemicals on site.
- Schedule and document equipment maintenance.
“The inspector didn’t ask us anything we couldn’t answer from our logs. Good documentation is the difference between a smooth inspection and a stressful one.” — Rachel Kim, Practice Manager
Common Sterilization Room Mistakes
| Mistake | Why It’s a Problem | Fix |
|---|---|---|
| Dirty and clean items on the same counter | Cross-contamination risk | Separate zones with physical distance |
| Open shelving for sterile packs | Dust and splash contamination | Use closed cabinets |
| Particleboard cabinetry | Swells and fails in humid conditions | Stainless or sealed thermofoil |
| Insufficient counter space | Trays pile up, errors increase | Minimum 24-inch depth per workstation |
| Poor ventilation | Steam damages surfaces; room becomes unpleasant | Install exhaust ventilation |
| No task lighting | Inspection errors and eye strain | Under-cabinet and overhead task lights |
| Shared sink for handwashing and instrument cleaning | Contamination risk | Dedicate separate sinks where possible |
| No documented protocols | Inconsistent practice; compliance risk | Post written steps at each station |
An FAQ on Dental Office Sterilization Rooms
1. How big should a dental sterilization room be?
A practical minimum is around 60 to 80 square feet for a small practice, with 80 to 120 square feet comfortable for two to four operatories. Space must allow clear walkways and separate dirty and clean zones.
2. What is a one-way workflow in a sterilization room?
Instruments move in a single direction from dirty to clean—receiving, cleaning, packaging, sterilization, and storage—without crossing back into earlier zones. This reduces contamination risk and improves efficiency.
3. What countertop material is best for a sterilization room?
Stainless steel or solid surface. Both are non-porous, heat resistant, and withstand frequent disinfection. Avoid laminate and wood.
4. Do I need special ventilation in a sterilization room?
Yes. Autoclaves release heat, steam, and odor. Exhaust ventilation protects casework from moisture damage and makes the room comfortable to work in. Confirm specific requirements with your equipment supplier and local code.
5. Can the sterilization room share a sink with handwashing?
It’s better to have separate sinks—one for hand hygiene and one for instrument cleaning—where space allows. If sharing is unavoidable, establish strict procedures and confirm with your local inspector.
6. What documentation is required for sterilization?
Requirements vary by region, but most expect logs of autoclave cycles, biological monitoring results, equipment maintenance, and written processing protocols. Keep records accessible and consistent.
7. How can I improve a small sterilization room?
Use vertical storage, choose compact equipment, keep a strict one-way flow, and eliminate clutter. Wall-mounted dispensers and under-cabinet lighting free up counter space. See our guide on small dental office design for broader strategies.
Important Note for Readers
Sterilization requirements vary significantly by country, state, and local jurisdiction. This article provides general design principles, not regulatory advice. Confirm all requirements with your local health authority, dental board, and equipment suppliers before finalizing a design or purchasing equipment. Never substitute published guidance for professional and regulatory consultation.
Conclusion
The sterilization room is a small space with outsized influence on safety and efficiency.
A strict one-way workflow from dirty to clean prevents cross-contamination and speeds turnaround.
Moisture-resistant surfaces, proper ventilation, and task lighting protect both staff and equipment.
Consistent documentation and posted protocols turn good design into reliable daily practice.
Additional Resource: For infection control guidance and instrument processing recommendations, visit the CDC’s Dental Infection Control page. https://www.cdc.gov/oralhealth/infectioncontrol/index.html