How Are Veneers Stuck On?
You look in the mirror and imagine a different smile. For many people, dental veneers represent that tangible path to change. You might have researched the types, the costs, and the stunning before-and-after photos. But then, a very specific, practical question pops into your head. You find yourself wondering about the mechanics. You ask yourself, quite literally, how do these thin shells actually stay put? How are veneers stuck on? This isn’t a silly question. In fact, it is the central question that determines the longevity and success of the entire cosmetic procedure. Without a reliable bond, a veneer is just a fragile piece of porcelain or composite. With the right adhesion protocol, it becomes a durable, functional, and beautiful part of your smile for many years.
This guide dives deep into that exact process. We will move beyond generic descriptions and explore the intricate, step-by-step dance between tooth and material. You will learn about the special cements, the crucial preparation steps, and the light that makes it all happen. We will also address the differences in sticking on composite versus porcelain veneers, the feel of the final result, and the long-term care required to keep that bond unbreakable. By the end, you will possess a thorough, realistic understanding of the science and art behind a securely attached veneer.
Understanding the Fundamental Bond
Before we dissect the clinical steps, you need to understand the basic principle. Simply put, sticking a veneer onto a tooth is nothing like gluing a broken vase handle. It is not a simple, one-material repair. The process involves creating a micromechanical and chemical union between three entirely different components. These are your natural tooth structure, a specialized adhesive system, and the restorative material of the veneer itself. The success of this union relies entirely on preparation and precision.
The Triad of Adhesion: Tooth, Cement, and Veneer
Think of the bond as a three-link chain. Every single link must be strong on its own, and the connections between them must be seamless. A failure in any one link means the veneer can come off, debond, or leak.
- Link 1: The Tooth Substrate: This is your natural enamel and sometimes a tiny bit of underlying dentin. Enamel is the ideal surface for bonding. Its high mineral content, composed of a dense crystalline structure called hydroxyapatite, allows for a powerful etching pattern. Dentin, which is softer, more organic, and contains fluid, is much trickier to bond to.
- Link 2: The Resin Cement: This is not a passive glue. Modern resin cements are sophisticated, dual-curing or light-curing composite materials. They are designed to be fluid enough to seat the veneer precisely but viscous enough not to run everywhere. They form the intermediary layer that interlocks with both the tooth and the veneer.
- Link 3: The Veneer Intaglio Surface: The intaglio surface is the internal, tooth-facing side of the veneer. For porcelain, this surface is treated to become chemically and mechanically receptive to the cement. For composite, it maintains a resin-based matrix that can bond directly with the cement.
Each link requires its own specific preparation. Ignoring the needs of one component guarantees a weak final bond. A dentist’s focus is entirely on treating each surface with the correct protocol at the correct time.
A Detailed Look at Modern Resin Cements
The hero of our story is undoubtedly the resin cement. Many people still imagine a dentist mixing a white powder and liquid in a dappen dish. This old-school cement, like zinc phosphate, relied solely on mechanical interlocking, gripping the irregularities of the tooth. It did not chemically bond. Today’s resin cements are a revolution. They actively stick to both the tooth and the porcelain, creating a near-inseparable hybrid layer.
Light-Cure vs. Dual-Cure vs. Self-Cure Cements
Not all resin cements behave the same way. The dentist selects a specific type based on the veneer material and its opacity. The choice is critical because if the cement does not fully set, the bond will fail.
Light-Cure Cements
These cements only harden upon exposure to a specific wavelength of intense blue light. The dentist has infinite working time to position the veneer perfectly and meticulously remove excess cement. Once satisfied, they activate the curing light, and the cement solidifies in about 20 to 40 seconds per segment. They work ideally for thin, translucent porcelain veneers where the light can easily penetrate through the material to reach the cement below.
Dual-Cure Cements
These cements start to set chemically on their own, but they also respond to the curing light. A dentist reaches for a dual-cure cement when they worry that the light cannot fully penetrate the veneer. This happens with thicker veneers, those used to mask severe discoloration, or opaque shades. The chemical cure guarantees a solid set even in deep, dark areas, while the light cure provides speed and a strong initial fix.
Self-Cure (Chemical-Cure) Cements
These rely entirely on a base-and-catalyst mixing reaction. No light is needed. They are rarely used for standard cosmetic veneers because they often come as two-paste systems and may be less color-stable. However, they are essential for bonding opaque restorations where zero light transmission occurs.
The following table clarifies the selection logic for a dentist:
| Cement Type | Curing Mechanism | Ideal Application | Working Time | Primary Advantage |
|---|---|---|---|---|
| Light-Cure | Blue light only (photoinitiators) | Thin, translucent porcelain or composite veneers | Infinite, until light is applied | Excellent color stability and total placement control |
| Dual-Cure | Light + Chemical reaction | Thicker porcelain, cases hiding dark stains, hybrid materials | Moderate, chemical reaction starts upon mixing | Guaranteed full cure in deep or dark areas |
| Self-Cure | Chemical reaction only (base + catalyst) | Extremely opaque restorations, under metal frameworks | Limited, sets on its own clock | Sets reliably with zero light exposure |
The overwhelming majority of aesthetic veneer cases use high-quality light-cure or dual-cure resin cements. These materials allow for a truly passive seat. The veneer rests gently in place, under no heavy pressure, until the light hits it.
Shade Selection and Try-In Pastes
You must understand that the cement layer affects the final color. Porcelain is slightly translucent. The underlying cement shade, combined with the tooth color, peeks through. A pure white cement over a darkened tooth might look chalky and dead. A too-translucent cement over a dark tooth will not block out the stain.
Dentists use water-soluble try-in pastes. These gels exactly mimic the final cement shades. The dentist places the veneer with different try-in colors—often clear, white opaque, or a warm bleach shade—and asks you to look in a mirror. You see the final optical effect before any permanent bond happens. This step removes the fear of the unknown. Once you approve the look, the dentist washes out the water-soluble paste and proceeds with the identical shade of resin cement. This attention to detail transforms a mechanical bond into an artistic one.
The Enemy of a Good Bond: Controlling Moisture
Imagine trying to stick a piece of clear tape to a wet, oily countertop. It simply will not hold. The oral environment is even more hostile. Saliva, blood, and gingival crevicular fluid constantly threaten to contaminate the bonding surface. A single drop of saliva contains millions of bacteria and proteins that form a microscopic film, a biofilm, that blocks adhesive penetration. Controlling moisture is the single most critical non-negotiable step in adhesion.
The Rubber Dam: The Gold Standard
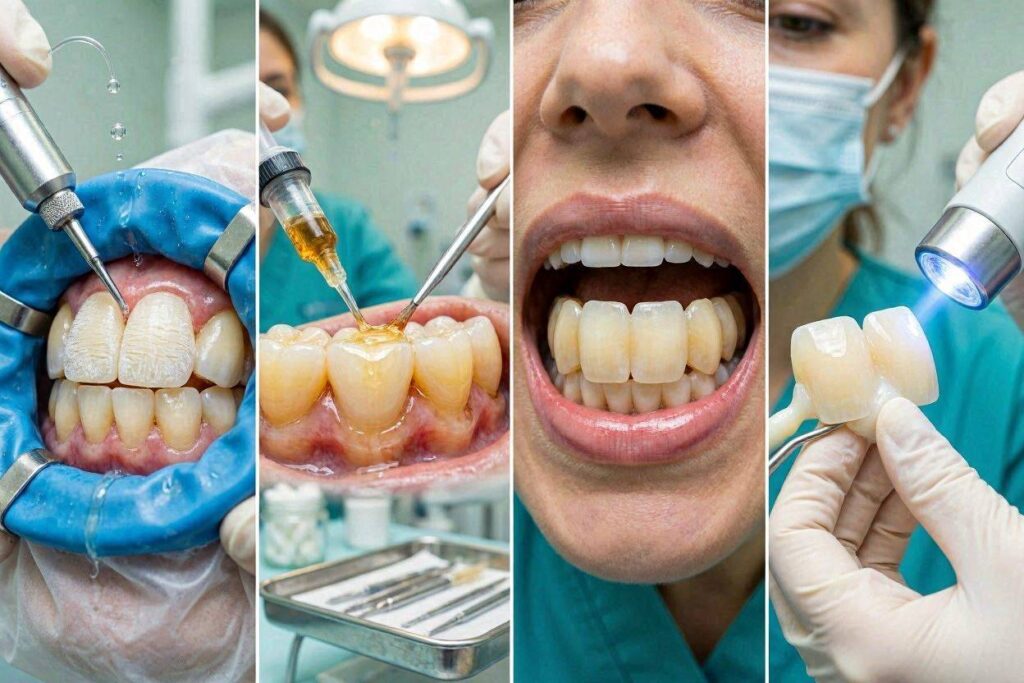
For truly predictable, long-term bonding, nothing outperforms a rubber dam. This is a thin, flexible sheet of latex or non-latex material. The dentist punches a small hole and isolates the tooth you are working on. The dam frames the tooth, pushing the tongue, cheeks, and saliva glands completely away.
When a rubber dam is in place, you can breathe and swallow freely without worrying about flooding the tooth. The dentist gets a completely dry, pristine field. The etchants and bonding agents work at their maximum potential. Adhesive dentistry simply works better under a dam. For a case of multiple anterior veneers, placing a rubber dam can be tricky, so dentists often use a split-dam technique or place each tooth’s dam individually before cementation. Many outstanding clinicians refuse to cement a single veneer without one.
Alternative Isolation Techniques
There are times when a full rubber dam might impede the seating of multiple veneers due to the clamp. In these situations, dentists use a combination of other effective tools. The goal remains the same: a totally dry field.
- Cotton Rolls and Dry Angles: These absorbents are tucked into the cheek folds, near the parotid duct, and under the tongue near the sublingual caruncles. They continuously wick away new saliva.
- Isovac or Isolite Systems: These modern devices combine a bite block, suction, tongue retractor, and an oral shield. They provide continuous aspiration and keep soft tissues far from the teeth. A bright LED light often illuminates the working field.
- Gingival Retraction Cord: The gum tissue hugs the tooth margin where the veneer ends. To expose the entire edge and control sulcular fluid, the dentist gently places a fine braided cord into this tiny crevice. Soaking the cord in a hemostatic agent stops any minor bleeding and dries the margin.
- Antisialogogues: For patients with heavy saliva flow, the dentist might recommend a medication to temporarily reduce saliva production for the duration of the bonding appointment.
Every strategy serves one purpose: to keep that enamel surface absolutely arid. Adhesive resins are hydrophobic. They repel water. If water sits on the enamel, the resin flows away from it, creating microscopic voids and a weak hybrid layer. This is how a veneer debonds five years later.
Step-by-Step: The Ceramic Veneer Bonding Protocol
We now enter the core of the subject. You are in the dental chair. The temporaries have been removed, and the custom-fabricated porcelain veneers are being tried in. The bond is about to happen. The following sequence is the exact, carefully choreographed protocol a cosmetic dentist follows. Each step builds upon the last. Rushing or skipping a step invites disaster.
Step 1: Try-In and Shade Verification
The dentist positions the porcelain veneers onto your unprepared or lightly prepared teeth. No cement is present yet. They evaluate the fit along every margin with an explorer. The contact points between teeth must allow dental floss to snap through with slight resistance. Too tight, and the veneer will not seat fully. Too loose, and food will pack painfully.
Now comes the aesthetic check. Using the try-in pastes you learned about earlier, the dentist loads the inside of the veneer. You sit up, look in a mirror under natural and operatory light, and give your honest feedback. You check for length, contour, and, most critically, color. Sometimes a veneer looks perfect in neutral shade; other times, a milky white or warm tinted paste works better. Do not rush this phase. Once you bond, changing the shade is impossible without drilling the veneer off.
Important Note for the Reader: During the try-in, the veneer is extremely fragile. It is not supported by cement. Be gentle. Let the dentist handle the piece fully. Never try to pull it out yourself, as the unsupported porcelain edge can fracture instantly with a fingernail.
Step 2: Preparing the Porcelain Intaglio Surface
The internal surface of a porcelain veneer, fresh from the laboratory, is biologically inert and completely smooth. To bond it with resin, the dentist must transform this inert surface into a high-energy, chemically active landscape.
- Etching with Hydrofluoric Acid: This is the most critical step for ceramic. The dentist applies a 4% to 9.5% buffered hydrofluoric acid gel strictly to the internal surface for a specific time, usually 20 to 90 seconds depending on the ceramic type. This acid does not touch your teeth. It selectively dissolves the glassy matrix of the porcelain, creating a microscopic honeycomb of retentive pores. The internal surface goes from shiny glass to a frosted, matte appearance.
- Rinsing and Cleaning: The acid is thoroughly suctioned and rinsed away with copious water spray. The veneer then sits in a distilled water bath or an ultrasonic cleaner with alcohol to remove any precipitated salts and debris from the etched pores.
- Application of Silane Coupling Agent: A clear liquid, silane, is painted onto the dry, etched surface. This molecule is a bifunctional connector. One end reacts with the silica in the porcelain. The other end has a methacrylate group that chemically bonds with the resin cement. Silane completely wets the etched ceramic, turning it from a high-surface-energy surface vulnerable to contamination into a reactive, primed substrate. A gentle warm-air dry evaporates the solvents, leaving the active silane layer behind. Without silane, the bond strength to porcelain drops by a huge margin.
Step 3: Simultaneously Preparing the Tooth Enamel
While the assistant is treating the porcelain, the dentist prepares the tooth. Even if the tooth has no mechanical preparation cuts, the enamel surface itself requires a precise chemical treatment.
- Cleansing the Tooth: A slurry of pumice and water, or a non-fluoride prophy paste, removes the temporary cement residue and pellicle. Chlorhexidine scrubbing can disinfect the surface.
- Enamel Etching with Phosphoric Acid: A gel of 35% to 37% phosphoric acid is applied precisely to the target enamel area for about 15 to 30 seconds. This blue or green gel etches the prismatic enamel rods, creating a frosty-white, irregular surface pattern at the microscopic level. This increases the surface area for bonding exponentially and raises the surface energy.
- Thorough Rinsing and Drying: The etch gel is rinsed away for a full 20 to 30 seconds to ensure no acid residue remains. The tooth is then air-dried. The etched enamel must appear chalky white, completely devoid of any shiny spots. A shiny spot indicates contamination or under-etched enamel.
- Application of Dental Adhesive: A thin, unfilled resin, the bonding agent, is scrubbed into the frosty enamel. It flows into the microporosities. The solvent, acetone or ethanol, is evaporated with a gentle air stream. The adhesive layer is not yet cured. It sits in a thin, glossy, uncured state, waiting for the cement.
Reader’s Note: If any dentin, the layer under enamel, is exposed, the protocol changes. A separate primer, often containing hydroxyethyl methacrylate (HEMA) and a hydrophilic monomer, must be applied to penetrate the moist collagen network of dentin. This is a more moisture-sensitive step. Enamel bonding remains purely predictable; dentin bonding is slightly less so. This is why conservative preparation that stays within enamel is the gold standard for durable veneer adhesion.
Step 4: The Cementation and Seating of the Veneer
The clock is now ticking. The tooth is primed, the veneer is silanated, and the field is dry. The assistant hands the dentist the shade-verified resin cement syringe.
The dentist gently expresses a small amount of cement into the intaglio of the veneer, filling it completely without bubbles. They then position the veneer on the tooth surface, pressing it in with a very light, passive finger pressure. Immediately, excess cement squishes out from all edges. This is a good sign; it means the void space is filled fully and no air is trapped.
Now comes the meticulous cleanup. With a micro-brush, the dentist swipes away the gross excess at the margins, moving from the gumline outward. Dental floss is passed through the contact points to remove interproximal cement before it hardens. A small amount of glycerin gel is often applied to the margins to block the oxygen-inhibited layer and allow the surface to cure completely tack-free.
Step 5: Tack Curing and Final Polymerization
The assistant holds the veneer steady, but the dentist needs to lock it in place quickly while still keeping a margin cleanable. They perform a “tack cure.” This is a very short burst, one or two seconds, of the curing light right through the center of the tooth. The light beam shines through the porcelain. The cement gels instantly, holding the position but leaving the edges uncured.
This allows the dentist to use a scaler blade or a curette to effortlessly peel away the now jelly-like excess from the fragile margins. Once the edges are perfectly clean, the final polymerization begins. The dentist holds the intense curing light, delivering over 1,000 mW/cm² of irradiance, directly on the tooth for 40 to 60 seconds per surface. They move the light from the facial to the lingual side, ensuring the entire cement seam receives a full dose of energy. The veneer is now firmly integrated.
Step 6: Finishing, Adjusting Occlusion, and Polishing
The hard bond has happened, but the function is not yet proven. The dentist removes the rubber dam or isolation materials. They hand you a mirror, but first, they must check your bite. Shiny articulating paper is placed, and you are asked to tap, grind, and move your jaw in all directions. Even a microscopic high spot, a fraction of a millimeter of excess cement or ceramic, can trigger pain, muscle spasm, or, worst of all, a fracture or debond over time.
With fine diamond finishing burs under water spray, the dentist gently adjusts any heavy contacts. Then, a series of flexible polishing discs, from coarse to superfine, followed by diamond-impregnated polishing pastes, bring the margins to a glass-like luster. A properly finished margin feels like polished glass to your tongue and resists plaque accumulation. The final step is a radiographic check if a contact was particularly tight, ensuring no remnant of cement floss remains trapped below the gum.
How Composite Resin Veneers are Bonded
The conversation changes slightly when the veneer material itself is composite resin rather than porcelain. Composite veneers are either fabricated directly in the mouth by the dentist (direct composite veneers) or made in a lab on a stone model and then bonded in (indirect composite veneers). The bonding mechanism, however, relies on the same fundamental resin chemistry but without hydrofluoric acid.
The Oxygen-Inhibited Layer as a Bonding Advantage
Composite resin, when cured in air, leaves a sticky, uncured surface layer called the oxygen-inhibited layer. For a direct veneer, the dentist builds the composite layer by layer directly on your etched enamel. Each increment chemically bonds to the oxygen-inhibited layer of the previous one. There is no separate cement step. The tooth is etched, an adhesive is applied and cured, and the first layer of composite directly contacts this uncured film. They become one continuous resin block. This process eliminates a separate cement interface, but it demands immense artistic skill from the dentist to create natural anatomy freehand.
Bonding Indirect Composite Veneers
Indirect lab-made composite veneers are stronger and more wear-resistant than direct ones but still require bonding with a resin cement. The internal treatment differs from ceramic.
- Surface Preparation: Since composite is a resin matrix, hydrofluoric acid is useless and even damaging. The internal surface is instead roughened mechanically. The laboratory sandblasts the intaglio with aluminum oxide particles at a gentle pressure, around 2 bar. This creates a uniform micromechanical roughness.
- Cleaning: The veneer is ultrasonically cleaned in distilled water or alcohol to remove blasting debris.
- Silane and Bonding: A universal silane primer or a dedicated composite primer is applied. This wets the surface. Crucially, a thin layer of an unfilled bonding resin is often painted onto the intaglio but left uncured. This creates a chemically receptive, wettable layer. The dual-cure resin cement then co-cures with this adhesive layer and the tooth adhesive, forming a single integrated resin mass.
The bond strength to an indirect composite, while excellent, may not match the ultra-high bond of etched porcelain due to the different wear patterns and flexural modulus of the material.
A Comparative Analysis: Bonding Porcelain vs. Composite
To consolidate the detailed information, let us examine a side-by-side comparison. This clarifies why a dentist handles a glass-ceramic veneer so differently from a resin-based one.
| Bonding Variable | Porcelain (Ceramic) Veneer | Indirect Composite Veneer | Direct Composite Veneer |
|---|---|---|---|
| Tooth Preparation | Etch with 35-37% phosphoric acid | Etch with 35-37% phosphoric acid | Etch with 35-37% phosphoric acid |
| Tooth Adhesive | Unfilled light-cure bonding resin | Unfilled light-cure or dual-cure bonding resin | Unfilled light-cure bonding resin |
| Veneer Internal Treatment | 4-9.5% Hydrofluoric acid etch + Silane | 50-micron Aluminum oxide sandblasting + Silane/Primer | Built incrementally; relies on oxygen-inhibited layer |
| Cement/Composite | Light-cure or dual-cure resin cement | Dual-cure resin cement recommended | Packable direct composite resin |
| Key Chemical Mechanism | Micromechanical interlock (HF pores) + Silane chemical bond | Micromechanical interlock (blasting) + Silane and co-curing | Free-radical co-polymerization between layers |
| Reason for Debonding | Saliva contamination during bonding, incomplete HF etch, no silane | Inadequate blasting, polymerization shrinkage stress | Bulk fracture of composite, wear, staining at interfaces |
This table demonstrates a crucial point: the bonding to the tooth side is nearly identical. The magic lies in how the restorative material’s internal face is transformed.
The Crucial Role of Occlusion in Long-Term Adhesion
Sticking a veneer on is a chemical event. Keeping it on is a mechanical one. You can have the most perfect chemical bond known to dentistry, but if your bite is crushing the veneer incorrectly, it will fail. The bite, or occlusion, dictates the forces that travel through the porcelain shell every single time you chew or clench.
Balancing Anterior Guidance
Dentists design veneers to recreate what is called “anterior guidance.” This means that when your lower jaw slides forward or sideways, your back teeth should slightly separate, or disclude. The smooth, engineered slopes on the back of your new upper front veneers guide these movements. If this guidance is too steep, the forces place excessive oblique loading on the bond. The porcelain can separate, producing a sharp “zing” sound as the vacuum breaks. If the guidance is too shallow, the back teeth stay in heavy contact during grinding, overloading them and possibly causing the front bond to survive while the back teeth wear down painfully.
The dentist meticulously checks for proper canine guidance. The upper canine veneer often takes the lateral forces. A balanced, group-function occlusion distributes forces, while a single, heavy intereference can fracture the canine. The cement bond is not designed to withstand chronic, repetitive, non-axial torque. It is designed to resist tensile and shear forces during normal function. Good occlusion protects the chemistry.
The Parafunctional Challenge: Bruxism and Clenching
This is a difficult conversation. A patient with untreated, heavy bruxism, unconscious grinding, or clenching, poses a serious risk to the cement bond. No adhesive on earth can reliably resist the hundreds of pounds of lateral force generated during a nocturnal grinding episode. The bond may hold, but the porcelain will eventually fracture. Or, the cement itself will experience fatigue failure, a microscopic cracking process that slowly propagates until the veneer pops off.
Important Reality Check: If you know you grind your teeth, you must tell your dentist before starting. A hard, custom-fitted night guard becomes a mandatory, non-negotiable part of your treatment. You will wear it every night. It acts as a sacrificial layer, separating your ceramic from opposing teeth. Sticking a veneer on without addressing a grinding habit is like painting a masterpiece on a crumbling wall.
Instrumentation and Materials: A Closer Look at the Tools
The protocols described require an arsenal of specific instruments. Understanding these demystifies the clinical scene and reinforces the precision involved. The process is not analogue; it is highly technical.
The Curing Light: Irradiance and Spectral Output
The dentist uses a high-powered LED or plasma arc curing light. This is not a simple flashlight. It emits a concentrated beam of blue light, typically in the 420 to 480 nanometer spectral range. This wavelength specifically activates camphorquinone, the photoinitiator within the resin cement. For the cement to reach full conversion, meaning all monomer units link into polymers, the light must deliver sufficient energy. A weak curing light with low irradiance, below 400 mW/cm², will not penetrate fully through thick porcelain. The bottom layer of cement remains gooey, an unpolymerized, cytotoxic mess with zero bond strength. The dentist periodically tests their light’s output with a radiometer. The bond depends entirely on this device’s power.
Finishing Burs and Polishing Systems
The margin, where the veneer meets the tooth, is the weak point. Removing excess cement without scratching the porcelain or the tooth root requires specialized tools. A carbide-tipped finisher or a fine-grit red-stripe diamond bur is used with water spray. A coarse diamond bur will chip the porcelain instantly. Following this, a systematic polishing sequence is non-negotiable. A common sequence includes:
- Flexible abrasive discs (Sof-Lex): Coarse, medium, fine, and superfine grits.
- Silicone polishing points impregnated with diamond dust.
- Aluminum oxide polishing paste on a felt wheel or a goat-hair brush.
- Diamond polishing paste for a final high-shine glaze.
A rough margin invites bacteria, causes gum inflammation, and eventually leads to marginal leakage. This leakage, staining and demineralization along the edge, is a slow-motion debond.
Potential Problems and How Dentists Solve Them
Nothing in dentistry works perfectly every single time. Saliva slips in. The veneer seats wrong. The shade is off. An honest guide must discuss these real scenarios. Knowing the solutions reduces anxiety because you understand the backup plan.
Premature Debonding: The Partial Pop-Off
You might feel a strange sensation when flossing. The veneer shifts slightly. It has not fallen off, but the seal is broken. This is a partial debond, often caused by localized contamination or an incomplete cement cure.
The solution is immediate removal. The dentist must pull the veneer off fully. Leaving it partially attached creates a suction cup that pumps bacteria into the gap, causing rapid decay. Removing a partially debonded veneer is often a delicate, destructive process. The dentist sections it with a fine bur, sacrificing the porcelain. They then clean the tooth surface, removing all old cement tags. A new impression goes to the lab, and a new veneer is fabricated. Re-bonding a loose veneer without fully cleaning the internal surface is a guarantee of a second failure. The residual cement inside the veneer is chemically inert and will not bond to new cement.
Sensitivity After Cementation
You might experience sharp, cold sensitivity days after the procedure. This rarely signifies cement failure. It often points to microscopic cement remnant particles subgingivally irritating the gum, or it’s a response to the acidic etching process. Post-operative sensitivity typically resolves in a few days with gentle care, desensitizing toothpaste, and ibuprofen if needed. However, if the bite feels high and the tooth throbs when chewing, a debond or fracture is a possibility. Sharp, pinpoint pain upon biting a seed or a hard bit of food often signals a bond separation that acts like a flap valve.
Margin Staining Over Years
Even with a perfect initial bond, the margin can pick up stain. Resin cement, unlike porcelain, is slightly porous. Microcracks from years of flexing can form at the cement-tooth interface. Dark pigments from coffee, red wine, and tobacco slowly infiltrate these microcracks, creating a brown or yellow line at the edge. This is a seal failure, not necessarily a total bond failure. The veneer is still firmly attached but cosmetically compromised. Refreshing the margins by carefully etching, re-sealing, and polishing can sometimes buy you more time without replacing the entire work.
The Patient Experience: What It Feels Like to Have Veneers Bonded
You have read the technical choreography. Now, what do you actually feel? Dentists often overlook this human element, but knowing the sensory experience calms the nerves.
The Tension-Free Try-In Phase
During the try-in, you feel the veneers clicking against your teeth. The dentist might hand you a mirror, and you see the “trial smile.” This part is exciting. You feel no pain, just the strange, temporary thickness of the shells. The dentist keeps asking you to assess the midline, the edges, the color. It feels collaborative.
The Actual Bonding Appointment
Numbing is optional and a subject of debate. Many expert cosmetic dentists prefer to bond without anesthetic. Why? Because they want you to close your mouth comfortably and feel your natural bite without a numb, droopy lip throwing off your proprioception. They can precisely adjust the occlusion based on your natural feedback. If your tooth preparation was deep into dentin, you will need anesthetic.
With isolation in place, you feel pressure, not pain. The etching gel has a sour taste if it seeps. The suction and high-volume evacuation are loud. When the dentist seats the veneer, you feel a gentle pressing sensation. The most intense part is the curing light, not from pain, but from the bright blue light and the warmth. The exothermic reaction of the cement setting creates a noticeable, localized heat spike that passes quickly.
After the final cure, the rubber dam comes off. You lick the back of your new teeth. They feel slick and glassy. The bite adjustment feels like fine sandpaper vibrating. Once polished, your tongue will obsessively play with the smooth, new lingual contours for a day or two. That strange, integrated smoothness is the physical manifestation of a perfectly bonded interface.
Caring for Your Bonded Veneers: A Maintenance Manual
The bond is set, but your habits now determine its lifespan. A veneer bond is strongest at day one and must be protected for the decades that follow. You must shift your mindset from a purely cosmetic owner to a responsible steward of a bonded restoration.
Daily Hygiene: The Non-Traumatic Technique
You must brush, but you must not scrub aggressively with a hard toothbrush. A soft-bristled or ultrasonic brush is ideal. Focus on the gumline, the critical margin, with a 45-degree angle, gently massaging to disorganize the plaque biofilm.
Flossing is non-negotiable. However, the technique changes. You must never snap the floss out from between the contacts. This snapping places a sudden, dislodging impact force on the cement margin. You pass the floss through, wrap the tooth in a C-shape, wipe up and down, and then gently pull it out from the side. Glide brand floss or PTFE-coated floss slides easily through tight contacts.
Water flossers like a Waterpik, set to a moderate pressure, are excellent. They flush out cement debris, food particles, and bacteria from the sulcus, the space at the gumline, without any mechanical stress on the veneer bond.
Avoiding Destructive Habits
Your veneers and their cement bonds are not tools. Opening a bottle cap, tearing a plastic tag, biting your fingernails, or chewing on a pen cap concentrates immense stress at a single point. This point-load stress can exceed the flexural strength of the porcelain or the cement itself. A cohesive fracture within the porcelain is one thing; a cohesive fracture within the cement layer immediately debonds the shell. Ice and hard, unpopped popcorn kernels are enemies of dental adhesion.
The Professional Maintenance Appointment
You should see your hygienist and dentist for a maintenance visit at least twice a year. But this is not a standard “scrape and polish” cleaning. The hygienist must know you have bonded restorations. They must use specific fine-grain polishing pastes and scalers that won’t scratch or lift the margins. The dentist will check the margins with an explorer, evaluate the occlusion with articulating paper, and take close-up intraoral photographs to compare them longitudinally for any changes in color or seal. They might also re-polish the margins. This maintenance, often called a cosmetic recall, is what pushes the lifespan of a well-bonded veneer from 10 years to over 20.
Debunking Common Myths Surrounding the Bond
The internet is cluttered with misconceptions. Let us clarify a few with rational, evidence-based facts.
- Myth: “They use superglue.” This is completely false. Cyanoacrylate, superglue, is toxic to living pulp tissue and becomes brittle in a wet environment. A dental resin cement is a completely different methacrylate-based chemistry.
- Myth: “The bond is permanent and unbreakable.” No dental bond is permanent. It is a highly durable, long-term interface. All dental materials experience fatigue. A realistic expectation is a lifespan of 15 to 20 years with excellent care, after which marginal degradation might necessitate replacement, not due to complete debond, but due to cumulative microleakage and aesthetic decline.
- Myth: “Lasers are used to stick them on.” Lasers do not stick veneers on. They can be used to gently trough the gum tissue to expose a margin for an impression, but the bond is purely a chemical adhesion via etch, silane, and resin, hardened with an LED light.
- Myth: “You can feel them stuck on your teeth.” A perfectly bonded, well-designed veneer feels biologically integrated. The tooth-veneer complex should feel like one solid unit. The tongue adapts to the new, optimal contour very quickly. You feel them with your tongue initially, but you do not feel the cement joint itself. It is seamless.
Understanding the Financial and Time Investment
Reading a 10,000-word guide on adhesion underscores the complexity of the procedure. The cost of veneers directly reflects the time, the laboratory artistry, and the meticulous, high-cost materials used in the bonding protocol. A single tube of premium resin cement can cost the dental practice hundreds of dollars. The silane, the etchants, the polishing systems, and the curing lights represent a substantial capital investment.
A rushed bonding appointment takes 30 minutes. A proper, artist-driven bonding appointment for two veneers can easily take two hours. For a full smile of six to ten veneers, the bonding day is a dedicated half-day clinical session. The fee you pay respects this uncompromising attention to detail. When you see a celebrity with a flawless smile, that smile is the result of an invisible, perfectly executed bond, not just pretty porcelain. You pay for the permanence of the bond.
The Evolution of Adhesion: A Brief History for Context
To fully appreciate modern veneer adhesion, a look backward offers necessary context. In the 1930s, a Hollywood dentist named Charles Pincus created the first veneers, called “Hollywood Laminates,” for actors. They were temporary caps attached with denture adhesive powder. They would fall off after a shoot. The dream of a permanently affixed, thin layer of ceramic existed, but the technology did not.
The invention of acid-etching by Dr. Michael Buonocore in 1955 was the breakthrough. He discovered that phosphoric acid transformed enamel into a bondable substrate. Later, in the 1970s and 1980s, the development of composite resins and silane coupling agents completed the triangle. Hydrofluoric acid etching for porcelain became a standard lab protocol. Before this, veneers were mechanically retained, requiring much more aggressive tooth reduction. Adhesion freed the dentist to preserve enamel. Today’s immediate dentin sealing and universal adhesive systems represent the latest plateau on a long climb of innovation. Your bonded veneer rests on a century of biomaterial science.
The Psychology of a Secure Smile
An often-overlooked dimension is the psychological impact of a secure bond. A patient who constantly worries that a veneer might pop off during a dinner date or a presentation lives in a state of oral hyper-vigilance. This anxiety is corrosive and diminishes the joy of the aesthetic investment.
Knowing the science, knowing that hydrofluoric acid created microscopic pores, that a silane primer chemically linked the glass to the resin, and that a calibrated light polymerized the chain, provides a profound sense of security. You can bite into a crisp apple, laugh uninhibitedly, and speak confidently because the integration is structural, not superficial. A truly expert bonding protocol provides a smile that feels as natural and secure as one’s own original enamel, perhaps even stronger due to the reinforced monobloc design. The greatest compliment a cosmetic dentist can receive is that their work goes unnoticed, feeling completely part of the patient.
Summary and Conclusion
This extensive exploration reveals that sticking on a veneer is a sophisticated biomimetic process, not a simple glue job. It relies on a precise chemical and micromechanical fusion between prepared enamel, a specialized silane-treated ceramic intaglio, and a high-strength resin cement, all cured under strict moisture isolation. The success of the bond depends on the meticulous execution of each phase, from the initial etch to the final occlusal adjustment and polish. Ultimately, the durability of this union is a shared responsibility between the dentist’s precision at placement and the patient’s commitment to long-term, non-traumatic care.
Frequently Asked Questions (FAQ)
Q: Can a veneer be stuck back on if it falls off?
A: Yes, it often can be, but the protocol is just as delicate. The dentist must meticulously clean out all old cement from the inside of the veneer and the tooth surface. They must re-etch the porcelain with hydrofluoric acid and re-apply fresh silane. Simply using new cement as a filler will lead to a very weak, short-lived re-bond. The tooth must be completely re-isolated and the entire bonding sequence repeated.
Q: Is the cement safe for my gums and body?
A: Fully cured, modern resin cements are extremely biocompatible and inert. The primary health concern is removing all uncured excess cement from under the gumline. Residual cement is a rough surface that attracts plaque bacteria, causing localized inflammation known as cement-induced peri-implantitis or gingivitis. A well-cleaned, polished margin poses no health risk.
Q: How long does the actual bonding process take for one veneer?
A: From the moment the temporary is removed to the final polish, bonding a single well-fitting veneer typically takes about 30 to 45 minutes of meticulous, focused work. Most of this time is spent on isolation, surface treatments, and precise cleaning of the margins, not on simply placing the piece.
Q: Will I need a shot of anesthetic for the bonding?
A: Not usually for the bonding of standard, minimally prepared veneers. The process is non-invasive to the dentin. Many dentists prefer patients to be un-numbed so they can provide accurate bite feedback during the final occlusal adjustment. If your teeth are sensitive, a local anesthetic is always an option.
Q: What happens if water or saliva touches the tooth during bonding?
A: This is contamination. The high-energy, etched enamel instantly attracts moisture and proteins. The dentist must immediately re-etch the enamel for a few seconds, rinse thoroughly, and re-dry before reapplying the adhesive. If the contamination occurs after the adhesive is applied but before curing, the adhesive layer is rinsed off completely, and the entire adhesive step is redone. Ignoring contamination guarantees a future debond.
Additional Resource:
For an authoritative and deeper scientific dive into dental adhesive protocols, explore the American Dental Association’s resource on bonding and etching at their official website: ADA.org – Bonding and Etching.
Disclaimer: This article is for informational and educational purposes only and does not constitute medical or dental advice. Dental procedures and protocols vary based on individual clinical cases. Always consult with a licensed, qualified dental professional for any questions regarding your oral health, cosmetic treatments, and specific care instructions.