How Long Does Dental Implant Take To Heal
Let’s be honest. When you first search for “how long does a dental implant take to heal,” you are probably hoping for a simple, one-word answer. Maybe something like “a week” or “a month.” Instead, you find a confusing range stretching from three months to over a year. It feels frustrating. I understand that urge to just know when you can finally enjoy a steak or smile confidently in a photo without thinking about the gap.
The truth is not hidden in a single number. It lives inside your own body’s incredible ability to regenerate bone. A dental implant is not a quick fix. It is a biological partnership between you and a precision-engineered piece of titanium. The healing process is about waiting for your jawbone to hug that implant so tightly that it becomes part of you. This guide strips away the marketing fluff and the overly optimistic promises. We will walk through the realistic, week-by-week journey, examining what happens inside your gums and bone when no one is looking.
We will explore why a healthy patient might heal faster than a smoker, how modern technology is changing the waiting game, and what “healed” actually means. You will learn why the final tooth is the last piece of a very long puzzle. This is not just a timeline. It is a survival guide for the mental and physical waiting period that stands between you and a restored smile.
Understanding the Biological Clock of a Dental Implant
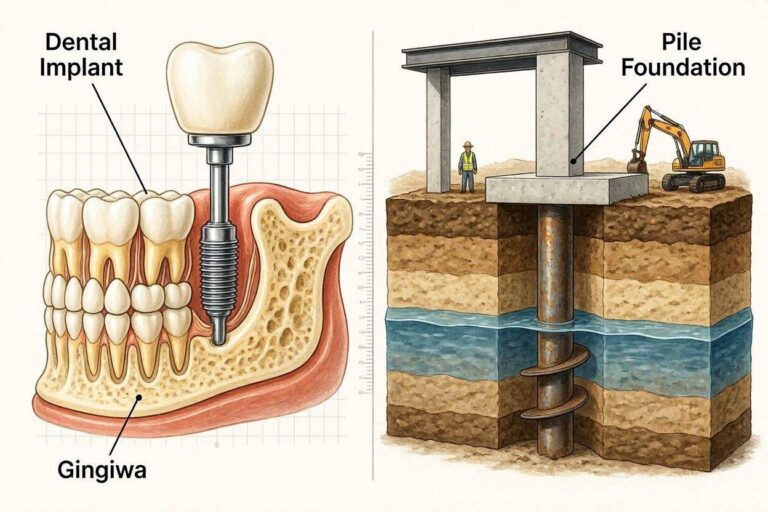
When we talk about healing time, we are not just talking about the gum closing up. We are talking about a complex physiological dance called osseointegration. This word sounds intimidating, but the concept is beautiful. It describes the moment living bone cells lock onto the non-living titanium surface without rejecting it. An orthopedic surgeon in the 1960s accidentally discovered this phenomenon, and it remains the absolute foundation of modern implant dentistry. Without this biological lock, the implant fails.
Think of the implant site as a construction zone. The actual drilling into the jawbone creates a precisely shaped wound. The body’s immediate reaction is to rush healing cells and blood to the area to form a clot. Over the next few days, that clot is replaced by a soft callus of new bone-forming cells. This immature bone is fragile. Over weeks, it matures and remodels. As this remodeling occurs, the bone creeps into the microscopic threads and surface imperfections of the titanium post. This is not a passive sliding in. It is an active, living grip.
The clock ticks differently based on the bone density in the jaw. The bone in the front lower jaw is often like dense oak, offering a very tight grip early on. The bone in the upper back jaw is often like soft pine, spongy and less cellular. Healing a successful implant in that upper posterior region takes a longer, more cautious approach because the biological foundation is naturally weaker.
Defining “Healed”: More Than Just a Closed Wound
This is where a lot of confusion creeps in. A patient looks in the mirror two weeks after surgery. The gum tissue looks pink and flat. There is no pain. They naturally assume the healing is done. But judging dental implant healing by the gum tissue is like judging a skyscraper’s stability by looking at the sidewalk. The work that matters is happening deeply below the surface.
We must separate the healing into distinct phases.
- Soft Tissue Healing: The gum closure around the implant or the healing cap. This often takes just one to two weeks.
- Clinical Stability: The moment the dentist deems the implant immobile to the touch. This is a manual test, a physical checking of the wiggle.
- Biological Integration: The completion of osseointegration on a microscopic level. This is the true end of healing.
A truly healed implant, ready for a functional load, does not move. Not even a micrometer. When you chew, the forces travel down the crown, through the abutment, into the implant, and dissipate into the jawbone. If the bone hasn’t fully healed, that force causes the implant to flex microscopically, breaking the bond and leading to fibrous encapsulation, which is essentially a scar tissue pocket. That is failure. So, “healed” means the bone is structurally mature enough to handle the shock of chewing a carrot or a piece of crusty bread without disrupting that precious bond.
The Unbreakable Rule: Why Rushing Destroys the Result
I cannot stress this enough. Biology does not negotiate. You cannot bribe your jawbone to grow faster. In the era of instant gratification, dental implants remain a stubborn holdout that demands patience. If a surgeon loads a permanent tooth onto an implant too early, even if the implant feels sturdy, the micro-motion created by chewing acts like a wobbling fence post. It prevents the bone from fusing to the metal. Instead of osseointegration, the body produces a fibrous capsule, similar to tendon or ligament tissue, around the implant.
Important Note: Once a fibrous capsule forms, the implant has failed biologically. You cannot “re-tighten” it. It must be removed, the bone must be regrafted, and the entire process must start from square one.
This is why dentists use a torque wrench to measure insertion resistance when placing the final tooth. It is not just about time passed. It is about the physical proof of integration. Waiting the full, prescribed time protects your financial investment and your physical health. A failed implant often leads to significant bone loss around the site, leaving a crater-like defect that is much harder to repair than a fresh extraction socket.
Phase 1: The Surgical Event and Immediate Aftermath (Day 0 – Day 7)
The healing journey begins the moment you push yourself out of the dental chair, the lower half of your face feeling alien and numb. The first week is emphatically not about bone growth. It is strictly about damage control. The dentist has incised the gum and drilled into the bone. This is a traumatic injury, even if it’s a controlled, sterile one. The body’s priority in these first seven days is to seal off the wound from the bacterial wilderness of the mouth and establish a clean inflammatory response.
In the first 24 hours, a blood clot forms over the implant site. This clot is sacred. It is the scaffolding for new tissue. Losing this clot—known as a dry socket in extraction terms, but similarly disastrous here—exposes the underlying bone to air, food, and bacteria. This causes a sharp, radiating pain and severely delays gum closure. For the first few days, your job is not to heal actively but to avoid disrupting the clotting process. This means avoiding suction, spitting forcefully, or poking the site with your tongue.
Swelling typically peaks around day three. This is not a sign of infection; it is the immune system rushing fluid and white blood cells to the area to clean up debris and start the proliferation of new blood vessels. Bruising may also appear, looking like a yellowish or purple smear on the skin near the jaw. By day five to seven, the gum tissue begins to migrate across the healing cap or the sutures. The pain should have shifted from a throbbing ache to a mild local soreness, manageable without heavy narcotics for most people.
The Critical “No Chew” Diet and Lifestyle Guidelines
The first week’s success depends heavily on your discipline. You are in a defensive posture. Any irrelevant pressure on the implant can deform the delicate fibrin clot and interrupt the soft tissue seal. You must adopt a mindset of nourishing your body without involving the surgical site.
Here is a practical table of food choices to guide you during the first week:
| Category | Safe to Eat | Strictly Avoid |
|---|---|---|
| Proteins | Scrambled eggs, smooth Greek yogurt, protein shakes (no straw), silken tofu, pureed lentil soup. | Chewy meats (steak, chicken breast, bacon), nuts, seeds, hard-boiled eggs. |
| Fruits/Veggies | Smooth applesauce, mashed avocado, seedless smoothies, pureed butternut squash, mashed potatoes. | Raw carrots, apples, berries with seeds, celery, corn on the cob. |
| Grains | Cream of wheat, oatmeal (room temp), soft white bread with crust cut off, overcooked pasta. | Crunchy granola, crispy rice, popcorn, crackers, toasted bagels. |
| Beverages | Cool water, milk, iced caffeine-free tea (no straw). | Hot coffee (heat dilates vessels), carbonated drinks, alcohol, acidic juices. |
Important Note: The “no straw” rule cannot be overstated. The suction created by a straw generates negative pressure inside the mouth, easily pulling a protective blood clot right out of the socket, leading to a painful dry socket and a significant delay in healing.
Beyond food, a few other restrictions apply. Smoking is the single most destructive habit during this window. The heat, the chemicals, and, primarily, the vasoconstriction caused by nicotine restrict oxygen flow to the healing gums. Smokers who light up in the first week face a catastrophically higher risk of early failure. Sleep with your head elevated on two pillows to allow gravity to drain the swelling away from the face, rather than letting it pool overnight. Avoid bending over or lifting heavy weights, as the head pressure can restart bleeding.
Phase 2: Soft Tissue Closure and the “False Safety” Period (Week 2 – Week 4)
Entering the second and third weeks, you will likely feel dramatically better. This is a treacherous phase for patient compliance precisely because it is so deceptive. The acute pain evaporates. The gum tissue begins to look pink and sealed around the healing cap or the cover screw. You might even start chewing cautiously on the other side of your mouth and wonder if that mysterious “osseointegration” thing has already happened. It has not.
This phase marks the “quiet low grade proliferation” of gum tissue. The body is replacing the temporary scaffolding (the clot) with granulation tissue, which is rich in new capillaries. This tissue is fragile and bleeds easily. You might notice a metallic healing abutment poking through the gum, becoming visible. This is intentional. It shapes the gum into a perfect circle for the future tooth. You clean it gently with a soft brush and perhaps a prescribed antibacterial rinse. You must still not brush the site aggressively. The maturation of the gum around a post, called the peri-implant soft tissue seal, is as vital as the bone healing below. This gum collar will act as a biological gasket, blocking bacteria from marching down the implant threads.
During this window, you might experience a phenomenon called “spicule exposure.” Tiny, sharp fragments of bone or tooth that were loosened during surgery migrate toward the surface and poke through the gum. They feel like a grain of sand or a white sesame seed caught in your cheek. Do not panic. Your body is simply ejecting debris. Usually, these work themselves out, or the surgeon can flick them away painlessly during a follow-up check.
The Itch and the Phantom Tingle: Interpreting Nerve Healing
A very specific kind of discomfort often arises in weeks two through four: an insistent, deep itch. You feel an urge to push on the implant or grind your teeth, much like the sensation inside a healing broken arm cast. This is called neuropathic sensation. Small nerve fibers that were severed or stretched during the bone drilling are regenerating and firing off somewhat random signals.
This internal itch does not mean the implant is infected or loose. It is actually a positive sign of re-innervation, the return of sensation to the area. However, you must be vigilant in distinguishing an itch from a real neuropathy. If you feel a persistent, electric “zap” shooting through the lip, chin, or tongue, or if the lower lip remains completely dead to the touch, the main nerve trunk may have been traumatized. An itch is central, localized, and dull. A nerve injury is often sharp and shoots along a pathway. By the end of week four, most patients have a sealed gum collar and a sense that the implant is “healed,” but loading a tooth on that implant right now is like pulling a tent stake out of loose, wet soil. The microscopic bond is simply not there.
Phase 3: Osseointegration — The Silent Transformation (Month 1 – Month 4+)
Now we enter the true mystery of the process. On the surface, nothing changes. You go about your life. You clean the healing cap. Maybe you forget the implant is there for hours at a time. But beneath the gum, a massive construction project is firing 24/7. Osteoblasts, the body’s bone-building cells, are migrating onto the titanium surface as if it were a natural bone lattice.
Titanium is biocompatible not because it is inert, but because it spontaneously forms a layer of titanium dioxide on its surface. This oxide layer allows bone proteins to adsorb directly onto it, setting a biological trap that tricks osteoblasts into treating the metal like home. In the first month, immature “woven bone” forms. This is like the body laying down a quick, messy net of concrete. It is strong in compression but low in tensile strength. From month two onwards, this woven bone is resorbed by cells called osteoclasts and replaced by dense, organized “lamellar bone.”
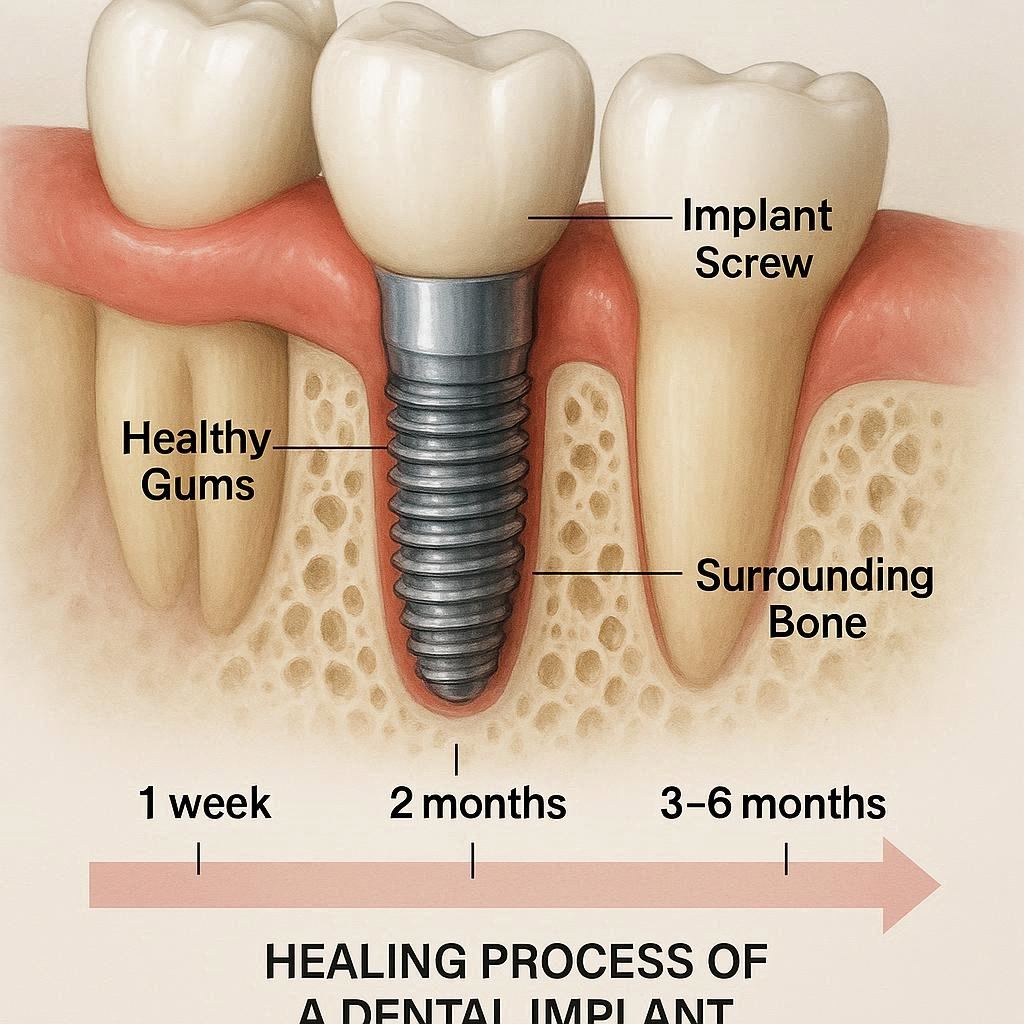
This remodeling is the slowest part. It is basically a home renovation happening inside the jaw, where workers are constantly tearing down the quick fixes and building a proper, load-bearing structure. The time this takes depends entirely on genetics, metabolic health, and the quality of the local blood supply. For a healthy person in the lower front jaw, this secondary remodeling is sufficiently advanced to support a tooth in three to four months. In the upper jaw, where the bone is less dense and blood supply is slightly different, a wait of four to six months is standard. Here is a realistic guide:
- Lower Jaw (Anterior): 3 – 4 months of silent healing.
- Lower Jaw (Posterior): 4 – 5 months.
- Upper Jaw (Anterior): 4 – 5 months.
- Upper Jaw (Posterior): 5 – 6 months, sometimes extending to 7 months if a sinus lift was involved.
What You Can (and Absolutely Cannot) Do During Peak Healing
As the implant integrates, your daily life normalizes, but the implant site is a “no-go zone” for chewing. You can eat a relatively normal diet, but you must chew on the opposite side.
Critical Rule: Avoid “testing” the implant. Humans have a nervous habit of pushing on healing wounds with their tongue or finger. You must consciously stop doing this. Pressing on an integrating implant creates micro-motion. The threshold for movement that disrupts bone integration is frighteningly small, measured in microns. Even a firm tongue push can fall into a danger zone for a very early healing site.
Indirect pressure is also dangerous. Eating a piece of toast on the opposite side might seem safe, but the crushing force transmits through the jawbone itself. The mandible flexes microscopically. A direct hit from a crunchy chip landing on the healing cap, however, is a clear and present danger. If you accidentally bite down on it and feel a sharp zing, you have likely bruised the interface. Call your dentist. A single traumatic impact can trigger the bone to pull away and form that dreaded fibrous capsule.
Variables That Speed Up or Sabotage the Timeline
A standard timeline is a starting point, not a contract. Your body’s specific chemistry and habits will inevitably stretch or compress these estimates. Two patients receiving identical implants by the same surgeon on the same day can heal months apart. Understanding these variables helps you stack the deck in your favor.
The Nicotine Effect: How Smoking Strangles Recovery
Cigarettes remain the single most destructive force against dental implant healing. The issue is not just the “smoke.” It is the systemic vasoconstriction. Nicotine constricts blood vessels, slashing peripheral blood flow by up to 70% for several minutes after inhalation. Healing bone is already operating in a low-oxygen environment initially, and smoking turns the site into a biological desert. A heavy smoker does not just heal slower; they often heal unsuccessfully. Studies consistently show failure rates in smokers are double or even triple those of non-smokers.
But the sabotage doesn’t stop at nicotine. Heat from inhaling causes local thermal trauma to the clotting process. The physical suction of dragging on a filter can dislodge clots in the early days. The chemicals impair the function of osteoblasts, reducing their ability to lay down new matrix. The advice is blunt and direct: stop smoking for a window that begins two weeks before surgery and extends for two to three months after surgery. Not “cut down.” Stop. Vaping, while sometimes presented as a harm-reduction tool, still delivers nicotine and thus replicates much of the vascular damage.
The Patient’s Biological Contributions: Age, Density, and Diabetes
Contrary to old myths, chronological age does not disqualify a person from implant healing. A healthy 80-year-old can heal just as well as a 30-year-old. The true determinant is bone density and metabolic health. Type 2 diabetes, particularly if uncontrolled with high HbA1c levels, significantly slows healing. The high sugar levels in the blood glycate the proteins, creating advanced glycation end-products (AGEs) that stiffen blood vessels and reduce the flexibility of the immune response.
Bone density also varies wildly. A 55-year-old woman with post-menopausal osteoporosis has a very different foundation than a 25-year-old man with thick, dense jaw ridges. Low bone density does not automatically disqualify you, but it demands a longer integration period and a modified surgical technique to ensure stability.
- Diabetes: Controlled blood sugar is key. Keep HbA1c within target range for a smooth recovery.
- Autoimmune Conditions: Conditions like rheumatoid arthritis or lupus can slow healing. The medications, especially immune suppressants, also play a significant role.
- Bruxism (Grinding): A grinder does not technically heal slower biologically, but they endanger the process. Unconscious night grinding generates massive lateral forces. A night guard on the rest of the teeth is essential, but the implant itself must be protected from any transitional forces.
A Closer Look at the Bone Quality Map
Every jaw tells a different story. The dentist classifies bone into types:
- Type 1: Dense, homogenous compact bone. (Excellent healing, great stability).
- Type 2: Thick compact bone around a core of dense trabecular bone. (Most common in the front lower jaw).
- Type 3: Thin porous compact bone and fine trabecular bone. (Often the back of the upper jaw).
- Type 4: Very thin, porous bone. (Poor healing capacity, notoriously tricky).
Type 4 bone requires a delicate touch, under-preparation of the site to compress the bone, and an extended, strictly non-loaded healing period. The surgeon must often push the clock to six or even eight months to prevent the implant from spinning out under loading forces.
Specialty Procedures: Adding Time to the Clock
Sometimes it is not just the implant healing. It is the entire landscape around it. If you lost a tooth years ago, you lost more than just the visible crown. You lost the stimulus that keeps the jawbone from melting away. Bone resorption is a permanent and predictable consequence of tooth loss. Preparing a site for an implant often requires rebuilding what years of denture wear or periodontal disease have destroyed. These preparatory surgeries happen before the implant clock even starts ticking.
Bone Grafting and Socket Preservation
If you had a tooth extracted and an implant placed simultaneously, you might have received a “socket graft” to fill the natural gap between the extraction wall and the implant. The healing for this graft follows a different, slower track. The implanted bone particles act as a scaffold for your own cells. New blood vessels must crawl through this scaffold like vines through a trellis before new bone can form. This adds roughly 2 to 3 months to the overall plan. A major block graft, where a whole section of donor bone is screwed to the jaw, completely resets the calendar. The block graft must heal and fuse to the native bone for 4 to 6 months before the implant drill is even allowed to touch it.
The Sinus Lift Recovery Window
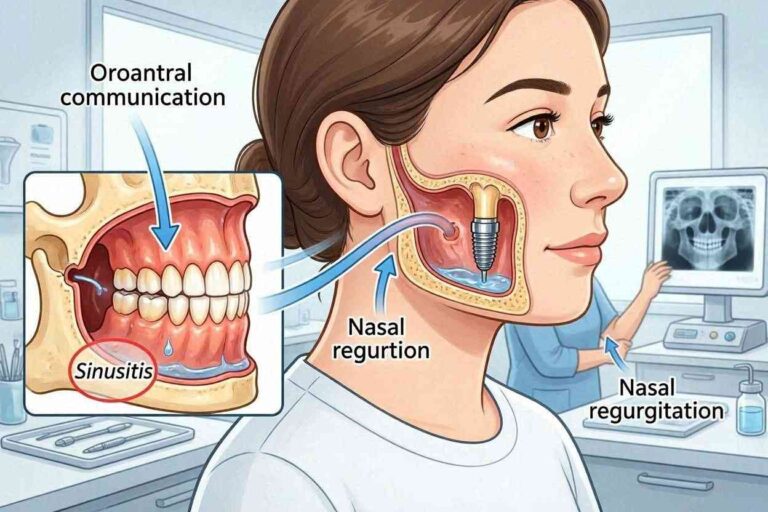
The upper molars sit right beneath an air-filled cavity known as the sinus. When these teeth are lost, the sinus often expands and drifts downward, leaving only a paper-thin floor of bone between the mouth and the sinus cavity. Placing an implant here without adequate bone would mean the implant simply punctures through into the sinus.
A sinus lift delicately elevates the sinus membrane and places graft material into that space. A sinus lift heals even more slowly than other grafts. The environment is warm and humid, and there is minimal native bone. The body has to populate a space inside a membrane with new hard tissue. This almost always needs 6 to 9 months of healing prior to implant placement. When you factor in the implant healing of another 6 months, the process approaches a year and a half before the crown is placed. This is the long game, but without it, the upper jaw implant has a negligible chance of long-term survival.
The Transitional Phase: Restorations and Immediate Loads
The waiting game is psychologically taxing. Walking around with a hole in your smile for six months is not feasible for many people. This is why transitional prosthetics are routinely offered. These are not the final teeth, but they bridge the aesthetic and functional gap during the long biological sleep.
A removable temporary flipper or partial denture replaces the missing tooth. It rests on the gum and neighboring teeth but must be meticulously designed to avoid putting pressure on the underlying healing implant. Even a small amount of rocking from a temp denture can transmit destructive forces. The internal surface of a denture sitting over an implant must be hollowed out completely to be “implant-free.”
A fixed Maryland bridge or a bonded temporary tooth offers a non-removable option. The dentist bonds a fake tooth to the back sides of the adjacent teeth. This does not touch the implant site and allows the gum to heal without any compression. These temporaries are essential for front teeth, where even a day without a smile is a social nightmare.
Truth About “Teeth in a Day”
The most marketed concept in implant dentistry is the immediate load. The surgeon extracts a bad tooth, places an implant, and screws a temporary crown on it, all in the same appointment. You walk out with a fixed tooth. The advertising suggests you have bypassed the healing wait. You have not. The implant is still healing biologically. The tooth is just there, functionally floating within the smile.
The critical caveat is the “non-functional” loading. The tooth placed is often shaved out of the bite so that when you close your mouth, it touches nothing. It looks like a tooth, but it works like a piece of jewelry. Any contact with food during chewing would create micro-motion, causing the bone to immediately interface a fibrous pad instead of fusing. Immediate loading is best suited for the dense bone of the lower front jaw, where multiple implants can be rigidly connected and splinted together, making them very resistant to individual micro-motion. In a soft, spongy upper jaw single tooth, immediate loading is a high-stakes gamble. Important Note: If a surgeon promotes “Teeth in a Day” for a full arch, be aware that the teeth are often temporary. You will still need a second fixed bridge after the biological healing is complete.
The Restoration Phase: Impressions, Abutments, and Delivery
The biological healing is verified when the surgeon tests the implant with a torque driver or a percussion instrument that emits a clear, sharp ringing sound. A dull thud indicates a failure. Once cleared, the implant re-enters the “clinical” phase. A small incision is made to expose the buried implant, the cover screw is removed, and a healing abutment is placed. This is a minor event, often done with just a little local anesthetic, and takes minutes. A new period of soft tissue conditioning begins, usually lasting 2 to 4 weeks, for the gum to form a perfect scalloped cuff around the abutment.
Once the gum collar is stable, the dentist takes an impression. This transfers the exact 3D position of the implant in your mouth to a stone model. The lab fabricates the abutment—the customized connector—and the final porcelain crown. This laboratory phase typically takes 2 to 3 weeks. Finally, you sit in the chair. The abutment snaps or screws into place with a definitive torque. The crown is cemented or screwed onto it. At that moment, the implant is officially “restored.”
The First Year of Function: The Final Test
The delivery of the crown is not the finish line. It is the beginning of the functional test. A crown that is slightly too high, causing a “high point” where you hit it first when biting, creates a traumatic occlusion. Normal chewing generates tens of thousands of pounds per square inch. Focused on one high spot, this forces the bone to fatigue and resorb.
In the first few weeks after crown delivery, you must train yourself. Chew with caution. Progress from soft solids to harder foods. If it feels “taller” than the other teeth, go back immediately for an adjustment. A crown that is left high for a week can already initiate bone loss. You also must adapt your hygiene. A toothbrush alone is not enough. The seam where the gum meets the crown is a fortress wall.
- String Floss: Sometimes works, but often the contours are too wide.
- Interdental Brushes: The best tool. A tiny bottle brush reaches under the crown to wipe the abutment clean.
- Water Flossers: A fantastic addition. Pulsating water with a non-metal tip disrupts the biofilm beneath the gumline. Use on a low pressure to avoid detaching the gum seal.
Seeing your dentist for a “per-implant tissue check” after six months is mandatory. They will look for bleeding on probing, a dead giveaway of peri-implant mucositis, the precursor to full-blown, destructive peri-implantitis.
Potential Complications That Extend the Healing
Sometimes the body’s response derails the timeline. Recognizing these early prevents a total loss. Early failure occurs within the first few months and typically presents as a complete lack of integration. The implant simply spins or lifts out because the bone failed to lock on. Infection causes a lingering, sour taste and pain. Overheating the bone during drilling can kill the local osteoblasts, leading to a soft tissue interface. Late failure occurs after the crown is seated. The most notorious and heartbreaking of these is peri-implantitis.
Peri-implantitis is a disease of the supporting bone. Bacteria colonizing the implant threads trigger the body to resorb its own bone, creating a crater. The gum looks red and bleeds, but often there is no pain until the implant moves. At the point of mobility, the bone is destroyed. Aggressive treatment involves opening the gum, debriding the infected threads, and grafting the defect, followed by months of re-healing. In most advanced cases, the implant is lost.
The Role of Technology in Monitoring the Unseen
How can a dentist truly know if healing is complete without cutting you open? Modern technology offers windows into the dark. Resonance Frequency Analysis (RFA) is a non-invasive tool. A small magnetic peg is attached to the implant, and a device pulses it. The machine spits out an Implant Stability Quotient (ISQ), a number from 1 to 100. A very low number means the implant is wobbly (failing). A high number like 70 suggests a stiff interface ready for loading.
This technology is brilliant for risk assessment. If an implant starts at an ISQ of 60 and over six weeks drops to 55, the doctor knows the secondary bone replacement is lagging, and they must delay loading. If it holds steady or climbs, healing is progressing. Cone Beam Computed Tomography (CBCT) scans also allow a 3D view, seeing whether new bone has filled in around the threads without needing an exploratory surgery as was common 20 years ago.
A Week-by-Week Summary of the Long Journey
Let’s consolidate the timeline into a digestible reference. This is what a single, uncomplicated implant often looks like.
- Day 1 – 3: Swelling peaks. Blood clot is vulnerable. Strict liquid/semi-liquid cold diet.
- Day 4 – 7: Sutures dissolve or feel tight. Soft food only. Bruising starts fading.
- Week 2 – 3: Gum tissue begins to look closed. You feel deceivingly normal. The “Bone Growth Phase” silently starts.
- Week 4 – 6: The implant enters a critical period where “woven bone” turns to “lamellar bone.” Avoid any hard poking.
- Month 3 – 4: Lower jaw implants are often ready for the second stage (exposing the implant). Upper jaw implants still need a few more months.
- Month 5 – 6: Upper posterior bone usually reaches maturity. Implant uncovery and healing abutment placement.
- Next 3 Weeks: Gums contour around the abutment. Final impressions and fabrication of the custom crown take about three weeks.
- Final Visit: Crown delivery. Bite adjustment is critical.
If a graft was involved, essentially extend the first vertical line of that timeline (pre-implant placement) by 4 to 6 months. The patient’s discipline in hygiene and diet is the silent, invisible variable that can accelerate or destroy every step of that schedule.
Conclusion
A dental implant’s healing journey is a profound biological process that transforms a sterile titanium post into a living part of your skeleton, demanding careful soft tissue closure and months of hidden bone integration. Success depends not on rushing toward the final crown but on honoring the phase of silent osseointegration, protecting the surgical site from the microscopic movements that destroy healing bone. While the timeline—from three months for a straightforward lower jaw case to over a year for complex regenerations—varies with your health, habits, and bone structure, the unshakable truth is that patience guarantees a result that feels indistinguishable from a natural tooth, capable of lasting the rest of your life.
Frequently Asked Questions
How can I tell if a dental implant is failing during the healing period?
You cannot always see a failing implant from the surface, but certain signs are red flags. A persistent, throbbing pain that does not respond to over-the-counter medication, especially if it worsens a week after surgery, indicates a problem. Mobility is the absolute confirmation of failure; an intact healing implant should feel as solid as a natural tooth root. A lingering foul taste, pus emerging from the gum, or a visible gray metal thread appearing above the gumline also demand immediate evaluation.
Why does my implant feel perfectly fine, but I still have to wait months for a tooth?
This is the most common point of confusion. The feeling of stability comes from the “primary” or mechanical grip the implant achieved when screwed into the bone, much like a screw in a piece of wood. However, the “secondary” biological bond—the actual fusion of bone cells to the titanium surface—has not yet occurred. Loading a tooth too early breaks this fragile biological bridge down before it becomes strong enough to handle the shock of chewing.
Does age influence how long I have to wait for an implant to heal?
Biological age, not chronological age, matters most. A healthy senior with good blood supply and mineral stores can heal just as efficiently as a younger person. The controlling factor is the quality and volume of the bone receiving the implant, not the number of birthdays. However, systemic conditions that often accompany aging, like osteoporosis or long-term diabetes, can extend the healing calendar and require careful medical management before and during recovery.
Can I wear my existing loose denture while the implant heals?
Yes, but it requires a critical modification. The denture must not transmit pressure onto the underlying implant. The internal surface that touches the healing cap must be generously hollowed out and refitted with a soft, temporary reline material by your dentist. Wearing a standard, hard denture that rocks on the implant will cause compression necrosis of the bone and instant failure.
Is it normal to feel small sharp pieces coming out of the gum weeks after surgery?
This is almost always normal. These are bone spicules or small fragments of residual material that lost their blood supply during surgery. Your body is programmed to eject these harmless debris items. They often feel like a grain of sand and can be wiped away or removed by your surgeon in seconds during a follow-up visit.