How to Clean Dental Implants at Home
You just invested in a brand-new smile. You walked out of the dental office with a gleaming dental implant, feeling like you have been given a second chance. Now, a sudden thought hits you as you stand in front of the bathroom mirror, toothbrush in hand: “How do I clean this thing? Is it the same as a real tooth? Will I ruin it?”
This is the critical moment. Proper home care is the single most important factor determining whether your implant lasts a decade or fails in a few years. A dental implant is not a “fit and forget” device. It demands a specific, dedicated cleaning protocol. The enemy is not the implant itself, but the microscopic bacterial biofilm that loves to colonize the junction where the crown meets the gum.
If you let plaque build up, you invite peri-implantitis. As we discussed in the first article, this is a rapidly destructive infection that can chew away the supporting bone until the implant becomes loose and fails. The good news? Preventing this is entirely within your power. You just need the right tools and the right technique.
This guide will walk you through every step of cleaning your dental implants at home. Whether you have a single crown, a multi-tooth bridge, or a full-arch All-on-4 prosthesis, we have you covered. Prepare to become the master of your implant’s destiny.
The Critical Difference: Why Implants Need a Special Approach
Before we grab our tools, we must understand the fundamental anatomical difference between a natural tooth and an implant. This difference dictates the entire cleaning strategy.
A natural tooth erupts through the gum, and it attaches to the bone via the periodontal ligament. This ligament is a network of collagen fibers that acts like a shock absorber. More importantly for cleaning, the ligament has a rich blood supply. When bacteria invade the gum around a natural tooth, the body can send an army of immune cells and inflammatory factors to fight back. The gum might bleed, but the defense is robust.
An implant has no periodontal ligament. It fuses directly to the bone (osseointegration). The soft tissue seal around an implant is a circumferential ring of collagen fibers that runs parallel to the implant surface. It is a much weaker, less vascular defense. When bacteria penetrate this seal, the inflammation goes straight to the bone. There is no shock-absorbing buffer and no rich blood supply to mount a strong defense.
| Feature | Natural Tooth | Dental Implant |
|---|---|---|
| Attachment | Periodontal ligament + cementum | Osseointegration (bone-to-implant) |
| Blood Supply | Rich, from ligament | Poor, from adjacent bone marrow |
| Collagen Fibers | Perpendicular, strong seal | Parallel, weaker seal |
| Response to Plaque | Gingivitis, reversible | Peri-implantitis, often rapid bone loss |
| Risk from Scratches | Lower, enamel is very hard | Higher, titanium/ceramic can scratch |
Because the seal is weaker, you must be both gentle and thorough. You cannot aggressively scrub the gum away from the crown, as you might with a natural tooth. You must meticulously disrupt the biofilm without traumatizing the tissue or scratching the implant components.
The Essential Toolkit for Implant Home Care
You cannot clean an implant properly with just a regular toothbrush and string floss. You need an armory of specialized tools. Here is the definitive list.
1. The Right Toothbrush (Manual or Electric)
A soft-bristled brush is mandatory. Medium or hard bristles can cause gum recession around an implant and scratch the visible abutment or crown surface. Scratches create grooves where bacteria hide.
Many hygienists recommend a sonic electric toothbrush for implant patients. The sonic vibration creates a secondary fluid dynamic action that can disrupt biofilm slightly beyond the reach of the bristles. This is a gentle, non-traumatic way to clean the critical marginal zone. If you use a manual brush, use a soft one with a small, compact head for precision.
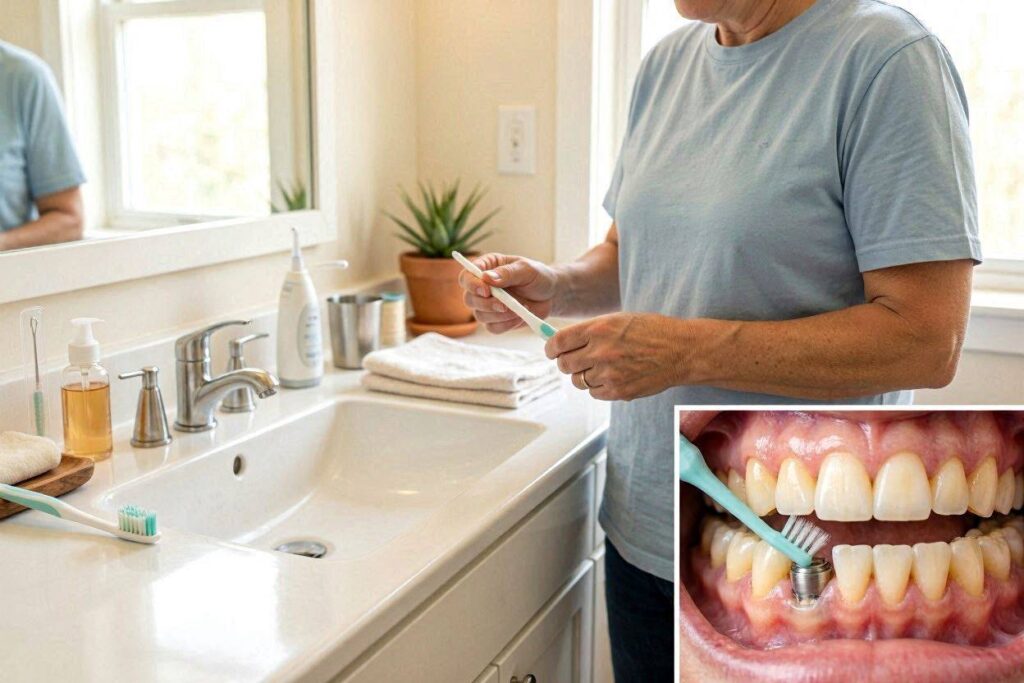
Technique Tip: Use the Bass technique or a modified Stillman technique. Place the bristles at a 45-degree angle to the gumline, pointing toward the gum. Gently vibrate or make small circles. Do not scrub back and forth like a saw.
2. Implant-Specific Dental Floss
Traditional string floss is often too thin to clean the wide, concave surfaces under an implant crown. Worse, it can shred and leave fibers behind, which irritate the gum.
Your weapon of choice is “super floss” or implant-specific floss. This floss has three parts:
- A stiff, thread-like end for threading under the bridge or through tight contacts.
- A soft, spongy middle section designed to absorb plaque and wipe the broad under-surface of the implant restoration.
- A regular floss segment.
How to use it: Gently guide the stiff end between the implant crown and the adjacent tooth. Pull the floss through until the spongy section is in contact. Wrap the floss around the implant in a C-shape, then gently move it back and forth and up and down, wiping the sides and the underside. Do not snap the floss in and out, as this can damage the fragile gum seal.
3. Interdental Brushes (Proxy Brushes)
These little bottle-brush cleaners are indispensable, especially for implants with wider embrasure spaces. The key is to use a brush with a plastic-coated wire. A metal wire can scratch the titanium abutment, creating a rough, bacteria-hosting surface.
Select a size that fills the space snugly but without forcing. Gently insert the brush from the cheek side and move it in and out a few times. This disrupts plaque on the sides of the implant and the adjacent tooth. For multi-implant bridges, these brushes can clean the large areas under the pontics (false teeth).
4. Water Flosser (Oral Irrigator)
A water flosser is a game-changer for implant care. A stream of pulsating water can flush out food debris and loosely adherent plaque from hard-to-reach areas, especially under full-arch fixed prostheses like All-on-4.
Crucial Settings:
- Tip: Use a non-metal tip, preferably one specifically designed for implants. The soft rubber tip is gentle on the tissue and the implant.
- Pressure: Start on the lowest pressure setting. High pressure can detach the fragile gum seal or even force bacteria deeper into the sulcus. You want a gentle lavage, not a power washer.
- Technique: Place the tip at a 90-degree angle to the implant and just below the gumline. Trace along the entire perimeter, pausing at the entry points under a bridge.
5. Rubber-Tip Stimulators and Soft-Picks
These flexible tools are excellent for a quick cleanup after meals. A soft silicone or rubber tip can be run along the gumline to dislodge food particles and massage the tissue. They are a gentle, take-anywhere alternative to a full brushing session.
6. Antimicrobial Mouthwash (Adjunctive)
A mouthwash is not a substitute for mechanical cleaning. Bacteria live in a sticky biofilm that requires physical force to disrupt. However, a non-alcoholic, antimicrobial rinse can be a helpful adjunct. Chlorhexidine is a prescription gold standard but can stain teeth with prolonged use. Hypochlorous acid or essential oil-based, alcohol-free rinses are good daily options to reduce bacterial load.
The Daily Step-by-Step Cleaning Routine
Consistency is everything. Integrate this routine into your morning and evening rituals.
Step 1: Pre-Rinse and Inspect
Before you pick up a brush, take a sip of water and swish. Dislodge loose debris. Stand in front of a mirror with good lighting and look closely at your implant. Are the gums pink and firm? Is there any bleeding or swelling? Early detection of problems is a superpower.
Step 2: Brush All Surfaces Intelligently
With your soft brush (sonic is ideal), start on the cheek-facing surfaces. Position the brush head at that 45-degree angle to the gumline. Let the brush do the work. Slowly trace the entire gumline around the implant. Move to the biting surface, then the tongue-facing side. Spend at least two full minutes brushing your whole mouth, focusing special attention on the implant zones.
Step 3: Interproximal Attack (Implant Floss or Interdental Brushes)
Now target the spaces between the implant and adjacent teeth. This is where the floss or proxy brush comes in. If the space is tight, use the implant floss with its spongy center. Cup the implant with the floss and wipe up and down several times. If the space allows, insert the plastic-coated interdental brush and gently move it in and out. You might see a tiny bit of bleeding at first if the tissue is inflamed. This should stop after a few days of consistent cleaning.
Step 4: Water Flossing (Especially for Bridges)
Fill your water flosser reservoir with warm water. Click in the soft rubber implant tip. Set the pressure to the lowest comfortable number. Place the tip just under the gumline and turn it on. Follow the contour of the implant and the bridge. Watch the water flow carry away food particles you never knew were there. This step is non-negotiable for full-arch restorations.
Step 5: Final Rinse
Finish with an alcohol-free, antibacterial mouthwash. Swish for 30 seconds, then spit. Do not rinse with water afterward; let the thin film of the rinse coat the surfaces. Your mouth will feel supremely clean, and your implant will thank you.
Special Cleaning Protocols for Different Restorations
Not all implants are created equal. The cleaning strategy must match the prosthesis.
Cleaning a Single Implant Crown
This is the simplest scenario. Your main focus is the circular “moat” around the crown. Use the soft brush angled into the sulcus. Use a single piece of super floss to wrap and wipe the entire circumference of the implant crown. An interdental brush can also clean the sides effectively. The goal is to disrupt the biofilm ring that forms right at the gumline.
Cleaning an Implant-Supported Bridge (Two Implants with a Span)
Here, you have two challenges: the abutment sites and the “pontic” area, the false tooth suspended between them. The underside of the pontic is a plaque trap.
- Floss Threading: You must thread the super floss under the pontic. Use the stiff end to go under the false tooth from the cheek side to the tongue side. Pull the spongy segment into place and use a shoeshine motion to scrub the underside of the pontic.
- Water Flosser: This is your best tool. The tip can easily access the space under the pontic. Flush it daily.
Cleaning All-on-4 or Full-Arch Fixed Prostheses
These are the most demanding to clean. The prosthesis is a full arch of teeth anchored by just 4 or 6 implants. It sits off the gum tissue, creating a large space underneath.
- The Underside is Critical: Food debris and plaque quickly accumulate on the underside of the prosthesis and around the implant cylinders. You cannot ignore this area.
- Tools for the Job:
- Water Flosser with a long, curved tip: This is essential to reach the back of the prosthesis from the tongue side.
- Super floss or a floss threader: Used daily to clean around each implant cylinder where it enters the prosthesis.
- Rubber tip stimulator: To gently trace the gum-to-prosthesis interface on the cheek side.
- An electric brush with a small, round head: To polish the visible teeth and access the gumline.
Technique for All-on-4 Underside: Lean over the sink. Use the water flosser tip to direct water from the back of the arch toward the front, flushing debris out the front. Then work from the cheek side, gently irrigating along the gum-prosthesis junction. It takes practice but becomes a quick, 60-second task.
Common Mistakes That Destroy Dental Implants
Even with good intentions, patients often make these critical errors.
- Using a Metal-Tipped Interdental Brush: The metal tip can scratch the titanium abutment or the base of the crown. Scratches are a haven for bacteria. Always use a plastic-coated wire.
- Scrubbing Aggressively: A hard-bristled brush and a sawing motion will cause gum recession. This exposes the dark metal margin of the abutment and creates a bigger, more uneven gap for food to enter. Gentle and precise is the goal.
- Forcing Floss Into a Tight Contact: If you snap floss hard between a tight implant crown and a natural tooth, you can damage the gum papilla. You can also shear off shreds of floss that get trapped. Use a gentle sawing motion and consider a thinner, polytetrafluoroethylene (PTFE) floss for very tight contacts.
- Skipping the Water Flosser on a Full Arch: Without daily flushing, a thick, foul-smelling biofilm matures under the prosthesis. This leads to chronic bad breath, fungal infections, and ultimately, peri-implantitis. The water flosser is not an optional extra; it is a hygienic necessity.
- Using Abrasive Toothpaste: Whitening toothpastes often contain silica or charcoal that can scratch the highly polished surface of the ceramic crown and the titanium abutment. A smooth surface resists plaque. Use a low-abrasive toothpaste (low RDA value).
- Ignoring Bleeding Gums: A common myth is “don’t brush bleeding gums.” The opposite is true. Bleeding is a sign of active biofilm that has been left behind. Gently clean the bleeding area more thoroughly. It will stop bleeding in a few days as the inflammation resolves.
Professional Maintenance: The Non-Negotiable Partnership
Your home care is 90% of the battle, but professional maintenance is the other essential 10%. You need a hygienist or dentist who understands implant care.
Frequency: For a fully dentate patient with implants, a recall every 3-4 months is wise. The biofilm matures rapidly. A 6-month recall might be too long to intercept early inflammation.
What They Do:
- Probing with a Plastic Probe: They gently measure the gum sulcus depth with a soft, plastic probe. Metal probes can scratch the titanium and introduce bacteria. They record any bleeding or increased pocket depth.
- Scaling with Special Instruments: They use scalers made of plastic, graphite, or titanium. These are softer than the implant surface and will not scratch it. They delicately remove any calcified deposits (calculus) without damaging the abutment.
- Radiographic Check: An X-ray every 1-2 years to check for any bone loss around the implant threads. This is the ultimate truth serum for implant health.
- Assessment of Prosthesis: They check for loose screws, chipped porcelain, and bite changes.
“The partnership between a motivated patient and a careful, implant-trained hygienist is the most powerful predictor of long-term implant success.” — A core principle in periodontal-implant maintenance.
Building a Lifelong Habit
Cleaning your implants might feel awkward and time-consuming at first. You might spend fifteen minutes navigating all the new tools. This is normal. Like any new skill, it becomes automatic with practice. Within a month, you will be able to run through your entire water-floss-brush routine in five minutes flat.
Create a visual cue. Keep your implant cleaning kit in a dedicated spot on the counter. Link the new flossing steps to an existing habit, like brushing your teeth. Very soon, the sensations of a deeply clean implant mouth—a feeling of smoothness, tight gums, and fresh breath—become a reward you crave.
Remember the investment you made. A few minutes of meticulous care each day is a small price to pay to keep your smile functional, beautiful, and pain-free for the rest of your life.
Conclusion
Cleaning dental implants at home requires a shift from aggressive scrubbing to gentle, intelligent biofilm disruption. Using a soft brush, implant-specific floss, plastic-coated interdental brushes, and a water flosser forms the foundation of a successful daily routine. The goal is not just a clean crown but the preservation of the delicate gum seal and supporting bone. By mastering these tools and partnering with a professional for regular maintenance, you can ensure your implant remains healthy for decades.
FAQ
1. Can I use regular toothpaste on my implant crown?
Yes, but choose a low-abrasive formula. Avoid “whitening” or “charcoal” toothpastes that have high Relative Dentin Abrasivity (RDA) values. These can scratch the smooth polished surface of the crown, making it more likely to attract plaque and stain over time.
2. My gums bleed when I floss around my implant. Should I stop?
No, you should not stop. Minor bleeding is a sign of localized inflammation caused by biofilm you have not yet removed. Gently continue to clean the area daily. The bleeding should resolve within 3-5 days as the tissue becomes healthier. If bleeding persists, see your dentist.
3. Is a water flosser really enough to replace string floss?
For many implant restorations, especially full arches, a water flosser is better than string floss for flushing large debris. However, to wipe the biofilm off the smooth surface of the implant, the friction of a sponge floss or plastic proxy brush is often superior. Ideally, use both in your routine.
4. How do I clean a full arch All-on-4 bridge by myself?
Focus on the space under the bridge. Use a water flosser with a curved tip from the back of the arch to flush food forward. Use Superfloss or a floss threader to wipe the cylindrical sides of each implant attachment under the bridge. Spend time each day on this underside; it is the most vulnerable area.
Additional Resource
For product recommendations and visual demonstrations of proper implant cleaning techniques, we recommend visiting the International Congress of Oral Implantologists: https://www.icoi.org/patient-education/