How To Prepare For Dental Implant Surgery
Deciding to get dental implants is a big step toward a healthier smile. It is normal to feel a mix of excitement and nervousness before the procedure. The good news is that most of that worry goes away when you know exactly what to do.
Preparing properly for dental implant surgery is not complicated. But it does require a clear plan. When you take the right steps beforehand, your surgery goes more smoothly, and your recovery happens much faster.
This guide walks you through every part of the preparation process. You will learn what to ask your dentist, how to get your body ready, what to buy for home, and what to expect on the day of surgery. No confusing medical terms. Just honest, useful information.
Let us start with the most important people in this process: your dental team.
Understanding Your Role In The Process
You play a major part in the success of your implants. Your dentist will handle the technical work. But your job is to show up prepared, both physically and mentally.
Think of this as a partnership. You follow the instructions. You ask good questions. You set up your home for recovery. The more you prepare, the easier everything becomes.
Most people worry about pain. That is completely understandable. But modern sedation and freezing make the procedure surprisingly comfortable. The real challenge is not the surgery itself. It is following the aftercare rules while your mouth heals.
With that in mind, let us go over the exact steps you should take before your surgery day.
Step 1: Schedule A Complete Pre-Surgical Consultation
Your first real preparation step is a thorough consultation. This is not the same as your initial implant evaluation. This appointment happens after you decide to move forward with surgery.
During this visit, your dental team will do several important things.
Medical History Review
You will fill out or update your medical history form. Be completely honest here. Many people forget to mention small issues like occasional acid reflux or seasonal allergies. But these details matter to your surgeon.
Important note for readers: Always tell your dentist about any bleeding disorders, heart conditions, or artificial joints. Also mention if you have ever had a reaction to local anesthesia.
Medication Assessment
Your dentist needs a full list of everything you take. This includes prescription drugs, over-the-counter pain relievers, vitamins, and herbal supplements.
Some common medications interfere with implant surgery:
| Medication Type | Why It Matters | What Usually Happens |
|---|---|---|
| Blood thinners | Increase bleeding risk | May need to pause or adjust dose |
| NSAIDs (ibuprofen, aspirin) | Slow clotting | Usually stop 5-7 days before |
| Bisphosphonates (bone drugs) | Affect bone healing | Requires special planning |
| Herbal supplements (garlic, ginkgo, vitamin E) | Thin blood | Stop 2 weeks before surgery |
Do not stop any medication without talking to your prescribing doctor first. Your dentist will coordinate with your physician when needed.
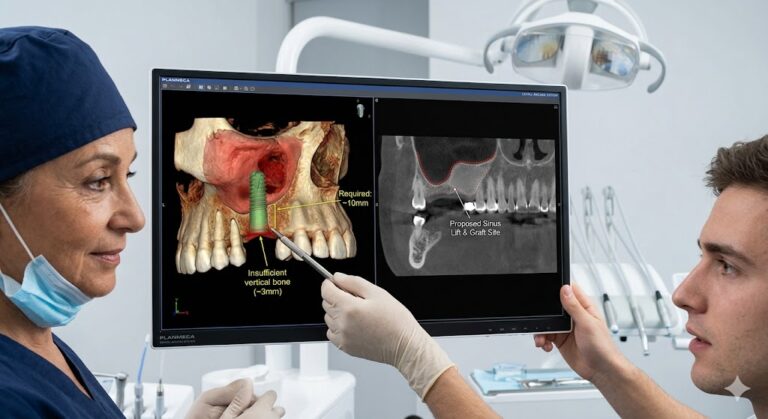
Imaging And Mouth Mapping
Modern implant planning often uses 3D imaging called a CBCT scan. This machine rotates around your head and creates a detailed picture of your jawbone, nerves, and sinuses.
The scan shows exactly where your dentist can place the implant safely. It also reveals any hidden problems, like low bone density or infection near the site.
This imaging appointment is quick, painless, and extremely valuable. It takes about 20 seconds of actual scanning time.
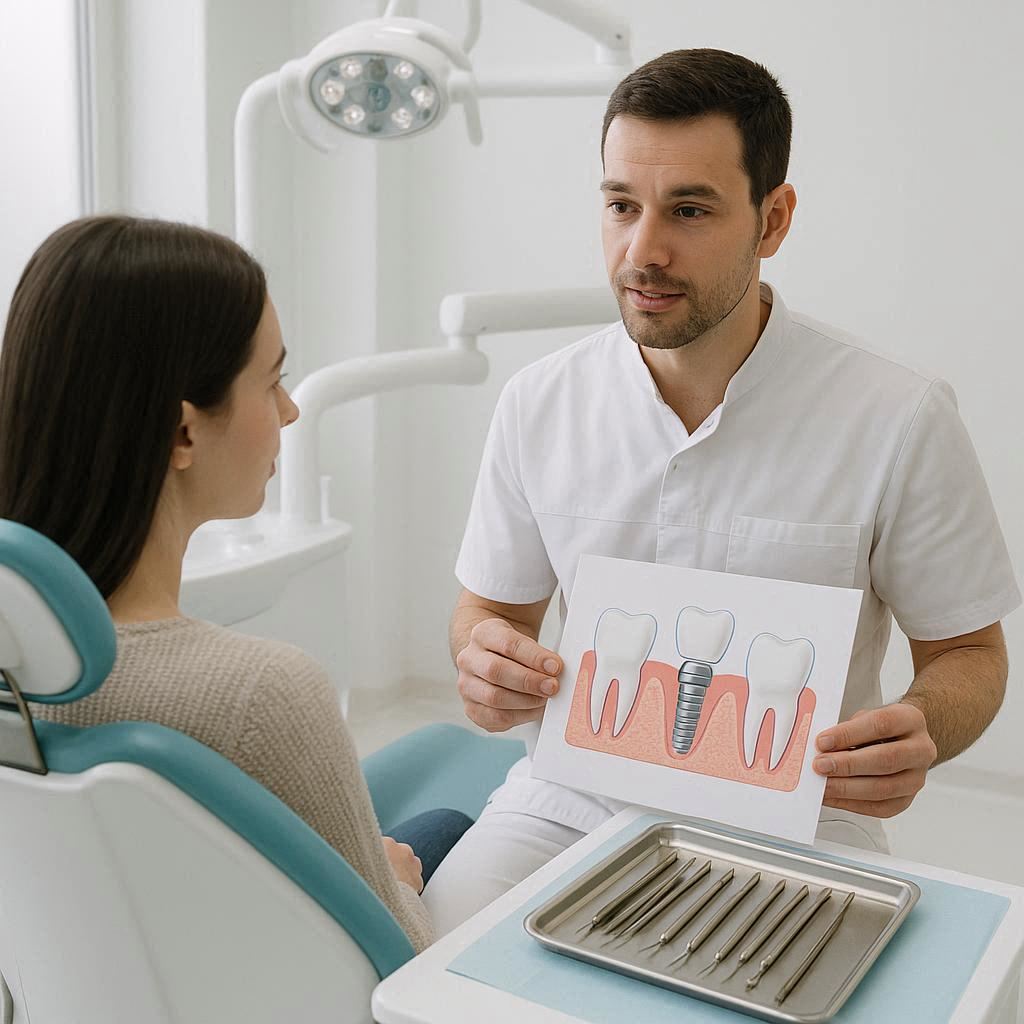
Treatment Plan Review
Your dentist should walk you through the entire surgical plan. This includes:
- How many implants you are getting
- Whether you need bone grafting first
- What type of sedation you will receive
- How long the surgery will likely take
- What to expect during healing
Do not leave this appointment until you understand every step. Write down your questions beforehand and bring them with you.
Step 2: Optimize Your Health Before Surgery
Your body needs to be in good condition to heal well. The weeks before surgery are the time to make smart health choices.
Address Active Dental Problems
Any active infection in your mouth must be treated before implant surgery. This includes gum disease, abscesses, or decay near the implant site.
Your dentist may schedule a deep cleaning or prescribe antibiotics to clear up existing problems. Do not skip this step. Placing an implant into an infected site almost always leads to failure.
Stop Using Tobacco
This is non-negotiable for most surgeons. Nicotine constricts blood vessels and reduces oxygen flow to healing tissues. For dental implants, that is a serious problem.
If you smoke or vape, your implant failure rate goes up significantly. Some studies show a failure rate three to four times higher compared to non-smokers.
Many dentists will refuse to place implants in active smokers. Others require you to stop for at least two weeks before surgery and throughout the healing period.
A realistic note: Quitting is hard. But if you cannot stop, be upfront with your surgeon. They may still work with you, but you need to understand the risks.
Manage Blood Sugar
High blood sugar interferes with healing and increases infection risk. If you have diabetes, your blood sugar should be well-controlled before surgery.
Your dentist or physician can help you determine if your levels are in a safe range. For most people, this means an HbA1c below 7 or 8 percent, depending on individual factors.
Eat A Nutrient-Rich Diet
Your body needs building blocks to heal. Focus on getting enough protein, vitamin C, vitamin D, and calcium in the weeks before surgery.
Good food choices include:
- Eggs, fish, and lean meats for protein
- Citrus fruits and bell peppers for vitamin C
- Dairy or fortified plant milks for calcium
- Mushrooms or fatty fish for vitamin D
Stay well hydrated too. Proper hydration helps your blood carry oxygen and nutrients to healing tissues.
Get Good Sleep
Sleep is when your body does most of its repair work. Aim for seven to nine hours per night in the week leading up to surgery. If you are exhausted on surgery day, your body will have a harder time coping with the procedure and healing afterward.
Step 3: Prepare Your Home For Recovery
Your home environment strongly affects how well you recover. Set everything up before you leave for surgery. You will not feel like doing much when you return.
Stock Your Kitchen
You will not be eating normally for several days. Soft, cold, and lukewarm foods are your best friends during early recovery.
Foods to buy beforehand:
- Yogurt and pudding
- Applesauce and smooth applesauce pouches
- Mashed potatoes (instant is fine)
- Protein shakes or meal replacement drinks
- Broth-based soups (cooled down)
- Scrambled eggs
- Cottage cheese
- Ice cream or frozen yogurt (good for swelling)
- Smoothie ingredients (bananas, protein powder, spinach)
Avoid anything hot, crunchy, spicy, or seeded. Tiny seeds can get stuck in the surgical site and cause problems.
Important note for readers: Do not use straws for at least one week after surgery. The sucking motion can dislodge the blood clot that forms over your healing implant. This leads to a painful condition called dry socket.
Set Up A Comfortable Rest Area
You will spend a lot of time resting with your head elevated. Prepare a spot on your couch or bed before you leave.
Gather these items:
- Extra pillows to prop up your head
- A soft ice pack or two (gel packs work great)
- Clean towels to protect your pillowcase
- A small table near your resting spot
- Phone charger within easy reach
- Entertainment (remote control, tablet, book)
Keeping your head elevated reduces swelling and helps control bleeding. Plan to sleep propped up for the first two to three nights.
Fill Your Prescriptions Ahead Of Time
Your dentist will likely send prescriptions to your pharmacy before surgery day. These often include:
- An antibiotic to prevent infection
- A prescription pain reliever
- An anti-inflammatory medication
- A special mouth rinse (chlorhexidine)
Pick these up at least one day before surgery. You do not want to be driving to the pharmacy while you are in pain or groggy from sedation.
Also buy over-the-counter items you might need:
- Extra gauze pads (non-stick type)
- Salt for salt water rinses
- Acetaminophen (Tylenol) if allowed
- A soft-bristled toothbrush
- Ice packs if you do not already have them
Arrange Transportation And Help
If you are receiving any form of sedation beyond local numbing, you cannot drive yourself home. This includes nitrous oxide (laughing gas), oral sedatives like Valium, or IV sedation.
Ask a trusted friend or family member to bring you to the appointment and stay with you for the first few hours at home. You may feel fine afterward, but the sedation drugs take time to fully wear off. Having someone around keeps you safe.
If you live alone, ask someone to check on you later that evening. A quick text or phone call is often enough, but it is good to have a backup person nearby in case you need help.
Step 4: Plan Your Surgery Day Logistics
Morning of surgery. You have prepared your home and your body. Now it is time to think through the actual day.
What To Wear
Choose comfortable, loose-fitting clothes. Layers are a good idea because your body temperature might fluctuate.
Wear a shirt with short sleeves or sleeves that roll up easily. This gives your dental team access to your arm if they need to place an IV for sedation.
Leave jewelry and watches at home. Remove any facial piercings before you arrive. Do not wear contact lenses. You will be resting with your eyes closed at times, and contacts can dry out or become uncomfortable.
Eating And Drinking Rules
Follow your dentist instructions carefully here. The rules change depending on what type of sedation you receive.
| Sedation Type | Eating/Drinking Rule |
|---|---|
| Local numbing only | Normal eating allowed |
| Nitrous oxide (laughing gas) | Light meal okay |
| Oral sedative pill | Nothing to eat 6 hours before |
| IV sedation | Nothing to eat or drink 8 hours before |
If you are told not to eat, that includes water, coffee, and even chewing gum. An empty stomach reduces the risk of vomiting while sedated.
Morning Oral Hygiene
You can brush your teeth on surgery morning. But be gentle around the surgical area. Do not floss near the implant site.
Do not use mouthwash unless your dentist specifically told you to. Many mouthwashes contain alcohol, which can irritate the surgical site.
What To Bring With You
Pack a small bag with these items:
- Your ID and insurance card
- A list of current medications
- Your dentist phone number
- Lip balm (your lips may get dry)
- A phone and charger
- Your ice packs (the dental office may not provide them)
- A small towel or cloth for drool (some people bleed a little afterward)
Leave valuables at home. You will be in and out of the treatment room, and you do not want to worry about your wallet or nice watch.
Arrive Early
Plan to arrive 15 to 20 minutes before your scheduled appointment. This gives you time to use the restroom, fill out any last-minute forms, and settle your nerves.
Rushing raises your stress level and your blood pressure. Give yourself a buffer so you can walk into the office feeling calm.
Step 5: Understand The Different Sedation Options
Knowing what to expect during surgery reduces fear. Your dentist will discuss sedation choices with you ahead of time. Here is a simple breakdown of each option.
Local Anesthesia Only
This is the same numbing shot you get for a filling. You remain fully awake and aware. You feel pressure and vibration but not sharp pain.
Best for: Single implant, high pain tolerance, no anxiety about dental work.
Nitrous Oxide (Laughing Gas)
You breathe the gas through a small mask over your nose. Within minutes, you feel relaxed and a bit floaty. The effect wears off almost immediately after the mask comes off.
Best for: Mild to moderate anxiety. You can drive yourself home after.
Oral Sedation
You take a pill about an hour before surgery. The medication makes you drowsy and relaxed. Most people fall into a light sleep but can be woken easily.
Best for: Moderate anxiety. You will need a driver.
IV Sedation
Sedative drugs go directly into your bloodstream through a small IV line. This produces a deeper sleep. You will not remember most of the procedure. You can still breathe on your own and respond to commands if needed.
Best for: High anxiety, multiple implants, longer procedures. Requires a driver and a few hours of monitored recovery after.
General Anesthesia
This is full unconsciousness. A medical anesthesiologist usually administers it. You will not remember anything. You need help breathing during the procedure.
Best for: Complex surgical cases or patients with special needs. Rare for routine implant placement.
Important note for readers: Do not let fear push you into deeper sedation than you actually need. Many people do perfectly fine with local anesthetic and some relaxing music through headphones. Have an honest conversation with your dentist about your anxiety level.
Step 6: Financial And Administrative Preparation
The practical side of preparation matters just as much as the medical side. Getting your paperwork and payment sorted out ahead of time removes a major source of stress.
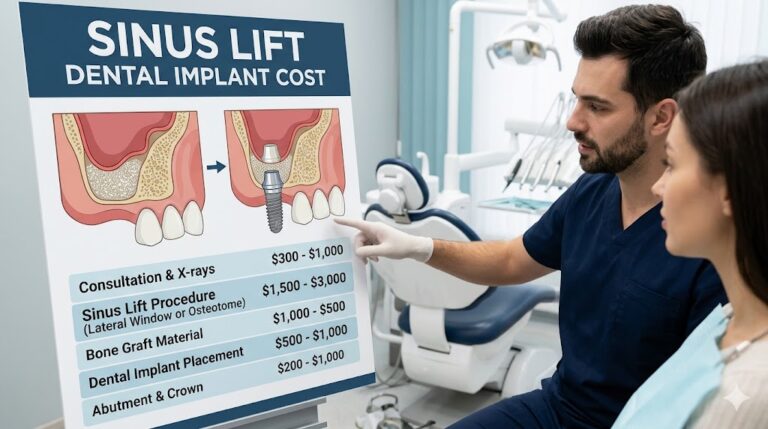
Understand Your Costs
Dental implants are an investment. Make sure you know exactly what you are paying for.
Ask for a written treatment plan that includes:
- The implant fixture itself
- The abutment (connector piece)
- The crown or denture
- Any bone grafting or sinus lift procedures
- Sedation fees
- Follow-up appointments
Check Your Insurance Coverage
Dental insurance rarely covers the full cost of implants. But it may cover parts of the procedure, such as:
- The crown portion
- Extractions of damaged teeth
- Diagnostic imaging
- Sedation
Call your insurance company before the pre-surgical consultation. Ask them to explain your benefits in simple terms. Write down the name of the representative you spoke with and the date of the call.
Payment Plans And Financing
Many dental offices offer payment plans through third-party companies like CareCredit or LendingClub. These plans break the total cost into monthly payments, sometimes with zero interest if paid within a certain time frame.
Do not be shy about asking for financial options. Dentists want you to get the care you need. Most are willing to work with you.
Time Off Work
You will need at least one day off work for the surgery itself. Many people take two to three days, especially if they are having multiple implants placed.
If your job involves physical labor, public speaking, or wearing a mask that presses on your face, you may need a full week off. Your dentist can write a work excuse note if your employer requires one.
Step 7: Mental And Emotional Preparation
Preparing your mind is just as important as preparing your mouth. Dental surgery triggers anxiety for many people. That is normal. But you can manage it.
Visualize A Positive Outcome
Close your eyes and imagine the surgery going smoothly. Picture yourself in the dental chair feeling calm and safe. See your dentist working carefully and confidently. Imagine leaving the office and starting your recovery at home.
This technique sounds simple, but athletes and performers use it all the time. Your brain responds to mental rehearsal almost like real practice.
Talk Through Your Fears
If you have specific fears about needles, drills, or being unable to swallow, tell your dental team. They hear these concerns every day. They have strategies to help.
You might ask for:
- Numbing gel before the needle
- A signal to stop (raising your hand)
- Headphones with your favorite music
- A weighted blanket across your lap
Do not suffer in silence. A good dental team wants you to feel comfortable.
Practice Relaxed Breathing
Slow, deep breathing lowers your heart rate and calms your nervous system. Try this simple pattern:
Breathe in slowly through your nose for four seconds. Hold for four seconds. Breathe out through your mouth for six seconds. Repeat five to ten times.
Practice this at home so it feels natural by surgery day. Then use it while you wait in the reception area.
Accept That You Will Handle This
Here is a truth you can trust: Thousands of people get dental implants every single day. Most of them were nervous beforehand. Almost all of them say it was easier than they expected.
You have prepared thoroughly. You have a skilled dentist. You have a plan for aftercare. You can absolutely handle this.
What Happens If You Need Bone Grafting
Many people need bone grafting before implant placement. This adds an extra step to the preparation process. Do not let this surprise you. About half of all implant patients need some amount of bone grafting.
Why Bone Grafting Happens
Your jawbone needs to be thick and tall enough to hold an implant securely. When you lose a tooth, the bone in that area slowly shrinks over time. This happens because the bone no longer has a tooth root stimulating it.
If you have been missing a tooth for months or years, you likely have some bone loss.
The Bone Grafting Procedure
The dentist places grafting material into the area where you need more bone. This material can come from:
- Your own bone (usually from your chin or hip)
- Donated human bone (processed and safe)
- Cow bone (processed into a safe grafting material)
- Synthetic bone materials
The graft acts like a scaffold. Your body slowly replaces the graft material with new, living bone over several months.
How Bone Grafting Changes Your Timeline
You will need to wait three to nine months after grafting before you can receive your implant. During this time, the new bone forms and hardens.
Use this waiting period wisely. Follow all the health preparation steps mentioned earlier. Quit smoking if you smoke. Get your nutrition on track. Practice good oral hygiene.
Some patients receive the bone graft and implant in the same surgery. This is called a simultaneous approach. It works when you only need a small amount of grafting.
Preparing For Multiple Implants Or Full Mouth Reconstruction
Getting several implants or a full set of implants is a bigger undertaking. Your preparation needs to be more extensive.
Create A Longer Recovery Plan
Plan to take at least three to five days off work. You will likely need someone to help you at home for the first 24 to 48 hours.
Stock extra soft foods. Buy more gauze and ice packs than you think you need. Set up two comfortable resting areas so you can move from the bedroom to the living room during the day.
Expect More Swelling
Multiple implants mean more trauma to your mouth. Swelling will be more noticeable and last longer. It typically peaks around day two or three after surgery, then slowly goes down.
Buy three or four gel ice packs so you always have a cold one ready. Rotate them throughout the day.
Arrange For Help With Daily Tasks
You may not feel up to cooking, cleaning, or childcare for several days. Ask friends or family to bring meals, watch your kids, or walk your dog.
If you do not have nearby support, consider hiring a temporary helper through a service like Care.com. Even a few hours of help makes a big difference.
Medication Management Before Surgery
Let me expand on the medication topic because it causes so much confusion.
Blood Thinners
Common blood thinners include warfarin (Coumadin), apixaban (Eliquis), rivaroxaban (Xarelto), and clopidogrel (Plavix). Even low-dose aspirin counts as a blood thinner.
Your dentist will contact your prescribing doctor to decide if you should stop these medications before surgery. Never stop them on your own. Blood thinners are usually prescribed for serious conditions like heart disease or stroke prevention.
Some patients can continue their blood thinners throughout implant surgery. Modern surgical techniques make this possible in many cases.
Diabetes Medications
If you take insulin or other diabetes drugs, your eating restrictions before surgery may affect your blood sugar. Talk to both your dentist and your doctor about adjusting your medication schedule on surgery day.
Bring your glucose monitor with you to the appointment. Check your levels before you leave home and again when you arrive at the dental office.
Herbal Supplements
Many people do not realize that natural supplements can have powerful effects on bleeding and healing.
Stop these supplements at least two weeks before surgery:
| Supplement | Why To Stop |
|---|---|
| Garlic | Thins blood |
| Ginkgo biloba | Thins blood |
| Ginseng | Thins blood |
| Green tea extract | Reduces clotting |
| Vitamin E | Thins blood (high doses) |
| Fish oil | Thins blood |
| St. John’s wort | Interacts with sedation |
| Kava | Increases sedation effects |
You can restart these supplements after your healing is complete, usually about two to four weeks after surgery. Ask your dentist for guidance.
The Night Before Surgery
Your final evening before the procedure. Use this time to double-check everything.
Do These Tasks
- Take any pre-surgery medications your dentist prescribed
- Shower and wash your hair (you may not feel up to it tomorrow)
- Lay out your comfortable clothes for the morning
- Charge your phone and any entertainment devices
- Confirm your ride to the appointment
- Set multiple alarms so you wake up on time
- Place ice packs in the freezer
What To Avoid
- Do not drink alcohol. It thins your blood and interacts poorly with sedation.
- Do not smoke or vape.
- Avoid heavy exercise.
- Do not eat a giant late-night meal if you need an empty stomach for sedation.
Relax Before Bed
Watch a funny movie. Read a relaxing book. Take a warm bath. Do something that takes your mind off the surgery.
If you feel anxious, write down your worries on a piece of paper. Tell yourself that you have prepared carefully and that you will handle whatever happens tomorrow. Then put the paper aside and try to sleep.
Day Of Surgery: A Step-By-Step Walkthrough
Knowing exactly what happens on surgery day makes everything feel less scary. Here is a realistic timeline.
When You Arrive
You check in at the front desk. The receptionist confirms your information and collects any remaining payment. You take a seat in the waiting area.
The dental assistant calls you back to the treatment room. They ask you to confirm your name, the surgical site, and any allergies. This safety check happens for every patient.
Getting Ready
You settle into the dental chair. The assistant places a blanket over you if you want one. They attach a monitor to your finger to track your heart rate and oxygen levels.
If you are receiving IV sedation, they place a small IV line in your arm or hand. This feels like a quick pinch.
Numbing And Sedation
The dentist numbs the surgical area with local anesthetic. You might feel a small sting from the needle. That sensation passes within a few seconds.
As the sedation takes effect, you feel warm and relaxed. You might drift off to sleep. Do not worry if you cannot remember parts of the procedure later. That is completely normal with sedation.
The Implant Procedure
While you are comfortable, your dentist makes a small incision in your gum. They expose the jawbone beneath. Using special drills, they create a space perfectly sized for your implant.
The implant fixture screws into this space. Your dentist checks that it is stable and positioned correctly. Then they place a healing cap or cover screw on top of the implant. Finally, they close the gum tissue with dissolvable stitches.
For a single implant, the active surgical time is often 30 to 60 minutes. Multiple implants take longer.
Waking Up
If you received sedation, you wake up gradually. The dental team helps you sit up slowly. You might feel groggy, dizzy, or emotional. All of this is normal.
The dentist gives you final instructions. Your driver helps you to the car. You go home and begin your recovery.
Your First 24 Hours Of Recovery
The preparation you did beforehand really pays off now. Your home is ready. Your food is stocked. You have help nearby.
Immediate Aftercare
Bite gently on the gauze pad the dentist placed over your surgical site. Change the gauze when it becomes soaked with blood. Most bleeding stops within four to six hours.
Apply ice packs to your face in 20-minute intervals. Do 20 minutes on, then 20 minutes off. Keep doing this throughout the first day. Ice constricts blood vessels and reduces swelling.
Rest with your head elevated on two or three pillows. Do not lie flat.
What To Expect
- Bleeding: Some oozing is normal for the first day. If you see bright red bleeding that soaks through gauze quickly, call your dentist.
- Swelling: Your cheek may look puffy. This is normal and peaks around day two or three.
- Pain: You will have some discomfort, but prescription or over-the-counter pain medication keeps it manageable for most people.
- Numbness: Your lip, chin, or tongue may feel numb for several hours after surgery. Do not bite or chew on numb areas. You could injure yourself without realizing it.
Eating And Drinking
Stick to cold or lukewarm soft foods for the first day. Yogurt, smoothies (spoon only, no straw), and cold soup are good choices.
Drink plenty of water to stay hydrated. Avoid hot drinks, alcohol, and carbonated beverages.
Oral Hygiene
Do not rinse your mouth vigorously today. Do not spit forcefully. Do not brush the surgical area.
You can gently brush your other teeth as usual. Be careful not to bump the implant site.
Days 2 Through 7 Of Healing
You have made it through the hardest part. Now your body takes over the healing work.
Managing Pain And Swelling
Continue using ice packs for the first 48 hours. After that, switch to warm compresses if you like. Warmth increases blood flow and can help with jaw stiffness.
Take your pain medication as directed. Many people switch from prescription pain relievers to over-the-counter acetaminophen by day three.
Do not take ibuprofen or naproxen unless your dentist approves. These drugs can interfere with bone healing in some patients.
Starting Salt Water Rinses
Beginning on day two, you can rinse gently with warm salt water. Mix one teaspoon of salt in a cup of warm water. Hold the rinse in your mouth and let it flow around the surgical area. Then let the water dribble out over the sink. Do not swish vigorously.
Do this two to three times per day, especially after eating.
Returning To Normal Activities
Most people feel well enough to return to desk jobs by day two or three. Listen to your body. If you are tired or in pain, take another day off.
Avoid exercise, heavy lifting, or bending over for the first week. These activities increase blood pressure and can cause bleeding from the surgical site.
Food Progression
Gradually add more solid foods as you feel able. Good options include:
| Day 2-3 | Day 4-7 |
|---|---|
| Scrambled eggs | Soft pasta |
| Mashed potatoes | Cooked vegetables |
| Cottage cheese | Soft bread without crust |
| Pudding | Pancakes |
| Protein shakes | Ground meat or fish |
Avoid anything crunchy, chewy, or hard for at least two weeks. This includes chips, nuts, steak, bagels, and raw vegetables.
Signs Of Problems: When To Call Your Dentist
Most implant surgeries heal without complications. But you need to know what warning signs look like.
Call Your Dentist If You Experience
- Bleeding that soaks through gauze pads after 12 hours
- Severe pain not relieved by your medication
- Swelling that gets worse after three days instead of better
- A fever over 101 degrees Fahrenheit (38.3 Celsius)
- Pus or foul drainage from the surgical site
- Numbness that lasts beyond 24 hours
- Difficulty breathing or swallowing
Normal Vs. Concerning
| Normal | Concerning |
|---|---|
| Mild oozing for 24 hours | Bright red bleeding after 12 hours |
| Moderate swelling for 3-5 days | Swelling spreading to eye or neck |
| Discomfort that improves daily | Pain getting worse after day 2 |
| Low-grade fever (under 100°F) | Fever over 101°F |
When in doubt, call your dentist. They would rather reassure you than have you worry at home.
Long-Term Preparation: Protecting Your Investment
Your preparation does not end after surgery day. In fact, the long-term success of your implant depends on what you do in the months and years afterward.
Healing Timeline Realistically
- First two weeks: The gum tissue heals around the implant.
- Three to six months: The bone grows tightly around the implant surface. This process is called osseointegration.
- Four to nine months: You receive your final crown or denture attachment.
Do not rush this timeline. Your implant needs that healing time to become strong and stable.
Oral Hygiene After Healing
Once your implant is fully restored, care for it like a natural tooth. But add a few special tools.
You will need:
- A soft nylon brush (avoid metal scrapers)
- Implant-safe floss or superfloss
- Small interproximal brushes to clean around the abutment
- A water flosser on a low setting
Important note for readers: Never use metal dental tools on your implant. Metal can scratch the surface of the implant or abutment. Those scratches trap bacteria and lead to gum inflammation around the implant.
Regular Maintenance Visits
Plan to see your dentist every six months for checkups. They will:
- Check the stability of your implant
- Clean around the abutment and crown
- Take x-rays occasionally to check the bone level
- Look for signs of peri-implantitis (gum disease around the implant)
With good care, dental implants last 20 years or more. Many last a lifetime.
Frequently Asked Questions
How painful is dental implant surgery?
Most people rate the discomfort as mild to moderate. The procedure itself is not painful because of anesthesia. Afterward, the pain is usually less than a tooth extraction. Over-the-counter or prescription medication keeps it manageable.
How long does the surgery take?
A single implant takes about 30 to 60 minutes of active surgical time. Multiple implants take longer. Plan to be at the dental office for two to three hours total when you include check-in, sedation preparation, and recovery.
Can I get all my teeth done in one day?
Some clinics advertise “teeth in a day” procedures. These are possible in specific cases but not for everyone. Most patients need traditional healing time between implant placement and final restoration. Ask your dentist if you are a candidate for immediate loading.
What happens if I run out of pain medication?
Call your dentist during office hours for a refill. Do not take leftover medication from a previous prescription. Do not borrow medication from a friend. If you are in severe pain after hours, most dental offices have an emergency number you can call.
Can I fly after dental implant surgery?
Wait at least one week before flying. Cabin pressure changes can affect healing. The dry air on airplanes also dries out your mouth, which is not helpful for healing. If you must fly, drink plenty of water and use a saline nasal spray.
Will my insurance cover the cost?
Dental insurance typically covers 10% to 50% of implant costs, depending on your plan. Medical insurance sometimes covers implants needed after accidents or cancer treatment. Call both your dental and medical insurers to understand your benefits.
Can I get implants if I have osteoporosis?
Yes, but your dentist needs to know. Some osteoporosis medications (bisphosphonates) increase the risk of a rare complication called osteonecrosis of the jaw. Your dentist will work with your doctor to determine the safest approach.
How soon can I eat normally after surgery?
Most people return to a fairly normal diet within two weeks. But avoid very hard, sticky, or crunchy foods for at least two months. Your implant needs time to fuse with your jawbone before handling heavy chewing forces.
Why do I need to stop taking ibuprofen?
Ibuprofen and other NSAIDs block an enzyme involved in bone healing. Some research suggests these drugs slow down osseointegration. Acetaminophen (Tylenol) does not have this effect and is usually safer for implant patients.
What if my implant fails?
Implant failure happens in about 2% to 5% of cases. If your implant does not heal properly, your dentist can usually remove it, allow the area to heal, and try again. Sometimes a larger implant or bone graft is needed for the second attempt.
Additional Resources
For more trustworthy information about dental implants, visit the American Academy of Implant Dentistry patient education section:
Resource Link: https://www.aaid.com/patients/
This website offers videos, patient stories, and a directory of qualified implant dentists in your area.
Conclusion
Preparing for dental implant surgery comes down to three main actions. First, have a thorough consultation with your dentist and share your complete medical history. Second, optimize your health by quitting tobacco, managing blood sugar, and eating well. Third, set up your home with soft foods, ice packs, and a comfortable resting area. Follow these steps, listen to your body during recovery, and you give your new implants the best possible chance for long-term success.
Disclaimer: This article is for informational purposes only and does not constitute medical advice. Every patient and every surgical procedure is unique. Always follow the specific instructions provided by your own dentist or oral surgeon. If you have concerns about your health or treatment plan, consult a qualified dental professional.