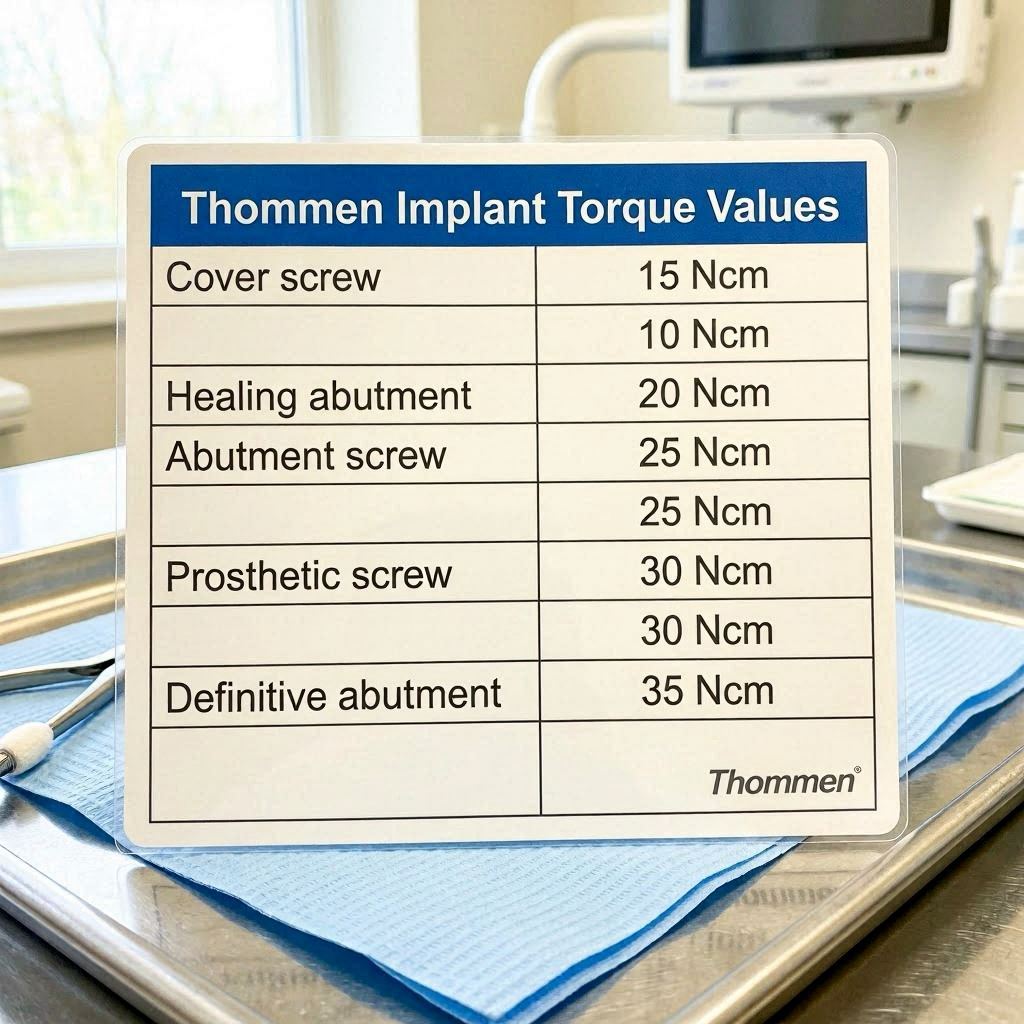
thommen implant torque values
Controlled torque application stands as a non-negotiable pillar of successful implant dentistry. When you work with Thommen Medical’s implant systems, understanding the specific torque requirements becomes the difference between long-term stability and mechanical failure. This guide walks you through every critical torque value you need, explains the reasoning behind each specification, and provides practical protocols you can trust in daily practice.
Patients trust us with their oral health. That trust demands precision. Thommen Medical, a Swiss manufacturer known for precision engineering, designs their implant systems around the principle of mechanical reliability. Their components function as an integrated system where every screw, every connection, and every abutment relies on exact tightening forces. Miss those targets, and you invite complications ranging from screw loosening to catastrophic component fracture.
This article serves as your comprehensive reference. Whether you place SPIs or restore them, manage single crowns or full-arch prostheses, you will find clear, actionable torque values here. We explore the science behind the numbers, the clinical techniques that ensure accuracy, and the troubleshooting strategies that save you from costly remakes. Bookmark this page. You will return to it often.
Understanding Torque in Implant Dentistry
Before diving into Thommen-specific numbers, you need a solid grasp of what torque actually means in the implant context. Many clinicians apply torque daily without fully appreciating the biomechanical principles at play. Understanding these principles transforms your approach from following instructions to practicing true precision dentistry.
What Is Torque and Why Does It Matter?
Torque represents a rotational force applied around an axis. In implant dentistry, you apply this force to tighten threaded components—implant bodies during placement, abutment screws, and prosthetic retaining screws. Manufacturers express torque values in Newton-centimeters, a unit combining force with distance from the rotation center.
When you tighten a screw, you create tension within it. This tension, called preload, acts as a clamping force that holds components together. Think of preload as a stretched spring pulling two parts into intimate contact. Without adequate preload, the joint remains unstable. With excessive preload, the screw stretches beyond its elastic limit and deforms permanently or fractures.
The Thommen system relies on precise preload to maintain the conical connection between implant and abutment. This connection, when properly torqued, creates a bacterial seal and distributes occlusal loads evenly through the implant body. Your torque wrench becomes the instrument that transforms a simple screw into a reliable, long-term joint.
Preload, Clamping Force, and Screw Joint Stability
The relationship between applied torque and achieved preload is not linear or perfectly predictable. Friction consumes a significant portion of your applied torque. Studies consistently show that only about 10 percent of tightening torque converts into useful preload. The remaining 90 percent overcomes friction between threads and under the screw head.
This reality carries profound clinical implications. Any factor that alters friction—lubrication, surface roughness, debris, or manufacturing tolerances—changes the preload achieved at a given torque value. Thommen manufactures their screws with tightly controlled surface finishes to standardize friction as much as possible. You still need to follow protocols meticulously to achieve consistent results.
The screw joint stabilizes when preload exceeds the separating forces encountered during function. Occlusal loads, lateral forces, and thermal cycling all work to separate the joint. A properly torqued Thommen screw maintains clamping force above these disruptive influences, keeping the abutment firmly seated against the implant shoulder day after day, year after year.
The Critical Role of Torque Wrenches and Calibration
Your torque wrench is only as reliable as its last calibration. Mechanical friction-style wrenches drift over time. Spring fatigue, wear on moving parts, and accidental damage all degrade accuracy. A wrench reading 35 Ncm might actually deliver 28 Ncm or 42 Ncm. Either error puts your restoration at risk.
Thommen recommends using calibrated torque control devices exclusively. Digital torque wrenches offer superior accuracy and often include data-logging features valuable for documentation. Whatever device you choose, establish a regular calibration schedule. Most manufacturers suggest recalibration annually or after any impact event. Document your calibration dates. A failed implant component rarely announces itself before the damage is done.
Always use the correct driver with your torque wrench. Worn driver tips damage screw heads and alter friction during tightening. Inspect drivers regularly under magnification. Replace them at the first sign of wear. This small investment prevents expensive complications.
Thommen Medical Implant Systems: An Overview
Thommen Medical has built its reputation on manufacturing implants and prosthetic components that prioritize connection stability and soft tissue integration. Their product lines share a common design philosophy while offering distinct features for different clinical situations. Understanding the landscape of their offerings helps you select the right components and apply correct torque values.
The SPI Implant System and Its Evolution
The SPI system represents the core of Thommen’s implant portfolio. SPI stands for “Swiss Precision Implant,” and the name reflects the engineering ethos behind every component. These implants feature a tapered body design with a progressive thread pattern that condenses bone gradually during insertion. The system includes tissue-level and bone-level options, accommodating various surgical protocols.
The original SPI design established the foundation. Over time, Thommen introduced the SPI ELEMENT, which incorporates an anodized surface treatment called INICELL for faster osseointegration. The implant-abutment connection remained consistent across these evolutions—a precise conical connection with platform switching that maintains soft tissue stability and crestal bone levels.
Current-generation SPI implants use an internal hex for anti-rotation combined with a deep conical seal. This combination provides the mechanical engagement needed for torque transfer during placement while ensuring a bacterial seal after restoration. The connection design directly influences the torque values you will use during both surgical and prosthetic phases.
The CONTACT Implant System Features
The CONTACT system offers Thommen’s solution for specific clinical scenarios, including immediate placement and situations requiring high primary stability. These implants feature a more aggressive thread design that engages cortical bone effectively. The connection geometry shares principles with the SPI system but incorporates modifications for the intended applications.
Understanding which system you are working with matters because component incompatibility creates risks. Always verify that abutments, screws, and instruments match the implant platform. Thommen’s packaging clearly identifies system compatibility. When in doubt, contact their technical support before proceeding.
Key Design Features Affecting Torque Application
Several Thommen design elements directly impact how you apply torque. The conical connection angle creates a friction-fit that resists rotation even before screw tightening. This initial stability lets you position abutments precisely without them spinning during hand-tightening.
The internal connection depth places the abutment screw head well below the implant platform. This design protects the screw from lateral forces that might otherwise loosen it. However, the depth also means you need longer drivers and must ensure complete engagement before applying torque.
Thommen screw materials deserve attention too. The manufacturer uses titanium alloys with specific mechanical properties. These alloys balance strength with a modulus of elasticity closer to bone than some alternatives. The screws can achieve the required preload without excessive risk of fracture—as long as you respect the specified torque limits.
Complete Thommen Implant Torque Value Reference
This section delivers the specific torque values you came for. We organize them by implant type, connection platform, and procedural stage. Use this as your quick-reference resource. Always verify against the most current Thommen instructions for use, as manufacturers occasionally update specifications based on ongoing research.
Insertion Torque Values for SPI Implants
Table: Recommended Insertion Torque for SPI Implants by Diameter
| Implant Diameter | Recommended Insertion Torque | Maximum Insertion Torque | Bone Quality Considerations |
|---|---|---|---|
| 3.5 mm (Narrow) | 25-35 Ncm | 45 Ncm | Reduce in D3/D4 bone |
| 4.0 mm (Standard) | 30-45 Ncm | 50 Ncm | Target 35 Ncm minimum for immediate loading |
| 4.5 mm (Standard) | 35-45 Ncm | 50 Ncm | Suitable for most posterior sites |
| 5.0 mm (Wide) | 35-50 Ncm | 60 Ncm | Use higher values in dense cortical bone |
| 6.0 mm (Extra-Wide) | 35-50 Ncm | 60 Ncm | Avoid excessive torque in poor-quality bone |
Insertion torque during implant placement serves two purposes. First, it indicates primary stability, which correlates with successful osseointegration. Second, it seats the implant fully into the osteotomy. You need enough torque to achieve complete seating without over-compressing bone and causing necrosis.
For SPI implants, Thommen recommends aiming for 25 to 45 Ncm during placement, with the specific target depending on implant diameter and bone quality. In dense D1 or D2 bone, a 4.0 mm or 4.5 mm implant typically seats fully at 35 to 45 Ncm. In softer D3 bone, you might achieve only 20 to 30 Ncm, which can still provide adequate stability for a two-stage protocol.
The maximum insertion torque warrants your attention. SPI implants can generally tolerate up to 50 Ncm during insertion without risk of body fracture. The 5.0 mm and 6.0 mm diameter implants handle up to 60 Ncm. Exceed these limits, and you risk deforming the implant body, damaging the internal connection, or creating excessive bone compression that leads to early failure.
Important Clinical Note: When you reach the recommended insertion torque before the implant fully seats, stop. Remove the implant, deepen or widen the osteotomy slightly, and reinsert. Never force an implant beyond the maximum torque specification. The implant body can fracture, and the internal connection can deform invisibly. You will not know about the damage until the restoration fails months or years later.
Insertion Torque Values for CONTACT Implants
Table: Recommended Insertion Torque for CONTACT Implants by Indication
| Clinical Indication | Implant Type | Recommended Insertion Torque | Maximum Torque |
|---|---|---|---|
| Immediate placement (anterior) | CONTACT 3.5/4.0 mm | 25-35 Ncm | 45 Ncm |
| Immediate placement (posterior) | CONTACT 4.5/5.0 mm | 30-45 Ncm | 50 Ncm |
| Healed ridge (standard) | All diameters | 30-45 Ncm | 50 Ncm |
| Immediate loading protocol | All diameters | Minimum 35 Ncm | Per diameter max |
| Soft bone protocol | All diameters | 15-25 Ncm (acceptable) | 35 Ncm |
CONTACT implants feature a more aggressive thread geometry that achieves higher insertion torque values than the SPI system in equivalent bone. This design characteristic makes them well-suited for immediate placement protocols where primary stability is paramount.
For immediate placement in extraction sockets, target 25 to 35 Ncm in anterior sites and 30 to 45 Ncm in posterior sites. The remaining socket walls provide the bone engagement, so the actual torque depends heavily on socket anatomy and bone quality. When the socket walls are thin or deficient, expect lower torque values and adjust your loading protocol accordingly.
For healed ridges, CONTACT implants typically seat at 30 to 45 Ncm in adequate bone. The minimum torque for immediate loading consideration is 35 Ncm, measured after final seating. If you achieve less, consider a two-stage approach with submerged healing or a one-stage approach with a healing abutment and delayed loading.
Abutment Screw Torque Specifications
Table: Abutment Screw Torque Values for Thommen Prosthetic Components
| Component Type | Screw Type | Recommended Torque | Retorque Protocol |
|---|---|---|---|
| Standard titanium abutment | M1.6 screw | 20 Ncm | After 10 minutes, confirm |
| Angled abutment (15°/20°) | M1.6 screw | 20 Ncm | After 10 minutes, confirm |
| Gold-plastic UCLA abutment | M1.6 gold screw | 15 Ncm | After 10 minutes, confirm |
| Cast-to abutment | M1.6 screw | 20 Ncm | After 10 minutes, confirm |
| Multi-unit abutment (SPI) | M1.8 screw | 25 Ncm | After 10 minutes, confirm |
| Scanbody for digital impression | M1.6 screw | Hand-tight only | Do not torque |
| Healing abutment/cap | M1.6 screw | 5-8 Ncm (hand-tight) | Not applicable |
Abutment screw torque represents perhaps the most critical value in the entire prosthetic workflow. Under-torque this screw, and it loosens. Over-torque it, and it fractures or deforms the abutment connection.
Thommen specifies 20 Ncm for the vast majority of their standard abutment screws. This value applies to solid titanium abutments, angled abutments, cast-to abutments, and most custom-milled components when using the standard M1.6 screw. The consistency across component types simplifies your clinical workflow—you reach for the same torque setting for most prosthetic cases.
Gold screws used with UCLA-type abutments require a lower torque of 15 Ncm. Gold alloys have different mechanical properties than titanium, including lower yield strength. The reduced torque acknowledges this difference while still providing adequate preload for clinical function.
Multi-unit abutments, which serve as foundations for full-arch restorations, use a larger M1.8 screw torqued to 25 Ncm. The increased diameter allows higher torque and generates greater preload, appropriate for the demanding biomechanical environment of full-arch prostheses.
Critical Warning: Scanbodies require only hand-tightening. Applying 20 Ncm to a scanbody distorts the component, potentially damages the implant connection, and produces an inaccurate digital impression. Train every team member on this distinction. A scanbody is not an abutment, and its torque requirement differs fundamentally.
Cover Screw and Healing Abutment Torque Values
Cover screws and healing abutments serve temporary functions during the osseointegration and soft tissue healing phases. Their torque requirements reflect this temporary status.
Cover screws need only enough torque to remain in place during submerged healing. Thommen recommends 5 to 8 Ncm, achieved by firm hand-tightening with the appropriate driver. Over-tightening a cover screw complicates its removal at the second stage and can damage the internal connection threads.
Healing abutments follow similar guidelines. Hand-tighten them firmly using the dedicated driver. If you use a torque wrench, set it to 8 Ncm maximum. The goal is retention without creating a joint so tight that removal damages the forming peri-implant soft tissue attachment.
Torque Protocols for Surgical Procedures
Surgical torque application differs fundamentally from prosthetic torque application. During surgery, you are placing the implant body itself, and the torque values serve both as an indicator of primary stability and as a means of achieving complete seating. Your technique during this phase directly influences osseointegration potential.
Step-by-Step SPI Implant Insertion Protocol
Start with sharp, properly cooled drills following the Thommen drilling sequence exactly. Each drill step prepares the osteotomy progressively, preserving bone and preventing overheating. The final drill diameter depends on your bone quality assessment—in dense bone, you drill to the full recommended diameter; in soft bone, you under-prepare slightly to achieve compression.
Mount the SPI implant on the appropriate carrier. For hand insertion, use the ratchet adapter with a torque-limiting device or a surgical motor with torque control. Begin turning the implant into the osteotomy at low speed, typically 15 to 25 rpm. The implant should advance smoothly without binding.
As the implant approaches final seating, monitor the torque display on your surgical motor or the feedback from your ratchet. The torque typically rises rapidly during the final few turns as the tapered body engages the full osteotomy depth. Continue until the implant platform reaches the planned vertical position—equicrestal, subcrestal, or supracrestal according to your treatment plan.
Record the final insertion torque value in the patient’s chart. This number informs your loading decision. Implants placed with insertion torque of 35 Ncm or greater may qualify for immediate loading protocols, assuming other criteria are met. Implants placed with insertion torque below 20 Ncm should heal submerged or at least without occlusal loading.
Step-by-Step CONTACT Implant Insertion Protocol
The CONTACT system’s more aggressive thread design requires attention to the drilling protocol. Even in dense bone, follow the recommended sequence carefully. Over-preparation negates the CONTACT design advantages; under-preparation creates excessive insertion torque.
After completing the osteotomy, thread the implant in slowly. The CONTACT threads cut more actively than SPI threads, so expect higher torque readings earlier in the insertion process. This is normal and reflects the design intent. Continue until the implant reaches the planned depth.
Pay attention to the torque curve during insertion. A smooth, progressive increase in torque indicates normal bone engagement. A sudden spike may indicate engagement with a dense cortical layer or an anatomical variation. If torque spikes above the recommended maximum, stop. Remove the implant, assess the osteotomy, adjust as needed, and reinsert.
Immediate Loading and Primary Stability Requirements
Thommen supports immediate loading protocols when specific conditions are met. The implant must achieve insertion torque of at least 35 Ncm. The bone quality must be adequate, generally D1, D2, or dense D3. The restoration must be splinted to other implants or protected from full occlusal forces during the initial healing period.
Multiple implant splinting increases the torque requirement. When you splint three or more implants for immediate loading, each implant should ideally achieve 35 Ncm or higher. The splinting distributes forces, but any single implant with insufficient primary stability acts as a weak link that compromises the entire restoration.
Document your insertion torque values meticulously for immediate loading cases. In the event of early failure, these records help determine whether inadequate primary stability contributed to the outcome. They also protect you medico-legally by demonstrating adherence to established protocols.
Torque Protocols for Prosthetic Procedures
The prosthetic phase demands equal precision to the surgical phase. Abutment screw torque values directly determine the longevity of your restoration. A systematic approach to torquing eliminates the variability that leads to complications.
Definitive Abutment Placement and Torque Sequence
Position the definitive abutment on the implant and confirm complete seating visually and tactilely. The abutment should seat fully without gaps and should not rotate on the implant. If rotation occurs before screw placement, verify that you have the correct abutment for the implant platform.
Hand-tighten the abutment screw until resistance is felt. This pre-tightening removes slack from the system and ensures the abutment is fully seated. Then apply torque in a slow, controlled manner. Rapid tightening generates heat and unpredictable friction, both of which alter the achieved preload.
Thommen recommends a two-step torque sequence for critical prosthetic screws. First, tighten to approximately 10 Ncm to seat all components completely. Then, without removing the driver, increase to the full recommended torque—20 Ncm for standard abutments, 15 Ncm for gold screws, or 25 Ncm for multi-unit abutments.
Wait approximately 10 minutes after initial torquing, then confirm the torque value. This waiting period allows for any initial settling or embedment relaxation in the screw joint. In most cases, the screw still holds the full torque value. If it does not, re-torque to specification and recheck.
Screw-Retained vs. Cemented Restoration Torque Nuances
Screw-retained restorations place the abutment screw directly in the load path of occlusal forces. This arrangement demands precise torque to prevent loosening. The Thommen conical connection helps by providing a friction-fit that supplements the screw’s clamping force. Still, the screw must achieve full preload to maintain joint stability.
Cement-retained restorations use a separate abutment screw that is not directly accessible after cementation. You cannot re-torque this screw later. Your initial torquing must be exact. Consider using a secondary torque confirmation after the waiting period but before cementing the crown. If the screw loosens, you lose the restoration—and often the abutment—requiring complete removal and replacement.
For hybrid restorations combining screw retention and cementation—such as a milled bar with individual cemented crowns—torque the bar screws to the multi-unit abutment specification of 25 Ncm. These screws bear the full functional load for the entire arch and leave no margin for error.
Multi-Unit Abutment Torque for Full-Arch Restorations
Full-arch restorations supported by Thommen implants typically use multi-unit abutments to create a common restorative platform. These abutments must be torqued with particular care because they serve as the foundation for the entire prosthesis.
Apply 25 Ncm to each multi-unit abutment screw using the recommended tightening sequence. When multiple multi-unit abutments are placed in the same arch, torque them in a cross-arch pattern, similar to tightening lug nuts on a wheel. This pattern distributes stresses evenly and prevents any single abutment from bearing disproportionate load during tightening.
After torquing all multi-unit abutments, verify each one at 25 Ncm. Do not skip this verification. A single under-torqued multi-unit abutment can cause progressive loosening of the entire framework, leading to a catastrophic failure that may require complete remake of the restoration.
Factors Influencing Implant Torque Values
Torque values do not exist in a vacuum. Biological, mechanical, and procedural factors all influence the torque you achieve during placement and the long-term stability of that torque. Understanding these variables helps you adapt protocols to individual clinical situations while staying within safe limits.
Bone Quality and Density Classifications
Bone density varies dramatically between patients and between sites within the same jaw. The Lekholm and Zarb classification describes four bone types: D1 (dense cortical), D2 (thick cortical with dense trabecular), D3 (thin cortical with fine trabecular), and D4 (very fine trabecular with minimal cortical).
In D1 bone, SPI implants typically achieve insertion torque of 45 to 50 Ncm with standard drilling protocols. You may need to use the full-diameter final drill to prevent excessive torque. In D4 bone, the same implant might achieve only 10 to 15 Ncm. Accept this lower value rather than under-preparing dramatically, which can cause bone necrosis.
Table: Insertion Torque Expectations by Bone Quality (SPI 4.0 mm Implant)
| Bone Quality | Typical Insertion Torque | Protocol Adjustment |
|---|---|---|
| D1 (dense cortical) | 40-50+ Ncm | Use full-diameter final drill |
| D2 (thick cortical, dense trabecular) | 30-45 Ncm | Standard protocol |
| D3 (thin cortical, fine trabecular) | 15-30 Ncm | Under-prepare by one step |
| D4 (minimal cortical, very fine trabecular) | 5-15 Ncm | Consider osteotome technique |
Screw Lubrication and Its Effects on Preload
Lubrication reduces friction during tightening, which means more applied torque converts to preload. A lubricated screw achieves higher preload at the same torque value compared to a dry screw. This phenomenon has significant clinical implications.
Thommen designs their torque recommendations for clean, dry screws. If you lubricate a screw—with saliva, blood, chlorhexidine, or any other fluid—you effectively increase the preload achieved at the specified torque. In extreme cases, this can push the screw past its yield point, causing permanent deformation or fracture.
Keep screws dry during torquing. If the operative field is moist, use cotton rolls, suction, and air drying to clear the implant connection before placing the screw. Do not apply lubricants or anti-seize compounds unless specifically directed by Thommen for a particular application. The manufacturer’s torque values assume clean, dry conditions.
Repeated Tightening and Screw Fatigue
Every tightening cycle subjects a screw to stress. Over time, this stress accumulates as metal fatigue. A screw that has been torqued and loosened multiple times behaves differently than a new screw, even if it looks identical under magnification.
Thommen recommends using new abutment screws for definitive restorations whenever possible. A screw costs a few dollars. A failed restoration costs thousands and damages your reputation. If you must reuse a screw—during try-in appointments, for example—limit the number of tightening cycles and use reduced torque for non-definitive stages.
Laboratory procedures often involve multiple screw-retrieval cycles. Communicate with your laboratory about using laboratory screws for fabrication and saving new screws for final delivery. The laboratory screws can be dedicated to model work only, preserving the new screws’ mechanical integrity for the patient.
Torque Wrenches and Instrumentation
Your instrumentation determines whether you actually deliver the torque you intend. Investing in quality torque control devices and maintaining them properly directly impacts your clinical outcomes.
Mechanical vs. Digital Torque Wrenches
Mechanical torque wrenches use a spring mechanism that releases or clicks when the preset torque is reached. They are simple, durable, and widely used. The audible and tactile click provides clear feedback that you have reached the target torque. However, their accuracy depends on proper storage (with the spring relaxed), regular calibration, and correct technique.
Digital torque wrenches use electronic sensors to measure applied torque and provide a digital readout. They offer several advantages: real-time torque display, often higher accuracy, data-logging capability, and elimination of the spring-fatigue problem. The main disadvantages are higher initial cost and the need for battery management.
Table: Comparison of Torque Wrench Types
| Feature | Mechanical (Click-Type) | Digital |
|---|---|---|
| Accuracy when new | ±4-6% | ±1-2% |
| Long-term accuracy | Degrades with spring fatigue | More stable |
| Calibration interval | Every 6-12 months | Every 12 months |
| User feedback | Audible click | Display reading |
| Cost | Lower | Higher |
| Durability | Very good | Electronic components sensitive |
| Sterilization | Autoclavable | Often requires barrier method |
| Data recording | Manual | Often automatic |
Proper Torque Wrench Technique
Technique errors account for significant torque variability in clinical practice. Even with a perfectly calibrated wrench, your technique determines the actual torque delivered to the screw.
Grip the torque wrench at its handle, not higher on the shaft. Gripping on the shaft changes the lever arm and alters the torque applied relative to the setting. Apply force smoothly and steadily, perpendicular to the wrench axis. Jerky or angled force application introduces errors.
Stop immediately when the wrench clicks or the display reaches the target value. Do not apply additional “confirmation” torque after the click. The click indicates you have reached the preset torque. Additional tightening over-torques the screw, potentially beyond its elastic limit.
When using a ratcheting torque wrench, maintain continuous rotation through the ratchet cycle. Stopping and restarting mid-cycle causes torque spikes that do not register on the wrench mechanism but are transmitted to the screw. Smooth, continuous motion is the goal.
Calibration Schedules and Documentation
Establish a written calibration protocol for your practice. Send mechanical wrenches for calibration every six to twelve months, depending on usage volume. Digital wrenches typically need annual calibration. Always calibrate after any impact event—dropping a wrench onto a hard floor almost certainly affects its calibration.
Document calibration dates and results. Store this documentation with your equipment maintenance records. If a mechanical complication arises and you need to demonstrate that your instrumentation was properly maintained, these records become invaluable.
Keep at least two torque wrenches covering the range you use most frequently—typically one for 15-20 Ncm and another for 25-35 Ncm. This redundancy allows you to continue working if one wrench requires service and provides a cross-check if you suspect a reading is inaccurate.
Common Complications Related to Incorrect Torque
Understanding the consequences of incorrect torque application helps you appreciate why precision matters. These complications are largely preventable when you follow established protocols.
Screw Loosening: Causes and Prevention
Screw loosening remains the most common mechanical complication in implant dentistry. It occurs when the separating forces acting on the joint exceed the clamping force provided by screw preload. The screw does not actually “unthread” itself; it loses preload until the joint opens, and then vibration eventually unthreads the now-unloaded screw.
Under-torquing is the most direct cause of screw loosening. If you apply 15 Ncm instead of the specified 20 Ncm, the screw achieves significantly less preload. The joint opens under occlusal loading, and loosening begins. What starts as a subtle mobility progresses to a loose screw, then a loose abutment, and eventually a fractured screw or damaged implant connection.
Prevention starts with always using a calibrated torque wrench to the manufacturer’s specification. It extends to ensuring clean, dry components, using new screws for definitive restorations, and verifying torque after the waiting period. For posterior restorations subjected to heavy occlusal forces, consider a slightly higher torque within the allowable range—but never exceed the maximum specification.
Screw Fracture and Retrieval Considerations
Screw fracture represents a more serious complication because removing a fractured screw fragment from an implant can be extremely challenging. Fractures occur when screw stress exceeds ultimate tensile strength, which happens with over-torquing or when a loosened screw is subjected to bending forces.
Over-torquing fractures are immediate and catastrophic. You feel the screw suddenly give way, and upon retrieval, the broken fragment remains in the implant. This complication often requires specialized retrieval kits, microscopes, and considerable patience. Success is not guaranteed.
Fatigue fractures occur later, when a screw that was under-torqued loosens slightly, allowing micromovement. Each functional cycle bends the screw slightly. Eventually, metal fatigue causes fracture, typically at the first thread or at the head-shank junction. The abutment may still appear clinically intact, but radiographic examination reveals the fracture.
If a screw fractures: Stop. Do not attempt retrieval with inappropriate instruments. Refer to a clinician experienced in screw retrieval or use a dedicated retrieval kit. Attempting removal with explorers, endodontic files, or other improvised tools often pushes the fragment deeper and damages the internal connection threads, converting a retrievable situation into an implant that must be removed.
Implant Body Fracture and Connection Damage
Implant body fracture is rare but devastating. It almost always results from excessive insertion torque or from attempting to force an implant past an obstruction. Once the implant body fractures, removal is the only option. The remaining fragment must be trephined out, often resulting in significant bone loss.
Connection damage can occur with over-torquing the abutment screw. The internal threads of the implant can strip if subjected to forces beyond their design limits. A stripped connection cannot retain an abutment screw, rendering the implant unrestorable. Like body fracture, this necessitates implant removal.
Never exceed the maximum torque specifications listed in this guide. If you encounter resistance suggesting an obstruction during implant placement, stop and investigate. Do not force the implant. The torque wrench protects the implant, but only if you respect its limits.
Thommen Torque Values in Clinical Scenarios
Real-world dentistry presents situations that protocol documents cannot fully anticipate. This section addresses common clinical scenarios and how to apply Thommen torque values appropriately.
Single-Tooth Restoration in the Posterior Maxilla
The posterior maxilla typically presents D3 or D4 bone quality, limiting insertion torque. A 4.5 mm SPI implant placed in this region might achieve only 15 to 25 Ncm. Accept this reality rather than under-preparing excessively.
Allow the implant to osseointegrate for 12 to 16 weeks before loading. At the restorative appointment, torque the abutment screw to 20 Ncm. If the restoration will receive heavy occlusal forces (bruxism, canine guidance on the first molar, opposing natural dentition), consider using a wider-diameter implant or an additional implant to share the load.
Design the occlusion carefully. In the posterior maxilla, lighter occlusal contacts reduce the separating forces on the screw joint. This conservative occlusal scheme compensates for the less-than-ideal screw joint mechanics imposed by the short clinical crowns often found in this region.
Immediate Anterior Implant Placement and Provisionalization
Anterior immediate placement demands careful torque management. The extraction socket provides limited bone engagement, often resulting in insertion torque of 20 to 30 Ncm. This may be sufficient for immediate provisionalization with a non-functional temporary, but rarely adequate for immediate functional loading.
For the anterior immediate case, torque the implant to the maximum achievable within the safe range. Use a CONTACT implant if additional primary stability is required. Torque the temporary abutment to 15 Ncm rather than the full 20 Ncm used for definitive abutments. This reduced torque allows for easier removal at the definitive impression appointment while still retaining the provisional adequately.
Ensure the provisional restoration is out of occlusion in all excursive movements. No centric contact, no protrusive contact, and absolutely no lateral contact. The patient must understand and comply with these restrictions during the entire osseointegration period.
Full-Arch Immediate Load Protocol
Full-arch immediate loading places the highest demands on torque management. Every implant in the arch must achieve at least 35 Ncm insertion torque. Multi-unit abutments are torqued to 25 Ncm. The prosthetic framework screws are torqued to the manufacturer’s specification for the specific abutment connection.
Sequence matters. Place all implants and verify insertion torque on each. If any implant fails to achieve 35 Ncm, you have a decision: convert that implant position to an unloaded healing implant (and modify the prosthesis design) or replace the implant with a wider or longer one that can achieve the required torque.
Torque the multi-unit abutments in a cross-arch sequence, then verify each. Deliver the provisional prosthesis on the same day, again verifying all prosthetic screws at the recommended torque. Schedule a follow-up appointment within two weeks to re-torque all accessible screws. This re-torque appointment is critical for full-arch cases and should not be delegated or skipped.
Comparing Thommen Torque Values with Other Implant Systems
Context helps you understand Thommen’s torque specifications more deeply. Every manufacturer designs their connection geometry and screws to achieve specific biomechanical goals. The torque values reflect those design choices, not arbitrary selections.
Thommen vs. Straumann Torque Values
Straumann implants use a different connection geometry—the CrossFit connection for bone-level implants—and specify different torque values. Standard Straumann abutment screws require 35 Ncm, significantly higher than Thommen’s 20 Ncm. This difference reflects the larger screw diameter and different connection design of the Straumann system.
Both systems achieve adequate preload for clinical function. The higher torque value does not necessarily mean a “better” connection; it means the screw is designed to achieve its optimal preload at that torque. Comparing torque values between manufacturers without understanding the underlying engineering is misleading.
Thommen vs. Nobel Biocare Torque Values
Nobel Biocare abutment screws for the conical connection system typically require 25 to 35 Ncm depending on the specific connection and component. Again, these values reflect Nobel’s screw design and connection geometry. The difference from Thommen’s 20 Ncm does not indicate superiority or inferiority of either system.
Thommen’s choice of 20 Ncm for standard abutment screws reflects their engineering assessment of optimal preload for their specific screw material, diameter, thread pitch, and connection geometry. Trust that assessment. Their clinical success rates demonstrate the adequacy of their torque specifications.
Understanding Rational Differences in Specifications
Manufacturers determine torque specifications through extensive testing. They evaluate preload achieved at various torque levels, fatigue resistance under cyclic loading, and failure modes at extreme torques. The published specification represents the optimal balance between adequate preload for clinical function and margin of safety against screw failure.
Some manufacturers specify a torque range, others a single value. Thommen typically specifies single values, which simplifies clinical decision-making. If a range is given, aim for the midpoint unless clinical circumstances suggest otherwise.
Laboratory Communication and Torque Documentation
Effective communication with your dental laboratory improves prosthetic outcomes. The laboratory needs to know which implant system you placed, which abutment you intend to use, and any special torque considerations for the case.
Prescribing Torque Values to the Laboratory
When you send a case to the laboratory, include the implant system and platform information explicitly. State: “SPI implant, standard platform, definitive abutment torque 20 Ncm.” This information helps the laboratory select appropriate laboratory screws and verify that the restoration design accommodates the screw access channel correctly.
For full-arch cases, specify multi-unit abutment torque requirements and the type of prosthetic screws that will be used. The laboratory can then design the framework with appropriate screw access and verify that the metal substructure adequately supports the screw seats.
Clinical Records and Torque Value Documentation
Record insertion torque for every implant placed. Note the bone quality assessment that informed your drilling protocol. Record the torque value actually achieved, not just the target. “Insertion torque achieved: 42 Ncm” provides more useful information than “Insertion torque adequate.”
Document abutment screw torque at delivery. Record the torque setting, the number of tightening cycles, whether a new screw was used, and any re-torque verification. This documentation protects you if a screw-related complication arises later and demonstrates your adherence to established protocols.
Frequently Asked Questions About Thommen Torque Values
What torque do Thommen SPI implants require during placement?
SPI implants require 25 to 45 Ncm insertion torque for standard diameters in normal bone, with a maximum of 50 Ncm for 3.5 mm and 4.0/4.5 mm implants, and up to 60 Ncm for 5.0/6.0 mm implants. The exact value depends on implant diameter and bone quality.
What is the abutment screw torque for Thommen implants?
Standard Thommen abutment screws require 20 Ncm. Gold screws for UCLA-type abutments require 15 Ncm. Multi-unit abutment screws require 25 Ncm. Always use a calibrated torque wrench.
Can I immediately load a Thommen implant with insertion torque below 35 Ncm?
Immediate loading is not recommended for implants with insertion torque below 35 Ncm. These implants should heal with a submerged or non-loaded protocol for 8 to 16 weeks depending on bone quality.
How often should I calibrate my implant torque wrench?
Mechanical wrenches should be calibrated every 6 to 12 months. Digital wrenches typically require annual calibration. Calibrate immediately after any impact or suspected damage. Document all calibrations.
Should I lubricate Thommen abutment screws before torquing?
No. Thommen torque specifications assume clean, dry screws. Lubrication reduces friction and increases preload at the same torque setting, potentially overloading the screw. Keep the operative field dry during torquing.
What happens if I over-torque an abutment screw?
Over-torquing can deform the screw beyond its elastic limit, causing permanent elongation or fracture. It can also strip the internal threads of the implant, rendering it unrestorable. Never exceed the specified torque.
Can I reuse an abutment screw?
Thommen recommends using new abutment screws for definitive restorations. Screws used during try-in or laboratory procedures may be reused for non-definitive stages but should be replaced for final delivery.
What should I do if an abutment screw fractures?
Stop and assess the situation carefully. Use dedicated screw retrieval instruments. Do not use endodontic files or improvised tools. If retrieval is challenging, refer to an experienced clinician or consider the implant unrestorable if the fragment cannot be removed without connection damage.
Additional Resources
For current and detailed technical documentation, refer directly to the manufacturer’s official resources:
Thommen Medical Official Website – Download Center
www.thommenmedical.com
This resource provides access to current instructions for use, surgical and prosthetic manuals, and technical bulletins that may update or supplement the information in this guide.
Conclusion
Thommen implant torque values are not suggestions; they are clinically validated specifications derived from rigorous engineering and clinical testing. You now have a complete reference for insertion torque during implant placement, abutment screw torque for every prosthetic component, and torque requirements for multi-unit foundations in full-arch cases. Understanding the biomechanical principles of preload and joint stability empowers you to apply these values with confidence and to troubleshoot when clinical circumstances deviate from the ideal. Precision torque application transforms good implant dentistry into predictable, long-lasting implant success.
Frequently Asked Questions
Q: What torque should I use for Thommen SPI implant placement?
A: Target 25-45 Ncm for standard diameters, with maximums of 50-60 Ncm depending on implant diameter. The exact target depends on bone quality and clinical indication.
Q: What is the Thommen abutment screw torque specification?
A: Standard titanium abutment screws require 20 Ncm. Gold screws require 15 Ncm. Multi-unit abutment screws require 25 Ncm.
Q: Do I need a special torque wrench for Thommen implants?
A: Any calibrated torque wrench covering the 15-35 Ncm range works with Thommen components. The manufacturer recommends regular calibration regardless of wrench type.
Q: Can I immediately load a Thommen implant with low insertion torque?
A: Insertion torque below 35 Ncm does not support immediate loading. Allow submerged or non-loaded healing for these implants.
Q: Should I use new or reused abutment screws for final restorations?
A: New screws are strongly recommended for definitive restorations. Limit screw reuse to non-definitive stages like try-in appointments.
Q: What is the torque for Thommen healing abutments?
A: Firm hand-tightening (approximately 5-8 Ncm) is sufficient. Do not torque healing abutments to the same value as definitive abutments.
Disclaimer: This article provides clinical reference information based on publicly available manufacturer documentation and general implant dentistry principles. Always consult the most current Thommen Medical instructions for use, which may be updated periodically. The author and publisher assume no liability for clinical decisions made based on this information. Implant dentistry requires professional training, clinical judgment, and adherence to applicable regulations and standards of care.