What Does a Healing Cap Look Like in Dental Implants?
Imagine this. You have just completed the surgical phase of your dental implant. The implant itself sits securely in your jawbone, hidden beneath your gum tissue. You might feel a small, smooth, round object right at the gumline when you touch the area with your tongue. That object is the healing cap. Patients often wonder if the shape is correct, if the color is normal, and if the size matches what the final tooth will look like. This guide walks you through every visual and physical characteristic of a healing cap, leaving no question unanswered.
We will explore the materials, the dimensions, the color variations, and the exact visual differences between a healing cap and a permanent restoration. You will learn what to look for in the mirror, how to know if the healing is progressing normally, and when a visual change might require a call to your dentist. The information here reflects standard clinical practice and provides an honest, realistic portrait of the implant journey.
Understanding the Role of a Healing Cap Before You See It
Before we dive into the appearance, let us establish a clear, simple definition of the component we are discussing. A healing cap, also called a healing abutment or a gingival former, serves as a temporary interface between the dental implant and the oral environment. The implant body sits completely under the gum. The healing cap screws into that implant and protrudes through the gum tissue. Its primary job is to shape the gum tissue into a natural-looking emergence profile while protecting the internal connection of the implant.
The Precise Clinical Purpose of the Component
Dentists place a healing cap to guide the soft tissue during the critical weeks after implant placement. Without this component, the gum would simply grow over the implant, sealing it off completely. That would require a second surgical procedure just to uncover the implant. The healing cap maintains an open pathway. It also molds the gum into a circular or slightly oval opening that will eventually frame the final crown beautifully.
The shape of the gum collar around a natural tooth is not perfectly round. It mirrors the cross-section of the tooth root. The healing cap begins this shaping process. By protruding through the gum at the correct angle and with the appropriate diameter, it trains the tissue to form a healthy, thick collar. This collar serves as a protective seal against bacteria and creates an aesthetic transition zone that looks completely natural when you smile.
Where the Healing Cap Sits in the Overall Timeline
To visualize the healing cap correctly, you need to know exactly when it appears in your mouth. In a two-stage implant protocol, the surgeon places the implant body and covers it completely with gum tissue. After three to six months of osseous integration, the surgeon makes a small incision to expose the implant and then attaches the healing cap. This cap remains visible in the mouth for two to six weeks while the gum tissue matures around it.
In a single-stage protocol, the surgeon places the healing cap immediately after inserting the implant body. You leave the surgical appointment with the cap already visible at the gumline. This approach eliminates the second uncovering procedure. Your dentist will discuss which protocol suits your specific case based on bone quality, implant stability, and the need for any simultaneous grafting procedures.
Important Note: The healing cap is a temporary component. You will never see it in the final restoration. The permanent abutment and crown will replace it entirely once the soft tissue has matured.
The General Shape and Silhouette of a Healing Cap
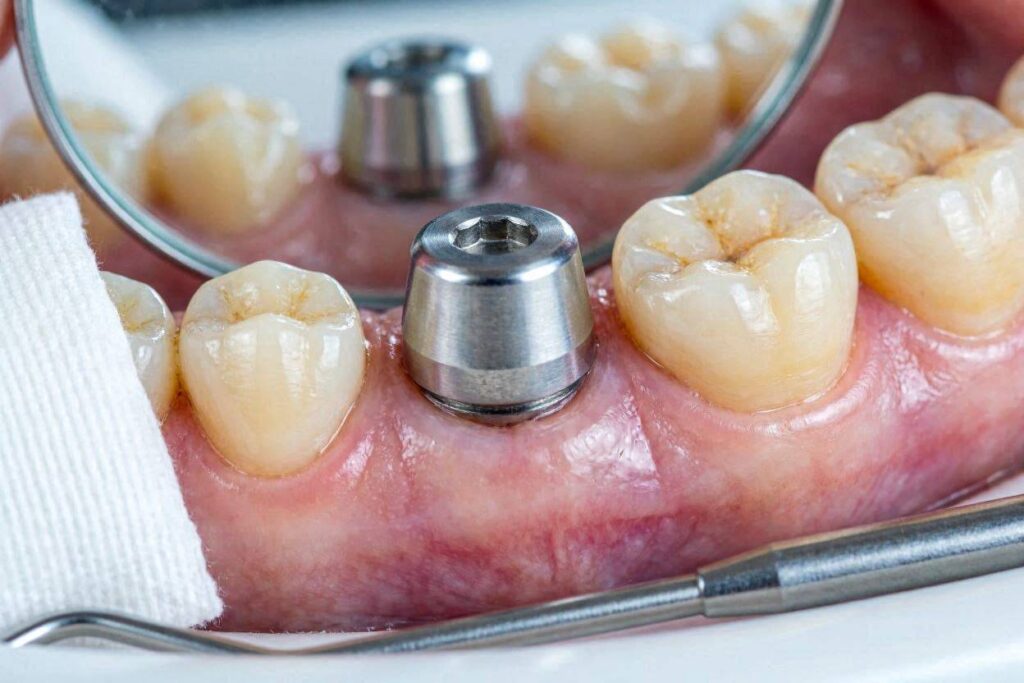
The most common question we hear is a simple one: “What does it look like?” Let us paint a clear, detailed picture. A healing cap typically resembles a tiny, low-profile metallic or white mushroom. The top portion, which sits above or level with the gum, looks like a flat or slightly domed disc. The bottom portion narrows into a threaded shaft that engages the internal connection of the implant.
The Classic Mushroom Profile Explained
Imagine a miniature button with a short stem. The “stem” threads down into the implant. The “button” part sits on top of the gum or just slightly submerged. In many designs, the transition from the narrow shaft to the wider top is smooth and curved. This curve is deliberate. It reflects the profile that the dentist wants to create in the gum tissue. A gradual slope allows the gum to drape naturally, mimicking the way tissue emerges around a natural tooth.
When you look in the mirror, you see only the top surface. It appears as a small, round, flat structure, usually between 4 and 7 millimeters in diameter. Some designs incorporate a slightly convex, dome-shaped top. Others feature a completely flat occlusal surface. In either case, the edges are rounded and smooth to avoid irritating your tongue or cheek.
The Significance of the Circular Gum Cuff
The visual frame around the healing cap matters as much as the cap itself. A healthy gum collar hugs the cap tightly, forming a neat, pink circle. You should see no gaps between the tissue and the metal or ceramic surface. The tissue edge should look crisp, not ragged or swollen. This tight adaptation is the visual hallmark of healthy maturation.
If you gently press on the tissue with a clean finger, it should feel firm and should not bleed. The circular shape you see at this stage will ultimately define the emergence profile of the final crown. The dentist selects the healing cap diameter specifically to create the ideal soft tissue architecture for the tooth being replaced.
Detailed Material Characteristics and Color Palette
The material of the healing cap dramatically influences its appearance. Two primary materials dominate the market: titanium and zirconia. A third category includes healing caps made from polyetheretherketone, commonly known as PEEK. Each material brings a distinct visual signature to your implant site.
Titanium Healing Caps: The Silver-Grey Standard
Titanium remains the most widely used material for healing abutments. When you see a titanium healing cap, you immediately notice its metallic silver-grey color. The surface finish can vary. Many feature a machined, slightly textured matte appearance. Others possess a highly polished, mirror-like shine. The polished versions reduce plaque accumulation and feel smoother to the tongue.
A titanium healing cap looks clearly metallic. In areas where your gum tissue is thin, the grey color might subtly show through the tissue, creating a slightly darkened hue at the gumline. This visual effect is purely cosmetic and does not indicate a problem. However, in highly aesthetic zones like the front teeth, many dentists now prefer tooth-colored alternatives to avoid any grey shadow.
Zirconia Healing Caps: The Tooth-Colored Alternative
Zirconia healing caps have transformed the aesthetic possibilities of implant treatment. These caps display a white, tooth-like color. Manufacturers offer them in multiple shades that correspond to natural tooth colors. The surface looks smooth and glossy, similar to a glazed ceramic restoration. When you smile, a zirconia healing cap blends harmoniously with adjacent natural teeth.
The visual advantage is striking. Even if your lip rises and exposes the gumline, an observer sees only a white surface that resembles a prepared tooth. Zirconia also offers excellent biocompatibility. The gum tissue adheres to it beautifully, often forming an even tighter, healthier collar than around titanium. For front teeth, many clinicians exclusively use zirconia healing caps to optimize the aesthetic foundation.
PEEK Healing Caps: The Temporary, Flexible Option
PEEK healing caps come in a range of colors, often beige, cream, or a soft white. The material is a high-performance thermoplastic polymer. Visually, a PEEK cap looks somewhat opaque and less glossy than zirconia. It may appear slightly duller. Some manufacturers color it pink to blend with the gum tissue. The most common color you will encounter is a matte, off-white shade.
PEEK components serve specific purposes. They work well for patients with metal allergies or sensitivities. They also provide a slightly flexible interface during the initial healing period. However, most clinicians reserve PEEK for specific situations and use titanium or zirconia for standard protocols.
Material Appearance Comparison Table
| Material | Color Palette | Surface Finish | Gum Shadow Risk | Best Used For |
|---|---|---|---|---|
| Titanium | Metallic silver-grey | Matte or highly polished | Grey shadow visible through thin tissue | Posterior teeth, non-aesthetic zones |
| Zirconia | Tooth-colored white, multiple shades available | Smooth, glossy, glazed | None; blends with natural dentition | Anterior teeth, high-aesthetic demand |
| PEEK | Beige, cream, off-white, or pink | Matte, opaque | Minimal; pink versions camouflage well | Metal allergy patients, provisional phases |
A Quick Visual Reference List
When you look at a healing cap, here is what you might notice based on the material:
- A metallic silver-grey disc with a matte or shiny top: titanium.
- A white, tooth-colored disc with a glossy finish: zirconia.
- A beige or cream-colored disc with an opaque, matte look: PEEK.
- A pink disc designed to mimic gum tissue: customized PEEK or hybrid components.
The Size Spectrum: Diameter and Height Variations
Healing caps do not come in a single, universal size. The dimensions vary based on the implant platform, the position in the mouth, and the desired emergence profile. Understanding the size spectrum helps you appreciate why your healing cap may look different from another patient’s.
Understanding Diameter Choices by Tooth Position
The diameter of the top disc typically ranges from 3.5 millimeters to 7.5 millimeters. A small incisor in the lower jaw requires a much narrower profile than a large molar in the upper jaw. The dentist selects a diameter that closely matches the neck of the tooth being replaced. For a central incisor, the healing cap diameter might measure 5 to 6 millimeters. For a first molar, the diameter could reach 7 millimeters or more.
When you view a healing cap on an incisor, you will see a relatively small circle relative to the surrounding teeth. On a molar, the cap will appear broader and more substantial. The visual proportion matters. A cap that is too wide for an incisor position can flatten the interdental papillae, those little triangular gum peaks between teeth. A cap that is too narrow for a molar may not create a sufficient emergence profile.
Height or Profile Options: Low, Standard, and High
The height of the healing cap, often called the cuff height or transmucosal height, also varies. This measurement dictates how far the top disc sits above the implant platform. In clinical terms, cuff heights range from 1 millimeter to 6 millimeters or more.
A low-profile cap (1-2 millimeters) suits situations where the gum tissue is very thin. The top disc sits almost flush with the gum surface. A standard profile (3-4 millimeters) works for most cases. The cap protrudes gently, providing enough structure to shape the gum collar. A high-profile cap (5-6 millimeters or more) serves patients with thick gum tissue or when the implant sits deeper beneath the surface.
Visually, a high-profile healing cap looks taller and more prominent. You can clearly see the metal or ceramic cylinder rising through the gum before it flares into the top disc. A low-profile cap looks like a flat coin sitting directly on the tissue with almost no visible shaft.
Matching Cap Size to Implant Platform
Every healing cap must precisely match the implant platform. Implant manufacturers produce proprietary connection geometries. A healing cap designed for a Straumann implant will not fit a Nobel Biocare implant. The dentist orders the healing cap from the same manufacturer and for the specific implant line used in your case.
The platform match determines the visual width at the very base, just above the implant connection. Some platforms feature a narrow diameter, such as 3.3 millimeters. Others feature a wide platform, exceeding 5 millimeters. The healing cap flares outward from this baseline to the final top disc diameter. This flare is what shapes the gum tissue into a beautiful emergence profile.
A Step-by-Step Visual Journey During Placement
Understanding how the healing cap looks during the placement appointment demystifies the entire process. We will walk through each visual stage so that you can mentally prepare for what you will see in the mirror afterward.
Before Placement: The Implant Site Appearance
On the day of healing cap placement, you arrive with either a completely healed, flat gum ridge or a slightly raised bump over the buried implant. If you had a two-stage surgery, the tissue looks intact and pink, with no metal visible. The dentist administers local anesthesia. Once the area is numb, the procedure begins.
The dentist makes a small, precise incision directly over the implant. In some cases, a small circle of tissue is removed, a technique called a tissue punch. Either way, the implant platform is exposed. You will not see this step, but you can imagine the round, metallic top of the implant coming into view, sitting flush with the bone.
The Cap Attachment and Initial Visual Result
The dentist removes the small cover screw that protected the implant’s internal connection. A stream of sterile saline irrigates the site. Then, using a hand driver or a torque wrench, the dentist threads the healing cap into the implant. A single, precise turn engages the threads. The dentist tightens the cap to the recommended torque.
Immediately after placement, the site looks raw. The healing cap sits atop a slightly bloody field. The gum tissue frames the cap with small, healing edges. At this very early stage, the cap looks prominent because the tissue has not yet adapted. You might notice a small amount of oozing blood or saliva mixed with a pink tinge. This is entirely normal.
The Immediate Post-Placement Mirror Check
When the dentist hands you a mirror, here is what you will likely see. A small, round, flat-topped metal or white component sits on the gum. The surrounding tissue appears slightly red and swollen. The cap itself looks clean, smooth, and sits at a right angle to the ridge. It does not move when you touch it gently with your tongue. The edges of the gum approximate the cap but do not yet form a tight seal.
The dentist will likely place a small piece of gauze and ask you to bite down gently. This pressure stops any minor bleeding and initiates the adaptation of the tissue. When you remove the gauze after 30 minutes, the site looks cleaner. The healing cap remains clearly visible, and a small rim of pink tissue begins to curl around its edges.
Distinguishing a Healing Cap from the Final Restoration
One of the most critical visual distinctions patients must understand is the difference between the temporary healing cap and the definitive components that follow. Confusing these stages can lead to unnecessary worry.
Healing Cap vs. Permanent Abutment: Key Visual Differences
The healing cap is a temporary, one-piece component. The permanent abutment is a custom or stock component that remains in the mouth long-term and supports the final crown. Visually, the permanent abutment often looks taller, more anatomical, and more varied in shape. While a healing cap typically presents a simple circular top, a permanent abutment may feature angled sides, a customized emergence profile, and a finish line that precisely follows the gum contour.
A stock permanent abutment might look like a metallic or ceramic cylinder with an anti-rotational base. A custom abutment, milled specifically for your implant position, mimics the shape of a prepared natural tooth. It tapers, curves, and inclines to support the crown in the exact orientation required by your bite. When you see a permanent abutment without the crown, it looks like a tooth stump made of titanium or zirconia, not a simple button.
Healing Cap vs. Temporary Crown: Visual Clarity
A temporary crown sits on top of either a temporary abutment or directly on the implant. It looks like a real tooth, although perhaps with a slightly less refined shape and a more monochromatic color. A healing cap, by contrast, is simply a flat or domed disc. It does not resemble a tooth at all.
If you have a temporary crown, you will see a tooth-shaped structure emerging from the gum. It will have cusps if it is a posterior tooth, or an incisal edge if it is an anterior tooth. The color will match your adjacent teeth to some degree. You can bite on it lightly. A healing cap, in contrast, is not designed for chewing. It sits low and protects the implant without restoring function.
Important Distinction: The healing cap is a tissue former. The temporary crown is a provisional restoration. They serve entirely different purposes and look completely different.
A Simple Recognition Checklist
Here is how you can tell what you are seeing in your mouth:
- Small, flat, round metallic or white disc at gum level: healing cap.
- Tall, cylindrical or anatomical tooth-colored component without a tooth shape: permanent abutment.
- Tooth-shaped, functional, biting surface visible: temporary or permanent crown.
- No component visible, flat healed gum: implant buried with cover screw.
Position-Specific Appearances in the Mouth
The healing cap adapts its visual presentation based on its location in the dental arch. A front tooth site presents unique aesthetic considerations. A back tooth site prioritizes function and access for oral hygiene.
Healing Caps in the Anterior Aesthetic Zone
In the front of the mouth, the healing cap plays a starring role in the visual outcome. You will typically see a zirconia, tooth-colored cap in this region. Dentists avoid titanium here whenever possible to prevent grey gum shadowing. The cap diameter will precisely match the mesiodistal space available. It will look symmetrical and centered within the gum ridge.
When you smile, even a high smile that reveals the gumline will show only a white disc that resembles a natural tooth emerging from the tissue. The gum should frame the cap with a scalloped shape, echoing the architecture of the adjacent teeth. The little triangular gum peaks, the papillae, should ideally fill the spaces next to the cap. If a papilla is missing, you will see a dark triangular void, which the final restoration will not necessarily correct without additional surgical manipulation.
Healing Caps in the Posterior Functional Zone
In the back of the mouth, the healing cap is often titanium. The aesthetic concerns diminish because your cheek and tongue hide the component during normal function. The diameter is larger, matching the broader neck of a molar. The cap may sit slightly lower relative to the gum because the tissue in the posterior region is often thicker and more keratinized.
When you look at a posterior healing cap with a dental mirror, you will see a substantial metallic disc. It should sit perfectly centered on the ridge. The surrounding gum platform should look wide and firmly attached. Because you chew primarily in the back, the cap must not interfere with the opposing teeth. The dentist checks the bite carefully to ensure that the healing cap does not receive any occlusal contact. If it does hit, the cap may loosen, or the implant may fail to integrate properly.
Size and Shape Variations by Arch Location Table
| Tooth Position | Typical Material | Diameter Range | Cuff Height | Visual Notes |
|---|---|---|---|---|
| Upper central incisor | Zirconia | 5.0 – 6.5 mm | 2 – 4 mm | Visible in smile; requires perfect aesthetics |
| Upper lateral incisor | Zirconia | 4.0 – 5.0 mm | 2 – 3 mm | Narrow profile; high aesthetic demand |
| Upper canine | Titanium or zirconia | 5.5 – 6.5 mm | 3 – 4 mm | Prominent position; gum contour critical |
| Upper premolar | Titanium | 5.0 – 6.5 mm | 3 – 5 mm | Moderate aesthetic concern |
| Upper molar | Titanium | 6.0 – 7.5 mm | 3 – 6 mm | Non-aesthetic zone; width for emergence |
| Lower incisor | Zirconia or titanium | 3.5 – 4.5 mm | 1 – 3 mm | Very narrow; thin tissue |
| Lower molar | Titanium | 6.0 – 7.5 mm | 3 – 6 mm | Large platform; thick tissue |
The Normal Healing Timeline and Its Visual Markers
Your healing cap will not look the same on day one as it does on day thirty. The tissue transforms visibly as healing progresses. Recognizing the normal visual sequence reduces anxiety and helps you identify when something veers off course.
Day 1 to Day 7: The Inflammatory Phase Visuals
Immediately after placement, the gum around the cap appears red and swollen. Small amounts of blood-tinged saliva are normal. The tissue edges look slightly everted, meaning they turn outward. The cap itself sits proud, looking taller than expected. By day three, the redness begins to subside. The swelling decreases. You will notice a thin, whitish film forming on the tissue, which is a normal fibrin clot.
By day seven, the cap should appear much cleaner. The gum starts to hug the cap more closely. Any sutures, if placed, may still be visible as small threads looping through the tissue. The color transitions from angry red to a healthier pink at the edges. You may feel the cap with your tongue as a smooth, stable object. It should not wobble.
Week 2 to Week 4: Proliferative and Maturation Phase
During weeks two through four, the transformation accelerates. The gum collar tightens around the cap. The tissue edge becomes crisp and well-defined. The color turns a uniform, coral pink. The cap no longer looks tall and prominent. Instead, it appears to settle into the tissue, with only the very top surface visible or slightly proud.
The emergence profile begins to take shape. You can see the gum sloping smoothly onto the sides of the cap. The circular opening looks symmetrical. Any papillae between the cap and adjacent teeth may begin to fill in, though complete papilla formation often takes months. When you brush gently around the area, the tissue feels firm and does not bleed.
One Month and Beyond: The Mature Soft Tissue Seal
At one month, the soft tissue has matured significantly. The biological width, a natural seal of connective tissue and epithelium, has formed. The healing cap looks like a well-integrated part of your mouth. The gum collar is tight, pink, and stippled, much like the texture of an orange peel. The cap surface may show slight plaque accumulation if oral hygiene is not meticulous, but the tissue remains healthy.
At this stage, your dentist determines that the site is ready for the next step. This could involve removing the healing cap and taking an impression for the permanent restoration, or placing a temporary crown to further sculpt the tissue.
Patient Quotation: One patient described the visual journey this way: “At first, I was horrified. It looked like a bolt sticking out of bloody gum. Two weeks later, it looked like a neat little button sitting in healthy pink skin. By the time the dentist removed it, I had almost forgotten it was there.”
Recognizing Warning Signs Through Visual Inspection
A well-trained eye can spot trouble early. You should examine your healing cap daily using a well-lit mirror. Knowing the difference between normal and abnormal appearances empowers you to act promptly if needed.
Healthy vs. Problematic Tissue Color
Healthy gum tissue around a healing cap looks coral pink or, in patients with darker skin tones, a deep pink to brown hue with no signs of angry redness. Problematic tissue looks bright red, dusky purple, or bluish. A localized red, swollen, bleeding bump on one side of the cap may indicate a retained suture fragment, a trapped food particle, or a localized infection.
If you notice a pale, whitish-grey color spreading from the cap margin, this could indicate tissue ischemia or trauma from excessive pressure. If the entire collar turns a uniform, fiery red and bleeds spontaneously, you may be looking at peri-implant mucositis, the precursor to more serious inflammation.
Normal Fluid vs. Purulent Exudate
Clear, slight fluid weeping during the first 24 to 48 hours is normal. This fluid represents serum and is part of the inflammatory healing process. A persistent, thick, yellow or green discharge is not normal. If you can express pus by gently pressing the tissue near the cap, you should contact your dentist immediately. A bad taste or odor accompanying the discharge is a classic sign of infection.
Important Note: Never squeeze the tissue around a healing cap forcefully. Gentle pressure with a clean finger is sufficient to assess for discharge. Aggressive manipulation can disrupt the healing seal.
Mechanical Stability: When to Be Concerned
A healing cap should feel completely rigid and immobile. You should not be able to move it with your tongue or finger. If the cap shifts, rotates, or feels loose, the screw connection may have failed. This requires prompt dental attention. A loose healing cap can irritate the tissue, allow bacteria into the implant connection, and compromise the entire restoration timeline.
Sometimes, only the top disc comes loose while the threaded shaft remains in the implant. In other cases, the entire component backs out. If the cap falls out completely, you will see a small, dark hole in your gum leading to the implant platform. Keep the cap safe, call your dentist, and avoid chewing on that side.
Visual Warning Signs Checklist
Contact your dentist if you observe any of the following:
- Bright red, purplish, or blue tissue color persisting beyond day seven.
- Spontaneous bleeding without any provocation after the first week.
- Thick, yellow, or green discharge.
- Foul taste or odor from the site.
- Visible movement or rotation of the healing cap.
- Sudden pain, swelling, or warmth spreading to the cheek or under the jaw.
- The healing cap appears to be sinking into the tissue or has disappeared.
A Comprehensive Comparison: Healing Cap vs. Cover Screw vs. Scan Body
Many components attach to an implant during the treatment sequence. Patients often confuse these parts. Let us visually distinguish the three most commonly mixed-up components.
The Cover Screw: The Hidden Protector
A cover screw is a tiny, flat, threaded screw that sits entirely within the implant body. It does not protrude above the implant platform. When placed, the gum completely covers it. You will never see a cover screw in your mouth. It looks like a miniature flathead screw with a very low profile. Its sole purpose is to seal the implant connection during the submerged healing phase.
The Healing Cap: The Tissue Shaper
The healing cap, as we have extensively described, protrudes through the gum. It features a visible top disc. It shapes the soft tissue and maintains an open channel. The top is either flat or slightly domed. The material is titanium, zirconia, or PEEK. It remains in place for weeks and is highly visible.
The Scan Body: The Digital Impression Tool
A scan body is a temporary component used during the digital impression appointment. It looks distinctly different from a healing cap. Scan bodies are often made of plastic with a metallic base, or they are fully metallic. They feature a tall, geometric shape with flat sides or specific contours that the intraoral scanner recognizes. They often have a narrow, elongated profile with sharp angles. Some look like tiny, abstract sculptures.
The dentist removes the healing cap, screws in the scan body, takes the digital impression, and then replaces the healing cap. The scan body spends only minutes in your mouth. Its visual appearance is complex and technical, not smooth and simple like the healing cap.
Component Identification Table
| Component | Visibility | Top Shape | Material | Duration | Purpose |
|---|---|---|---|---|---|
| Cover Screw | None; subgingival | Flat, screw head | Titanium | Months | Protects implant during osseointegration |
| Healing Cap | Visible; transgingival | Flat or domed disc | Titanium, zirconia, PEEK | Weeks | Shapes gum tissue, maintains opening |
| Scan Body | Temporary; transgingival | Tall, geometric, angled | Plastic, metal hybrid | Minutes | Transfers implant position digitally |
| Permanent Abutment | Visible under crown | Anatomical, stump-like | Titanium, zirconia | Years | Supports final crown |
Customized and CAD/CAM Healing Caps: The Modern Evolution
Modern implant dentistry has moved beyond generic, off-the-shelf healing caps. Digital workflows now allow for the fabrication of customized healing abutments that precisely replicate the emergence profile of the planned final crown. This technology has significant visual implications.
How a Custom Healing Cap Differs Visually
A custom healing cap does not look like a simple round disc. It mirrors the cross-sectional shape of the future tooth at the gum level. For a central incisor, the custom cap might have a triangular or slightly oval shape with flatter facial and lingual surfaces. For a premolar, it might look more oval. This anatomical shape creates a more natural gum contour than a simple circle.
The custom cap often features a marginal contour that follows the scalloped architecture of the gumline. When you look in the mirror, the custom healing cap resembles a very short, white tooth stump emerging from a beautifully contoured gum collar. The aesthetic difference compared to a stock circular cap is significant, especially in the anterior region.
The Digital Workflow Behind the Appearance
The process begins with a cone-beam CT scan and an intraoral scan of your existing dentition. The dentist plans the ideal implant position and the ideal final crown shape. Using CAD software, the laboratory designs a healing abutment that replicates the emergence profile of that planned crown. A milling machine fabricates the component from a solid block of titanium, zirconia, or hybrid ceramic.
This customized component is then delivered at the time of implant placement or at the uncovering appointment. The tissue heals around a shape that perfectly matches the future restoration. When it is time to place the final crown, the gum architecture is already mature and ideally contoured. The visual result is seamless and predictable.
Quotation from a restorative dentist: “Custom healing abutments represent a paradigm shift. We are no longer forcing the tissue to adapt to a round cylinder and then hoping it will accept a triangular crown. We shape the tissue from day one to match the final anatomy.”
Living with a Healing Cap: What You Feel and See Daily
The visual appearance of the healing cap is only one aspect of the experience. The tactile sensations and daily maintenance routines also shape your perception.
The Tongue’s Obsession with the New Object
Your tongue will relentlessly explore the healing cap for the first several days. This is a normal neurological response. The brain is mapping the new object and assessing it. The healing cap feels smooth, rounded, and foreign. Most patients describe the sensation as a small, polished pebble or a shirt button sitting on the gum. The feeling is not painful, but it is undeniably present.
Over time, the tongue habituates. The healing cap becomes part of the oral landscape, and you will stop noticing it consciously. If the cap feels sharp, rough, or jagged, something is wrong. A properly placed, quality healing cap should feel completely smooth in every direction.
Eating and the Visual Field
While the healing cap is in place, you must adhere to a soft diet initially and then transition to chewing on the opposite side. When you look at the cap during meals, food particles can temporarily collect around the base. Gentle rinsing with warm salt water clears this debris. The visual of food particles around the cap is normal as long as you remove them effectively.
You should not see the cap moving or bending under chewing forces. Even gentle chewing on the healing cap can overload the implant and cause failure. The cap is a tissue former, not a tooth. Treat it with care.
Oral Hygiene: The Visual Goal of Cleanliness
Keeping the healing cap pristine is essential. You want to see a clean, shiny surface with no yellowish or white plaque accumulation. Use a very soft toothbrush. Gently brush the top surface of the cap in a circular motion. Angle the bristles to clean the junction between the cap and the gum.
The visual goal is a metallic or ceramic gleam. If a film accumulates despite brushing, a cotton swab dipped in chlorhexidine gel, prescribed by your dentist, can gently wipe the surface clean. The gum collar should remain pink and tightly adapted. This daily visual check is a powerful tool for maintaining health.
The Removal Process: The Final Visual Chapter
The healing cap’s journey ends when the tissue is mature and ready for the final impression. This removal appointment offers a fascinating visual reveal.
What the Dentist Sees Upon Removal
When the dentist unscrews the healing cap and lifts it away, the underlying tissue tunnel is revealed. To the naked eye, this tunnel looks like a perfectly circular, smooth-sided opening leading directly to the implant platform. The tissue walls are pink, firm, and free of any bleeding or granulation tissue. This healthy, well-formed tunnel is the direct result of the healing cap’s shape and the body’s regenerative response.
If the healing cap did its job perfectly, the implant platform is easily accessible. The tissue does not collapse inward. The emergence profile is stable and ready to receive the impression coping or scan body.
The Patient’s Mirror View After Removal
After removal, the dentist will often hand you the mirror so you can see the mature soft tissue architecture. You will see a small, dark hole in your gum where the cap used to be. This hole is clean, well-defined, and surrounded by a thick, pink collar of tissue. The visual is often quite startling to patients who expected to see something more substantial. This healthy, healed tunnel represents the foundation for the crown that will soon occupy that space.
The dentist will immediately proceed with the impression process so that the tunnel does not collapse. Once the impression is complete, the dentist may replace the healing cap, a temporary abutment, or a temporary crown to maintain the tissue contour until the permanent restoration is delivered.
Permanent Restoration: The Visual Transformation
The final visual chapter is the delivery of the permanent abutment and crown. The healing cap is gone. In its place stands a restoration designed to look, feel, and function like a natural tooth.
The Emergence Profile Becomes Visible
The contour that the healing cap created now becomes the transition zone for the permanent restoration. The final crown emerges from the gum with a natural, gradual flare. There is no abrupt step, no visible metal margin, and no dark shadow. The gum collar frames the crown seamlessly.
This visual harmony is the reward for the weeks of healing cap maturation. Patients who see their final restoration for the first time often express amazement at how natural the implant looks. The credit goes, in large part, to the unassuming little healing cap that laid the groundwork.
The Color and Material Harmony
With a zirconia permanent abutment and an all-ceramic crown, the entire visible structure is white. The gum tissue appears vibrant and healthy. The metallic implant remains hidden far beneath the surface. The healing cap, whether zirconia or titanium, has done its job, and its visual legacy lives on in the beautiful soft tissue architecture.
Conclusion
A healing cap looks like a small, flat-topped metallic or tooth-colored disc sitting at the gumline, serving as a temporary tissue shaper during the implant journey. Its appearance evolves from a prominent, swollen-frame component to a neatly integrated button surrounded by healthy, tight gum over several weeks. Understanding its material, size, and normal visual timeline empowers you to participate confidently in your treatment and recognize when healing is progressing as expected.
FAQ: Common Questions About Healing Cap Appearance
Q: Is it normal to see the metal of the healing cap through my gum?
A: Yes, especially with thin tissue and titanium caps. A slight grey shadow is common. If aesthetics are a concern, discuss a zirconia cap with your dentist.
Q: Can the healing cap fall out on its own?
A: Rarely, but it can if it loosens. If you feel movement or the cap dislodges, contact your dentist immediately. Keep the cap safe and avoid chewing on that side.
Q: Why does my healing cap look so much smaller than my other teeth?
A: Because it is a tissue former, not a tooth replacement. It creates the gum opening. The final crown will match your other teeth in size and shape.
Q: How long will the healing cap be visible?
A: Typically between two to eight weeks, depending on your healing protocol and tissue maturation rate.
Q: Can I brush the healing cap directly?
A: Yes, with a very soft toothbrush and gentle circular motions. Keeping it clean is essential for healthy tissue maturation.
Additional Resource:
For a peer-reviewed overview of implant components and their clinical management, visit the American Academy of Periodontology’s patient resources at perio.org.
Disclaimer: This article provides educational information based on standard dental implant protocols. It does not constitute medical advice. Individual cases vary. Always consult your licensed dental professional for diagnosis and treatment recommendations specific to your oral health condition.