What is the Implant Post
The dental implant post is the foundation of the entire tooth replacement process. It serves as the artificial root that secures your new tooth in place. When patients hear the word “implant,” they often picture the final white crown. But the crown is just the visible reward. The true workhorse lies hidden beneath the gum line. This article explores every aspect of the implant post. You will learn what it is, what materials it’s made from, the different types and designs available, and how your dentist chooses the right one for your specific situation. By the end, you will have a profound understanding of this small but mighty component that restores smiles worldwide.
Defining the Dental Implant Post
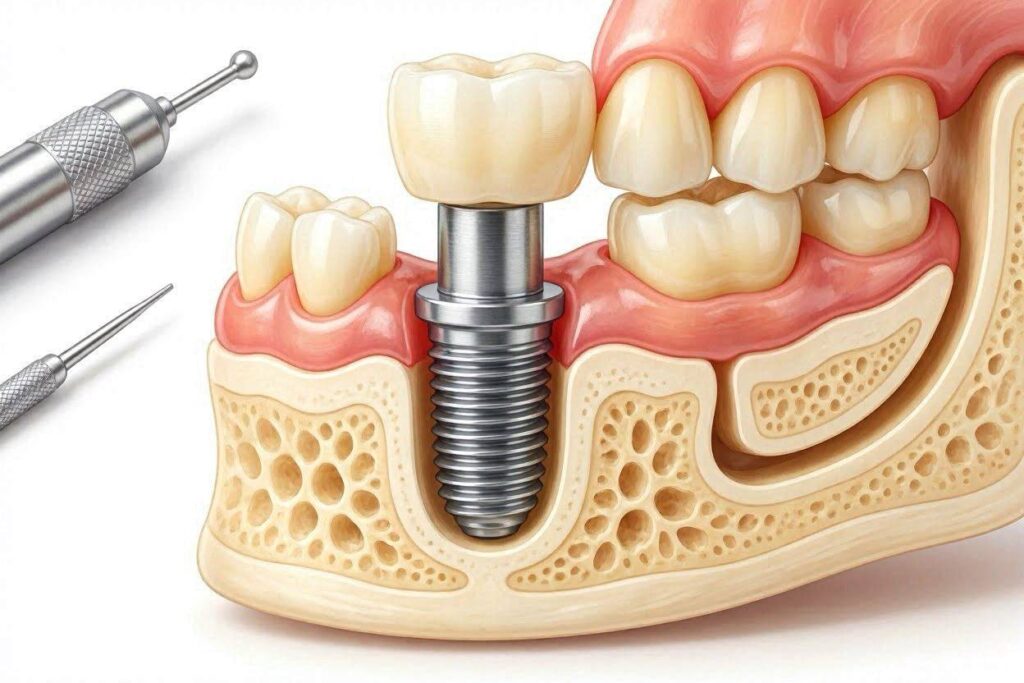
An implant post is a screw-shaped or cylindrical fixture surgically inserted into the jawbone. Think of it as a high-tech, biocompatible anchor. Its entire purpose is to replace the root portion of a missing natural tooth. A tooth root does two critical things. It holds the visible crown in place and it transmits chewing forces into the jawbone, keeping the bone stimulated and alive. The implant post takes over both these roles. Once placed, the bone fuses directly to its surface through osseointegration. This creates an anchor point that is extremely stable. The post then sits inside the bone, with only its top platform or connection point visible at or just below the gum line, ready to receive a connector piece called an abutment and finally the dental crown.
Not Just a Simple Screw
It’s easy to underestimate the implant post. At a glance, it looks like a simple screw. In reality, it is a highly engineered medical device. The threads, shape, surface, and internal connection are the result of decades of biomechanical research. Every micron of its design influences how well bone attaches to it and how it distributes stress. A poorly designed post can lead to bone loss and failure. A well-designed one can last a lifetime. The post is the buried half of the dental implant system. Its successful placement and integration are what differentiate dental implants from removable dentures or bridges that merely rest on the gums.
The Critical Functions of the Implant Post
The implant post is not a passive piece of metal. It performs several active, vital functions from the moment it’s placed.
Structural Anchorage
This is the most obvious function. The post provides a solid, immovable anchor in the jaw. Once osseointegrated, it resists forces in multiple directions. Chewing creates vertical, diagonal, and lateral forces. The post’s thread design and rigid fusion to bone allow it to withstand these forces without wobbling. This stability is what prevents embarrassing clicking or movement when you eat or speak. It gives you the confidence to bite into a crisp apple or a tough steak, knowing the tooth will not shift.
Load Transmission and Bone Stimulation
This is perhaps the most important biological function. When you chew on a natural tooth, the forces travel down the root and are transferred to the periodontal ligament, which then pulls on the surrounding bone. This tension stimulates the bone cells, signaling them that the bone is needed and should be maintained. When a tooth is lost, this stimulus disappears. The body starts resorbing the bone, thinking it’s no longer useful. A dental implant post restores this loading function. It transmits compressive and tensile forces directly into the jawbone. This mechanical stimulation maintains bone density and volume. It prevents the sunken facial appearance that often occurs with prolonged tooth loss. The post quite literally keeps your jawbone active and healthy.
Providing a Soft Tissue Seal
The top of the implant post, where it emerges from the bone, is a critical interface. The gum tissue here is meant to form a tight seal around it, much like a turtleneck sweater. This “biological width” of attached soft tissue is a crucial defense barrier. It prevents food debris and oral bacteria from traveling down the side of the post to the bone. The post’s collar, the very top smooth section, is designed to support this soft tissue attachment. A healthy, keratinized band of gum around the post is a key indicator of long-term health. It prevents peri-implant diseases.
Materials Used in Implant Posts
The material from which an implant post is made is the single most important factor for its biocompatibility. Your body has a zero-tolerance policy for uninvited materials. The post material must be non-toxic, non-allergenic, and actively promote bone attachment.
Commercially Pure Titanium (CP Ti)
Commercially pure titanium is the gold standard and the most widely used material. It comes in four grades, with Grade 4 CP Ti being the strongest and most common for implants. The beauty of CP Ti lies in its ability to spontaneously form a stable, dense oxide layer on its surface. This titanium dioxide layer is biologically inert. The body doesn’t recognize it as foreign. In fact, it’s what bone cells love to attach to. CP Ti has excellent corrosion resistance in the human body. It is not ferromagnetic, so it’s safe for MRI scans. Its modulus of elasticity, while much stiffer than bone, is lower than some other alloys, which can be beneficial for stress distribution.
Titanium Alloys (Ti-6Al-4V ELI)
This alloy is an extra strength titanium. The “6Al-4V” means it is composed of 6% aluminum and 4% vanadium, with the balance being titanium. The “ELI” stands for Extra Low Interstitials, indicating high purity. This alloy has significantly higher tensile strength and fatigue resistance than CP Ti. This makes it the material of choice for implants with smaller diameters. A narrow diameter CP Ti post might be at risk of fracturing under high loads. A Ti-6Al-4V alloy post can handle the same forces with a smaller profile. The enhanced mechanical properties allow for more versatile designs. The biocompatibility is still excellent, though the surface oxide is primarily titanium dioxide, as the aluminum and vanadium are within the material’s matrix.
Zirconia (Ceramic Implants)
Zirconia is a high-performance ceramic, specifically yttria-stabilized tetragonal zirconia polycrystal (Y-TZP). It is the metal-free alternative. Zirconia implants are white, like a natural tooth root, which is an aesthetic advantage. In patients with thin, translucent gums, a titanium implant post can sometimes show through as a dark shadow. Zirconia eliminates this risk. It has extremely high compressive strength and excellent biocompatibility. The bone-to-implant contact achieved with modern micro-roughened zirconia surfaces is comparable to titanium. Its modulus of elasticity is slightly lower, closer to that of bone. However, zirconia is more brittle than titanium and less tolerant of bending forces. The long-term clinical data, while very positive, is not yet as voluminous as the 50+ years of data on titanium.
Material Comparison Table
| Material | Key Property | Best Use Case | Aesthetic Advantage |
|---|---|---|---|
| CP Titanium (Grade 4) | Optimal biocompatibility, proven track record | Standard and wide-diameter implants in all zones | None (metallic gray) |
| Ti-6Al-4V Alloy | High strength, excellent fatigue resistance | Narrow-diameter implants, situations with high load | None (metallic gray) |
| Zirconia (Y-TZP) | Tooth-colored, high biocompatibility | Aesthetic zone, patients with metal sensitivity | Excellent (white) |
The Anatomy of an Implant Post
The external and internal geometry of a post is a masterpiece of engineering. Nothing is random. Every groove, thread, and connection point has a purpose.
The Implant Body and Threads
The main body is either parallel-walled or tapered. A tapered body mimics the shape of a natural tooth root. This allows for placement between converging tooth roots or in areas with a buccal bone concavity without perforation. The threads are critical. They are what convert the implant’s rotational movement into linear insertion and provide initial mechanical grip. Thread pitch refers to the distance between threads. A finer pitch has more threads per unit length, providing a greater surface area and a more even load distribution in dense bone. A coarser pitch has a deeper bite and is better for softer bone to engage more bone between threads. The shape of the thread also matters. A V-shaped thread is effective for cutting. A square or buttress thread provides optimal compressive load transfer. Many modern implants have variable thread designs, with one pitch at the bottom for self-tapping and another at the top for compression.
The Apical Design
The apex, or tip, of the implant is the first part to enter the prepared bone site. Its design influences the insertion path and the implant’s self-tapping ability. A rounded, blunt apex is atraumatic and ideal for lifting the sinus membrane. A pointed, cutting apex has a tap-like design, allowing the implant to cut its own thread path into slightly undersized bone, improving primary stability. Some have a small chamber at the tip to collect bone debris during placement, which can act as an autograft to accelerate healing.
The Coronal Collar and Platform
The very top of the implant post is the collar or neck. This part sits at the crest of the bone or just below it. It is usually a smooth, machined section. This smooth surface is designed for soft tissue attachment. If it’s rough, bacteria can more easily adhere, leading to peri-implantitis. The implant platform is the flat top surface. It holds the abutment. The stability of this connection is everything. The platform is often designed with a “platform switching” concept, where the abutment is slightly narrower than the implant platform, shifting the inflammatory cell infiltrate inward and better preserving crestal bone levels.
The Internal Connection
Hidden inside the implant body is the internal connection. This is a precisely machined hollow that receives the abutment screw. The most common design is the internal hex or conical connection. A conical connection, like a Morse taper, creates a virtual cold weld between the abutment and the implant. This creates a hermetically sealed interface, eliminating micro-movements and preventing bacterial leakage. This connection type is so tight it requires significant force to separate. It distributes loads deep into the implant body, reducing stress on the abutment screw. An external hex connection was the original design, where a small hex shape protrudes from the top of the implant. It is simpler but places higher stress on the screw and is more prone to micro-gaps.
Types of Implant Posts Based on Design
Dental implant posts come in various shapes and sizes to match different anatomical situations. A one-size-fits-all approach does not exist in modern implantology.
Standard Platform Implants
These are the workhorse implants, typically with a diameter around 3.75mm to 4.5mm. They are used to replace a single tooth in a healed site with adequate bone width. They have a reliable internal connection and can handle most masticatory forces. The vast majority of implants placed worldwide are in this category. The body length can vary significantly, from short 6mm to long 16mm posts, depending on the available bone height.
Narrow Diameter Implants
Also known as mini implants, these have a diameter of less than 3.5mm, often 2.5mm to 3.0mm. They are a solution for tight spaces. You might have a missing lower incisor where the gap is too narrow for a standard implant. In these cases, a narrow implant made of strong titanium alloy is perfect. They are also used to stabilize a full lower denture, where multiple mini implants can be placed in a minimally invasive flapless surgery to “snap” the denture into place. Their primary limitation is strength; they cannot handle as high a load as a standard implant.
Wide Diameter Implants
These have a diameter of 5mm or greater. They are used to replace large molars, where the chewing forces are highest. A wider implant provides more surface area for osseointegration and is mechanically more robust. They are also used in sites where a tooth was extracted and the socket is wide, allowing the wide implant to fill the space better. Sometimes, a wide implant is used as a “rescue” implant if a previous standard-diameter implant failed, and the new site needs a wider fixture for stability.
Short Implants
Bone height is often lost in the back of the upper jaw due to sinus expansion and in the back of the lower jaw due to the nerve canal. A short implant, typically 8mm or less in length, can be a game-changer. It avoids the need for advanced bone grafting procedures like a sinus lift or nerve repositioning. To compensate for the reduced length, short implants often have a wider diameter and an aggressive thread design to maximize bone contact. They are a minimally invasive option with high success rates when properly indicated.
Zygomatic Implants
These are specialized, very long implants, ranging from 30mm to 52.5mm. They are not anchored in the jawbone but in the zygomatic bone, which is the dense cheekbone. They are a solution for patients with severe bone loss in the upper jaw who are not candidates for, or want to avoid, extensive bone grafting. The implant post travels through the maxillary sinus cavity or along its wall and engages the solid zygomatic bone. This is an advanced surgical procedure requiring specialist training.
One-Piece vs. Two-Piece Implant Systems
The way an implant post connects to the tooth crown defines another classification: one-piece or two-piece systems.
Two-Piece Systems
This is the conventional and most common system. The “two pieces” are the implant post and the abutment. The implant post is placed first and buried under the gum tissue to heal. After osseointegration, a second minor surgery exposes the top of the implant, and a healing cap is placed. Later, the final abutment is screwed into the internal connection of the implant post, and the crown is cemented or screwed onto the abutment. The advantage is excellent control. The implant post is protected from all oral forces during the fragile healing period. The prosthetic parts can be changed later without disturbing the integrated post. If the crown chips in ten years, the dentist can remove it from the abutment or remove the abutment itself, leaving the post untouched in the bone.
One-Piece Systems
A one-piece implant is a single unit where the implant body and the abutment are milled from a single piece of material. The implant post is placed, and a portion of it protrudes through the gum into the oral cavity immediately after surgery. The crown is then cemented or bonded directly onto this protruding post. The main advantage is simplicity. There is no connection interface at the bone level, eliminating the risk of a micro-gap and bacterial leakage at the connection. There is no second-stage surgery. The most common one-piece implants are small diameter mini implants used for denture stabilization. Zirconia implants are also often a one-piece design because a two-piece connection in ceramic is mechanically challenging to engineer without a risk of fracture. The disadvantage is less prosthetic flexibility. If the protruding abutment portion is damaged, you may have to replace the entire implant.
How the Implant Post Is Placed: A Surgical Overview
The placement of an implant post is a carefully choreographed surgical procedure. It’s a marriage of precision planning and gentle surgical technique.
Computer-Guided Surgery and Freehand Placement
Today, many implants are placed using a 3D-printed surgical guide. The dentist merges a CBCT scan with a digital scan of your teeth. They virtually plan the exact 3D position, depth, and angulation of the implant post, visualizing the bone, vital nerves, and the final crown’s position. This “restoration-driven” planning dictates where the post goes. The surgical guide fits over your teeth and has metal sleeves that direct the drills. This makes the surgery more predictable, faster, and often flapless, reducing post-operative discomfort. Freehand placement relies on the surgeon’s skill and spatial judgment, guided by clinical landmarks. It is still highly successful in experienced hands.
The Drilling Sequence
Regardless of the guidance method, the drilling protocol is sacred. The surgeon uses a series of successively wider drills under copious sterile saline irrigation. The sequence is strict: a small pilot drill creates a starter hole of the correct depth and alignment. Then, a sequence of wider drills enlarges the osteotomy to the final diameter, which is slightly smaller than the implant itself. This “undersized” preparation is deliberate. It creates compressive forces when the implant post is inserted, maximizing primary stability. Drills are used at low speed with an intermittent “pumping” motion to prevent heat buildup. A bone temperature over 47°C for one minute causes necrosis.
Placing the Post
The implant post is removed from its sterile packaging. It is carried to the mouth on a special mount that clicks into the handpiece or a manual ratchet. The post is slowly threaded into the prepared site. The surgeon feels the torque build. A high insertion torque (over 35 Ncm) is generally a good sign of strong initial stability. Once fully seated, the mount is removed. A cover screw is placed on top of the post to protect the internal connection from bone growth. If it’s a two-stage procedure, the gum is sutured closed over it. If it’s a one-stage procedure, a taller healing abutment is placed that protrudes from the gum.
Choosing the Right Implant Post for Your Case
Your dentist doesn’t just pick a favorite brand. The choice is a complex decision matrix based on your specific anatomy and needs.
- Bone Density: Dense D1 bone in the anterior mandible requires a different drill protocol and perhaps a tapered, self-tapping post design. Soft D4 bone in the posterior maxilla often benefits from an implant with a wider diameter and a condensing, expanding thread design to pack the soft bone, increasing stability.
- Available Space: The mesiodistal distance (gap size) and the buccolingual bone width are measured on the CBCT. The implant post must have at least 1.5mm of bone around it and be 1.5mm away from adjacent tooth roots.
- Vertical Bone Height: This dictates the implant length. A measurement is taken from the bone crest to the inferior alveolar nerve canal (lower jaw) or the floor of the maxillary sinus (upper jaw). A 2mm safety margin is standard.
- Aesthetic Requirements: In the front of the mouth, a bone-level implant with a slightly deeper placement and a scalloped platform to support the interproximal papillae is crucial. Zirconia posts are a strong option here.
- Patient’s Systemic Health: For a patient with a history of metal allergies, a zirconia post is the definitive choice. A patient on certain medications may have compromised healing, influencing the surface type and healing protocol.
The Lifecycle of an Implant Post
From the moment it’s placed, the implant post embarks on a life of service that should, ideally, be measured in decades.
Healing and Osseointegration Phase
Immediately after placement, a blood clot fills the micro-space between the post threads and the prepared bone. Platelets release growth factors. Osteoblasts migrate to the titanium dioxide surface and start laying down woven bone. Over 3-6 months, this bone matures into strong lamellar bone that is intimately interlocked with the implant’s roughened surface. During this time, the implant post must remain unloaded. Any micro-motion will cause the bone to be replaced by a fibrous scar tissue, which means failure. The patient eats a soft diet and protects the site.
The Functional Phase
Once the abutment and crown are attached, the implant post enters its working life. With every chew, it transmits compressive, tensile, and shear forces to the surrounding bone. A healthy post with an intact soft tissue seal will see no bone loss beyond the initial remodeling that establishes the biological width (typically 0.5-1.5mm in the first year). The bone remains stable on an annual radiograph. The patient maintains it with diligent cleaning, focusing on the sulcus around the abutment. The post itself, hidden deep in the bone, is in a sterile, dark, and stable environment.
The End-of-Life Scenario
A successful implant post may outlive the patient. However, failures do occur. Late failures are usually due to peri-implantitis. Bacteria progress down the side of the post, destroying the osseointegrated bond. The bone melts away around the post. If too much bone is lost, the post loses its support, becomes mobile, and must be removed. Mechanical failure is another possibility. Although rare, the post itself can fracture, often at the point of a loose abutment screw. A fractured titanium post is a catastrophic event. The remnant must be carefully trephined out, often requiring bone grafting and replacement. This highlights the importance of a strong internal connection and confirming an absolutely passive fit of the prosthetic components.
Important Note: The implant post is a definitive prosthetic treatment. The initial surgical investment and healing time are significant. Choosing the cheapest post or a provider based on price alone can be a grave error. The quality of the post, its connection design, and the long-term availability of prosthetic components from the manufacturer are critical considerations. A failed post can lead to bone loss that is far more difficult and expensive to reconstruct than the original surgery.
Common Myths About Implant Posts
Let’s clear up some persistent misconceptions that can cause unnecessary worry.
- Myth: The post sticks out into my sinus or hits my nerve.
Fact: Advanced 3D imaging is used to measure exactly how much bone you have. The post is selected to be shorter than that distance, with a safety margin. If you don’t have enough bone, a graft or a short implant is used. The post will not impinge on vital structures. - Myth: Titanium posts cause a constant metallic taste or allergic reaction.
Fact: True allergy to titanium is exceedingly rare, with only a handful of documented cases worldwide. The oxide layer is extremely stable and doesn’t leach out metal ions to cause a taste. A metallic taste is often from other dental metals, not a well-integrated titanium post. - Myth: The post is heavy and I will feel it in my jaw.
Fact: The implant post and crown are extremely light, weighing only a few grams. Once integrated, they feel like a part of you. The sensation is not one of carrying a foreign object, but simply of having a solid tooth again. The phenomenon of “osseoperception” means you actually feel through the bone.
Conclusion
The implant post is the engineered root that makes modern tooth replacement possible. Its biocompatible material, precisely designed threads, and internal connection work in harmony to fuse with your jawbone, providing stable anchorage and maintaining vital bone density. Understanding this hidden component reveals why dental implants are the premier solution for missing teeth, demanding meticulous care and rewarding you with decades of function.
FAQ
1. How do I know what material my implant post is?
Your dentist provides an implant passport or card after the procedure. It records the manufacturer, model, lot number, and material (e.g., Grade 4 Titanium). This is a crucial document to keep for your lifetime.
2. Can an implant post break?
It is extremely rare, but possible, usually due to a severe accident, chronic teeth grinding without a nightguard, or a loose abutment screw that concentrates all the load at the post’s neck.
3. Is a black line showing at the gum a problem with the post?
If you have a titanium post, thin gums, and gum recession, the dark grayish color of the metal can show through. It is not a sign of post failure, but an aesthetic concern. A zirconia post would not cause this.
Additional Resource
Learn more about material safety and standards from the International Congress of Oral Implantologists: https://www.icoi.org/
Disclaimer: This article is for informational purposes only and does not constitute medical advice. Always consult a qualified healthcare professional for diagnosis and treatment of dental conditions.