All About Drills Used for Dental Implant Surgery
The dental implant drill is the most critical instrument in the surgical operatory. It is the tool that literally carves the path for your new tooth root. While the implant post, the abutment, and the crown receive most of the attention from patients, the drills are the unsung heroes that determine whether the surgery is precise, atraumatic, and successful. A dental implant drill is not a single drill bit from a hardware store. It is part of a highly engineered, sequential surgical system that must cut bone with micron-level accuracy while preserving the vitality of the bone cells. Excessive heat, wobble, or poor cutting efficiency from a substandard drill can kill bone, cause implant failure, or damage vital nerves. This article takes you deep into the world of implant drills. You will learn about the types, the strict drilling protocols, the critical importance of irrigation and torque, and the technology that is shaping the future of implant site preparation.
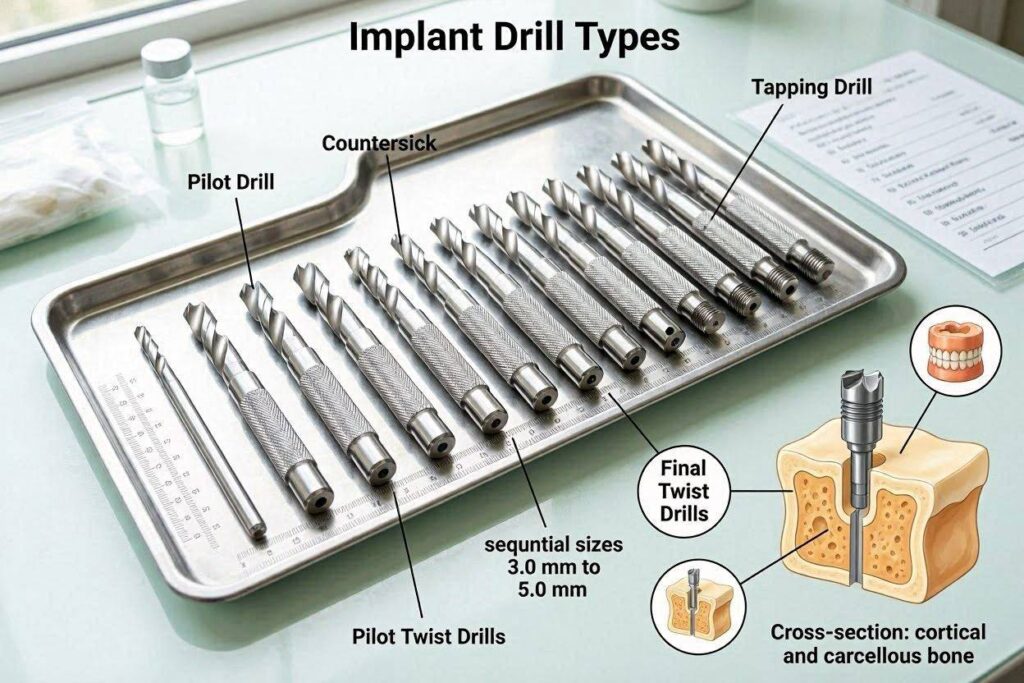
The Purpose of the Implant Drill
The implant drill prepares the osteotomy, which is the precise hole in the jawbone that will receive the implant. This is not a simple task. The hole must be the exact diameter, depth, and angulation to match the implant. The walls of the osteotomy must be clean, sharp, and free of debris. The surrounding bone must remain alive and well-perfused. A drill that overheats the bone, deviates from the planned path, or creates an irregular, wobbly hole will compromise primary stability and the osseointegration process. The drill is, therefore, a precision surgical tool, not just a boring device. It must cut bone efficiently while generating minimal frictional heat, and it must do so in a sterile, controlled manner.
The Material Science of Surgical Drills
Implant drills are fabricated from high-grade surgical stainless steel or, increasingly, from durable materials with hard coatings. The steel must be exceptionally hard to maintain a sharp cutting edge over multiple sterilization cycles, yet tough enough not to become brittle. The cutting geometry is critical. The drills have specially designed flutes—the helical grooves that run along the shaft. These flutes are not just for cutting. They are also designed to channel bone debris (the “bone chips”) up and away from the cutting tip and, crucially, to allow cooling irrigant to flow down to the very bottom of the osteotomy. The tip of the drill is often non-cutting and rounded or has a specific cutting angle to guide the drill without grabbing or wobbling.
The Sequential Drilling Protocol: A Step-by-Step System
Implant surgery almost never involves a single drill. It uses a sequence of multiple drills, each increasing incrementally in diameter. This is called the sequential drilling protocol. The rationale is biological and mechanical. Creating the final-diameter hole in one step would generate immense heat and place extreme torque stress on the bone. The sequential protocol is gentle. It gradually enlarges the osteotomy, allowing heat to dissipate and the surgeon to feel the bone density at each step and adjust accordingly.
The Starter or Round Bur
The very first instrument is often a small round diamond or carbide bur. It is used to mark the precise entry point on the bone crest, as determined by the surgical guide or the surgeon’s pre-operative measurements. This initial cortical perforation prevents the pilot drill from skidding or “walking” on the slippery, dense cortical bone surface. It creates a small, stable dimple.
The Pilot Drill
The pilot drill is the workhorse and the most important drill in the sequence. It is long, narrow (typically 1.8mm to 2.2mm in diameter), and has depth markings, often as laser-etched rings, corresponding to the planned implant lengths. The pilot drill establishes the definitive trajectory, depth, and angulation of the implant. If the pilot drill is off-angle, every subsequent wider drill will follow that same incorrect path. Surgeons use a surgical guide or a paralleling pin to verify the alignment of the pilot osteotomy before proceeding. Great care is taken to use a steady, low-speed, high-torque handpiece with copious irrigation.
The Intermediate and Final Drills
A sequence of intermediate drills follows. A typical sequence for a 4.0mm diameter implant might be: Pilot (2.0mm) -> 2.8mm -> 3.5mm -> 4.0mm final drill. The final drill matches the diameter of the implant body. In soft bone, the surgeon may use a final drill that is slightly narrower than the implant to create a compressive fit (undersized preparation). In very dense bone, a bone tap, which is a tool that cuts threads into the bone walls, may be used to facilitate implant insertion and reduce insertion torque. Each drill is used with an in-and-out “pumping” motion. This allows irrigant to reach the tip, clears bone debris from the flutes, and prevents the drill from binding and overheating.
Surgical Drill Design and Engineering
The design of the drill tip and flutes is a differentiator between a basic and an advanced implant system.
Flute Design and Debris Evacuation
Deep, polished, and wide flutes are essential. They act as a conveyor belt, moving bone chips coronally away from the cutting face. If the flutes are shallow or clogged, debris packs around the drill, drastically increasing friction and heat. This heat is the primary enemy of bone cells. The flutes must remain sharp and free of damage. Dull or damaged drills must be discarded according to the manufacturer’s recommended usage count. Using a worn drill past its lifespan is a dangerous cost-cutting measure that leads to bone necrosis.
Depth Control and Calibration
Each drill has a series of markings, either rings or a color-coded band system, that correspond to specific implant lengths (e.g., 10mm, 12mm, 14mm). These must be clearly visible and accurate. The surgeon uses these markings in conjunction with a surgical guide’s metal sleeves that physically stop the drill at the planned depth. Some advanced surgical motor systems have a digital depth stop and auto-stop function, adding a layer of safety.
Surgical Handpieces and Torque Control
The drills are not placed in a standard dental drill used for filling cavities. They are used with a dedicated implant surgical motor. This motor is a highly calibrated device that delivers very precise speeds (often 800-1500 RPM for drilling) and high torque with no wobble. It has an integrated pump that delivers a steady stream of sterile saline coolant through the handpiece and through an internal or external irrigation channel in the drill itself, directly to the cutting tip. The motor also controls the implant insertion torque for the final placement of the fixture. The handpiece is sterilized and dedicated solely to surgery.
The Threat of Heat: Bone Necrosis
The most critical safety parameter in implant drilling is temperature control. Living bone cells are exquisitely sensitive to heat. If the bone temperature exceeds 47 degrees Celsius (116.6 degrees Fahrenheit) for more than one minute, irreversible bone necrosis occurs. The bone essentially cooks. The cells die. This devitalized bone will not osseointegrate. It will be resorbed by the body, creating a radiolucency and leading to implant failure. To prevent this, three things are mandatory: sharp, new drills, copious chilled sterile saline irrigation, and an intermittent drilling technique. The saline acts as a coolant and lubricant. The pumping motion prevents prolonged friction at any one point. This is not a negotiable step; it is a fundamental surgical principle.
Guided Surgery: Drills in a Digital Workflow
The integration of 3D CBCT imaging and intraoral scanning has revolutionized how drills are guided. In a fully guided surgery, a 3D-printed surgical guide is fabricated. This guide fits precisely over the patient’s remaining teeth or is bone-anchored. It contains metal sleeves at the precise pre-planned 3D positions of the implants. The surgical drills are passed through these sleeves. Special drill keys, or “guided drills,” have an extra-long shank and physical stops. The sleeve controls the drill’s position, angle, and, with the drill stop, its depth. This technology is called static computer-aided implant surgery. It elevates the precision and safety of the drilling process, allowing for flapless surgery in many cases and ensuring the implant emerges in the exact restoratively-driven position planned on the software. The drills used must be specifically designed for the guide system, with the correct offset from the sleeve.
Dynamic Navigation
A newer technology is dynamic navigation, which is like a GPS for the drill. A stereoscopic camera tracks the position of the patient’s jaw and the position of the handpiece with a special drill attachment in real-time. The surgeon views a monitor that shows the live drill tip position superimposed on the CBCT scan. This allows for freehand drilling with micron-level real-time feedback, without the physical constraint of a static guide. It requires a different drill calibration workflow but uses the same fundamental sequential drill philosophy.
Drill Protocols for Different Bone Densities
The bone is not uniform. The surgeon adjusts the drilling protocol based on the bone type, which is often assessed during the pre-operative CBCT analysis and confirmed tactilely during the pilot drilling.
Drilling in Dense D1 Cortical Bone
This bone, found in the anterior mandible, is like drilling into hard oak. It has few blood vessels. The risk is extreme heat generation. The protocol is to use sharp drills, high irrigation, a slow, controlled speed, and a more exaggerated pumping motion. The final preparation is often exactly the implant diameter or even slightly wider, and a bone tap is used to pre-cut the threads, because screwing an implant into dense, un-tapped bone can generate so much torque that the implant binds and the bone fractures.
Drilling in Soft D4 Cancellous Bone
This bone, found in the posterior maxilla, is like drilling into soft balsa wood. It offers little resistance. The risk is wobbling and creating an irregular, oversized osteotomy that provides no primary stability. The surgeon may use an undersized drilling protocol, known as “bone condensing.” They do not use the final drill; they instead use osteotomes—tapered instruments that compress the soft bone laterally, increasing its density. The final implant is then inserted with a tight, compressive fit. This is a biologic adaptation of the drilling technique to the surgical site.
The Drill as a Diagnostic Tool
Experienced surgeons use the feel of the drilling as a real-time diagnostic tool. The resistance on the handpiece tells them about the bone density profile through the depth of the osteotomy. A sudden drop in resistance could indicate a void, a cyst, or entry into the maxillary sinus. A sudden hard stop with a different tone could indicate hitting a dense root remnant or the cortical floor of the sinus. This haptic feedback is an irreplaceable human skill, even in the age of digital guides.
Cleaning, Sterilization, and Drill Lifecycle
Implant drills are reusable medical devices, but they have a finite lifespan. They are exposed to high mechanical stress and the corrosive effects of steam sterilization. After each use, they must be meticulously cleaned with a soft brush and enzymatic cleaner to remove all bioburden from the flutes. They are then inspected under magnification for any dulling, chipping, or damage to the cutting edges. They are sterilized in a validated autoclave cycle, ideally in a dedicated cassette that protects their delicate tips. Every manufacturer specifies a maximum number of uses, often documented as “drills to discard after 20 or 30 osteotomies.” Using a drill beyond its life leads to increased heat, decreased cutting efficiency, and a higher risk of implant failure. A quality-conscious practice tracks drill usage with a log and replaces them proactively.
Important Note: The implant drills are the instruments that create the intimate bony bed for your implant. A clinic that invests in premium, well-maintained drill systems and follows strict usage limits is a clinic that values the biological outcome over cutting corners. Do not be afraid to ask your surgeon about their sterilization protocols and how often they replace their surgical drills.
Conclusion
The drills used for dental implant surgery are a sequential, precision-engineered system designed to create an osteotomy of exact dimensions, angulation, and depth while preserving the vitality of the surrounding bone through copious cooling. From the pilot drill that establishes the critical trajectory to the final shaping drills that are adapted to the bone density, each step is a deliberate, biologically informed act. The integration of 3D surgical guides and strict drill lifecycle management has elevated this process into a highly predictable, safe, and precise medical procedure.
FAQ
1. Can a dentist use the same drills for every implant brand?
No. Implant drills are system-specific. The drill diameters and the connection interface for the guided surgery sleeves are matched to the geometry of the implant brand. A Straumann drill cannot be used to place a Nobel Biocare implant and vice versa. This is why clinics invest in separate surgical kits for each implant system they use.
2. Is it safe to reuse implant drills, or should they be single-use?
Most implant drills are approved for reuse after sterilization, with a strict maximum usage count defined by the manufacturer. Some components, like tissue punches, are single-use. The key is meticulous cleaning, inspection, and a tracking system that ensures a drill is retired before it becomes dull.
3. What happens if a drill breaks during the surgery?
A drill fracture is a rare but serious intraoperative complication. If a piece of the stainless-steel drill breaks off deep in the osteotomy, the surgeon must attempt to retrieve it with special instruments. If irretrievable, the broken fragment may need to be left in place, and the implant site must be abandoned and grafted, with a new attempt planned after full healing. This is almost always caused by a fatigued, damaged, or misused drill.
Additional Resource
For more on surgical standards and safety, visit the International Congress of Oral Implantologists: https://www.icoi.org/