Do Dental Implants Require Stitches?
You run your tongue gently over the surgical site and feel something unusual. Small threads. Knots. A texture that was not there before surgery. The stitches are there, and suddenly you have questions. Are they necessary? How long will they stay? What happens if one comes loose? Do all dental implant procedures require stitches, or did your case need them for a specific reason?
These questions matter. Stitches play a critical role in protecting the surgical site during the vulnerable early days of healing. Understanding why they are used, what types exist, and how to care for them helps you navigate recovery with confidence. This guide answers every question you have about stitches and dental implant surgery.
The Short Answer: Do Dental Implants Require Stitches
Most dental implant procedures require stitches, but not all. The answer depends on the surgical technique used, the number of implants placed, whether extractions or bone grafting were performed simultaneously, and your surgeon’s preferred protocol.
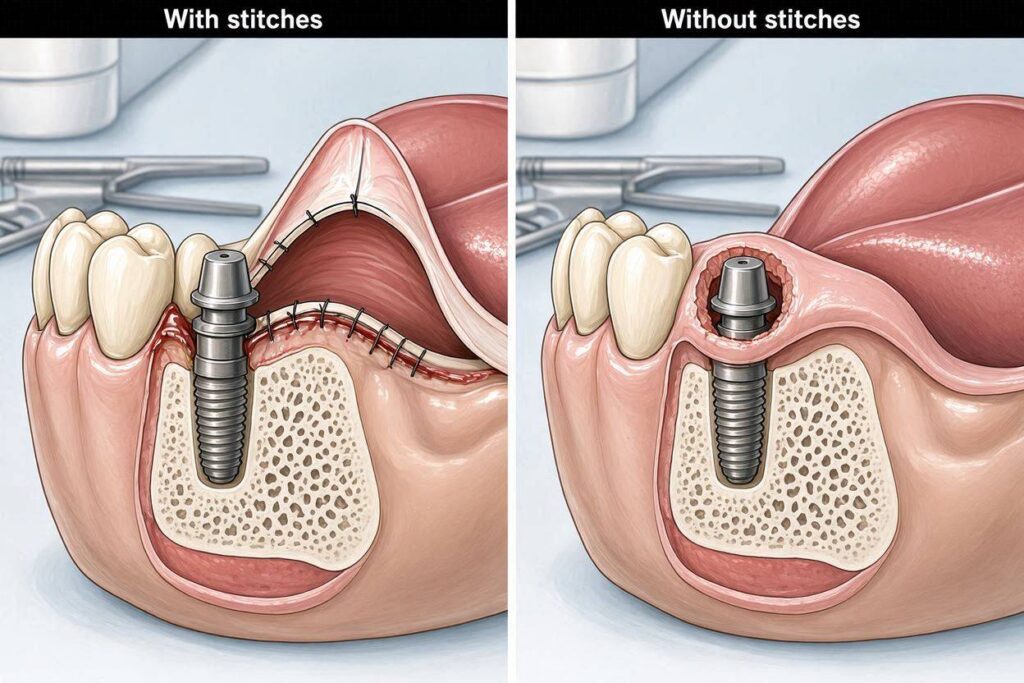
In a traditional implant procedure, the surgeon makes an incision in the gum tissue to expose the underlying bone. After preparing the implant site and placing the fixture, the gum tissue must be closed over the surgical area. Stitches accomplish this closure. They hold the tissue in place, protect the underlying bone and implant, and create the conditions necessary for proper healing.
However, some modern techniques eliminate or minimize the need for stitches. Flapless implant surgery, in which the implant is placed through a small opening in the gum without a large incision, may require no stitches at all or only a single suture. Computer-guided surgery with prefabricated surgical guides increasingly allows for these minimally invasive approaches.
Why Stitches Are Used in Dental Implant Surgery
Stitches serve several essential purposes beyond simply closing a wound.
Protecting the Surgical Site
The primary function of stitches is to hold the gum tissue closed over the implant site. This protection prevents:
- Bacteria and food debris from entering the surgical area
- Physical disruption of the blood clot from tongue movement or chewing
- Exposure of the underlying bone, which causes pain and delays healing
- Contamination that could lead to infection and implant failure
Stabilizing the Blood Clot
The blood clot that forms after surgery is the foundation of healing. It contains growth factors, immune cells, and the structural proteins needed for new tissue formation. Stitches hold the gum tissue in close approximation, protecting the clot from displacement.
Controlling Bleeding
Closing the tissue under gentle tension helps control post-operative bleeding. The pressure exerted by properly placed sutures compresses small blood vessels, reducing oozing and promoting clot stability.
Guiding Tissue Healing
Stitches guide the gum tissue to heal in the correct position. When an implant is placed, the surrounding gum tissue needs to adapt to the new contours. Sutures position the tissue optimally, influencing the final shape and health of the gum around the eventual restoration.
Creating a Barrier
Until the gum tissue seals naturally, which takes approximately 24 to 48 hours for the initial epithelial layer, the sutured closure serves as a mechanical barrier against the oral environment. This barrier function is critical during the first two days when the wound is most vulnerable.
Types of Stitches Used in Dental Implant Surgery
Not all stitches are the same. The type your surgeon uses affects your post-operative experience.
Resorbable Sutures
Resorbable sutures are designed to dissolve on their own over time. The body’s natural enzymes break down the suture material, eliminating the need for a removal appointment.
Common resorbable suture materials:
| Material | Dissolution Time | Characteristics |
|---|---|---|
| Plain gut | 5–7 days | Fast-dissolving; used for superficial closure |
| Chromic gut | 7–14 days | Treated to dissolve more slowly than plain gut |
| Polyglactin (Vicryl) | 2–4 weeks | Synthetic; predictable absorption |
| Poliglecaprone (Monocryl) | 2–3 weeks | Smooth; minimal tissue reaction |
| Polydioxanone (PDS) | 6–8 weeks | Slow absorption; extended wound support |
Advantages of resorbable sutures:
- No removal appointment needed
- Less patient anxiety about suture removal
- Ideal for patients who cannot easily return for follow-up
- Reduced risk of disturbing the healing site during removal
Disadvantages:
- May dissolve before the tissue is fully healed in some cases
- Some materials cause more tissue reaction than non-resorbable sutures
- Patients sometimes worry when sutures dissolve earlier than expected
Non-Resorbable Sutures
Non-resorbable sutures do not dissolve and must be removed by the surgeon at a follow-up appointment, typically 7 to 14 days after surgery.
Common non-resorbable suture materials:
| Material | Characteristics |
|---|---|
| Nylon (Ethilon) | Smooth, minimal tissue reaction, easy removal |
| Polypropylene (Prolene) | Very inert, slides through tissue easily |
| Silk | Natural fiber, easy to handle, higher tissue reaction |
| PTFE (Gore-Tex) | Very smooth, excellent for delicate tissue |
| Polyester (Ethibond) | Strong, braided, good handling |
Advantages of non-resorbable sutures:
- Remain in place until intentionally removed
- Provide predictable wound support duration
- Often cause less tissue reaction than some resorbable materials
- Can be removed earlier if healing is rapid
Disadvantages:
- Require a second appointment for removal
- Removal can cause brief discomfort
- Left too long, they can accumulate plaque and irritate tissue
Suture Size
Suture size is measured by diameter, with larger numbers indicating thinner sutures. Dental implant surgery typically uses sutures sized 3-0, 4-0, or 5-0, with 4-0 and 5-0 being most common for delicate oral tissues.
Suture Techniques
The way sutures are placed affects healing:
| Technique | Description | Common Use |
|---|---|---|
| Interrupted | Individual sutures, each tied separately | General closure; if one fails, others remain |
| Continuous | One long suture with knots only at ends | Faster placement; even tension distribution |
| Mattress | Sutures that pass through tissue twice | Evert wound edges; good for thick tissue |
| Figure-of-eight | Crossed suture pattern | Securing tissue over extraction sockets |
When Stitches May Not Be Necessary
Advances in implant surgery techniques have reduced or eliminated the need for stitches in selected cases.
Flapless Implant Surgery
Flapless surgery involves placing the implant without making a large incision or reflecting the gum tissue. Instead, the surgeon uses a small punch to create an opening through the gum directly over the implant site. The implant is placed through this small opening.
Candidates for flapless surgery:
- Adequate bone volume confirmed by 3D imaging
- Sufficient keratinized (tough) gum tissue
- No need for bone grafting or contouring
- Straightforward implant positioning
- Computer-guided surgical protocol
Stitch requirements with flapless surgery:
- Often no stitches needed at all
- If a stitch is placed, it is typically a single suture to close the small opening
- Healing is generally faster than with traditional flap surgery
Computer-Guided Surgery
Computer-guided implant surgery uses a 3D-printed surgical guide to place implants with high precision through minimal access. When combined with flapless techniques, the need for stitches is greatly reduced.
Immediate Implant Placement with Healing Abutment
When an implant is placed immediately after tooth extraction, and a healing abutment is attached that extends through the gum, the surgeon may not need to suture the gum completely closed. The healing abutment occupies the opening, and the gum tissue adapts around it. Small sutures may still be used to close any gaps, but extensive suturing is often unnecessary.
What to Expect: The Stitching Process
Understanding the process reduces anxiety about what happens during surgery.
During Surgery
You will not feel the stitches being placed. The surgical site is fully anesthetized. After the implant is placed and any bone grafting is completed, the surgeon repositions the gum tissue and secures it with sutures. The number of sutures depends on the incision size and the technique used.
A straightforward single implant placement might require three to five sutures. A more extensive procedure involving multiple implants, extractions, or grafting may require more.
Immediately After Surgery
When the anesthesia wears off, you may become aware of the sutures. They may feel like small threads or knots against your tongue or cheek. This sensation is normal and typically diminishes over a few days as you become accustomed to them and as the tissue begins to heal.
The First Week
During the first week, the sutures do their most important work. The tissue begins to knit together at the wound edges. You may notice:
- A pulling sensation as swelling decreases and sutures become slightly looser
- Small knots that feel more prominent as the tissue relaxes
- Resorbable sutures beginning to soften or fragment (depending on material)
- Non-resorbable sutures remaining intact
How to Care for Stitches After Dental Implant Surgery
Proper stitch care prevents complications and supports healing.
The First 24 Hours
Do not disturb the stitches in any way during the first 24 hours:
- Do not rinse your mouth
- Do not spit
- Do not touch the area with your tongue or fingers
- Do not brush near the surgical site
- Allow the initial clot to stabilize undisturbed
Days 2 Through 7
After 24 hours, begin gentle care:
- Rinse gently with warm salt water after meals
- Do not swish vigorously; let the water move passively
- Brush teeth away from the surgical site normally
- Avoid flossing near the sutures
- Continue prescribed antimicrobial rinse as directed
What to Avoid Throughout the Stitch Period
| Activity | Why to Avoid | Duration |
|---|---|---|
| Pulling or picking at sutures | Disrupts healing and may open the wound | Until sutures dissolve or are removed |
| Vigorous rinsing or spitting | Can dislodge sutures and clot | First week minimum |
| Using a straw | Creates suction that can disrupt sutures | At least 1 week |
| Smoking | Impairs healing and increases infection risk | At least 2 weeks; longer is better |
| Hard, crunchy, or sticky foods | Can catch on sutures and pull them loose | Until sutures dissolve or are removed |
| Electric toothbrush near the site | Mechanical disruption of sutures | Until surgeon clears you |
Recognizing Normal vs. Abnormal Suture Appearance
Normal findings:
- Sutures remain intact for the first several days
- Mild redness immediately adjacent to sutures
- Small amount of white or yellowish material on sutures (fibrin, a normal healing protein)
- Sutures feeling slightly looser as swelling decreases
- Resorbable sutures appearing frayed or partially dissolved after 5–7 days
Findings to report to your surgeon:
- Sutures coming completely undone within the first 3–4 days
- Increasing redness, swelling, or pain around sutures
- Pus or foul-smelling discharge
- Sutures that appear to be cutting into the tissue
- Heavy bleeding that does not stop with gentle pressure
Suture Removal: What to Expect
If your surgeon used non-resorbable sutures, you will return for removal.
When Removal Occurs
Suture removal typically occurs 7 to 14 days after surgery. The exact timing depends on:
- The healing progress observed by your surgeon
- The location in the mouth (areas with more movement may need longer support)
- The extent of the surgical procedure
- Your individual healing speed
The Removal Process
Suture removal is quick and typically involves minimal discomfort:
- The surgeon or assistant examines the surgical site to confirm adequate healing
- Using sterile instruments, each suture is cut and gently pulled free
- You may feel a slight tugging sensation but usually no pain
- The process takes only a few minutes
- No anesthesia is typically needed
After Removal
Once sutures are removed:
- The surgical site should remain closed
- Continue gentle oral hygiene
- Avoid aggressive brushing or flossing near the site for a few more days
- The tissue will continue to mature and strengthen over the following weeks
Resorbable Sutures: The Dissolving Process
If your surgeon used resorbable sutures, you will observe them changing over time.
What to Expect
| Time Frame | What Happens |
|---|---|
| Days 1–3 | Sutures intact; no visible change |
| Days 4–7 | Sutures may begin to soften; knots may feel looser |
| Days 7–10 | Sutures begin to fragment or dissolve; pieces may come loose |
| Days 10–14 | Most suture material has dissolved or fallen away |
| After 2 weeks | Sutures typically gone; some small fragments may persist temporarily |
What to Do If Sutures Dissolve Early
It is not uncommon for resorbable sutures to dissolve or come loose before the tissue feels completely healed. If this happens:
- Do not panic; the tissue underneath may have sealed sufficiently
- Continue gentle oral hygiene
- Avoid mechanical stress on the area
- Contact your surgeon if you are concerned, especially if bleeding resumes or a gap opens
Most surgeons expect some variation in dissolution time. The tissue beneath the sutures may be adequately healed even if the sutures dissolve sooner than anticipated.
What to Do If Sutures Persist Too Long
Some resorbable sutures, particularly those made of slower-dissolving materials, may persist beyond two weeks. If sutures remain after 2–3 weeks and cause irritation:
- Contact your surgeon for evaluation
- They may remove the remaining sutures manually
- Do not attempt to remove them yourself
Special Situations and Stitch Requirements
Different clinical scenarios affect stitch requirements.
Single Implant Placement
A straightforward single implant placed in a healed extraction site typically requires a small incision and several sutures. The suturing is relatively minimal, and healing is usually uncomplicated.
Multiple Implant Placement
Placing multiple implants in the same arch requires a larger surgical field and more extensive suturing. The surgeon may use a combination of suture techniques to close the tissue optimally around each implant site.
Implant Placement with Simultaneous Extraction
When an implant is placed immediately after tooth extraction, the socket adds complexity to closure. The surgeon may need to suture the gum tissue over or around the implant, depending on whether a healing abutment is placed.
Implant Placement with Bone Grafting
Bone grafting at the time of implant placement requires meticulous closure. The graft material must be completely covered and protected. This often requires:
- More sutures than implant placement alone
- Tension-free closure (releasing the gum tissue so sutures are not under strain)
- Possibly different suture materials that provide longer wound support
- Extra attention to protecting the graft during healing
Full Arch Implant Procedures
Procedures like All-on-4 or All-on-6 involve placing multiple implants and often extracting remaining teeth and contouring bone. These extensive procedures require substantial suturing. The surgeon may use a combination of resorbable and non-resorbable sutures for different parts of the closure.
Stitches vs. No Stitches: Comparing Approaches
| Factor | Traditional Flap Surgery with Stitches | Flapless Surgery Without Stitches |
|---|---|---|
| Incision | Larger; gum tissue reflected | Small punch opening |
| Visibility for surgeon | Excellent; direct bone visualization | Limited; relies on imaging and guides |
| Stitches required | Yes; multiple | None or minimal |
| Post-operative discomfort | Moderate | Less |
| Swelling | More | Less |
| Healing time (soft tissue) | 7–14 days for initial closure | Often faster |
| Applicability | Most cases, including complex ones | Selected straightforward cases |
| Precision | Dependent on surgeon skill | Enhanced by computer guidance |
Both approaches are valid. Your surgeon recommends one over the other based on your specific anatomy, the complexity of the case, and their training and experience.
Potential Complications Related to Stitches
While stitches are generally well-tolerated, complications can occur.
Suture Dehiscence
Dehiscence occurs when the wound edges separate, exposing the underlying tissue or implant. This is one of the more common minor complications.
Causes:
- Sutures placed under too much tension
- Swelling that puts pressure on the closure
- Premature dissolution of resorbable sutures
- Mechanical disruption from food, tongue, or toothbrush
- Infection weakening the tissue
Management:
- Small areas may heal on their own with careful hygiene
- Larger openings may require re-suturing
- Antibiotic mouth rinse to prevent infection
- Close monitoring for signs of implant exposure
Suture Infection
Infection around sutures presents as increasing redness, swelling, pain, and possibly purulent discharge.
Risk factors:
- Poor oral hygiene
- Smoking
- Uncontrolled diabetes
- Immunocompromised status
- Contamination during surgery
Management:
- Professional evaluation
- Antibiotics if indicated
- Possible early suture removal to allow drainage
- Culture of any discharge to guide antibiotic selection
Suture Granuloma
A granuloma is a small nodule of inflammatory tissue that can form around a suture, particularly silk sutures left in place too long. It appears as a small, red, raised area at the suture site.
Management:
- Suture removal typically resolves the granuloma
- For resorbable sutures, the granuloma resolves as the suture dissolves
- Rarely requires additional treatment
Accidental Suture Removal
Patients sometimes accidentally dislodge sutures with their tongue, toothbrush, or food. If a single suture among several is lost:
- The remaining sutures continue to hold the wound
- Contact your surgeon for guidance
- If the wound remains closed, intervention may not be needed
- If the wound gapes open, re-suturing may be required
Advances in Suture Technology
Suture technology continues to evolve, offering new options for implant surgery.
Antibacterial Sutures
Some sutures are coated or impregnated with antibacterial agents, such as triclosan or chlorhexidine. These sutures aim to reduce bacterial colonization along the suture track, potentially lowering infection risk.
Knotless Sutures
Knotless suture designs, including barbed sutures, eliminate the need for traditional knots. The barbs grip the tissue, distributing tension evenly and potentially reducing tissue strangulation at knot points.
Tissue Adhesives
In some cases, tissue adhesives (surgical glues) supplement or replace sutures for superficial closure. Cyanoacrylate adhesives can seal small incisions without sutures. However, in the moist oral environment, adhesives alone are generally insufficient for implant surgery closure. They may be used in conjunction with sutures.
Communicating with Your Surgeon About Stitches
Being informed helps you have productive conversations with your surgical team.
Questions to Ask Before Surgery
- Will my procedure require stitches?
- What type of sutures will you use?
- Will I need to return for suture removal?
- How many sutures do you anticipate placing?
- What should I expect during healing?
- What signs of complications should I watch for?
Information Your Surgeon Needs from You
- Any known allergies (some sutures contain materials that can trigger reactions in sensitive individuals)
- Bleeding disorders or anticoagulant use
- History of poor wound healing or keloid formation
- Smoking status
- Any previous reactions to suture materials
The Healing Timeline After Suturing
Understanding the healing sequence helps you interpret what you observe.
| Time | Soft Tissue Healing Stage | What You Notice |
|---|---|---|
| Day 1–2 | Clot formation; early inflammation | Swelling, mild discomfort, sutures intact |
| Day 3–5 | Epithelial cells migrate across wound | Decreased swelling; sutures may feel looser |
| Day 5–7 | Wound epithelium sealed | Minimal discomfort; sutures still present |
| Day 7–10 | Tissue strengthening | Sutures removed or dissolving |
| Day 10–14 | Wound closed and strengthening | Sutures gone or removed; tissue still maturing |
| Week 2–4 | Collagen remodeling | Tissue appearance normalizing |
| Week 4–8 | Mature soft tissue | Gum tissue around implant is stable |
Conclusion
Most dental implant procedures do require stitches to close the gum tissue, protect the surgical site, stabilize the blood clot, and guide proper healing. The specific type of sutures, whether resorbable or non-resorbable, and the number placed depend on the surgical technique, the complexity of the case, and surgeon preference. Flapless implant surgery using computer guidance can sometimes eliminate the need for stitches, but this approach applies only to selected straightforward cases. Proper care of your stitches during the first week after surgery is essential for preventing complications and supporting the healing that leads to successful implant integration.
Frequently Asked Questions
Do all dental implants need stitches?
Most dental implant procedures require stitches to close the gum tissue over the surgical site. However, some minimally invasive flapless procedures, guided by computer technology, can be performed without stitches or with only a single suture.
How long do stitches stay in after dental implant surgery?
Non-resorbable stitches are typically removed 7 to 14 days after surgery. Resorbable stitches dissolve on their own, usually within 1 to 3 weeks depending on the material used.
What happens if a stitch comes loose early?
If one stitch among several comes loose, the remaining stitches usually hold the wound adequately. Contact your surgeon for guidance. If the wound opens, it may require re-suturing.
Can I feel the stitches after implant surgery?
Yes, you may feel the stitches as small threads or knots against your tongue or cheek. This sensation is normal and typically diminishes as you become accustomed to them and as the tissue heals.
Is suture removal painful?
Suture removal is typically quick and causes minimal discomfort. You may feel a slight tugging sensation, but local anesthesia is rarely needed. Most patients find the removal process much easier than anticipated.
Additional Resources
- American Association of Oral and Maxillofacial Surgeons: www.aaoms.org
- American Academy of Implant Dentistry: www.aaid.com
- International Congress of Oral Implantologists: www.icoi.org