How Do I Get Invisalign? A Realistic, Step-by-Step Guide for 2026
So, you are tired of hiding your smile. Maybe you have a crooked tooth that catches the light in every photo. Perhaps your bite feels slightly off when you chew. Or you finished traditional braces years ago, stopped wearing your retainer, and watched your teeth slowly drift back. Now, you are looking for a second chance without the metal brackets.
You are probably here because you typed that exact question into a search bar: How do I get Invisalign?
It is a simple question. The marketing makes the answer look simple too. A quick scan, a box of clear plastic trays, and six months later, a perfect smile. But the reality of the process involves dental health evaluations, financial planning, personal discipline, and a long-term commitment to retention. You deserve a guide that walks you through the messy, real, unglamorous details—the stuff the television commercials skip.
This article covers every stage. We will move from the moment you first Google a provider to the day you finish wearing your retainers years later. There are no shortcuts described here, because there are no shortcuts that work. I will not promise you a two-week transformation or claim the process is painless. I will give you the roadmap you need to make an informed decision and navigate treatment successfully.
Understanding the Reality Before You Start
Before you even search for a dentist, we need to level with each other. The orthodontic industry loves phrases like “invisible braces” and “a new smile in months.” Those phrases sell a product. They do not prepare you for the lived experience.
It Is a Medical Procedure, Not a Beauty Product
Aligner therapy repositions the bones that house your teeth. Your body breaks down and rebuilds bone tissue in response to controlled pressure. That process creates inflammation. It can hurt. It changes how you speak, eat, and socialize. You are not buying a whitening kit. You are signing up for a biological process that demands respect.
“Patients often enter the process thinking about aesthetics. I need them to understand we are moving bones through living tissue. The health of the gums, roots, and jaw joints dictates everything. The straight smile is a happy side effect of a healthy, functional bite.” — A practicing orthodontist with over 15 years of aligner experience
Aligners Are One Tool Among Many
Invisalign is a brand name. Many companies now produce clear aligners. This brand happens to have the largest research budget, the most advanced material science, and the longest track record. Other systems exist. Some are excellent. Some are dangerous mail-order experiments. This guide focuses on the Invisalign system because of its ubiquity and proven track record, but the principles apply to any medically supervised clear aligner therapy.
There Are No Guarantees in Timeline
Your dentist might quote you 12 months. That estimate is an educated guess. Your body’s biological response, your compliance with wear time, and unexpected tracking errors can extend treatment. Go into this with an open mind. The goal is a healthy, stable result—not a speed record.
Chapter 1: The Self-Assessment — Are You a Good Candidate Right Now?
You do not need a dental degree to spot some obvious disqualifiers. Answering a few questions honestly saves you time and consultation fees. It also prepares you for the conversation with a doctor.
Dental Health Prerequisites
Aligners sit tightly against your teeth for 20 to 22 hours a day. They trap saliva, bacteria, and whatever you last ate against your enamel. If your mouth is not fundamentally healthy, aligners will accelerate existing problems.
You need healthy gums first. Gums should not bleed when you brush or floss. Pink, firm, and non-tender is the baseline. Active gum disease causes bone loss. Applying orthodontic force to teeth already losing bone support is dangerous. Treat the gum disease. Get stable. Then consider alignment.
You cannot have active cavities. Cavities are bacterial infections creating holes in your teeth. Sealing bacteria under a tight plastic tray for months is a recipe for rapid decay. Any reputable doctor will require all fillings and crowns to be completed before scanning.
Old dental work must be stable. Crowns, bridges, and veneers do not automatically disqualify you. But a loose crown or a failing root canal needs repair first. Orthodontic force can dislodge compromised work.
Specific Conditions Aligners Handle Well
The technology excels at treating certain types of misalignment.
- Crowding: Mild to moderate crowding responds well. Teeth are rotated and moved into the arch.
- Spacing: Gaps between teeth, if not caused by gum disease, close predictably.
- Relapse: Adults who had braces as teens and stopped wearing retainers see excellent results. The teeth “remember” their previous position to some degree.
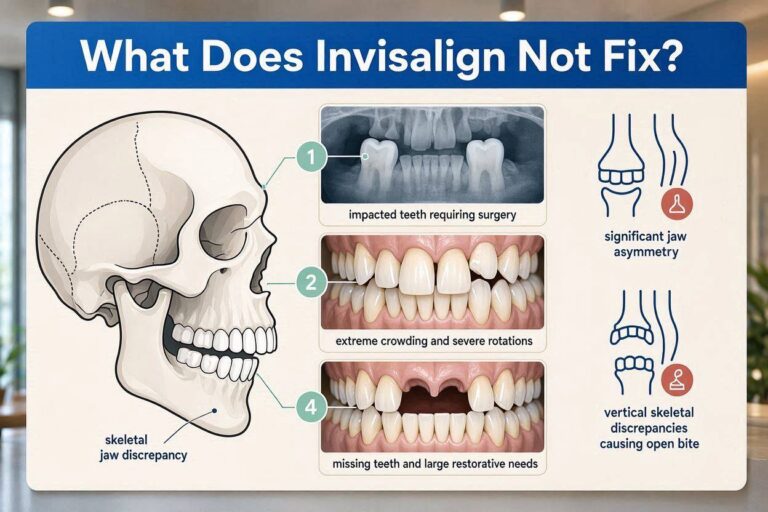
Complex Cases That Need a Specialist
General dentists can offer Invisalign. However, certain conditions demand an orthodontist—a specialist who spent additional years studying tooth movement and facial growth.
| Condition | Why a Specialist Matters |
|---|---|
| Severe overbite or underbite | May require elastics, attachments, or even adjunctive jaw surgery. |
| Impacted teeth | Teeth stuck in the jawbone need coordinated surgical and orthodontic care. |
| Significant midline discrepancies | Correcting facial asymmetry involves complex biomechanics. |
| Open bites (front teeth don’t overlap) | Often linked to tongue posture or joint issues; needs comprehensive diagnosis. |
| Extractions needed | Removing healthy teeth to create space demands careful planning. |
If your case falls into the complex category, do not panic. Treatment is still possible. But start your search with an orthodontist, not a general dentist who does a few cases a year. Experience matters when things get complicated.
Chapter 2: Finding the Right Provider — The Most Critical Decision
You are not buying a commodity. You are paying for a diagnosis, a custom treatment plan, and professional oversight. The skill of the person designing your ClinCheck plan and monitoring your progress determines your result far more than the plastic itself.
Orthodontist vs. General Dentist: A Blunt Comparison
This debate generates heat online. Let’s break it down without corporate talking points.
Orthodontists complete dental school, then a two-to-three-year residency focused exclusively on moving teeth and managing facial growth. They treat malocclusion all day, every day. They see the rare complications, the root resorption, the ankylosed teeth that won’t move. They manage cases that go off-script.
General dentists are restorative experts. They fill teeth, place crowns, manage gum health. Many take continuing education courses in Invisalign. Some become highly skilled and treat hundreds of cases. Others treat a handful of mild cases a year. Their depth of orthodontic knowledge varies enormously.
| Factor | Orthodontist | Experienced General Dentist |
|---|---|---|
| Specialist training | 2-3 years residency focused on tooth movement | CE courses; varies widely |
| Complex case experience | Daily exposure to difficult malocclusions | Typically selects straightforward cases |
| Backup options | Can switch to braces on same patient seamlessly | May refer out if aligners fail |
| Cost | Often comparable or slightly higher | Often comparable |
| Appointment availability | May have less flexible hours | May offer evening/weekend slots |
Important Note: Invisalign awards tiers based on case volume. Look for providers at the “Diamond” or “Diamond Plus” level if you want someone with high volume. Volume is not everything, but it is a useful signal. A doctor who treats five cases a year simply cannot develop the same intuitive grasp of biomechanics as one who treats 200.
How to Research Like an Investigator
Do not just Google “Invisalign near me” and book the first ad you see. Spend an afternoon doing detective work.
Read reviews with a filter. Ignore reviews that say “friendly staff” and “nice office.” Look for reviews that mention the result. Search for keywords like “finished,” “retainer,” “two years later,” “tracking.” Look for reviews on Google Maps, but also check health-specific platforms like RateMDs. Pay attention to any review describing a complication and how the doctor handled it. Every doctor gets complications. The good ones manage them transparently.
Study their social media. Many orthodontists post before-and-after photos. Look at their finished cases. Are they treating cases similar to yours? Are the final bites well-aligned, or are they just showing straightened front teeth? A beautifully aligned front six teeth with a terrible posterior bite is a failure. Look for photos showing the back teeth coming together properly.
Check professional credentials. In the United States, the American Association of Orthodontists website lets you search for board-certified specialists. Certification from the American Board of Orthodontics means the doctor voluntarily passed rigorous written and clinical examinations. This signals a commitment to excellence beyond licensure.
The Consultation Strategy
You need at least two consultations. Three is better. This feels like overkill. It is not. You are making a decision that affects your health, appearance, and finances for years.
Consultation One: Go to the highest-volume, most-reviewed orthodontic practice in your area. Listen to their assessment. Ask hard questions.
Consultation Two: Go to a smaller practice, perhaps a general dentist recommended by a friend. Compare the vibe, the proposed treatment plan, the timeline.
Consultation Three (Optional): See a university dental school clinic. The process takes longer, but faculty orthodontists supervise residents. Costs are often significantly lower.
Chapter 3: Your First Appointment — What Actually Happens
The free consultation is not really free. It is a sales pitch, but a good one also provides genuine diagnostic value. You should leave with a clear understanding of your problem and proposed solution, whether you buy from that provider or not.
The Clinical Evaluation
A technician or the doctor will look in your mouth with a mirror. They will check your gums, the condition of your enamel, and your existing dental work. They will assess your bite with thin articulation paper, asking you to tap your teeth together and slide your jaw. Expect them to measure overjet (horizontal overlap) and overbite (vertical overlap).
Periodontal probing might happen. A thin ruler slides between your tooth and gum. Numbers like 1, 2, and 3 indicate healthy pocket depths. A 4 or higher suggests gum disease. If you hear higher numbers, the conversation should shift from alignment to gum health.
They will assess your joints. The doctor will place fingers on the side of your face near your ears and have you open and close. Clicking, popping, or pain in the temporomandibular joints (TMJ) matters. Aligner therapy can sometimes help joint issues—and sometimes aggravate them. An honest doctor admits what they do not know.
The Technology Pitch
Most practices now use an intraoral scanner. A wand moves around your mouth, building a 3D model on a screen in real-time. The scanner is fast, radiation-free, and extremely accurate. Ask if this scan is used for your ClinCheck simulation or only for a “preview.”
A “smile simulation” is not a treatment plan. Some software generates a quick visualization of straight teeth. This is a marketing tool. Your actual ClinCheck plan, the one the doctor designs, is a medically precise sequence of tooth movements. It takes the doctor days to refine after you leave.
Photographs and radiographs. Expect full facial and intraoral photographs. Expect a panoramic X-ray or cone-beam computed tomography (CBCT) scan. The 3D CBCT scan reveals root positions, bone thickness, sinus proximity, and the health of your jaw joints. Without this imaging, the doctor is moving teeth blindly. Decline treatment from any provider who does not take adequate imaging.
“I’ve seen a lot of failed results coming from a lack of proper diagnostics. Without a clear picture of each patient’s mouth, there’s no way to predict the right outcomes the first time around. A cheap price isn’t a bargain if you need a second treatment to fix the first one.” — A Diamond Plus Invisalign provider reflecting on the importance of imaging
The Discussion About Attachments, IPR, and Elastics
Do not leave the consultation without understanding these three words. Many patients feel blindsided when they show up to get their first trays.
Attachments are tiny tooth-colored bumps of composite resin bonded to your teeth. They act as handles, giving the aligner something to push against for complex movements like rotations or extrusions. Most patients need attachments. Ask how many. Ask if they will be on your front teeth. You cannot hide them completely; they are visible up close.
Interproximal Reduction (IPR) involves shaving tiny amounts of enamel—fractions of a millimeter—between specific teeth to create space. The drill or hand-file does not hurt, but the sensation is unpleasant. The enamel dust tastes gritty. IPR allows crowded teeth to align without flaring outward. Ask if you need it. Ask where. Ask how much enamel will be removed. A conservative doctor removes minimal enamel and only when necessary.
Elastics are small rubber bands you hook onto your aligners. They correct bite discrepancies by connecting your upper and lower teeth in specific configurations. Wearing elastics demands commitment. They are visible. They snap. You must wear them. A plan that requires elastics adds complexity to daily life. Know about them upfront.
Chapter 4: The Financial Reality — Costs, Insurance, and Negotiation
The price of Invisalign varies wildly. Geography, provider specialty, case complexity, and your insurance policy all shift the number. We need to talk about money honestly, without the glossy brochure euphemisms.
The True Cost Range in 2026
For comprehensive treatment in the United States, expect a range between $3,500 and $9,000. The national average for comprehensive cases sits near the middle of that range. Mild cases (Invisalign Express or Lite) might cost between $2,000 and $4,500.
| Case Type | Typical Duration | Typical Fee Range (USD) |
|---|---|---|
| Express/Lite (minor crowding/spacing) | 6-12 months | $2,000 – $4,500 |
| Comprehensive Moderate | 12-18 months | $4,000 – $6,500 |
| Comprehensive Complex (bite correction, elastics, many attachments) | 18-24+ months | $5,500 – $9,000+ |
These fees usually include everything: records (scan, photos, X-rays), the ClinCheck design, all aligners, all attachments, IPR, office visits, one set of retainers, and some post-treatment follow-up. Ask explicitly what is included. Some offices quote a lower fee but charge extra for the final retainers or for additional scans if tracking fails.
Dental Insurance: The Fine Print
Most dental insurance plans categorize orthodontics separately from general dentistry. Key details to investigate:
- Lifetime maximum: Unlike your annual crown benefit, orthodontic benefits typically cap at a set dollar amount for your entire life. Common lifetime maximums are $1,000, $1,500, or $2,000. Rarely, plans cover $3,000.
- Age limits: Some plans only cover dependents up to age 19 or 26. Adult orthodontic coverage is becoming more common but is far from universal.
- Payment structure: Insurance companies disburse the lifetime maximum in quarterly or monthly installments throughout treatment. If you switch providers mid-treatment, you risk leaving money on the table. Understand the timing.
Ask your provider’s financial coordinator to submit a pre-treatment estimate to your insurance. This document will tell you exactly what the insurance will pay before you commit.
Payment Options and Negotiation Tactics
In-office payment plans: Most practices offer interest-free in-house financing. You pay a down payment (often 20-30%) and spread the balance over the length of your treatment. This is usually the best deal because there is no third-party lender.
Third-party financing: CareCredit, Sunbit, and similar companies offer longer terms but charge interest. Some offer deferred-interest promotions—if you fail to pay the full balance within the promotional window, all accrued interest gets added retroactively. Read the terms. The interest rate can exceed 25% APR once the retroactive clause kicks in.
Negotiation is permissible. Private practices, not corporate chains, have flexibility. You can ask, “Is there a discount for paying in full upfront?” Some offices offer 5-10% off for cash or check payment that avoids credit card processing fees. You can ask, “Can you match a quote from another Diamond-level provider?” The worst they can say is no.
Flexible Spending Accounts (FSA) and Health Savings Accounts (HSA): Orthodontics are a qualifying medical expense. You can use pre-tax dollars. If you time your treatment with your plan year, you can plan your FSA contributions accordingly.
Chapter 5: The Records Appointment — The Digital Blueprint
You chose a provider. You signed the financial agreement. Now you return for the records appointment where the actual treatment plan gets built.
The Definitive Scan
The intraoral scan takes about 10 to 15 minutes. The technician puffs air on your teeth to dry them, then glides the wand over every surface. You will see a raw 3D model appear on the screen. The scan captures your current dentition down to fractions of a millimeter. This scan goes to Align Technology’s labs, where technicians create a digital model.
Photographs That Matter
The assistant will use cheek retractors—uncomfortable plastic prongs that pull your lips away—to take sharply focused photos of every tooth surface. They also take portrait photos: face at rest, smiling broadly, profile view. These images document baseline appearance and aid in treatment planning. The retractors are not painful, but you will feel exposed. Breathe through your nose.
The Doctor’s Prescription
Here is the part most patients never see. Your doctor opens the scanned model in ClinCheck, Invisalign’s treatment planning software. They do not simply hit “auto-generate.” An experienced provider spends 30 minutes to several hours manipulating the digital teeth.
They decide:
- Which teeth move first
- The sequence of space closure
- Where attachments go and what shape they take
- How much IPR between which teeth
- Whether the plan uses “bite ramps” (small bumps on the aligner that help open a deep bite)
- The shape of the final arch form
- The position of your final bite
Your doctor then submits this detailed prescription to Align Technology. Technicians at Align produce a proposed ClinCheck animation. The doctor reviews it, rejects or modifies it, and iterates until the plan is biologically sound and aesthetically pleasing. This back-and-forth can take days or weeks. A rushed plan is a bad plan.
Chapter 6: Delivery Day — Starting Your Journey
The big day arrives. You sit in the chair. The assistant brings out a box containing your first several sets of aligners. The reality of the commitment sinks in.
Attachments: The Moment of Truth
If your plan requires attachments, the bonding process happens now. The assistant cleans and etches your teeth. The dentist places a template tray loaded with composite resin over your teeth, then cures each attachment with a bright blue light. The template removes, leaving small rough bumps bonded to your enamel. The assistant will smooth any sharp edges.
Your aligner fits over the attachments and snaps into place. The attachments make the aligner fit tighter, grip harder. Removing the aligner for the first time with attachments feels like prying a tight plastic shell off your teeth. You will develop a technique. Everyone does. At first, it feels impossible. Then, muscle memory forms.
Instructions You Must Follow
- Wear time: 20 to 22 hours per day. That leaves 2 to 4 hours for eating, drinking anything not water, and cleaning. You start the clock the moment you remove the trays and stop it when you put them back in.
- Eating protocol: Never eat with aligners in. Even a small snack. Food particles get ground between the aligner and your teeth. You risk cavities and staining.
- Drinking protocol: Water only with aligners in. No coffee, no tea, no red wine, no seltzer. Hot liquids can warp the plastic. Sugary or acidic liquids bathe your teeth in trouble. If you drink something other than water, remove the aligners. If removing them is not practical, use a straw and rinse thoroughly with water afterward. Understand the risk.
- Tray changes: A typical schedule is every 7 days or every 10 days. Some plans use 14-day changes. Your doctor sets the interval. Stick to it rigidly. Do not accelerate changes to speed up treatment. Your bones need time to heal between movements.
- Storage: The aligners live in your mouth or in their case. Never wrap them in a napkin. They will end up in the trash. The case is your constant companion.
What Day One Feels Like
Discomfort is normal. A feeling of pressure, tightness, or a dull ache signals that the aligners are working. The sensation peaks about 8 to 24 hours after inserting a new tray. Over-the-counter pain relievers like acetaminophen help. Avoid ibuprofen if your doctor advises against it; some evidence suggests it may slow tooth movement, though the research is not definitive.
Your speech changes temporarily. You will have a lisp for the first few days. The plastic covering your palate changes your tongue’s reference point. Read aloud, sing in the car, record your voice. Your brain adapts quickly. The lisp resolves within a week or two for most people.
Your mouth produces extra saliva. Your body interprets the tray as a foreign object and ramps up saliva production. This is annoying but temporary. Stay hydrated. The excess saliva normalizes within a few days.
Chapter 7: Life with Aligners — The First Month
The first four weeks separate those who adapt from those who struggle. Build systems. Develop habits. Expect frustration and push through it.
Daily Rhythm and Time Management
Your day revolves around a simple but unforgiving cycle:
Morning: Remove aligners. Place in case. Eat breakfast. Brush teeth thoroughly. Floss. Clean aligners. Reinsert. (Time elapsed: 30 to 45 minutes).
Midday: Remove for lunch. Repeat cleaning protocol. Reinsert. (Another 30 to 45 minutes).
Evening: Remove for dinner. Repeat protocol. Reinsert before bed. (Another 45 to 60 minutes).
This uses your entire daily allotment of non-wear time. Social events, coffee breaks, and spontaneous snacks become logistical negotiations. You learn to plan. You decline food at a party because you just put your trays back in. You swish water aggressively at the bar after a clear liquor soda.
Cleaning Regimens That Actually Work
Aligner hygiene matters. Dirty aligners smell. They look cloudy and stained. They harbor bacteria against your teeth.
For the aligners:
- Mechanical cleaning is most effective. Use a soft, separate toothbrush dedicated to the aligners.
- Use clear, fragrance-free liquid soap or a denture/aligner cleaning solution. Avoid toothpaste; it contains abrasives that micro-scratch the plastic, creating havens for bacteria and causing cloudiness.
- Rinse thoroughly with cool or lukewarm water. Never hot water; the thermoplastic warps.
- Soak daily in aligner cleaning crystals, denture tablets, or a dilute hydrogen peroxide solution for 15-30 minutes to control biofilm.
For your teeth:
- Brush after every meal before reinserting aligners. If you cannot brush, rinse vigorously with water and brush as soon as possible.
- Floss daily. Food trapped between teeth under an aligner guarantees interproximal cavities.
- Consider adding a fluoride mouthwash at a separate time from brushing to strengthen enamel.
Pain and Discomfort: What Is Normal, What Is Not
Normal: Dull, pressure-like ache peaking the day after a tray change. Teeth feel slightly loose to gentle pressure (this is mobility from bone remodeling). Sharp edges on a new tray that irritate your tongue (use the emery board provided or dental wax).
Not Normal: Sharp, persistent, localized pain on a single tooth. Throbbing pain that keeps you awake. Pain that does not decrease after 3-4 days into a tray. Facial swelling. These signal a problem: a tooth not tracking, excessive force, an undiagnosed crack, or an abscess. Call your doctor immediately. Do not “wait and see.”
Chapter 8: Tracking, Attachments, and Mid-Treatment Adjustments
Around week four to six, you return for your first progress check. The doctor assesses whether your teeth are tracking—moving synchronously with the aligner plan.
The Phenomenon of “Not Tracking”
Tracking failure occurs when a tooth lags behind the plastic. You might see a space between the aligner’s edge and the edge of your tooth. A single non-tracking tooth can unravel the entire sequence.
Causes of poor tracking:
- Insufficient wear time
- Not using Chewies (small cylindrical foam cushions you bite on to seat the aligner fully)
- A tooth’s biological resistance to the planned movement
- Inadequate attachment shape or placement
The solution varies. Often, the doctor extends wear time for the current tray and has you aggressively use Chewies. Sometimes, they order a “mid-course correction” or “refinement”—a new scan and a fresh set of aligners to get the case back on track. A skilled doctor knows when to push through and when to re-scan.
Attachments Popping Off
Attachments occasionally debond. If one pops off a back tooth, you might not notice immediately. If the key attachment on a stubborn tooth pops off, that tooth will stop moving. Call your provider’s office. They will schedule a short appointment to replace it. Do not ignore a missing attachment for weeks.
The Mid-Treatment Refinement Scan
Many comprehensive plans include a refinement phase. You finish your initial series of aligners—say, 26 trays. Your doctor takes a new scan. The scan shows some teeth still need tweaking. Another 10-14 trays get ordered. This is normal, expected, and often built into the treatment fee. It is not a failure of the original plan. It is a reflection of biology’s unpredictability.
Chapter 9: Eating, Drinking, and Social Life
Clear aligners are less obtrusive than braces. They are not invisible in a social context, and they demand behavioral changes. Planning ahead prevents most awkward moments.
The Restaurant Protocol
Excuse yourself to the restroom before sitting down. Remove your aligners. Store them safely in your case—never on a napkin beside your plate. An incalculable number of aligners end their lives in restaurant trash bins. After the meal, swish water vigorously in the bathroom. If possible, give your teeth a quick brush or at least pop in some sugar-free gum to lift debris. Reinsert aligners.
Alcohol and Nightlife
You can drink with aligners in, but understand the compromise. Stick to clear, sugar-free liquids: vodka soda, white wine (accepting the acid and staining risk), light beer. Dark beer and red wine will stain your attachments and potentially your aligners. Sugary mixers bathe your teeth in sugar. Always chase alcoholic beverages with water. Remove and brush thoroughly before bed.
Intimate Relationships
Your partner may notice the aligners. The attachments feel rough to the tongue. The aligner edges can be sharp. Honest communication solves this. Remove them if you prefer. Just account for the time out of mouth. Do not let aligners disrupt your romantic life; just plan around them.
Chapter 10: Special Considerations for Adults
Adults make up a huge segment of the market. Your age brings advantages—compliance, motivation—and specific challenges.
Root Resorption and Bone Density
Adult tooth roots are not as resilient as those of teenagers. Orthodontic force applied too aggressively can cause the root tips to shorten—a process called root resorption. Mild resorption is common and harmless. Significant resorption can loosen teeth. An experienced provider plans slower, lighter forces for adults.
Restorative Work and Implants
Crowns and bridges move through bone just like natural teeth, but the aligner’s grip on smooth porcelain is different. Attachments bond less predictably to restorative materials. Your doctor will plan accordingly. Dental implants, however, do not move. Titanium fused to bone stays put. Your aligner plan must work around the implant, using it as an anchor.
Periodontal Maintenance
If you have a history of bone loss, you must maintain rigorous periodontal cleanings—every three months—during orthodontics. Orthodontic force on teeth with reduced bone support requires extremely light, carefully monitored force. Find a periodontist-orthodontist team that communicates.
Chapter 11: Teen Treatment and Compliance Features
Invisalign markets aggressively to teens. The product includes features designed to accommodate growing mouths and potentially unreliable wearers.
Eruption tabs leave space for unerupted second molars to grow in. Compliance indicators are small blue dots on the aligner that fade with wear time, giving parents and doctors a rough objective measure of compliance. These dots are useful, but a determined teen can game them. Parental supervision still matters.
Teens with aligners face the same social pressures as teens with braces. Aligners offer the advantage of fewer dietary restrictions and easier hygiene. The disadvantage is the responsibility: a lost aligner disrupts treatment. A forgotten tray in a lunchbox gets thrown away. Parents should budget for replacement aligner fees.
Chapter 12: The Final Stretch — Finishing and Refinements
You finish your last tray. You look in the mirror and see straight teeth. The journey feels complete. Clinically, it is not.
The Decision to Stop Refining
Perfection is a moving target. You can refine endlessly, chasing a microscopic rotation or a millimeter of space. At some point, the biological cost outweighs the aesthetic gain. Your doctor will guide this decision. A good result is functionally sound, aesthetically pleasing, and stable. An obsessive pursuit of “ideal” can lead to root damage, patient burnout, and diminishing returns.
Bonded Retainer or Removable?
Stability after treatment requires retention for life. Your doctor will recommend one or both:
- Fixed (bonded) retainers: A thin wire bonded to the back of your front six lower or upper teeth. It is invisible, permanent, and eliminates the compliance variable. Flossing requires threaders or a water flosser. They can break, and you might not notice. A broken retainer means teeth shift. Check it daily with your tongue.
- Removable retainers (Vivera, Essix): Clear plastic trays similar to your aligners but thicker and more durable. You wear them nightly, forever.
Most stable protocol: bonded retainers plus removable night-time retainers. Redundancy protects you. If the bonded wire breaks, the removable retainer holds things until you can get the wire repaired.
Chapter 13: Retention — The Forever Phase
You are never truly “done.” Every orthodontist in the world repeats this mantra: “Wear your retainers for as long as you want your teeth to stay straight.” Teeth have elastic memory. Gums, lips, and the tongue exert constant pressure. Aging changes the jawbone and soft tissue. Without retention, teeth shift. It is not a matter of if. It is a matter of when.
Year One Protocol
Wear your removable retainers full-time (or per your doctor’s specific instruction) for the first few months. Then transition to nightly wear. Be obsessive. You just spent thousands of dollars and months of effort. This year cements the stability.
Long-Term Habits
After the first year or two, night-time wear three to five nights a week may suffice for many people. Some need every night. If your retainer feels tight when you put it in, your teeth have already started to shift. Increase wear frequency immediately. Do not let a slightly tight retainer turn into a non-fitting retainer.
Retainer Replacement
Removable retainers wear out. They thin, crack, and lose their grip. Replace them when they show signs of degradation. This costs a few hundred dollars per arch every few years. Budget for this recurring expense. It is far cheaper than re-treatment.
Chapter 14: The Risks, Side Effects, and Complications You Need to Know
All medical procedures carry risk. Informed consent requires acknowledging these openly. Most patients sail through without major issues. Some do not. You need to know the landscape.
Pain: Expect discomfort, sometimes significant, especially during tray changes.
Root Resorption: Shortening of tooth roots, usually asymptomatic and harmless in mild forms; rarely progressive and destructive.
Decay and Decalcification: Inadequate hygiene leads to permanent white spot lesions and cavities around attachments.
Gum Recession: Thin gum tissue can recede when teeth are moved outward. Careful planning minimizes this risk.
TMD Flare-Ups: Jaw joint issues can worsen or improve. No honest orthodontist can guarantee improvement.
Open Posterior Bite: Sometimes the back teeth do not fully settle together after treatment. This often self-corrects with normal chewing after aligners stop, but occasionally requires additional treatment.
Allergic Reaction: Extremely rare, but possible reaction to the aligner material.
Aspiration or Ingestion: Loose attachments or broken pieces of aligner could theoretically be swallowed or inhaled. This is extraordinarily uncommon.
Chapter 15: Alternatives Worth Understanding
You know about braces. Several other aligner systems exist, and understanding them helps you validate your choice.
Lingual Braces
Custom brackets bonded to the back surfaces of your teeth. Truly invisible from the front. Speech and tongue irritation are significant. Hygiene is difficult. Cost is high. But they offer the precision of braces with complete aesthetic concealment.
Other Clear Aligner Brands
Spark, ClearCorrect, SureSmile, and uLab are all competitors. They use different materials and software. The quality of the result depends more on the doctor than the brand. No independent research consistently proves one system superior to another across all case types. Invisalign’s advantage is its vast data set, smart material (SmartTrack), and continuous R&D investment. But a skilled orthodontist can get excellent results with multiple systems.
Chapter 16: The Psychology of Treatment — Patience, Trust, and Communication
You will feel impatient. You will feel frustrated. You will look in the mirror at tray 12 and feel like nothing has changed. You will watch your ClinCheck animation and wonder why real life is slower.
This is normal. The psychological burden of orthodontics is real. Taking weekly progress photos helps. The changes are too gradual to notice daily. Comparing a photo from week one to week twenty reveals the transformation.
Communicate openly with your provider. If something hurts in a worrying way, speak up. If you feel the result is drifting from what you expected, discuss it. A good doctor listens. A dismissive doctor is a red flag, even late in treatment.
Conclusion
Getting Invisalign means committing to a medically supervised process that begins with an honest assessment of your dental health and ends with a lifetime of retention. The journey requires you to find a skilled provider, navigate financial planning, and adapt your daily habits around rigid aligner wear. When you follow the realistic steps outlined here—from consultation to forever retainers—you invest in a stable, functional, and confident smile built on transparency and effort.
Frequently Asked Questions
How long does the entire process take, from first call to starting treatment?
Typically 3 to 6 weeks. After your consultation, the records appointment and ClinCheck planning take two to four weeks. Align Technology then fabricates your aligners and ships them to your provider, which takes another one to two weeks. Complex plans or busy practices may extend this.
Does Invisalign work for severe crowding?
Yes, in experienced hands. Severe crowding often requires IPR, attachments, and sometimes extraction of premolars to create space. An orthodontist, not a general dentist, should manage severe cases. The Invisalign system’s limits have expanded dramatically in recent years.
Will my insurance cover treatment?
Check your specific plan. Orthodontic coverage is typically a separate lifetime maximum, often $1,000 to $2,000 per person. Many plans now cover adults. Have your provider submit a pre-treatment estimate to confirm your exact coverage before you commit.
How much does Invisalign actually cost out of pocket?
For comprehensive treatment in the United States, expect $3,500 to $9,000 before insurance. The average fee falls near the middle of that range. Mild cases cost less. Factors include geographic location, provider specialty, and case complexity.
Can I switch providers mid-treatment?
It is possible but complicated and expensive. You will likely have to pay the new provider a new fee. Your original provider keeps the money for work already completed. Your insurance benefits may not transfer smoothly. Choose your provider carefully the first time.
What happens if I lose an aligner?
Call your provider. A common protocol: if you are near the end of your current tray’s cycle, they may have you move to the next tray. If not, they may order a replacement or have you wear the previous tray while waiting. Always have your most recent tray saved—never throw away the previous set.
Is the treatment painful?
Most patients describe pressure, tightness, and dull aching, particularly during the first few days of a new tray. True pain is less common but possible. Discomfort decreases as you progress through a tray’s cycle. A sharp, persistent, localized pain is not normal and warrants a call to your doctor.
How many attachments will I need?
It depends on your plan’s biomechanics. Complex tooth movements—rotations, extrusions, root torque—require attachments. A typical comprehensive case might involve 10 to 20 attachments. Some are on front teeth. Ask your provider during the ClinCheck review to show you exactly where each attachment goes.
Do I need a bonded retainer after treatment?
Most orthodontists recommend it for the lower front teeth at minimum. These teeth are the most relapse-prone. A bonded retainer combined with a removable night-time retainer provides the highest stability. Discuss the pros and cons with your provider.
Can I whiten my teeth during Invisalign treatment?
Many providers offer whitening gel to use inside your aligners, turning them into whitening trays. This works conveniently. However, attachments do not whiten. Once attachments are removed, you may have slightly darker spots where the composite was bonded. A final professional whitening after attachment removal creates a uniform result.
Additional Resource
American Association of Orthodontists – Find an Orthodontist
Link: https://aaoinfo.org/locator/
Use this tool to locate board-certified orthodontic specialists in your area. Filter by location and specialty credentials to find a provider with the advanced training described in this article.
Disclaimer: This article provides general educational information and does not constitute medical or dental advice. The process described reflects typical experiences in the United States as of 2026. Individual results, costs, and treatment protocols vary. Always consult a licensed dentist or orthodontist for a personalized evaluation before beginning any orthodontic treatment.