How To Keep Dental Implant Caps Clean?
The healing abutment, often called the healing cap or healing cuff, is a small metal or plastic cylinder that screws into the top of a newly placed dental implant. It protrudes through the gum tissue into the mouth. Its purpose is to shape the soft tissue and create a clean, circular access channel to the implant platform. During the months of osseointegration, this healing cap is the only part of the implant complex exposed to the oral environment. Keeping it meticulously clean is non-negotiable. Plaque accumulation around the healing cap can cause peri-implant mucositis, soft tissue inflammation, and even bacterial contamination of the implant platform, potentially compromising osseointegration. This guide provides a precise, actionable protocol for cleaning implant healing caps, the transitional cover screws, and the definitive implant crowns during the vulnerable healing and maintenance phases.
The Healing Abutment: What It Is and Why It Matters
When a dental implant is placed, the surgeon may either submerge the implant completely under the gum tissue (two-stage protocol) or place a healing abutment that extends through the gum (one-stage protocol). In the one-stage approach, the healing abutment is visible in the mouth from the day of surgery. In the two-stage approach, the implant heals buried under the gum, and a second minor surgery exposes the implant and places the healing abutment.
The healing abutment is cylindrical and slightly wider than the implant platform. It forms a soft tissue cuff—a ring of healed gum tissue that will later accommodate the final abutment and crown. The surface of the healing abutment is polished titanium or a smooth plastic material. Despite the smooth surface, a bacterial biofilm can and will form on any oral surface that is not cleaned. The junction between the healing abutment and the gum tissue is a microscopic gap. Bacteria colonizing this area can trigger inflammation, swelling, redness, bleeding, and discomfort. If the inflammation persists, the soft tissue may proliferate, overgrowing the healing cap and requiring surgical excision before the final impression can be taken.
Cleaning the Healing Abutment During the Osseointegration Phase
The healing abutment is present in the mouth for 3 to 6 months, sometimes longer. During this period, the cleaning protocol is gentle but thorough. The goal is to disrupt the biofilm daily without traumatizing the healing soft tissue.
The First Week Post-Surgery
In the immediate postoperative period, the surgical site is tender, and the gum tissue is actively healing. The surgeon provides specific instructions that override any general cleaning advice.
- Do not brush the surgical site directly for the first 5 to 7 days. The blood clot and early granulation tissue must be protected.
- Rinse gently with warm salt water or a prescribed antimicrobial mouthwash. Chlorhexidine gluconate 0.12% is commonly prescribed. Rinse with approximately 15 milliliters for 30 seconds, twice daily. Do not swish vigorously; allow the rinse to bathe the area passively.
- Avoid using a water flosser or any mechanical cleaning device near the implant during the first week. The pressure can dislodge the healing tissues.
After the First Week: Initiating Gentle Mechanical Cleaning
Once the surgeon confirms that initial healing has progressed, gentle mechanical cleaning of the healing abutment begins. The healing abutment head is accessible above the gumline.
- Use an ultra-soft, compact-headed toothbrush. A post-surgical toothbrush with extra-soft bristles, or a pediatric toothbrush, is ideal. Gently brush the exposed top and sides of the healing abutment with a circular or rolling motion. Do not scrub the gum tissue. The goal is to wipe the smooth metal or plastic surface clean of plaque.
- Brush the adjacent teeth meticulously. Plaque from adjacent natural teeth can migrate to the implant site. Keep the entire quadrant clean.
Interdental Cleaning Around the Healing Abutment
The healing abutment is surrounded by a sulcus, a shallow groove. Plaque can accumulate in this sulcus and on the sides of the abutment below the gumline.
- Use an interdental brush with a fine diameter. Select a brush that passes gently between the healing abutment and the adjacent tooth without forcing. Insert the brush and lightly clean the side of the abutment. Do not push the brush deep into the sulcus; the goal is to clean the visible surface and the immediate subgingival area gently.
- A water flosser on the lowest pressure setting can be introduced after the second or third week, with surgeon approval. Use a non-metal tip, such as a soft rubber irrigator tip. Direct the stream at the junction of the healing abutment and the gum tissue. The pulsating water flushes plaque and food debris from the sulcus. Keep the pressure low to avoid tissue detachment.
Cleaning the Cover Screw (Submerged Implant)
In the two-stage protocol, the implant is completely submerged under the gum tissue. A small, flat cover screw seals the implant platform. The gum tissue is sutured closed over it. There is nothing to clean in the mouth during the submerged healing phase. The site heals undisturbed.
At the second-stage surgery, the surgeon makes a small incision to expose the cover screw, removes it, and places the healing abutment. From this point, the cleaning protocol for the healing abutment applies. The cover screw itself requires no patient cleaning because it is never exposed to the oral environment while in function.
Cleaning the Definitive Implant Crown and Abutment
After osseointegration is confirmed, the healing abutment is removed, and the final abutment and crown are placed. The cleaning protocol shifts to long-term maintenance. The definitive restoration has contours that are more complex than the simple cylinder of the healing abutment. The junction between the crown margin and the abutment, and the abutment-implant interface, are plaque-retentive areas.
Daily Home Care for the Implant Crown
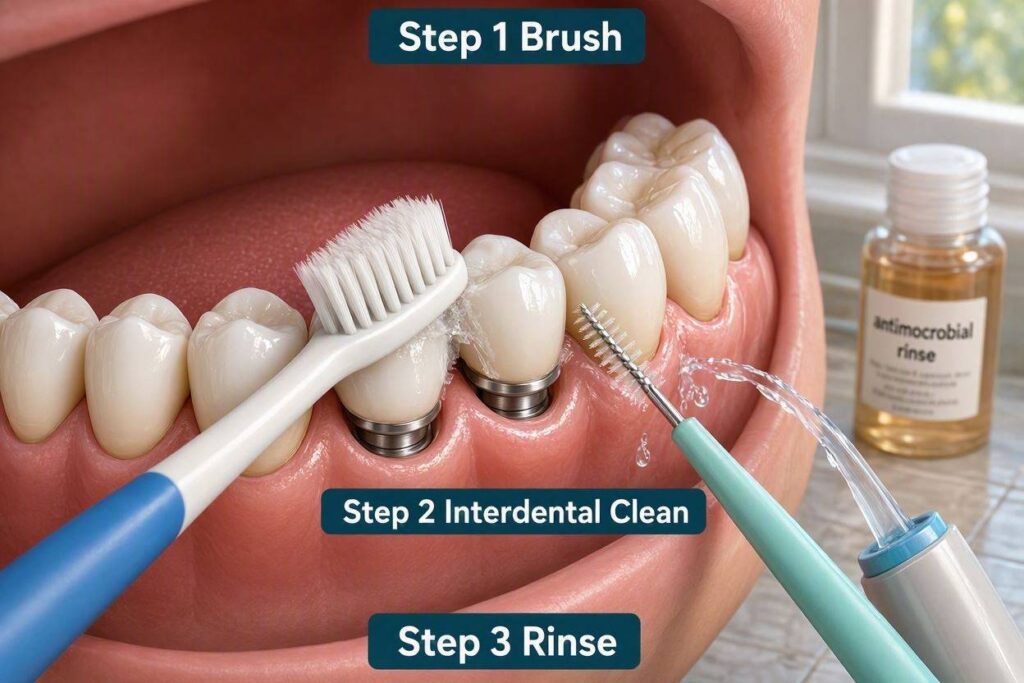
- Soft-bristled electric or manual toothbrush: Angle the bristles at 45 degrees into the sulcus around the implant crown. Brush the facial, lingual, and occlusal surfaces thoroughly. Spend extra time at the gum margin.
- Interdental brush: The most critical tool. Select the largest brush that fits comfortably in the embrasure spaces on either side of the implant crown. Clean the mesial and distal surfaces of the abutment and the underside of the crown margin. The curve of the brush should adapt to the concave emergence profile of the crown.
- Shred-resistant PTFE floss or implant-specific floss: If the interproximal space is too tight for an interdental brush, use floss. Wrap it around the crown in a C-shape and gently slide it below the gumline, polishing the abutment surface.
- Water flosser with a non-metal tip: Use daily on a medium pressure setting. Direct the stream along the gumline and into the embrasures. The water flosser reaches areas that mechanical brushes and floss cannot.
The Cement Hazard: Why Residual Cement Must Be Avoided
If the implant crown is cemented, there is a risk of residual cement extruding into the peri-implant sulcus. Even microscopic amounts of cement below the gumline are a potent plaque trap and a direct cause of peri-implantitis. The dentist must meticulously remove all excess cement at the delivery appointment, using a dental explorer, floss, and radiographic verification.
As a patient, if you feel a rough, gritty, or sharp edge at the gumline of your new implant crown, or if the gum tissue becomes persistently inflamed, red, and bleeds despite good cleaning, residual cement is a prime suspect. Return to your dentist for an evaluation. The cement must be completely removed. In many practices, screw-retained crowns are preferred specifically to eliminate the cement risk.
The Role of Antimicrobial Rinses
Antimicrobial mouthwashes are adjuncts to mechanical cleaning, not substitutes. They reduce the bacterial load in the mouth but cannot penetrate and disrupt an established biofilm.
Chlorhexidine Gluconate
Chlorhexidine is a potent prescription antimicrobial that binds to oral surfaces and provides sustained release over hours. It is useful for short-term use: the initial postoperative period after implant placement or second-stage surgery, and acute flare-ups of peri-implant mucositis. Long-term use causes brown staining of teeth and tongue, alters taste, and can increase calculus formation. It is not a maintenance mouthwash.
Non-Alcoholic, Non-Staining Daily Rinses
Over-the-counter rinses containing chlorine dioxide, stabilized hydrogen peroxide, or essential oils (alcohol-free versions) can be used as part of the daily cleaning routine. Adding a small amount to the water flosser reservoir provides a low-level antimicrobial flush through the peri-implant sulcus. This is safe for indefinite daily use.
Professional Maintenance: The Hygienist’s Role
The patient’s home care is the daily defense. The professional maintenance visit is the periodic inspection and deep clean. For implant patients, the recall interval is typically every 3 to 6 months.
Peri-Implant Probing
The hygienist uses a specialized plastic or titanium-coated periodontal probe to measure the depth of the peri-implant sulcus. The probing depth, bleeding on probing, and any purulence (pus) are recorded. These measurements are compared to the baseline taken at the time the crown was delivered. An increasing probing depth or the onset of bleeding indicates a problem that requires intervention.
Professional Debridement
The hygienist removes any mineralized calculus deposits (calculus) and biofilm from the implant surfaces. Metal instruments are contraindicated because they scratch the titanium, creating micro-retentive grooves that accelerate plaque accumulation. The hygienist uses plastic, carbon-fiber, or titanium-coated curettes specifically designed for implant maintenance. An ultrasonic scaler with a non-metal tip and a polishing cup with a non-abrasive paste completes the cleaning.
Patient Education Reinforcement
The professional maintenance visit is a teaching opportunity. The hygienist observes the patient’s home care technique, uses disclosing solution to reveal missed plaque, and recommends adjustments to the tools or technique.
Conclusion
Keeping dental implant caps clean during the healing phase requires a gentle but disciplined protocol: avoiding the surgical site for the first week, then using an ultra-soft toothbrush, a fine interdental brush, and a low-pressure water flosser to disrupt biofilm on the healing abutment without traumatizing the healing soft tissue. For definitive implant crowns, the daily routine centers on an interdental brush to clean the critical abutment-crown-gum interface, shred-resistant floss, and a water flosser, with particular vigilance for residual cement in cemented restorations. Professional maintenance every 3 to 6 months using non-metal instruments is the essential complement to home care, ensuring the peri-implant tissues remain healthy for decades.
Frequently Asked Questions
Can I use an electric toothbrush on my healing abutment?
Yes, but only after the surgeon clears you for mechanical cleaning (typically after the first week). Use an electric toothbrush with a soft or extra-soft brush head and a pressure sensor. Keep the brush on low speed and gently contact the top of the healing abutment. Do not press into the gum tissue. The oscillating action effectively polishes the abutment surface.
My healing abutment feels loose. What should I do?
Call your implant dentist immediately. A loose healing abutment can allow bacteria and debris into the implant connection. Do not attempt to tighten it yourself. If it falls out completely, retrieve it and bring it to the appointment. The dentist will clean the implant well, place a new healing abutment, and ensure it is torqued to the correct specification. A short period without the healing cap is manageable, but the tissue can begin to close over the implant within hours, so prompt attention is important.
Is bleeding around my healing abutment normal?
Mild bleeding during brushing in the first week or two can occur as the tissue heals. Persistent bleeding after the first month, or bleeding on gentle touch, indicates inflammation—peri-implant mucositis. The plaque biofilm is not being adequately disrupted. Increase the frequency and thoroughness of your cleaning, and inform your dentist at your next visit. Early mucositis is reversible.
Can I use a water flosser on a high setting to clean better?
No. High pressure can detach the healing soft tissue from the abutment surface, disrupting the formation of the soft tissue seal. It can also force bacteria deeper into the sulcus. Use the lowest effective pressure setting. The goal is a gentle lavage, not a power wash. When in doubt, use a lower setting.
Additional Resource
The International Team for Implantology (ITI) provides patient-focused educational materials at iti.org. Their “Patient Information” section includes illustrated guides on implant maintenance, the correct use of interdental brushes around implant restorations, and the role of professional maintenance in preventing peri-implant disease. The ITI is a leading global academic organization in implant dentistry, and its recommendations are evidence-based and authoritative.