How to Take Care of Dental Implants
A dental implant is a triumph of modern medicine. It feels, functions, and looks like a natural tooth. This incredible mimicry can create a dangerous illusion: that an implant needs no special attention. The truth is different. A natural tooth is connected to your body by a living, bleeding, defensive periodontal ligament. An implant is anchored directly to the bone. This bond is incredibly strong, but it lacks the immune-surveillance network of a natural root. The soft tissue seal around an implant is more vulnerable to bacterial penetration. Taking care of a dental implant is a deliberate, daily act of biofilm disruption. It is not difficult, but it is specific. Neglect does not cause a cavity, as an implant cannot decay. Neglect causes peri-implant mucositis, which, left unchecked, silently progresses to peri-implantitis, a destructive, bone-eating infection that is the leading cause of late implant failure. This guide is your definitive manual for the home care rituals, the professional tools, and the disciplined hygiene philosophy that will make your implant a lifelong companion.
The Fundamental Difference: Tooth vs. Implant
To care for an implant, you must first respect the difference. A natural tooth has a periodontal ligament, a complex mesh of collagen fibers that inserts into the root cementum on one side and the alveolar bone on the other. This ligament has a rich blood supply. When bacteria invade the gum sulcus of a natural tooth, the body’s immune response sends a flood of white blood cells, and the tissue bleeds, signaling inflammation. The ligament itself is a barrier. An implant has no ligament. The titanium oxide surface has a direct, rigid, microscopic bond with the bone. The gum tissue around it forms a cuff of collagen fibers that run parallel to the implant surface, not perpendicularly inserting into it like they do on cementum. The blood supply to this peri-implant mucosa is far less. When bacteria penetrate this weaker, parallel-fiber seal, the immune response is slower, and the infection can spread directly down the implant surface to the bone crest. Your hygiene routine must compensate for this anatomical vulnerability.
The Daily Home Care Toolkit
Your home care for a single implant or a multi-implant bridge is not a one-brush-fits-all affair. It is a layered toolkit, and you must use the right tool for the right surface.
The Power Toothbrush: The Foundation
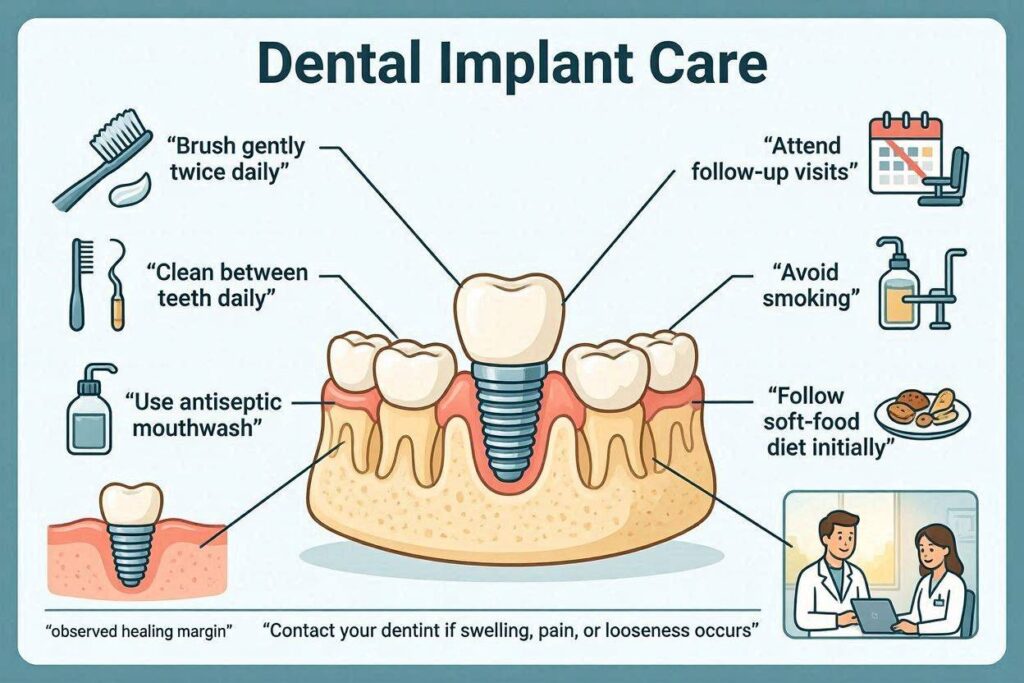
A high-quality sonic or oscillating-rotating electric toothbrush is not a luxury. It is the foundation. The mechanized bristle movement disrupts plaque biofilm more effectively than a manual brush. Use it for a full two minutes, covering all natural teeth and the implant crown. Pay particular attention to the gum line. Angle the brush head at 45 degrees to the gum, so the bristles gently tuck into the sulcus around the implant crown. Let the brush do the work. You are not scrubbing; you are guiding. Scrubbing can traumatize the fragile gum cuff and cause recession, exposing the implant abutment or, worse, the implant threads.
Interdental Brushes: The Side-Surface Cleaners
Flossing a single implant crown is excellent, but for implant bridges, interdental brushes are more effective. An interdental brush is a tiny, cone-shaped or cylindrical brush on a thin wire. You must select the correct size. It should pass through the space between the implant and the adjacent tooth with slight resistance. Push it gently from the cheek side, then from the tongue side, cleaning the underside of the connector and the abutment surface. This physically scrapes the biofilm from the vulnerable areas under the bridge where a toothbrush cannot reach. Do this once a day.
The Floss Protocol: Wrapping the Implant
For a single implant crown, flossing is mandatory. Use a specialized implant floss, which is thicker and fluffier, or tape-style floss. Criss-cross the floss around the implant crown, forming a C-shape. Slide it down under the gum line on one side, rub it up and down against the abutment surface, and then cross it to the other side and repeat. You are not just popping the floss in and out. You are mechanically cleaning the abutment surface in the sulcus.
The Water Flosser: The Sulcus Irrigator
A water flosser with a non-metal, soft plastic tip is a powerful adjunct. Set it to a low-to-medium pressure setting. High pressure can detach the fragile soft tissue seal. Point the tip at the gum line and trace around the implant, flushing out food debris and loosely adherent plaque from the sulcus. The water flosser is not a replacement for physical brushing and flossing. It is an irrigating rinse.
Cleaning a Full-Arch Implant Bridge (All-on-4)
A full-arch, screw-retained bridge requires a more involved, multi-step daily routine. This is a fixed restoration, meaning you cannot remove it. The dentist unscrews it at your professional maintenance visit. Your daily cleaning must manage the complex geometry under the bridge.
- The Super Floss or Floss Threader: You must thread specialized, stiff-tipped super floss under the bridge frame, passing it between the implants. Once threaded, you use the spongy, fuzzy part of the floss to pull back and forth under the entire length of the bridge, polishing the tissue-facing surface and the abutment surfaces. This is a learned skill, and it takes practice and patience.
- The End-Tuft Brush: A small, narrow brush with a tuft of bristles at the tip. You use it to clean the distal (back) surface of the very last implant and the area where the bridge meets the gum.
- The Rubber Tip Stimulator: A soft, cone-shaped rubber tip. Use it to gently trace the gum line, disorganizing the plaque at the very margin of the tissue.
- The Non-Alcohol Antimicrobial Rinse: A daily rinse with a chlorhexidine-free, non-alcohol mouthwash can help reduce the bacterial load. Alcohol dries the oral mucosa and is not recommended for long-term use around implants.
Professional Maintenance: The Non-Negotiable Recall Visit
Your daily home care is essential, but it is not sufficient. You must see your dentist or dental hygienist for a professional implant maintenance visit. The interval for a healthy implant patient is every six months. For a patient with a history of periodontitis or peri-implantitis, the interval is every three to four months. This is not a standard dental cleaning. It is a specific, coded procedure.
The hygienist will use special non-metallic, plastic, or titanium scalers to clean the implant abutment and the surrounding gum. Metal scalers will scratch the titanium surface, creating microscopic grooves where bacteria can hide. The hygienist will also use a glycine powder air polisher, a device that sprays a fine, gentle powder of glycine (an amino acid) mixed with water. This powder is soft enough not to damage the titanium surface but abrasive enough to efficiently remove the biofilm. The hygienist will meticulously probe around the implant with a thin, plastic, flexible probe. They measure the depth of the peri-implant sulcus. Healthy depths are 3mm or less, with no bleeding. Bleeding on gentle probing is the first clinical sign of peri-implant mucositis. A deepening pocket and bleeding indicate peri-implantitis. This probing data is recorded at every visit and is the early-warning system that triggers intervention before bone loss occurs.
Lifestyle Factors That Directly Impact Implant Longevity
Your daily habits are a direct chemical and mechanical input into the implant environment.
- Smoking: Tobacco smoke is a potent vasoconstrictor. It strangles the blood supply to the oral mucosa, dramatically reducing the tissue’s capacity to fight infection and heal. Smokers have a significantly higher rate of peri-implantitis and implant failure. The best thing you can do for your implant and your life is to quit.
- Bruxism (Grinding and Clenching): An implant does not have the shock-absorbing ligament of a natural tooth. All the force of your bite is transmitted directly to the bone. Grinding or clenching at night applies pathological forces that can fracture the crown, loosen the abutment screw, or, in the worst case, fracture the implant itself. If you have been diagnosed with bruxism, your dentist must fabricate a custom, hard, full-coverage occlusal guard. You must wear it every night.
- Diet: The implant crown is immune to sugar because bacteria cannot dissolve ceramic or titanium. However, the gum tissue around the implant is not immune to the systemic inflammation caused by a high-sugar, pro-inflammatory diet. A diet rich in antioxidants, vitamin C, and omega-3 fatty acids supports a healthy oral microbiome and a robust immune response.
The Early Signs of Trouble You Must Recognize
You are the first line of defense. Between professional visits, you must be vigilant. The signs of trouble are subtle. Red, puffy, or tender gums around the implant, distinct from the rest of your healthy gum tissue. Bleeding when you brush or floss around the implant. A bad taste or persistent bad breath that seems to emanate from the implant area. Pus or a small pimple on the gum, called a fistula, indicating an abscess. A change in how the implant tooth feels—a sense of slight movement, or a feeling of pressure or dull ache. If you notice any of these, contact your implant dentist immediately. Early peri-implant mucositis is reversible with a professional cleaning and improved hygiene. Peri-implantitis with bone loss is a surgical disease that requires intervention.
The Travel and Special Occasion Protocol
When you travel, pack your full implant hygiene toolkit. Do not rely on a hotel toothbrush. A water flosser with a travel case and a set of interdental brushes take up minimal space. If you are sick with a cold or flu, your immune system is distracted. Be extra diligent with your implant hygiene. Rinse with a gentle saline solution to soothe the tissues and reduce the bacterial load. If you are undergoing any major medical procedure that requires prophylactic antibiotics, inform your physician about your dental implants. While late infection of an osseointegrated implant from a distant bacteremia is extremely rare, your medical team should know.
Conclusion
Taking care of dental implants requires a disciplined, multi-tool daily routine that physically disrupts the bacterial biofilm on the crown, abutment, and in the sulcus, using an electric toothbrush, specialized floss or interdental brushes, and a water flosser. This home care must be reinforced by a professional maintenance visit every three to six months, where a hygienist uses non-metallic scalers and glycine powder air polishing to remove calculus without scratching the titanium, and gently probes to monitor the health of the peri-implant tissue. Avoiding smoking, managing a grinding habit with a night guard, and recognizing the early warning signs of red, bleeding gums are the final, critical pillars of a lifetime of implant health.
Frequently Asked Questions
Can I use a regular metal scaler on my implant at home?
Absolutely not. You must never put a metal instrument on your implant crown or abutment. At home, use nylon or plastic-coated interdental brushes and plastic scalers if needed. Metal scratches the titanium and zirconia surfaces, creating a microscopic haven for bacteria and permanently roughening the surface.
My implant feels plaque-free. Why do I still need professional cleanings?
Because you cannot remove the hard, mineralized deposit called calculus. Even with perfect brushing, the minerals in your saliva will precipitate into calculus on the implant abutment, just as they do on a natural tooth. This calculus provides a rough, sheltered surface for bacteria. Only professional, non-metallic instruments can remove it safely.
How long can I expect my dental implant to last with good care?
With meticulous home care and consistent professional maintenance, a modern dental implant has a documented long-term survival rate of over 95% at 20 years. The implant fixture itself can last a lifetime. The prosthetic components—the crown and the abutment screw—are the mechanical parts that may require replacement over decades, just as a car tire wears. The biological foundation, the implant-bone interface, is yours to protect.
Can teeth whitening products damage my implant?
No, whitening gels (hydrogen peroxide or carbamide peroxide) will not damage the titanium implant or the ceramic crown. However, they will also not whiten the implant crown. The porcelain or zirconia color is intrinsic and cannot be changed by bleaching. If you whiten your natural teeth, you may create a mismatch, and the implant crown may need to be remade to match the new shade.
Additional Resource:
For further reading on the long-term maintenance of dental implants, explore the patient resources provided by the International Team for Implantology at www.iti.org.
Disclaimer: The hygiene recommendations in this article are general best-practice guidelines. Your specific restoration, gum type, and medical history may require a customized care plan. Always follow the individualized instructions provided by your implant surgeon and restorative dentist.