Torque Wrench for Dental Implants
If you have ever placed a crown on a dental implant or simply tightened a screw, you already know that feeling. That moment when you are not sure if you have turned enough. Or worse, if you have turned too much.
In the world of dental implants, precision is not just a luxury. It is a requirement for long-term success. And that is exactly where a torque wrench for dental implants becomes the most important tool in your clinical setup.
But let us be honest. Many professionals still rely on “hand feel” or basic ratchets. And for a long time, that worked. But modern implant systems have very specific tolerances. Too much torque can strip the screw or fracture the implant body. Too little torque leads to screw loosening, prosthetic instability, and eventually, bone loss.
This guide will walk you through everything you need to know about torque wrenches in implant dentistry. From how they work to how to choose one, from calibration to common mistakes. No fluff. No copied content. Just practical, honest, and original information you can use starting tomorrow morning.
What Exactly Is a Torque Wrench for Dental Implants?
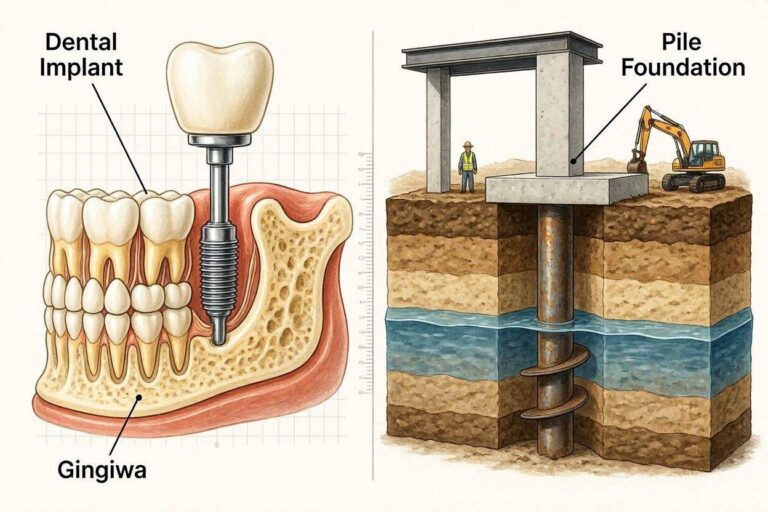
A torque wrench is not a regular screwdriver. It is not a ratchet. It is a precision instrument designed to apply a very specific amount of rotational force to an implant screw or abutment screw.
Think of it this way. When you tighten a screw on a bicycle, you turn until it feels tight. That is fine for a bike. But inside a patient’s jawbone, “feels tight” is not a measurable unit. A torque wrench measures force in Newton-centimeters (Ncm) or inch-pounds (in-lb). In implant dentistry, we almost always use Ncm.
Most implant systems require tightening values between 10 Ncm and 35 Ncm for abutment screws. Healing abutments might need only 10 to 15 Ncm. Final prosthetic screws often need 25 to 35 Ncm. Some wide-diameter implants or specific systems go up to 45 Ncm, but that is less common.
The torque wrench gives you a mechanical or digital confirmation that you have reached the exact value prescribed by the implant manufacturer. No guessing. No overtightening. No loose screws coming back to haunt you in six months.
Important note: Never use a torque wrench designed for automotive or industrial use on dental implants. Those tools operate at much higher torque values—often in foot-pounds—and will instantly destroy an implant screw or fracture the implant.
Why Standard Ratchets Are Not Enough
Let me be direct. Using a simple friction ratchet or a non-calibrated driver is a clinical risk. I understand why some clinicians do it. It is faster. It feels simpler. And for temporary restorations, maybe it works fine.
But for definitive prostheses, the risks are real.
Here is what happens when you do not use a torque wrench:
- Undertightening: The screw does not achieve enough clamp load. Over time, chewing forces cause micromotion. The screw backs out. The crown becomes loose. The patient notices clicking or movement. You have to unscrew, replace the screw, and retorque. Sometimes the abutment damages the implant interface.
- Overtightening: This is worse. You can strip the internal threads of the implant. You can fracture the abutment screw. You can crack the implant body itself. In some cases, the implant cannot be retrieved without surgery. The patient loses the implant. You lose time, money, and trust.
A torque wrench eliminates the guesswork. It gives you repeatable, verifiable results.
And here is another point. In many countries, dental regulatory bodies expect documented torque values in the patient record. If you ever face a legal claim related to a failed implant, not having a torque record puts you in a weak position. The torque wrench is not just clinical best practice. It is also risk management.
Types of Torque Wrenches Used in Implant Dentistry
Not all torque wrenches are the same. You will find several types on the market. Each has strengths and weaknesses. The right choice depends on your budget, clinical volume, and personal preference.
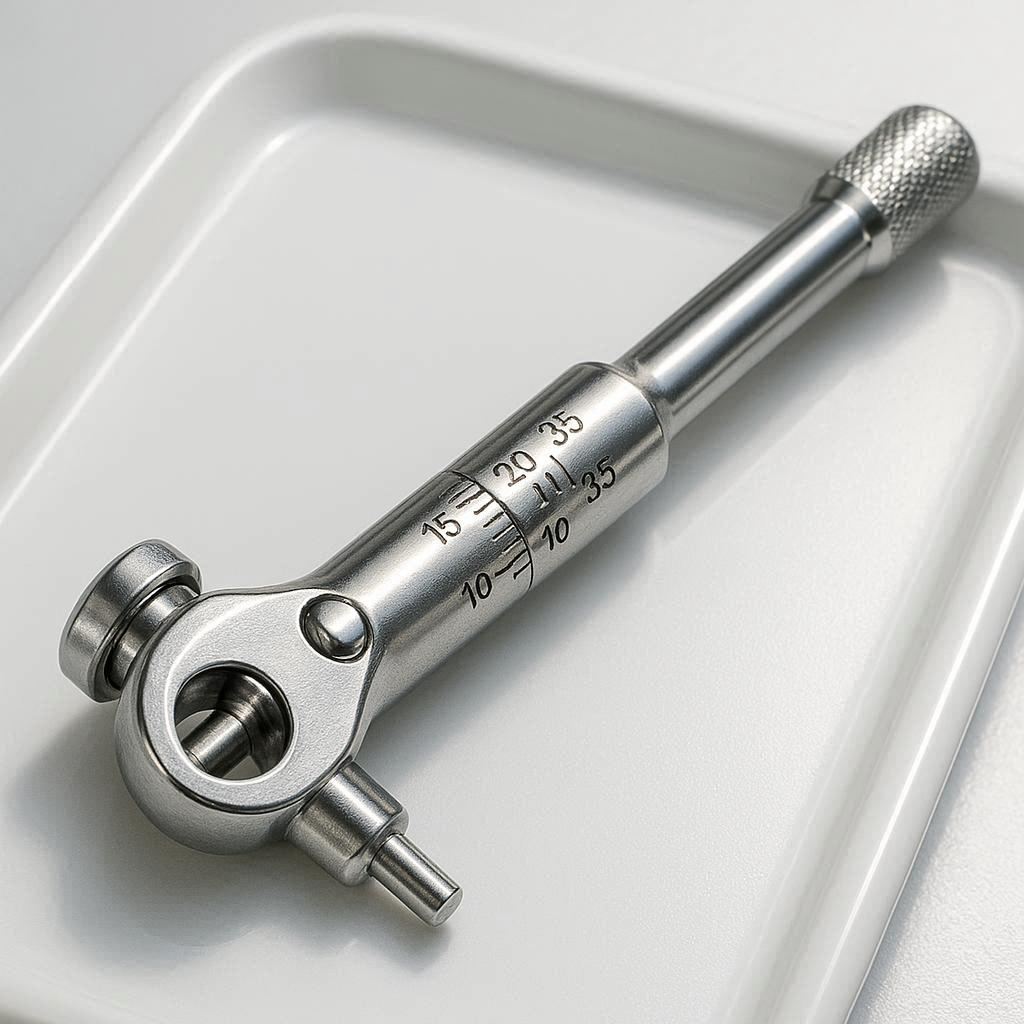
Manual Click-Type Torque Wrenches
This is the most common type in dental clinics. The wrench has an internal spring mechanism. You set the desired torque value on a scale. As you tighten the screw, the wrench applies force. When you reach the preset value, the wrench produces an audible click and a tactile break in the handle.
Advantages:
- Affordable. Most cost between $200 and $600.
- No batteries or electronics to fail.
- Simple to use and train assistants.
- Very reliable if calibrated yearly.
Disadvantages:
- You need a separate wrench for different torque ranges or interchangeable heads.
- The click can be subtle in a noisy operatory.
- You must reset the wrench to zero after each use to preserve the spring.
Beam-Type Torque Wrenches
These are simpler tools. They have a long handle and a fixed head. A pointer moves along a scale to show real-time torque as you turn. You watch the pointer and stop when you hit the target value.
Advantages:
- Very durable. Almost nothing to break.
- No calibration required if stored properly.
- Inexpensive. Often under $150.
Disadvantages:
- You have to watch the scale while tightening. Awkward positioning makes this hard.
- Less accurate in clinical settings because you cannot see the scale clearly from all angles.
- Mostly used in lab settings, not directly on patients.
Digital Torque Wrenches
These are the high-end option. A digital torque wrench uses a strain gauge and a microprocessor. It displays torque in real-time on an LCD screen. Many also record peak torque and store data.
Advantages:
- Extremely accurate. Often within 1% of the displayed value.
- You can see torque build-up in real time.
- Data storage for compliance and record-keeping.
- Some models connect to practice management software.
Disadvantages:
- Expensive. Prices range from $800 to over $2,500.
- Batteries die at inconvenient times.
- Electronics can fail if dropped or exposed to moisture.
- Requires periodic electronic calibration.
Hydraulic Torque Wrenches
These are rare in general implant dentistry. They use hydraulic pressure to apply torque. You might see them in research settings or very high-end prosthetic labs. For routine clinical use, they are overkill. Expensive, bulky, and unnecessary.
Which One Should You Choose?
| Type | Accuracy | Cost | Ease of Use | Best For |
|---|---|---|---|---|
| Click-type | ±6% | $ | Easy | Most general dentists |
| Beam-type | ±4% | $ | Moderate | Lab use, backups |
| Digital | ±1% | $$$ | Very easy | High-volume clinics, specialists |
| Hydraulic | ±2% | $$$$ | Complex | Research, industrial |
For 90% of implant dentists, a high-quality click-type torque wrench from a reputable brand is the best balance of cost and performance. Digital is nice to have but not essential. Beam-type is fine for a backup or for the lab.
How to Use a Torque Wrench Correctly
Buying the right tool is only half the battle. Using it correctly is what matters.
Here is a step-by-step protocol that works for most implant systems. Always check your specific implant manufacturer’s instructions first.
Step 1: Select the Correct Driver Tip
Most implant systems use a specific driver. Hex, star, or tri-lobe. Make sure your torque wrench accepts interchangeable tips. The tip must seat fully into the screw head. Partial engagement strips screws.
Step 2: Set the Desired Torque Value
If using a click-type wrench, unlock the handle. Rotate the scale until the zero mark aligns with your target torque. For example, 25 Ncm. Lock the handle. For digital wrenches, use the buttons to set the target value. The device will beep or vibrate when reached.
Step 3: Insert the Driver and Align
Place the driver tip into the screw head. Keep the wrench handle perpendicular to the screw axis. Angled application reduces accuracy. Maintain a straight line from handle to screw.
Step 4: Apply Steady, Slow Pressure
Do not jerk or snap the wrench. Apply a smooth, continuous turning force. The speed matters. Too fast, and you overshoot. Too slow, and the screw does not seat properly. Aim for about one second per 5 Ncm.
Step 5: Listen and Feel for the Signal
For click-type wrenches, you will feel a distinct break in the handle and hear a click. Stop immediately. Do not continue turning. The click means you have reached the target. Turning further overtightens the screw.
For digital wrenches, stop when you hear the beep or see the display flash.
Step 6: Record the Value
Write down the torque value and the date in the patient chart. Some digital wrenches store this automatically. For click-type, manual recording is fine. This creates a verifiable record of proper tightening.
Step 7: Reset the Wrench to Zero
This is critical for click-type wrenches. After use, turn the scale back to zero. Storing a click-type wrench under tension weakens the spring over time. A weakened spring gives false low torque readings. Reset it every single time.
Torque Values for Common Clinical Situations
Manufacturers provide specific torque recommendations. Do not guess. Do not use “standard” values across different brands. A Straumann screw is not a Nobel Biocare screw. They have different geometries, thread pitches, and materials.
Here are typical ranges. Use them only as a reference. Always verify with your implant system’s manual.
| Clinical Situation | Typical Torque (Ncm) |
|---|---|
| Healing abutment (hand-tight plus 1/8 turn) | 10–15 |
| Open tray impression coping | 10–15 |
| Closed tray impression coping | 5–10 |
| Abutment screw (single crown) | 20–35 |
| Abutment screw (bridge) | 25–35 |
| Central screw for stock abutment | 30–35 |
| Final prosthetic screw (prefabricated crown) | 15–25 |
| Base abutment for screw-retained crown | 25–35 |
| Temporary cylinder | 10–15 |
| Scan body for digital impression | 5–10 |
Some newer systems use a “two-stage torque” protocol. You tighten to 15 Ncm, wait 30 seconds, then tighten to 30 Ncm. This allows the screw threads to settle. Check if your system recommends this.
Important note: Never exceed 45 Ncm on any dental implant screw. Above this, the risk of screw fracture or implant body distortion rises dramatically. If a manufacturer recommends 45 Ncm or higher, verify directly with their technical support before proceeding.
Calibration: The Most Overlooked Maintenance Task
Here is a hard truth. Most torque wrenches in dental clinics are out of calibration.
Not a little. A lot.
Studies have shown that click-type torque wrenches used daily can drift by 15% to 20% within 18 months without calibration. That means when you think you are applying 30 Ncm, you might actually be applying 24 Ncm or 36 Ncm. Both are outside the safe window.
Calibration is not optional. It is mandatory.
How Often Should You Calibrate?
- Click-type wrenches: Every 12 months or every 5,000 cycles, whichever comes first.
- Digital wrenches: Every 12 months as a minimum. Some manufacturers recommend every 6 months.
- Beam-type wrenches: Every 24 months, but verify by checking zero and scale alignment.
If you drop a torque wrench on the floor, calibrate it before using it again. Dropping can shift internal components.
How Is Calibration Done?
A calibration service compares your wrench’s output to a certified reference. They apply known loads and measure the wrench’s response. If it is out of tolerance, they adjust it. If it cannot be adjusted, they replace it.
Calibration services are available from:
- Implant manufacturer service centers
- Third-party dental equipment repair companies
- Torque tool calibration laboratories (found in industrial cities)
Cost is typically $50 to $150 per wrench. Worth every penny compared to a failed implant.
Can You Calibrate In-House?
Yes, but only for verification, not for certification. You can buy a digital torque sensor and test your wrench. This tells you if it is accurate. But you cannot legally adjust most click-type wrenches yourself without specialized equipment. For compliance, send it to a certified lab.
Common Mistakes Clinicians Make
Even experienced implant dentists make errors with torque wrenches. Here are the most frequent ones I see in teaching and practice.
Mistake 1: Not Zeroing the Wrench After Use
This is number one. I walk into clinics and pick up click-type wrenches left at 30 Ncm from last week. That spring has been under tension for days. The calibration is now compromised. Zero it. Every time. Make it a habit like washing your hands.
Mistake 2: Using the Wrong Driver Tip
A worn driver tip rounds off screw heads. A mismatched tip does not engage fully. The result? Stripped screws that are almost impossible to remove. Replace driver tips every 50 to 100 uses or immediately if they show wear.
Mistake 3: Applying Force at an Angle
The torque wrench assumes the force is perpendicular to the screw. If you hold it at an angle, you lose mechanical advantage. You might overtighten trying to compensate. Always keep the handle in line with the screw axis.
Mistake 4: Continuing Past the Click
The click is the stop signal. Some clinicians keep turning “just a little more” because they think the click is a warning. It is not. The click is the limit. Stop immediately.
Mistake 5: Using a Torque Wrench for Removal
Torque wrenches are designed for tightening, not loosening. Using them to remove screws damages the internal mechanism. For removal, use a standard ratchet or a screwdriver. Only use the torque wrench for final tightening.
Mistake 6: Ignoring Manufacturer-Specific Values
I have seen dentists use 30 Ncm for every screw regardless of brand. That is dangerous. Some systems require 15 Ncm for abutments. Others require 35 Ncm. Read the manual. Keep a reference chart in your operatory.
Digital vs. Manual: A Practical Comparison
Let me help you decide which path to take.
Choose a Manual Click-Type Wrench If:
- You place fewer than 100 implants per year.
- You have a limited budget.
- You trust your team to reset the wrench to zero.
- You are willing to send it for annual calibration.
- You do not need electronic records.
Choose a Digital Wrench If:
- You place over 200 implants per year.
- You want real-time torque graphs for difficult cases.
- You need automatic record-keeping for legal protection.
- You have the budget ($1,000+).
- You are willing to manage batteries and electronics.
What I Personally Recommend
Start with a quality manual click-type wrench from a major implant brand or a dedicated torque tool company. Use it for one year. If you find yourself wanting data storage or real-time feedback, upgrade to digital. Keep the manual as a backup. Two wrenches are better than one.
How to Choose a Torque Wrench: Buyer’s Checklist
When you are ready to buy, use this checklist.
1. Does it work with your implant system?
Check the connection type. Most modern torque wrenches use an ISO 1797-1 connection for interchangeable tips. Avoid proprietary connections unless you only use one implant brand.
2. What is the torque range?
Look for a wrench that covers 5 Ncm to 45 Ncm at minimum. Some wrenches start at 10 Ncm. That is fine. But you will need 5 Ncm for scan bodies and copings, so consider buying a low-range wrench as well.
3. Is the scale easy to read?
Poorly marked scales cause errors. Look for clear laser-etched markings. Digital displays should be bright and contrasty.
4. Does it come with a calibration certificate?
New wrenches should include a certificate of calibration from the factory. This is not a guarantee of long-term accuracy, but it shows the manufacturer cares about quality.
5. Is replacement service available?
Can you buy new springs? Can you get replacement driver tips? Does the company offer calibration services? If not, keep looking.
6. What is the warranty?
Reputable brands offer 1 to 2 years on mechanical parts. Lifetime warranties are rare but exist on some beam-type wrenches.
Recommended Brands (Based on Clinical Experience)
I do not take sponsorships. These are brands I have used or seen used reliably in practice.
- W&H – Excellent click-type and digital options. Very durable.
- NSK – Good mid-range options. Reliable calibration stability.
- Straumann – Expensive but perfectly matched to their implants.
- Nobel Biocare – Proprietary but very accurate.
- BTI – Budget-friendly click-type. Good for starting out.
- Biomet 3i – Solid manual wrenches.
- Dentium – Affordable and widely available.
Avoid no-name wrenches from online marketplaces. I have tested a few. They are not accurate out of the box, and they drift within months. Your patients deserve better.
Maintenance and Storage Best Practices
A torque wrench that lives in a drawer, banged around by other instruments, will not stay accurate for long.
Here is how to protect your investment.
Daily Maintenance
- Wipe the wrench with a soft cloth after each patient. Do not submerge in ultrasonic cleaners or autoclave the entire wrench. Only the driver tips and removable heads are autoclavable.
- Check the driver tip for wear. Look for rounded edges or burrs.
- Reset click-type wrenches to zero.
- Store in a foam-lined drawer or a dedicated wrench case. Do not let it roll around loose.
Weekly Maintenance
- Inspect the locking mechanism on click-type wrenches. It should engage firmly.
- Check digital wrenches for battery level. Replace batteries proactively every 3 months.
- Lightly lubricate moving parts if specified by the manufacturer. Most modern wrenches are sealed and do not need lubrication.
Annual Maintenance
- Send the wrench for professional calibration.
- Replace the spring on click-type wrenches after 5,000 cycles or 2 years, whichever comes first. Springs are wear items.
- Update firmware on digital wrenches if offered.
What Not to Do
- Do not drop the wrench. Even a short drop onto a tile floor can misalign internal components.
- Do not use the wrench as a hammer. Yes, I have seen this. No, it is not okay.
- Do not clean with acetone or strong solvents. They damage plastic components and markings.
- Do not leave digital wrenches in direct sunlight or hot cars. Heat affects battery life and LCD screens.
Torque Wrench and Osseointegration: The Connection
Let me explain why torque matters for bone healing.
Osseointegration is the direct structural and functional connection between living bone and the surface of a load-bearing implant. It takes time. Typically 3 to 6 months.
During that healing period, the implant must be absolutely stable. Any micromovement disrupts the formation of new bone. This is called micromotion.
When you place a healing abutment or a temporary crown, the torque you apply affects how forces transfer to the implant. If the abutment screw is undertightened, the restoration moves slightly with each bite. That micromotion travels down to the bone-implant interface. Bone cells respond by forming fibrous tissue instead of bone. You get a failed osseointegration.
If the screw is overtightened, you create stress within the implant body. That stress can cause microfractures in the surrounding bone. Again, healing is compromised.
The correct torque value, applied with a calibrated torque wrench, creates the optimal preload in the screw. Preload is the tension that clamps the abutment to the implant. With proper preload, the screw does not loosen, and forces are distributed evenly. The bone heals without disturbance.
This is not theoretical. Multiple clinical studies have shown a direct correlation between correct torque application and implant survival rates at 5 and 10 years.
So when you pick up that torque wrench, remember: you are not just tightening a screw. You are creating the conditions for biological success.
Real-World Clinical Scenarios
Let me walk you through three common situations. Each requires a different approach.
Scenario 1: Single Posterior Crown
You have placed a 4.8 mm x 10 mm implant in the mandibular first molar position. Osseointegration is complete. You are placing a custom zirconia abutment and a screw-retained crown.
Manufacturer specifies 30 Ncm for the abutment screw.
You select your click-type torque wrench. Set to 30 Ncm. Insert the driver. Tighten slowly. You feel the click at 30 Ncm. Stop. Record. Place the crown. Torque the prosthetic screw to 25 Ncm as specified. Fill the access hole with cotton and composite.
Six months later at recall, the crown is stable. No screw loosening. The torque wrench did its job.
Scenario 2: Full-Arch Fixed Prosthesis
You have four implants supporting a bar overdenture. The abutment screws are 35 Ncm each. This is a high-stress situation. Uneven torque between the four screws can create a rocking bar.
Use a digital torque wrench. Tighten each screw to 20 Ncm in a cross pattern. Then go back and tighten each to 35 Ncm in sequence. The digital wrench shows real-time torque. You can see if one screw is taking more force than others. Adjust the sequence if needed.
After final tightening, check each screw again. Sometimes the first screw loses preload as you tighten the others. Retorque if necessary.
Scenario 3: Cement-Retained Crown
You are using a stock titanium abutment. The abutment screw requires 30 Ncm. But the abutment itself has an internal screw that connects to the implant. You torque that to 30 Ncm. Then you cement the crown onto the abutment.
Here is the trick. The cementation process does not affect the screw torque. But if you need to remove the crown later, you must first remove the cement. Then access the screw. The torque wrench is still essential for the abutment screw. The cement does not change that.
Frequently Asked Questions (FAQ)
Can I use a torque wrench for both healing abutments and final prostheses?
Yes, as long as the torque range covers both. Most wrenches that go down to 10 Ncm work for healing abutments. For very low values like 5 Ncm, consider a dedicated low-range wrench.
How do I know if my torque wrench is accurate?
Send it for calibration. Or buy a portable torque tester. But calibration by a certified lab is the gold standard.
What happens if I use a torque wrench that is out of calibration?
You risk undertightening or overtightening. Both can lead to screw loosening, implant fracture, or failed osseointegration.
Can I autoclave my torque wrench?
No. Only the removable driver tips and the wrench head (if specified) are autoclavable. The handle and internal mechanism are not heat-stable. Clean with a disinfectant wipe.
Do I really need a torque wrench for temporary restorations?
For short-term temporaries (less than 3 months), many clinicians use hand-tightening only. But if the temporary will be in place longer, use a torque wrench. Micromotion over months can still affect healing.
How many torque wrenches should a clinic own?
At least two. One primary and one backup. If you place both anterior and posterior implants, consider one low-range (5–25 Ncm) and one standard-range (10–45 Ncm).
Are cheap torque wrenches from Amazon reliable?
In my testing, no. Most are inaccurate out of the box. The springs are poor quality. Calibration drifts quickly. Buy from a reputable dental supplier.
What is the most common torque value used in implant dentistry?
30 Ncm. Many abutment screws for single crowns use this value. But again, check your manufacturer.
Additional Resources
For further reading and verified technical data, I recommend the following external resource:
🔗 International Team for Implantology (ITI) – Clinical Guidelines on Prosthetic Screw Torque
Visit the ITI website and search for their consensus statements on screw tightening protocols. These documents are peer-reviewed and updated regularly. They provide manufacturer-neutral guidance.
Note: Always cross-reference external guidelines with your specific implant system’s instructions.
Important Notes for Readers
- Do not mix implant systems. A torque wrench that works for one brand may require a different driver tip for another. Keep dedicated tips labeled by system.
- Replace screws after multiple tightenings. Most implant screws are designed for 3 to 5 tightening cycles. After that, the threads deform. Always use a new screw for the final restoration.
- Lubrication matters. Some manufacturers recommend a small amount of sterile lubricant on the screw threads before torquing. This reduces friction and improves preload accuracy. Check your manual.
- Patient factors matter. In low-density bone (Type IV), some clinicians reduce torque by 10% to 20% to avoid stripping the bone threads. This is an advanced technique. Discuss with a mentor first.
- Document everything. In your patient record, note the torque value, the wrench used, its last calibration date, and the operator’s name. This is your legal shield.
Conclusion
The torque wrench for dental implants is not an accessory. It is a clinical necessity. It protects your work, your patients, and your peace of mind. A calibrated torque wrench applied correctly ensures that screws stay tight, implants integrate fully, and prostheses remain stable for years.
Choose the right type for your practice. Maintain it religiously. Calibrate it annually. And use it on every single implant restoration, no exceptions. Your future self—and your patients—will thank you.